-
[AEWS 3기] 6주차 - EKS SecurityAWS 2025. 3. 15. 22:30
- 기초 이론
- 실습환경 배포
1.2. AWS LoadBalancer Controller, ExternalDNS, gp3 storageclass, kube-ops-view(Ingress) 설치
- 설치
- 확인
1.3. 프로메테우스 & 그라파나(admin / prom-operator) 설치 : 대시보드 Import 17900 - Link
Copy# repo 추가 helm repo add prometheus-community https://prometheus-community.github.io/helm-charts # 파라미터 파일 생성 : PV/PVC(AWS EBS) 삭제에 불편하니, 4주차 실습과 다르게 PV/PVC 미사용 cat <<EOT > monitor-values.yaml prometheus: prometheusSpec: scrapeInterval: "15s" evaluationInterval: "15s" podMonitorSelectorNilUsesHelmValues: false serviceMonitorSelectorNilUsesHelmValues: false retention: 5d retentionSize: "10GiB" # Enable vertical pod autoscaler support for prometheus-operator verticalPodAutoscaler: enabled: true ingress: enabled: true ingressClassName: alb hosts: - aews-prometheus.$MyDomain paths: - /* annotations: alb.ingress.kubernetes.io/scheme: internet-facing alb.ingress.kubernetes.io/target-type: ip alb.ingress.kubernetes.io/listen-ports: '[{"HTTPS":443}, {"HTTP":80}]' alb.ingress.kubernetes.io/certificate-arn: $CERT_ARN alb.ingress.kubernetes.io/success-codes: 200-399 alb.ingress.kubernetes.io/load-balancer-name: myeks-ingress-alb alb.ingress.kubernetes.io/group.name: study alb.ingress.kubernetes.io/ssl-redirect: '443' grafana: defaultDashboardsTimezone: Asia/Seoul adminPassword: prom-operator defaultDashboardsEnabled: false ingress: enabled: true ingressClassName: alb hosts: - aews-grafana.$MyDomain paths: - /* annotations: alb.ingress.kubernetes.io/scheme: internet-facing alb.ingress.kubernetes.io/target-type: ip alb.ingress.kubernetes.io/listen-ports: '[{"HTTPS":443}, {"HTTP":80}]' alb.ingress.kubernetes.io/certificate-arn: $CERT_ARN alb.ingress.kubernetes.io/success-codes: 200-399 alb.ingress.kubernetes.io/load-balancer-name: myeks-ingress-alb alb.ingress.kubernetes.io/group.name: study alb.ingress.kubernetes.io/ssl-redirect: '443' alertmanager: enabled: false defaultRules: create: false kubeControllerManager: enabled: false kubeEtcd: enabled: false kubeScheduler: enabled: false prometheus-windows-exporter: prometheus: monitor: enabled: false EOT cat monitor-values.yaml # helm 배포 helm install kube-prometheus-stack prometheus-community/kube-prometheus-stack --version 69.3.1 \ -f monitor-values.yaml --create-namespace --namespace monitoring # helm 확인 helm get values -n monitoring kube-prometheus-stack # PV 사용하지 않음 kubectl get pv,pvc -A kubectl df-pv # 프로메테우스 웹 접속 echo -e "https://prometheus.$MyDomain" open "https://prometheus.$MyDomain" # macOS # 그라파나 웹 접속 : admin / prom-operator echo -e "https://grafana.$MyDomain" open "https://grafana.$MyDomain" # macOS- (옵션) 4주차 노션 확인하여 17900 대시보드에 PromQL/Variables 수정 해둘 것
2. k8s 기본 개념 및 kind로 k8s x.509 인증서 확인
2.2. Practical Guide to Kubernetes API - Blog
Understanding the Basics‣API 구조 분석‣데모 - 클러스터에서 실행 중인 모든 Pod 나열
- k8s 생성
- 클라이언트에 API 서버 인증
- API 서버에 클라이언트 인증
- HTTP 요청
- 추가 탐색을 위한 팁
2.3. [운영서버2 EC2] kind(k8s) x.509 인증서 확인
- 운영서버2 EC2 공인 IP 확인 후 SSH 접속
- 인증서 정보 확인
- kind 설치자의 kubeconfig 정보 확인 - https://www.base64decode.org/
- 신규 관리자를 위한 인증서 설정 - K8S_Docs
다음 실습을 위해서 kind 삭제→ K8S 인증/인가 실습 후 아래 삭제 할 것!
2.4. k8s 인증/인가
- Controlling Access to the Kubernetes API - Docs
3. EKS 인증/인가
3.3. Immutable ConfigMap 활용 : aws-auth 컨피그맵을 잘못 수정 시 발생하는 장애 재현과 이를 방지하기 위한 방안 - Link
- 실수로 system:nodes 삭제해서 장애를 재연해보자! ← 현재는 재현 안됨
Copy# [터미널1] 노드 상태 모니터링 watch -d kubectl get node # aws-auth 컨피그맵 수정 > "- system:nodes" 삭제 kubectl edit cm -n kube-system aws-auth ------ ... data: mapRoles: | - groups: - system:bootstrappers - system:nodes # 삭제 해보자! ... ------- 대략 5분 정도 후에 모든 노드가 NotReady 상태로 빠진다!
Copy(gasida:default) [root@myeks-bastion ~]# kubectl get node NAME STATUS ROLES AGE VERSION ip-192-168-1-68.ap-northeast-2.compute.internal NotReady <none> 134m v1.24.13-eks-0a21954 ip-192-168-2-53.ap-northeast-2.compute.internal NotReady <none> 134m v1.24.13-eks-0a21954 ip-192-168-3-175.ap-northeast-2.compute.internal NotReady <none> 134m v1.24.13-eks-0a21954- 다시 설정 원복!
Copy# aws-auth 컨피그맵 수정 > "- system:nodes" 삭제 kubectl edit cm -n kube-system aws-auth ------ ... data: mapRoles: | - groups: - system:bootstrappers - system:nodes # 다시 추가 ... ------- 유사한 장애 예방을 위해서 컨피그맵을 수정 불가 상태로 설정하자 : 추가로 kube-apiserver 가 컨피그맵 변경 감시(watch)를 하지 않아도 되니, 약간의 성능 향상?을 줌
Copy# aws-auth 컨피그맵 수정 > immutable: true 추가 kubectl edit cm -n kube-system aws-auth ------ ... immutable: true ------ # 설정 확인 kubectl get cm -n kube-system aws-auth -o yaml | yh | grep immutable # aws-auth 컨피그맵 수정 시도 # 방안1(skip) kubectl edit cm -n kube-system aws-auth # 방안2 IRSA 신규 생성 시도 >> CloudFormation 스택 확인해보자, 실패하나? 성공할까? eksctl create iamserviceaccount \ --name test-sa \ --namespace default \ --cluster $CLUSTER_NAME \ --approve \ --attach-policy-arn $(aws iam list-policies --query 'Policies[?PolicyName==`AmazonS3ReadOnlyAccess`].Arn' --output text) # aws-auth 컨피그맵 변경 확인 >> 변경이 되었는지 확인해보자! kubectl get cm -n kube-system aws-auth -o yaml | yh- 만약 변경이 필요 시 어떻게 하나?
- Once a ConfigMap is marked as immutable, it is not possible to revert this change nor to mutate the contents of the data or the binaryData field. You can only delete and recreate the ConfigMap. Because existing Pods maintain a mount point to the deleted ConfigMap, it is recommended to recreate these pods??
Copy# aws-auth 컨피그맵 수정 > immutable: true 삭제 시도 kubectl edit cm -n kube-system aws-auth ------ # configmaps "aws-auth" was not valid: # * immutable: Forbidden: field is immutable when `immutable` is set << 제거 역시 변경이니, 이 행위 역시 차단됨 ... immutable: true << 제거 후 저장 시도 ------ # immutable: true 내용 제외하고, 기존 설정 백업 kubectl get cm -n kube-system aws-auth -o yaml | kubectl neat | grep -v immutable > cm-aws_auth.yaml cat cm-aws_auth.yaml | yh # [터미널1] 모니터링 watch -d kubectl get cm -n kube-system # 기존 컨피드맵 삭제 후 신규 컨피그맵 생성 및 확인 kubectl delete cm -n kube-system aws-auth kubectl apply -f cm-aws_auth.yaml kubectl get cm -n kube-system aws-auth -o yaml | yh kubectl get node3.4. EC2 Instance Profile(IAM Role)에 맵핑된 k8s rbac 확인 해보기

3.4.1. 노드 mapRoles 확인
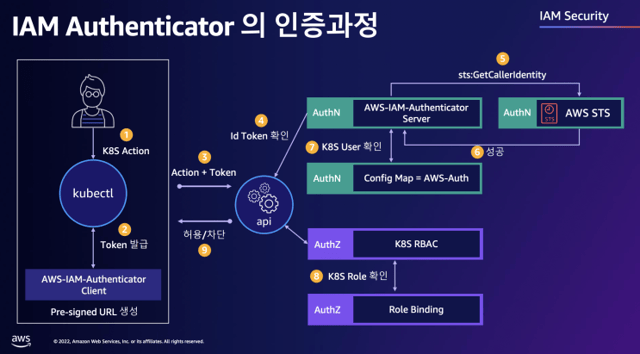
Copy# 노드에 STS ARN 정보 확인 : Role 뒤에 인스턴스 ID! for node in $N1 $N2 $N3; do ssh ec2-user@$node aws sts get-caller-identity --query Arn; done "arn:aws:sts::911283464785:assumed-role/eksctl-myeks-nodegroup-ng1-NodeInstanceRole-LHQ7DWHQQRZJ/i-07c9162ed08d23e6f" "arn:aws:sts::911283464785:assumed-role/eksctl-myeks-nodegroup-ng1-NodeInstanceRole-LHQ7DWHQQRZJ/i-00d9d24c0af0d6815" "arn:aws:sts::911283464785:assumed-role/eksctl-myeks-nodegroup-ng1-NodeInstanceRole-LHQ7DWHQQRZJ/i-031e672f89572abe8" # aws-auth 컨피그맵 확인 >> system:nodes 와 system:bootstrappers 의 권한은 어떤게 있는지 찾아보세요! # username 확인! 인스턴스 ID? EC2PrivateDNSName? kubectl describe configmap -n kube-system aws-auth ... mapRoles: ---- - groups: - system:nodes - system:bootstrappers rolearn: arn:aws:iam::911283464785:role/eksctl-myeks-nodegroup-ng-f6c38e4-NodeInstanceRole-1OU85W3LXHPB2 username: system:node:{{EC2PrivateDNSName}} ... # Get IAM identity mapping(s) eksctl get iamidentitymapping --cluster $CLUSTER_NAME ARN USERNAME GROUPS ACCOUNT arn:aws:iam::[AWS_ACCOUNT]:role/eksctl-myeks-nodegroup-ng1-NodeInstanceRole-nCRQBRG4eGhJ system:node:{{EC2PrivateDNSName}} system:bootstrappers,system:nodes3.4.2. awscli 파드를 추가하고, 해당 노드(EC2)의 IMDS 정보 확인 : AWS CLI v2 파드 생성 - 링크 , 공식이미지링크
Copy# awscli 파드 생성 cat <<EOF | kubectl apply -f - apiVersion: apps/v1 kind: Deployment metadata: name: awscli-pod spec: replicas: 2 selector: matchLabels: app: awscli-pod template: metadata: labels: app: awscli-pod spec: containers: - name: awscli-pod image: amazon/aws-cli command: ["tail"] args: ["-f", "/dev/null"] terminationGracePeriodSeconds: 0 EOF # 파드 생성 확인 kubectl get pod -owide # 파드 이름 변수 지정 APODNAME1=$(kubectl get pod -l app=awscli-pod -o jsonpath="{.items[0].metadata.name}") APODNAME2=$(kubectl get pod -l app=awscli-pod -o jsonpath="{.items[1].metadata.name}") echo $APODNAME1, $APODNAME2 # awscli 파드에서 EC2 InstanceProfile(IAM Role)의 ARN 정보 확인 kubectl exec -it $APODNAME1 -- aws sts get-caller-identity --query Arn kubectl exec -it $APODNAME2 -- aws sts get-caller-identity --query Arn # awscli 파드에서 EC2 InstanceProfile(IAM Role)을 사용하여 AWS 서비스 정보 확인 >> 별도 IAM 자격 증명이 없는데 어떻게 가능한 것일까요? # > 최소권한부여 필요!!! >>> 보안이 허술한 아무 컨테이너나 탈취 시, IMDS로 해당 노드의 IAM Role 사용 가능! kubectl exec -it $APODNAME1 -- aws ec2 describe-instances --region ap-northeast-2 --output table --no-cli-pager kubectl exec -it $APODNAME2 -- aws ec2 describe-vpcs --region ap-northeast-2 --output table --no-cli-pager # EC2 메타데이터 확인 : IDMSv1은 Disable, IDMSv2 활성화 상태, IAM Role - 링크 kubectl exec -it $APODNAME1 -- bash ----------------------------------- 아래부터는 파드에 bash shell 에서 실행 curl -s http://169.254.169.254/ -v ... # Token 요청 curl -s -X PUT "http://169.254.169.254/latest/api/token" -H "X-aws-ec2-metadata-token-ttl-seconds: 21600" ; echo curl -s -X PUT "http://169.254.169.254/latest/api/token" -H "X-aws-ec2-metadata-token-ttl-seconds: 21600" ; echo # Token을 이용한 IMDSv2 사용 TOKEN=$(curl -s -X PUT "http://169.254.169.254/latest/api/token" -H "X-aws-ec2-metadata-token-ttl-seconds: 21600") echo $TOKEN curl -s -H "X-aws-ec2-metadata-token: $TOKEN" –v http://169.254.169.254/ ; echo curl -s -H "X-aws-ec2-metadata-token: $TOKEN" –v http://169.254.169.254/latest/ ; echo curl -s -H "X-aws-ec2-metadata-token: $TOKEN" –v http://169.254.169.254/latest/meta-data/iam/security-credentials/ ; echo # 위에서 출력된 IAM Role을 아래 입력 후 확인 curl -s -H "X-aws-ec2-metadata-token: $TOKEN" –v http://169.254.169.254/latest/meta-data/iam/security-credentials/eksctl-myeks-nodegroup-ng1-NodeInstanceRole-1DC6Y2GRDAJHK { "Code" : "Success", "LastUpdated" : "2023-05-27T05:08:07Z", "Type" : "AWS-HMAC", "AccessKeyId" : "ASIA5ILF2FJI5VPIYJHP", "SecretAccessKey" : "rke6HXkaG4B/YLGUyAYtDnd3eMrjXlCpiB4h+9XJ", "Token" : "IQoJb3JpZ2luX2VjEAUaDmFwLW5vcnRoZWFzdC0yIkcwRQIhAOLQr2c2k4UwqTR2Iof2wq9Faduno1a2FX07ASHsO/rCAiAvCqQRv/JrSDZNZKNMloaBTR4s91O+RNWfSlfNluimmirLBQg+EAEaDDkxMTI4MzQ2NDc4NSIM1/RJmwkWziNhz8TEKqgFZZr1FpwHmLWNzdCdbNxtPk/YhbqbED6JzFiWJssqdRq4UniamoGrkV75oaf7o0CXQTlgK7r6f07goYA268UlqGx9XHKmeSoUt3ZTG79B1BIiSW22JVFzs4/fMpcwQLFv1lJKcGOqKehXrlq4yQ2zln4QTi/S30rp2ARiUfjgdp2+gkWKzOVWkdgoKtn3OAfdI/hBJHiz1eDPZsqqzv8eyP6sdo1xHJ6OY7xjLtTHWRaQpt6SStKTzsN88sJi9NebBXV63FJ6EkGNaC7eFo/nq9xZtGJqsu3PEuseadl8a8LJzOfNO0NP+4p8o0fMV4oeKSItZUIu88CvinvGd3bp1FWlVItDsGwjo6qOTxCg2ov6p7cAbTudEA5AwSjDlHm/BX08JN4XN7kDKtBQhHoWRbeI3suqZmtLPrSu5NCfgVu2jJpMiwOEhVV9W+fBUica345sIp94qIVVwrVbDnuLC0QDSXKxD+GRhcqdtA54QmUodqxv/bEUlRy1wVUty7Umucxl3B6MYBVSXR7PRzcf2U3vvqbJDJAT5dhFTRI1gK1YcXLzpT1T3wluMsyMPFpEWYMe/QEDAn0UwJ55pZt2pKohioiLJ3amWfNUhzoDkmXXZhAOM71e8gUVdrtAVcnl30MTDjHlIWIOBWrVMshunM5Wfmr4H4BAV+8of6xGz5AhoodWNVE+/x+XifO6h9l+Plwq24Jp8SbiCF3ZFQVe20ijsfDqK6SFAveL4vcVz7sEGLTZXLNLycgeGQmcvkb7Mmmoir/9UwNCWFWBbWXZfsEbNfSLhInw+k53FLb5I+axJPhEDSE5Iqmu+cuvoZfLy+bOailVgQN/jX6vZSL3ihhJwsP7t58urN34tKP+sjOpIBWv2bV2OnntaAqbc24tmc0wjWkaw5IwqKDGowY6sQGFB40kmsXmxihug/yKwcMK/pg5xFknPFO56P6BzErLmt1hcpNF4QBQzh/sdFi7Y/EOh9NqU/XFdFeJLp6KgaxUASLSW/k6ee+RzhbW0aSJb9GYi7tZdArcjg4YaQ6hdXdCFXiYWbNyIMs2MH8APT5jFDnwpbqSnlO2Ao64XY12cm2tMWVH+KTUyLGICHP1az7kD3/tV9glw9rJB2AOL4iA3TTuK+U2o+pHWEHRQOVh3p4=", "Expiration" : "2023-05-27T11:09:07Z" } ## 즉, 각 node에서는 aws-auth configMap에 mapping되어있는 rolearn의 iam role이 할당되어있고, 해당 iam role을 통해서 eks api server에 authentication 진행 ## 해당 iam role은 eks cluster의 system:bootstrappers와 system:nodes group에 속해있음 kubectl describe cm -n kube-system aws-auth Name: aws-auth Namespace: kube-system Labels: <none> Annotations: <none> Data ==== mapRoles: ---- - groups: - system:bootstrappers - system:nodes rolearn: arn:aws:iam::[AWS_ACCOUNT]:role/eksctl-myeks-nodegroup-ng1-NodeInstanceRole-nCRQBRG4eGhJ username: system:node:{{EC2PrivateDNSName}} kubectl rbac-tool lookup system:nodes SUBJECT | SUBJECT TYPE | SCOPE | NAMESPACE | ROLE | BINDING ---------------+--------------+-------------+-----------+-----------------------+------------------------ system:nodes | Group | ClusterRole | | eks:node-bootstrapper | eks:node-bootstrapper kubectl rolesum -k Group system:nodes Group: system:nodes Policies: • [CRB] */eks:node-bootstrapper ⟶ [CR] */eks:node-bootstrapper Resource Name Exclude Verbs G L W C U P D DC certificatesigningrequests.certificates.k8s.io/selfnodeserver [*] [-] [-] ✖ ✖ ✖ ✔ ✖ ✖ ✖ ✖ kubectl rbac-tool lookup system:bootstrappers SUBJECT | SUBJECT TYPE | SCOPE | NAMESPACE | ROLE | BINDING -----------------------+--------------+-------------+-----------+-----------------------+------------------------ system:bootstrappers | Group | ClusterRole | | eks:node-bootstrapper | eks:node-bootstrapper kubectl rolesum -k Group system:bootstrappers Group: system:bootstrappers Policies: • [CRB] */eks:node-bootstrapper ⟶ [CR] */eks:node-bootstrapper Resource Name Exclude Verbs G L W C U P D DC certificatesigningrequests.certificates.k8s.io/selfnodeserver [*] [-] [-] ✖ ✖ ✖ ✔ ✖ ✖ ✖ ✖ ## 출력된 정보는 AWS API를 사용할 수 있는 어느곳에서든지 Expiration 되기전까지 사용 가능 # 파드에서 나오기 exit ---3.4.3. awscli 파드에 kubeconfig (mapRoles) 정보 생성 및 확인
Copy# node 의 IAM Role ARN을 변수로 지정 eksctl get iamidentitymapping --cluster $CLUSTER_NAME NODE_ROLE=<각자 자신의 노드 Role 이름> NODE_ROLE=eksctl-myeks-nodegroup-ng1-NodeInstanceRole-1DC6Y2GRDAJHK # awscli 파드에서 kubeconfig 정보 생성 및 확인 >> kubeconfig 에 정보가 기존 iam user와 차이점은? kubectl exec -it $APODNAME1 -- aws eks update-kubeconfig --name $CLUSTER_NAME --role-arn $NODE_ROLE kubectl exec -it $APODNAME1 -- cat /root/.kube/config ... - --role - eksctl-myeks-nodegroup-ng1-NodeInstanceRole-3GQR27I04PAJ kubectl exec -it $APODNAME2 -- aws eks update-kubeconfig --name $CLUSTER_NAME --role-arn $NODE_ROLE kubectl exec -it $APODNAME2 -- cat /root/.kube/config3.5. Authentication with EKS API - Link & Access Management - Link , KrBlog*
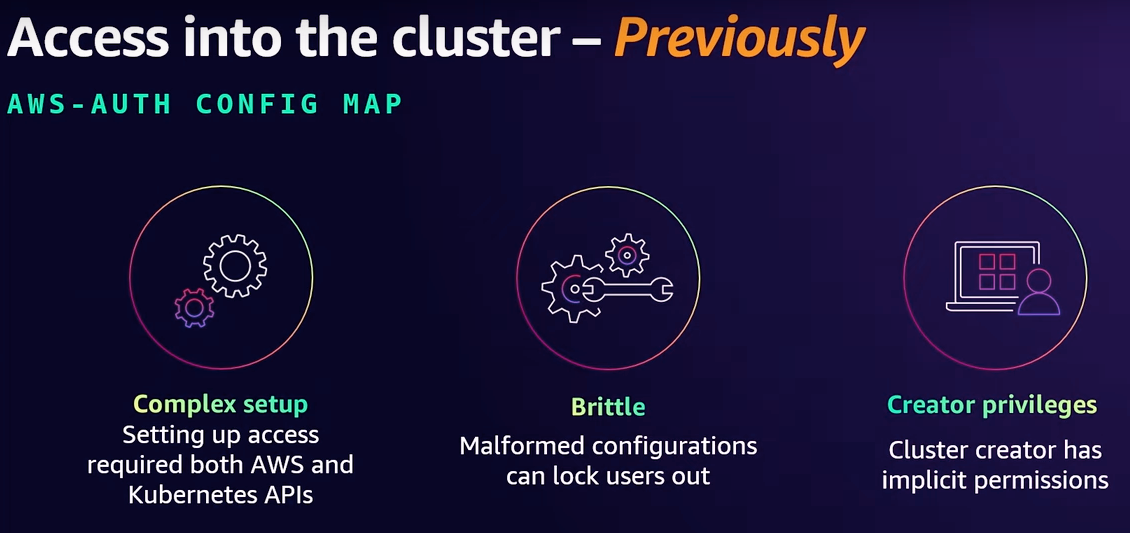

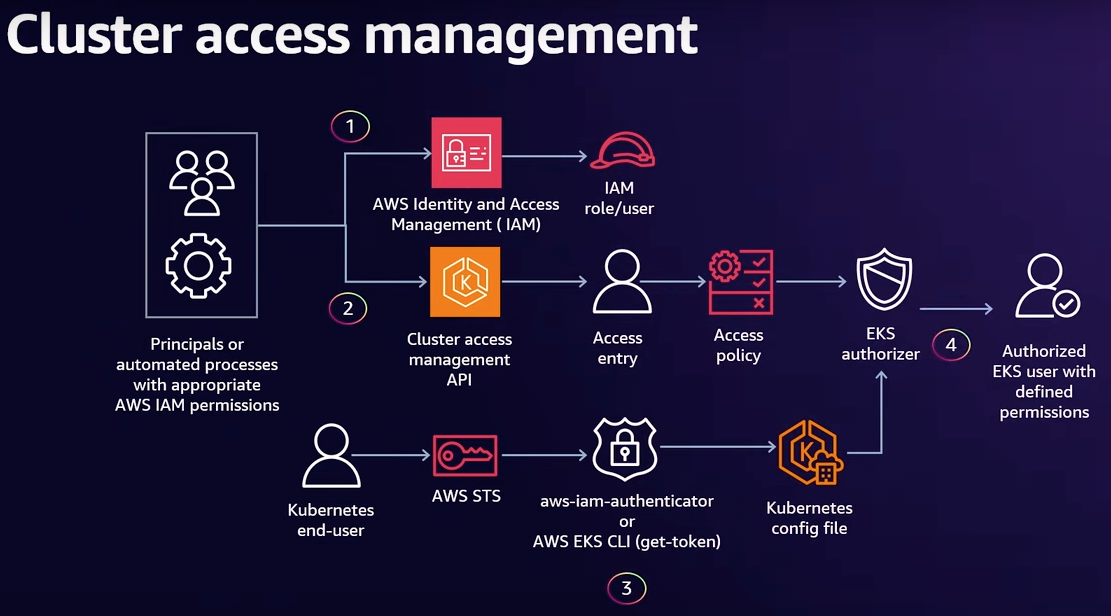
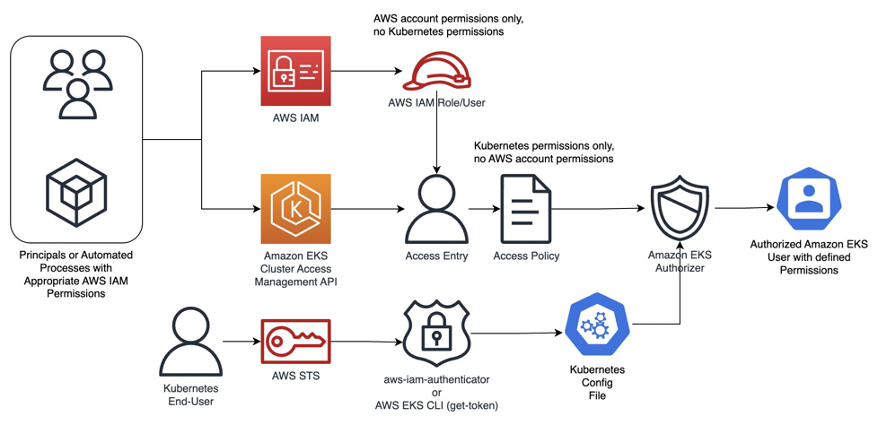
- EKS → 액세스 : IAM 액세스 항목
- EKS → 액세스 구성 모드 확인 : EKS API 및 ConfigMap ← 정책 중복 시 EKS API 우선되며 ConfigMap은 무시됨
- 기본 정보 확인 : access policy, access entry, associated-access-policy - Link , Docs , User-facing_roles , AccessPolicy*
- testuser 설정
- [myeks-bastion-2]에서 testuser로 확인
- Access entries and Kubernetes groups - Link
- [myeks-bastion-2]에서 testuser로 확인
- kubernetesGroups 업데이트 적용
- [myeks-bastion-2]에서 testuser로 확인
- Migrate from ConfigMap to access entries - Link : 직접 실습 해보시기 바랍니다.
4. EKS IRSA & Pod Identity
4.3. 실습
4.3.1. access aws resource without serviceaccount token
Copy# 파드1 생성 cat <<EOF | kubectl apply -f - apiVersion: v1 kind: Pod metadata: name: eks-iam-test1 spec: containers: - name: my-aws-cli image: amazon/aws-cli:latest args: ['s3', 'ls'] restartPolicy: Never automountServiceAccountToken: false terminationGracePeriodSeconds: 0 EOF # 확인 kubectl get pod kubectl describe pod # 로그 확인 kubectl logs eks-iam-test1 An error occurred (AccessDenied) when calling the ListBuckets operation: User: arn:aws:sts::[AWS_ACCOUNT]:assumed-role/eksctl-myeks-nodegroup-ng1-NodeInstanceRole-nCRQBRG4eGhJ/i-068c49921e97a7bc6 is not authorized to perform: s3:ListAllMyBuckets because no identity-based policy allows the s3:ListAllMyBuckets action # 파드1 삭제 kubectl delete pod eks-iam-test1- CloudTrail 이벤트 ListBuckets 확인 → 기록 표시까지 약간의 시간 필요 - Link
 Copy
Copy{ "eventVersion": "1.11", "userIdentity": { "type": "AssumedRole", "principalId": "AROA2NK3X5AIXKCEBTJDB:i-068c49921e97a7bc6", "arn": "arn:aws:sts::[AWS_ACCOUNT]:assumed-role/eksctl-myeks-nodegroup-ng1-NodeInstanceRole-nCRQBRG4eGhJ/i-068c49921e97a7bc6", "accountId": "AWS_ACCOUNT", "accessKeyId": "ASIA2NK3X5AISX2N4LBD", "sessionContext": { "sessionIssuer": { "type": "Role", "principalId": "AROA2NK3X5AIXKCEBTJDB", "arn": "arn:aws:iam::[AWS_ACCOUNT]:role/eksctl-myeks-nodegroup-ng1-NodeInstanceRole-nCRQBRG4eGhJ", "accountId": "715841333265", "userName": "eksctl-myeks-nodegroup-ng1-NodeInstanceRole-nCRQBRG4eGhJ" }, "attributes": { "creationDate": "2025-03-15T10:56:28Z", "mfaAuthenticated": "false" }, "ec2RoleDelivery": "2.0" } }, "eventTime": "2025-03-15T11:14:14Z", "eventSource": "s3.amazonaws.com", "eventName": "ListBuckets", "awsRegion": "ap-northeast-2", "sourceIPAddress": "15.165.200.196", "userAgent": "[aws-cli/2.24.24 md/awscrt#0.23.8 ua/2.1 os/linux#6.1.128-136.201.amzn2023.x86_64 md/arch#x86_64 lang/python#3.12.9 md/pyimpl#CPython m/C cfg/retry-mode#standard md/installer#docker md/distrib#amzn.2 md/prompt#off md/command#s3.ls]", "errorCode": "AccessDenied", "errorMessage": "User: arn:aws:sts::[AWS_ACCOUNT]:assumed-role/eksctl-myeks-nodegroup-ng1-NodeInstanceRole-nCRQBRG4eGhJ/i-068c49921e97a7bc6 is not authorized to perform: s3:ListAllMyBuckets because no identity-based policy allows the s3:ListAllMyBuckets action", "requestParameters": { "Host": "s3.ap-northeast-2.amazonaws.com" },4.3.2. Service Accounts
- Kubernetes Pods are given an identity through a Kubernetes concept called a Kubernetes Service Account.
- When a Service Account is created, a JWT token is automatically created as a Kubernetes Secret.
- This Secret can then be mounted into Pods and used by that Service Account to authenticate to the Kubernetes API Server.
Copy# 파드2 생성 cat <<EOF | kubectl apply -f - apiVersion: v1 kind: Pod metadata: name: eks-iam-test2 spec: containers: - name: my-aws-cli image: amazon/aws-cli:latest command: ['sleep', '36000'] restartPolicy: Never terminationGracePeriodSeconds: 0 EOF # 확인 kubectl get pod kubectl describe pod kubectl get pod eks-iam-test2 -o yaml kubectl exec -it eks-iam-test2 -- ls /var/run/secrets/kubernetes.io/serviceaccount kubectl exec -it eks-iam-test2 -- cat /var/run/secrets/kubernetes.io/serviceaccount/token ;echo # aws 서비스 사용 시도 # serviceaccount token이 volume projection에 의해서 할당 됬지만, 해당 token에는 AssumeRoleWithWebIdentity을 호출하기 위한 적절한 jwt 값이 없음 # IRSA 필요 => serviceaccount에 annotation으로 적적한 iam role arn 할당 필요! kubectl exec -it eks-iam-test2 -- aws s3 ls An error occurred (AccessDenied) when calling the ListBuckets operation: User: arn:aws:sts::[AWS_ACCOUNT]:assumed-role/eksctl-myeks-nodegroup-ng1-NodeInstanceRole-nCRQBRG4eGhJ/i-068c49921e97a7bc6 is not authorized to perform: s3:ListAllMyBuckets because no identity-based policy allows the s3:ListAllMyBuckets action # 서비스 어카운트 토큰 확인 SA_TOKEN=$(kubectl exec -it eks-iam-test2 -- cat /var/run/secrets/kubernetes.io/serviceaccount/token) echo $SA_TOKEN # jwt 혹은 아래 JWT 웹 사이트 이용 https://jwt.io/ jwt decode $SA_TOKEN --json --iso8601 ... #헤더 { "alg": "RS256", "kid": "9c0be8aac53145389904bd7abbd37266111e3001" } # 페이로드 : OAuth2에서 쓰이는 aud, exp 속성 확인! > projectedServiceAccountToken 기능으로 토큰에 audience,exp 항목을 덧붙힘 ## iss 속성 : EKS OpenID Connect Provider(EKS IdP) 주소 > 이 EKS IdP를 통해 쿠버네티스가 발급한 토큰이 유요한지 검증 { "aud": [ "https://kubernetes.default.svc" ], "exp": 1773573500, "iat": 1742037500, "iss": "https://oidc.eks.ap-northeast-2.amazonaws.com/id/2174C9416D84BF77C6039307AA117319", "jti": "bac7a3e9-c0d3-408b-90b3-1f6cc4612a55", "kubernetes.io": { "namespace": "default", "node": { "name": "ip-192-168-2-225.ap-northeast-2.compute.internal", "uid": "2cdd3246-06c5-4969-9c54-b1b78b10b9d9" }, "pod": { "name": "eks-iam-test2", "uid": "f6e2c752-c21b-4823-9f35-50a40d7f4393" }, "serviceaccount": { "name": "default", "uid": "b9cb0930-3fe3-4a49-b610-3398e3070654" }, "warnafter": 1742041107 }, "nbf": 1742037500, "sub": "system:serviceaccount:default:default" } # 파드2 삭제 kubectl delete pod eks-iam-test2- As you can see in the payload of this JWT, the issuer is an OIDC Provider. The audience for the token is https://kubernetes.default.svc. This is the address inside a cluster used to reach the Kubernetes API Server.
- This compliant OIDC token now gives us a foundation to build upon to find a token that can be used to authenticate to AWS APIs. However, we will need an additional component to inject a second token for use with AWS APIs into our Kubernetes Pods. Kubernetes supports validating and mutating webhooks, and AWS has created an identity webhook that comes preinstalled in an EKS cluster. This webhook listens to create pod API calls and can inject an additional Token into our pods. This webhook can also be installed into self-managed Kubernetes clusters on AWS using this guide.
4.3.3. IRSA - 링크
- IRSA 동작 : k8s파드 → AWS 서비스 사용 시 ⇒ AWS STS/IAM ↔ IAM OIDC Identity Provider(EKS IdP) 인증/인가
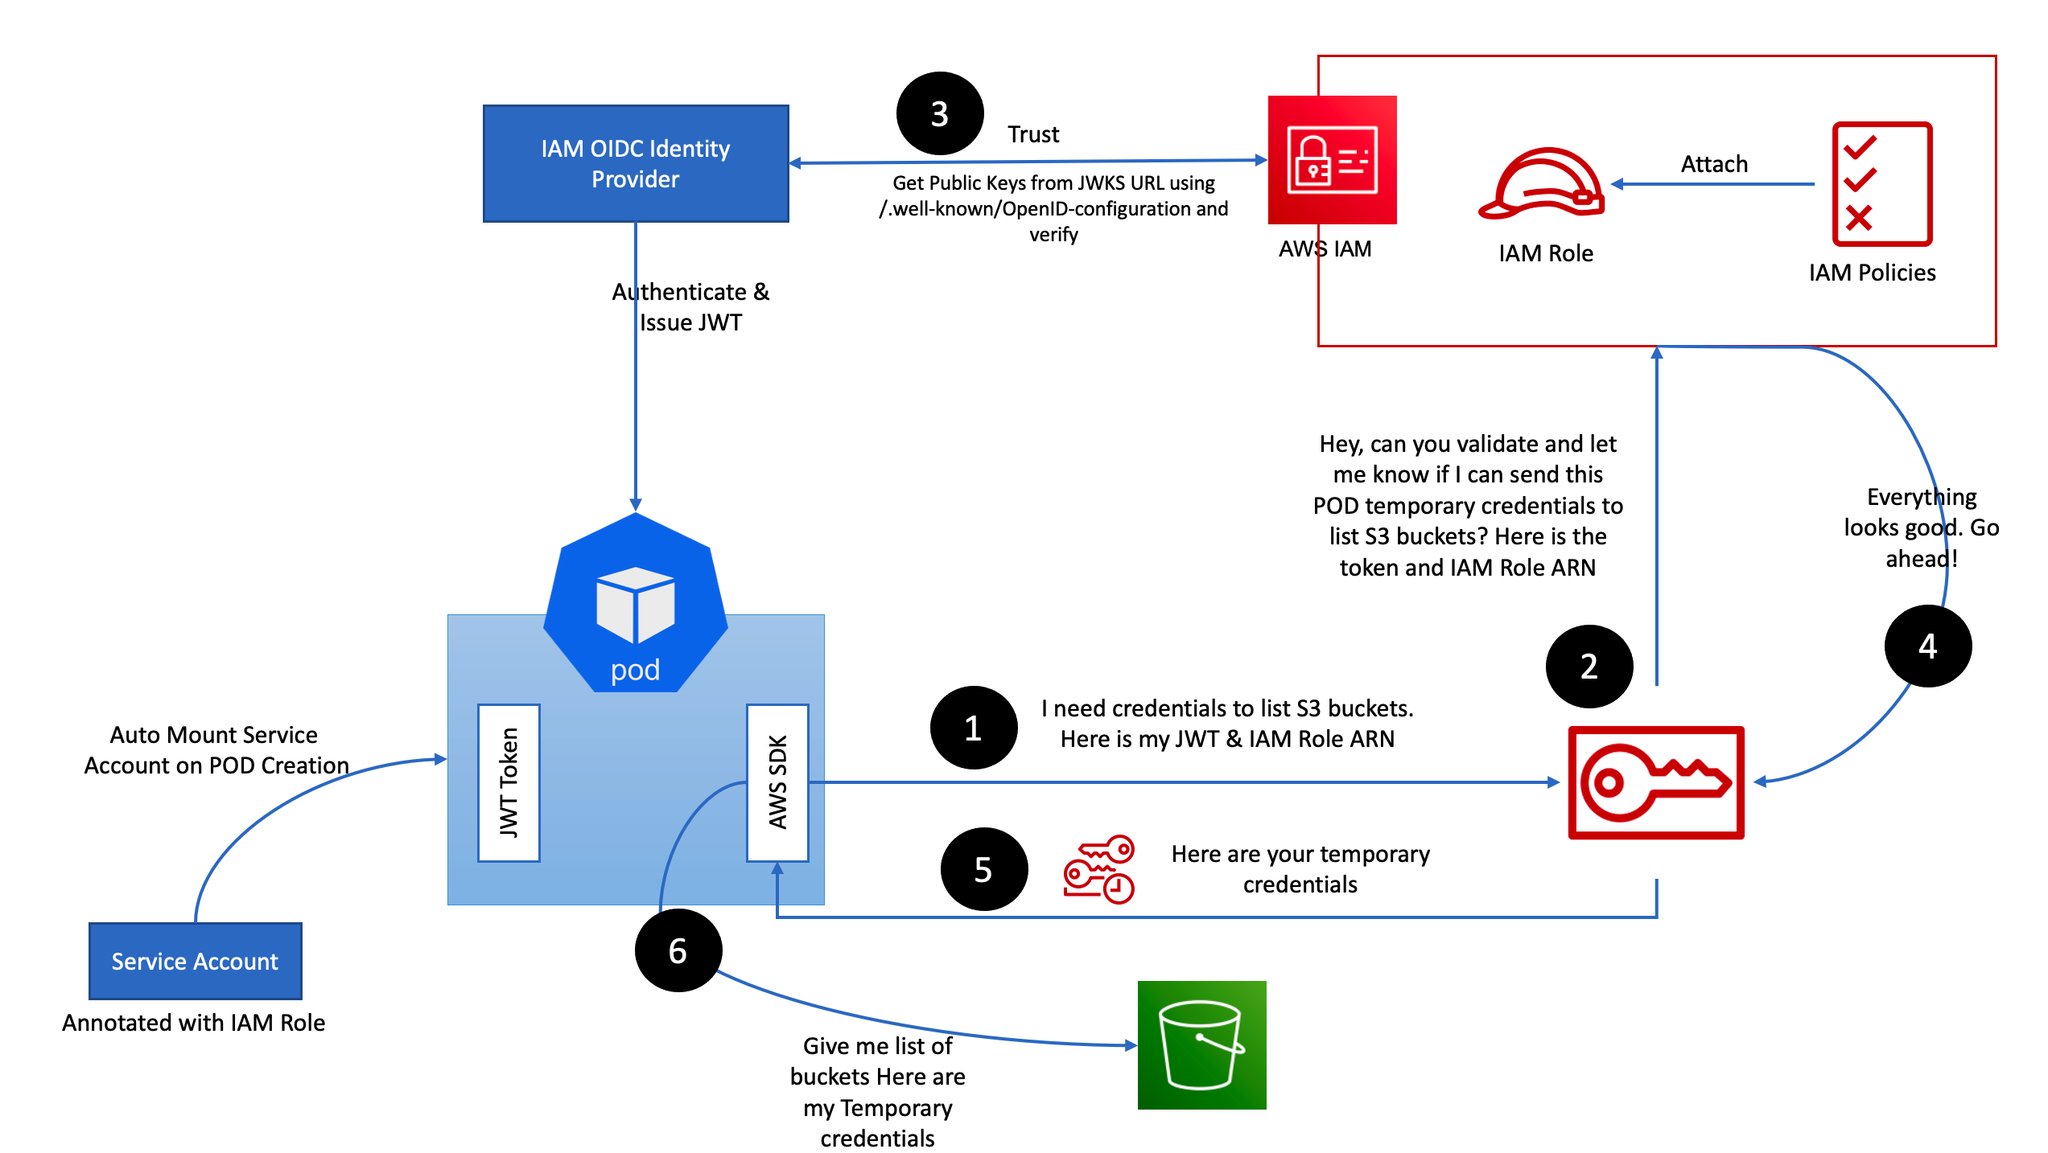
- : This webhook is for mutating pods that will require AWS IAM access
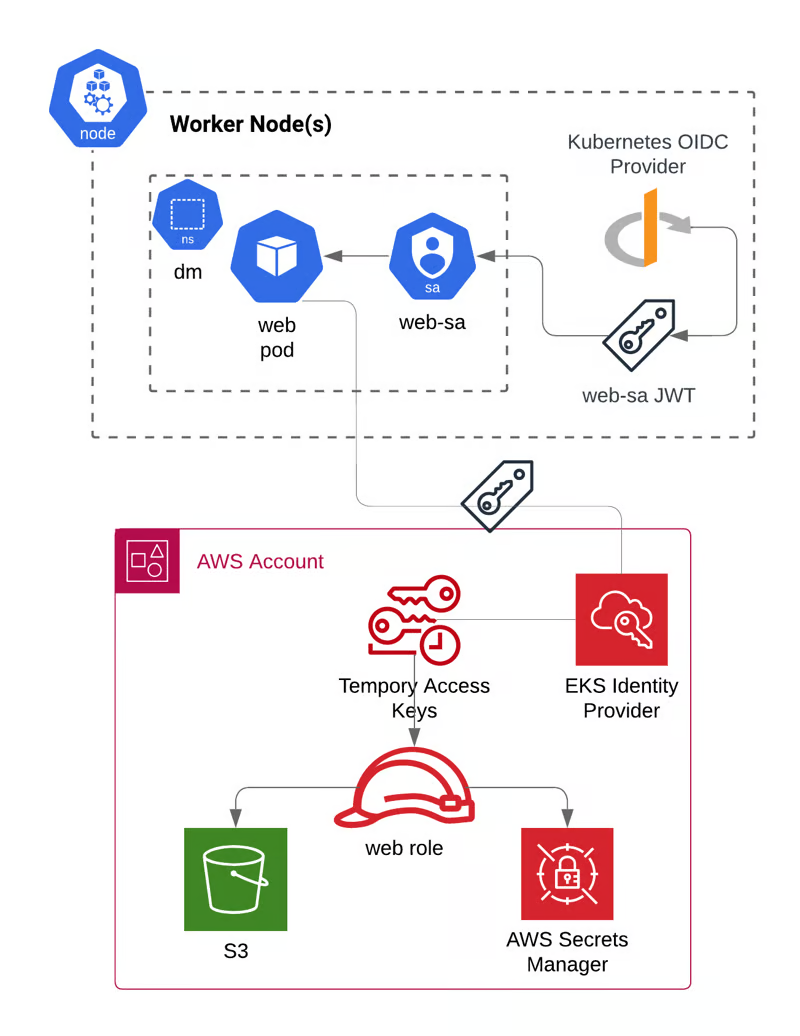
- For the webhook to inject a new Token into our Pod, we are going to create a new Kubernetes Service Account, annotate our Service Account with an AWS IAM role ARN, and then reference this new Kubernetes Service Account in a Kubernetes Pod. The eksctl tool can be used to automate a few steps for us, but all of these steps can also be done manually.
- The eksctl create iamserviceaccount command creates:
- Finally, it will also annotate the Kubernetes Service Account with the IAM Role Arn created.
Copy# Create an iamserviceaccount - AWS IAM role bound to a Kubernetes service account eksctl create iamserviceaccount \ --name my-sa \ --namespace default \ --cluster $CLUSTER_NAME \ --approve \ --attach-policy-arn $(aws iam list-policies --query 'Policies[?PolicyName==`AmazonS3ReadOnlyAccess`].Arn' --output text) # 확인 >> 웹 관리 콘솔에서 CloudFormation Stack >> IAM Role 확인 # aws-load-balancer-controller IRSA는 어떤 동작을 수행할 것 인지 생각해보자! eksctl get iamserviceaccount --cluster $CLUSTER_NAME # Inspecting the newly created Kubernetes Service Account, we can see the role we want it to assume in our pod. kubectl get sa kubectl describe sa my-sa Name: my-sa Namespace: default Labels: app.kubernetes.io/managed-by=eksctl Annotations: eks.amazonaws.com/role-arn: arn:aws:iam::[AWS_ACCOUNT]:role/eksctl-myeks-addon-iamserviceaccount-default--Role1-zdFUoWcguPRf Image pull secrets: <none> Mountable secrets: <none> Tokens: <none> Events: <none>- Let’s see how this IAM role looks within the AWS Management Console. Navigate to IAM and then IAM Roles and search for the role. You will see the Annotations field when you describe your service account. ⇒ IAM Role 확인
- Select the Trust relationships tab and select Edit trust relationship to view the policy document.
- You can see that this policy is allowing an identity system:serviceaccount:default:my-sa to assume the role using sts:AssumeRoleWithWebIdentity action. The principal for this policy is an OIDC provider.
Copy{ "Version": "2012-10-17", "Statement": [ { "Effect": "Allow", "Principal": { "Federated": "arn:aws:iam::[AWS_ACCOUNT]:oidc-provider/oidc.eks.ap-northeast-2.amazonaws.com/id/2174C9416D84BF77C6039307AA117319" }, "Action": "sts:AssumeRoleWithWebIdentity", "Condition": { "StringEquals": { "oidc.eks.ap-northeast-2.amazonaws.com/id/2174C9416D84BF77C6039307AA117319:aud": "sts.amazonaws.com", "oidc.eks.ap-northeast-2.amazonaws.com/id/2174C9416D84BF77C6039307AA117319:sub": "system:serviceaccount:default:my-sa" } } } ] }
위에서 Federated 부분에 추가된것이 바로, myeks eks cluster의 openID Connect Provider URL이다. 또한, Condition 부분에 sub 에는 사용자를 구분하기 위한 유니크한 구분자로 “system:serviceaccount:default:my-sa”가 추가 되었는데 내용을 살펴보면, system:serviceaccount:[NAMESPACE]:[SERVICEACCOUNT_NAME]이 추가된 것을 볼 수 있다.
이렇게 federated와 sub가 정상적으로 추가되어야 pod는 해당 serviceaccount token으로 AssumeRoleWithWebIdentity요청하여 access token을 받아올 수 있다.
- Now let’s see what happens when we use this new Service Account within a Kubernetes Pod : 신규 파드 만들자!
Copy# 파드3번 생성 cat <<EOF | kubectl apply -f - apiVersion: v1 kind: Pod metadata: name: eks-iam-test3 spec: serviceAccountName: my-sa containers: - name: my-aws-cli image: amazon/aws-cli:latest command: ['sleep', '36000'] restartPolicy: Never terminationGracePeriodSeconds: 0 EOF # 해당 SA를 파드가 사용 시 mutatingwebhook으로 Env,Volume 추가함 : AWS IAM 역할을 Pod에 자동으로 주입 kubectl get mutatingwebhookconfigurations pod-identity-webhook -o yaml # 파드 생성 yaml에 없던 내용이 추가됨!!!!! # Pod Identity Webhook은 mutating webhook을 통해 아래 Env 내용과 1개의 볼륨을 추가함 kubectl get pod eks-iam-test3 kubectl get pod eks-iam-test3 -o yaml ... volumeMounts: - mountPath: /var/run/secrets/eks.amazonaws.com/serviceaccount name: aws-iam-token readOnly: true ... volumes: - name: aws-iam-token projected: sources: - serviceAccountToken: audience: sts.amazonaws.com expirationSeconds: 86400 path: token ... kubectl exec -it eks-iam-test3 -- ls /var/run/secrets/eks.amazonaws.com/serviceaccount token kubectl exec -it eks-iam-test3 -- cat /var/run/secrets/eks.amazonaws.com/serviceaccount/token ; echo ... # admission controller의 mutation webhook에 의해 pod에 injection됨 kubectl describe pod eks-iam-test3 ... Environment: AWS_STS_REGIONAL_ENDPOINTS: regional AWS_DEFAULT_REGION: ap-northeast-2 AWS_REGION: ap-northeast-2 AWS_ROLE_ARN: arn:aws:iam::[AWS_ACCOUNT]:role/eksctl-myeks-addon-iamserviceaccount-default--Role1-zdFUoWcguPRf AWS_WEB_IDENTITY_TOKEN_FILE: /var/run/secrets/eks.amazonaws.com/serviceaccount/token Mounts: /var/run/secrets/eks.amazonaws.com/serviceaccount from aws-iam-token (ro) /var/run/secrets/kubernetes.io/serviceaccount from kube-api-access-69rh8 (ro) ... Volumes: aws-iam-token: Type: Projected (a volume that contains injected data from multiple sources) TokenExpirationSeconds: 86400 kube-api-access-sn467: Type: Projected (a volume that contains injected data from multiple sources) TokenExpirationSeconds: 3607 ConfigMapName: kube-root-ca.crt ConfigMapOptional: <nil> DownwardAPI: true ... # 파드에서 aws cli 사용 확인 eksctl get iamserviceaccount --cluster $CLUSTER_NAME kubectl exec -it eks-iam-test3 -- aws sts get-caller-identity --query Arn "arn:aws:sts::[AWS_ACCOUNT]:assumed-role/eksctl-myeks-addon-iamserviceaccount-default-Role1-GE2DZKJYWCEN/botocore-session-1685179271" # 되는 것고 안되는 것은 왜그런가? kubectl exec -it eks-iam-test3 -- aws s3 ls # 현재 serviceaccount token에 할당된 iam role은 s3Readonly이다. ec2에 대한 permission은 없음! kubectl exec -it eks-iam-test3 -- aws ec2 describe-instances --region ap-northeast-2 kubectl exec -it eks-iam-test3 -- aws ec2 describe-vpcs --region ap-northeast-2- AWS CloudTrail 이벤트 중 AssumeRoleWithWebIdentity - Link
- If we inspect the Pod using Kubectl and jq, we can see there are now two volumes mounted into our Pod. The second one has been mounted via that mutating webhook. The aws-iam-token is still being generated by the Kubernetes API Server, but with a new OIDC JWT audience.
Copy# 파드에 볼륨 마운트 2개 확인 kubectl get pod eks-iam-test3 -o json | jq -r '.spec.containers | .[].volumeMounts' # kube api-server에 대한 token을 volume projection [ { "mountPath": "/var/run/secrets/kubernetes.io/serviceaccount", "name": "kube-api-access-pnp2n", "readOnly": true }, # aws sdk를 통해서 AssumeRoleWithWebIdentity호출하여 accesstoken을 얻기 위한 token을 volume projection { "mountPath": "/var/run/secrets/eks.amazonaws.com/serviceaccount", "name": "aws-iam-token", "readOnly": true } ] # aws-iam-token 볼륨 정보 확인 : JWT 토큰이 담겨져있고, exp, aud 속성이 추가되어 있음 kubectl get pod eks-iam-test3 -o json | jq -r '.spec.volumes[] | select(.name=="aws-iam-token")' { "name": "aws-iam-token", "projected": { "defaultMode": 420, "sources": [ { "serviceAccountToken": { "audience": "sts.amazonaws.com", "expirationSeconds": 86400, "path": "token" } } ] } } # kubectl get MutatingWebhookConfiguration NAME WEBHOOKS AGE pod-identity-webhook 1 147m vpc-resource-mutating-webhook 1 147m # pod-identity-webhook 확인 kubectl describe MutatingWebhookConfiguration pod-identity-webhook kubectl get MutatingWebhookConfiguration pod-identity-webhook -o yaml ... name: iam-for-pods.amazonaws.com # iam-for-pods.amazonaws.com은 AWS EKS에서 Pod Identity Webhook의 Mutating Webhook으로, 다음과 같은 작업을 수행합니다: # Pod 생성 시 호출되어 ServiceAccount의 IAM 역할 정보를 확인. # Pod에 환경 변수(AWS_ROLE_ARN, AWS_WEB_IDENTITY_TOKEN_FILE)와 토큰 볼륨을 주입. # Pod이 AWS 리소스에 안전하고 세밀하게 접근할 수 있도록 인증 메커니즘 제공.- If we exec into the running Pod and inspect this token, we can see that it looks slightly different from the previous SA Token.
- You can see that the intended audience for this token is now sts.amazonaws.com, the issuer who has created and signed this token is still our OIDC provider, and finally, the expiration of the token is much shorter at 24 hours. We can modify the expiration duration for the service account using eks.amazonaws.com/token-expiration annotation in our Pod definition or Service Account definition.
- The mutating webhook does more than just mount an additional token into the Pod. The mutating webhook also injects environment variables.
Copy# AWS_WEB_IDENTITY_TOKEN_FILE 확인 IAM_TOKEN=$(kubectl exec -it eks-iam-test3 -- cat /var/run/secrets/eks.amazonaws.com/serviceaccount/token) echo $IAM_TOKEN # JWT 웹 확인 { "aud": [ "sts.amazonaws.com" ], "exp": 1742124856, "iat": 1742038456, "iss": "https://oidc.eks.ap-northeast-2.amazonaws.com/id/2174C9416D84BF77C6039307AA117319", "jti": "002385c4-4554-427f-b09a-16a7afccc969", "kubernetes.io": { "namespace": "default", "node": { "name": "ip-192-168-2-225.ap-northeast-2.compute.internal", "uid": "2cdd3246-06c5-4969-9c54-b1b78b10b9d9" }, "pod": { "name": "eks-iam-test3", "uid": "8be2ceb7-145d-4864-9dfb-5cb8ae015d7a" }, "serviceaccount": { "name": "my-sa", "uid": "2c588830-cd85-4e46-ab81-b82ade7c14c3" } }, "nbf": 1742038456, "sub": "system:serviceaccount:default:my-sa" } # env 변수 확인 kubectl get pod eks-iam-test3 -o json | jq -r '.spec.containers | .[].env' [ { "name": "AWS_STS_REGIONAL_ENDPOINTS", "value": "regional" }, { "name": "AWS_DEFAULT_REGION", "value": "ap-northeast-2" }, { "name": "AWS_REGION", "value": "ap-northeast-2" }, { "name": "AWS_ROLE_ARN", "value": "arn:aws:iam::911283464785:role/eksctl-myeks-addon-iamserviceaccount-default-Role1-1MJUYW59O6QGH" }, { "name": "AWS_WEB_IDENTITY_TOKEN_FILE", "value": "/var/run/secrets/eks.amazonaws.com/serviceaccount/token" } ]- Now that our workload has a token it can use to attempt to authenticate with IAM, the next part is getting AWS IAM to trust these tokens. AWS IAM supports federated identities using OIDC identity providers. This feature allows IAM to authenticate AWS API calls with supported identity providers after receiving a valid OIDC JWT. This token can then be passed to AWS STS AssumeRoleWithWebIdentity API operation to get temporary IAM credentials.
- The OIDC JWT token we have in our Kubernetes workload is cryptographically signed, and IAM should trust and validate these tokens before the AWS STS AssumeRoleWithWebIdentity API operation can send the temporary credentials. As part of the Service Account Issuer Discovery feature of Kubernetes, EKS is hosting a public OpenID provider configuration document (Discovery endpoint) and the public keys to validate the token signature (JSON Web Key Sets – JWKS) at https://OIDC_PROVIDER_URL/.well-known/openid-configuration.
Copy# Let’s take a look at this endpoint. We can use the aws eks describe-cluster command to get the OIDC Provider URL. IDP=$(aws eks describe-cluster --name myeks --query cluster.identity.oidc.issuer --output text) # Reach the Discovery Endpoint curl -s $IDP/.well-known/openid-configuration | jq -r '.' # In the above output, you can see the jwks (JSON Web Key set) field, which contains the set of keys containing the public keys used to verify JWT (JSON Web Token). # Refer to the documentation to get details about the JWKS properties. curl -s $IDP/keys | jq -r '.'- AWS CloudTrail 이벤트 중 AssumeRoleWithWebIdentity - Link
- IRSA를 가장 취약하게 사용하는 방법 : 정보 탈취 시 키/토큰 발급 약용 가능 - 링크
- AWS는 JWT 토큰의 유효성만 확인 하지만 토큰 파일과 서비스 계정에 지정된 실제 역할 간의 일관성을 보장하지는 않음 → Condition 잘못 설정 시, 토큰과 역할 ARN만 있다면 동일 토큰으로 다른 역할을 맡을 수 있음
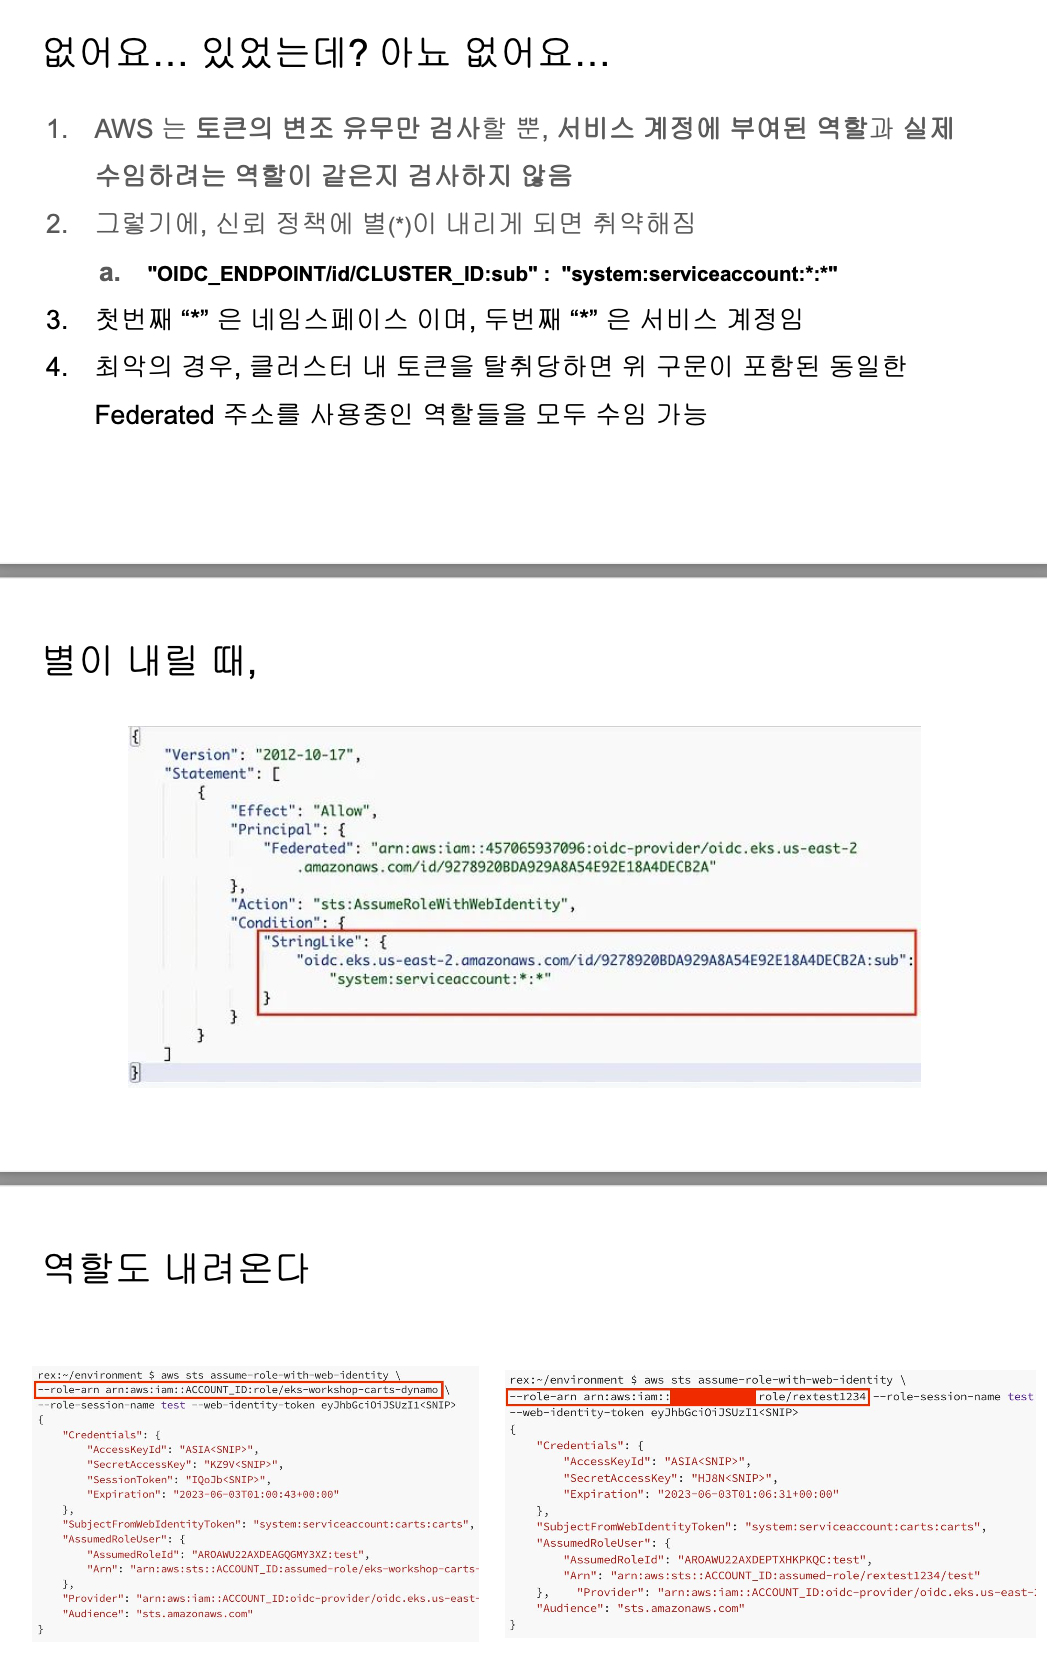
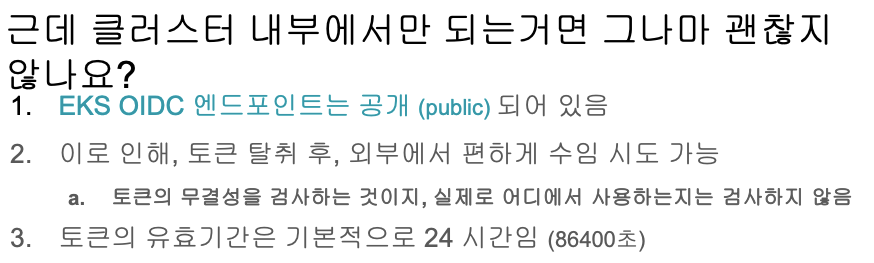
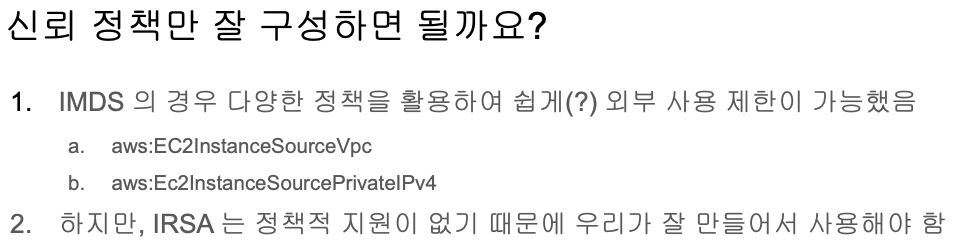
- IAM Channelge Level 6 문제
- 실습 확인 후 파드 삭제 및 IRSA 제거
Copy# 실습 확인 후 파드 삭제 및 IRSA 제거 kubectl delete pod eks-iam-test3 eksctl delete iamserviceaccount --cluster $CLUSTER_NAME --name my-sa --namespace default eksctl get iamserviceaccount --cluster $CLUSTER_NAME kubectl get sa4.4. EKS Pod Identity
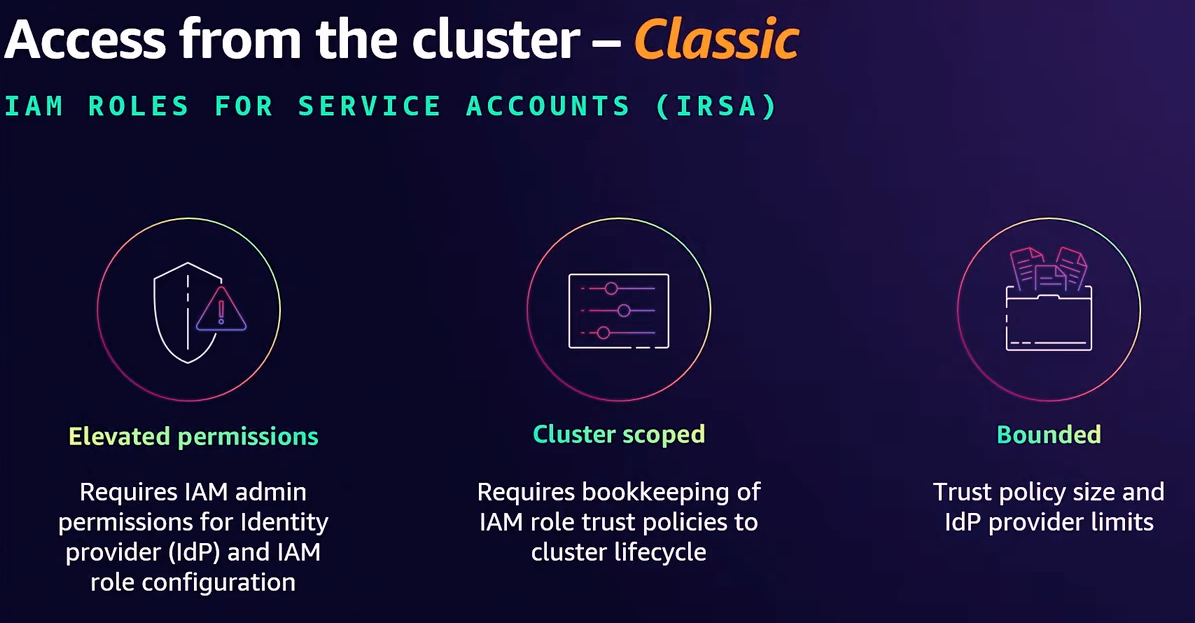

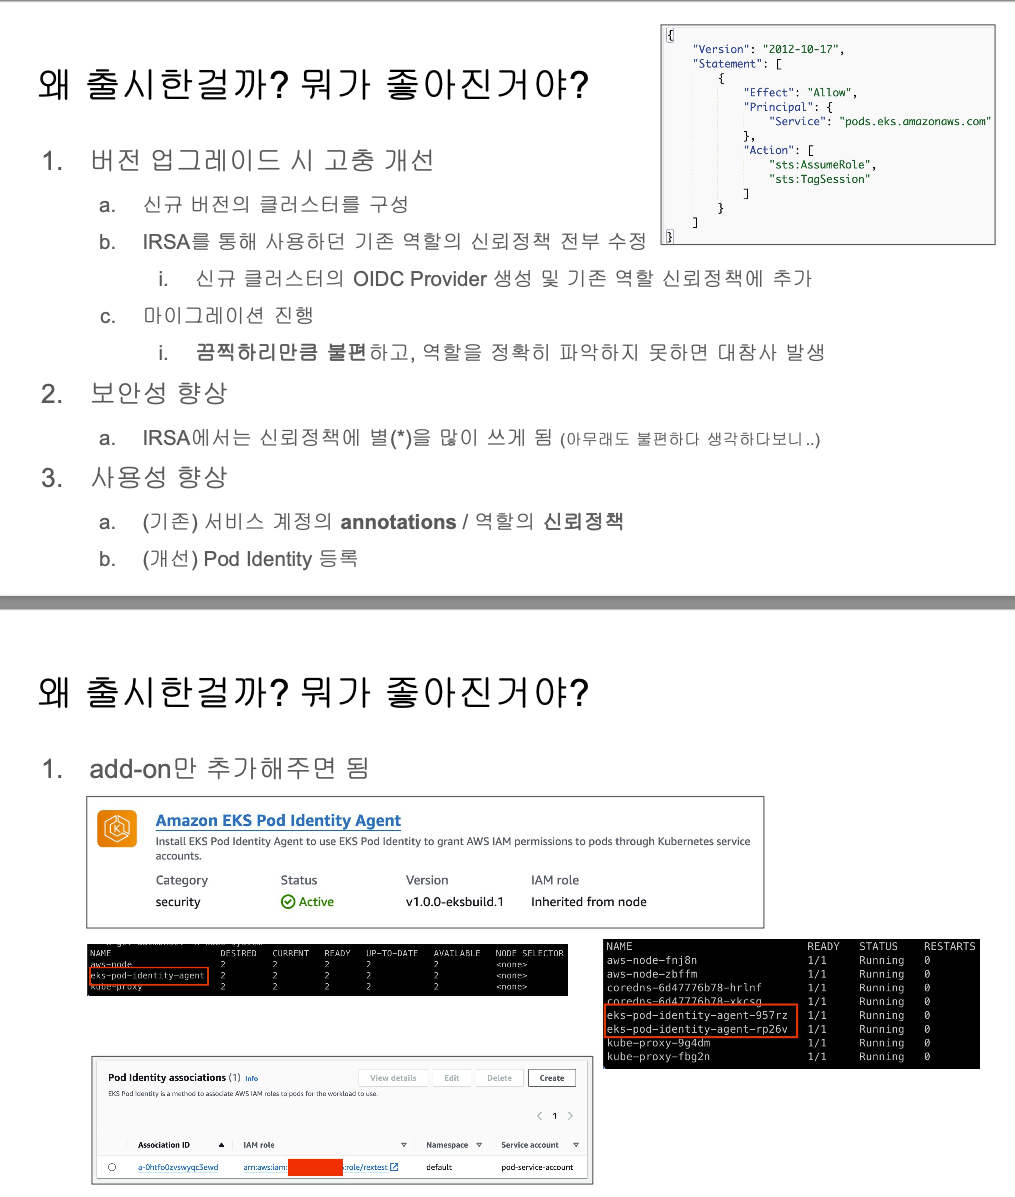
- Amazon EKS Pod Identity: a new way for applications on EKS to obtain IAM credentials - Link
- Amazon EKS Pod Identity simplifies IAM permissions for applications on Amazon EKS clusters - Link
- [EKS Workshop] EKS Pod Identity : 오픈소스 Agent, Add-on 설치 지원 - Link


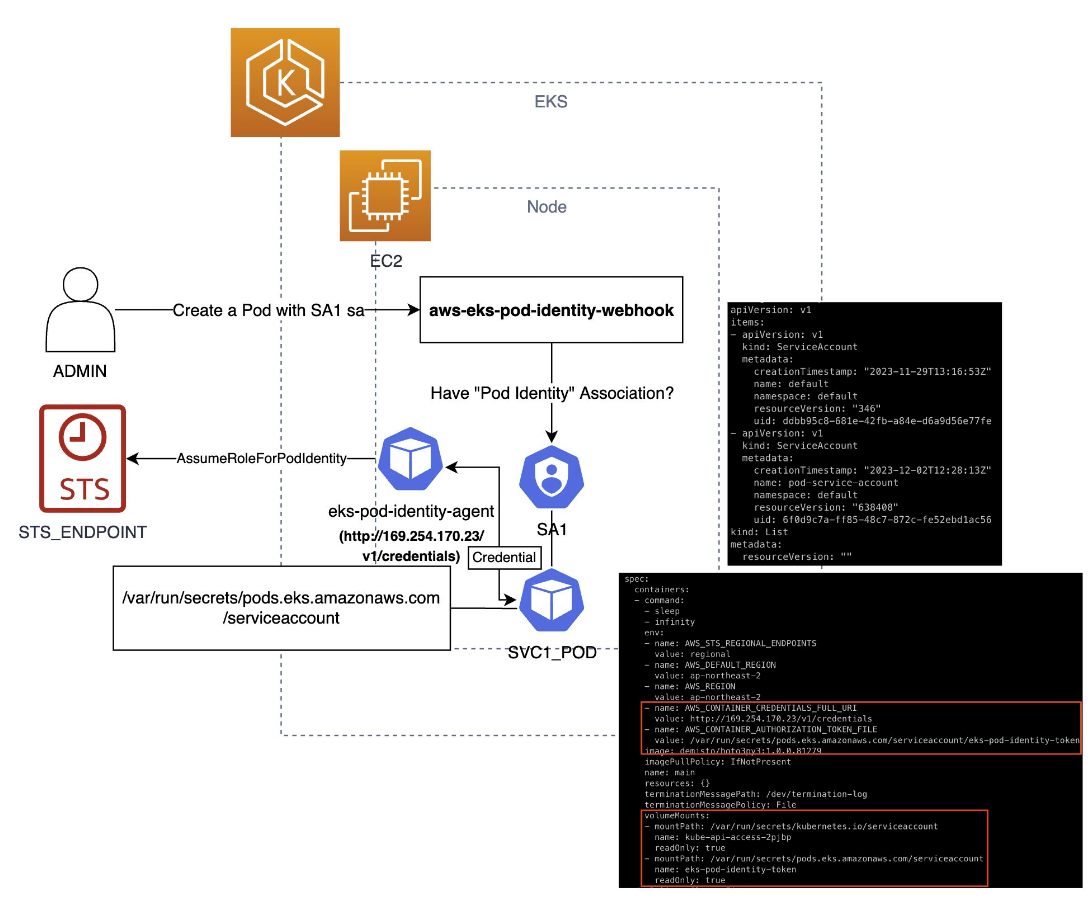
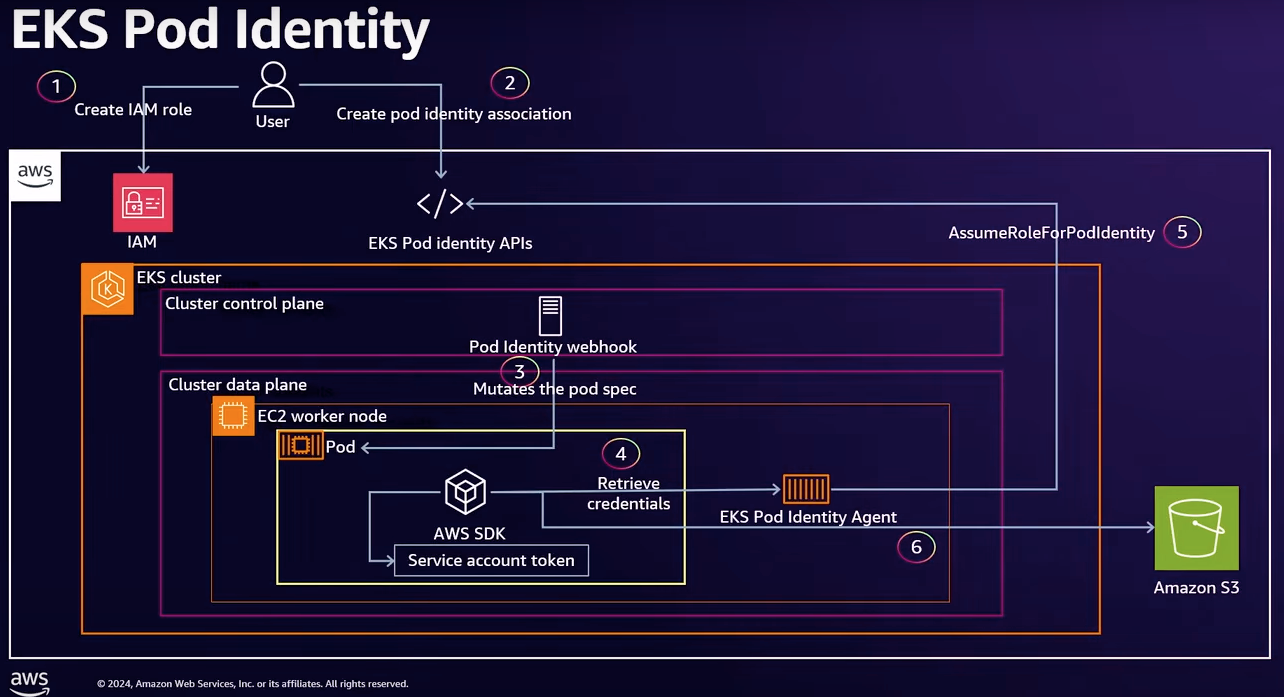
- eks-pod-identity-agent 설치
- podidentityassociation 설정
- 테스트용 파드 생성 및 확인 : AssumeRoleForPodIdentity - Link
- 실습 리소스 삭제
- IAM Session tags → Support for session tags 실습 도전해보세요 - Link Blog
- IRSA vs EKS Pod Identity
- 고려사항
5. Kyverno
5.1. Kyverno?
K8S Native Policy Mgmt - Link , Blog , Playground , Policy , Docs , Github , ddii , devocean , whchoi98 , Youtube
- [EKS Workshop] Policy management with Kyverno - Link
- Managing Pod Security on Amazon EKS with Kyverno - 링크 & PSS - Link
- Kyverno (Greek for “govern”) is a policy engine designed specifically for Kubernetes.
- 기능 - Link
- 동작 : Dynamic Admission Control 로 실행, Mutating/Validating admission 에서 동작하여 허용/거부 결과 반환
5.2. Kyverno 실습
5.2.1. 설치 - HelmChart
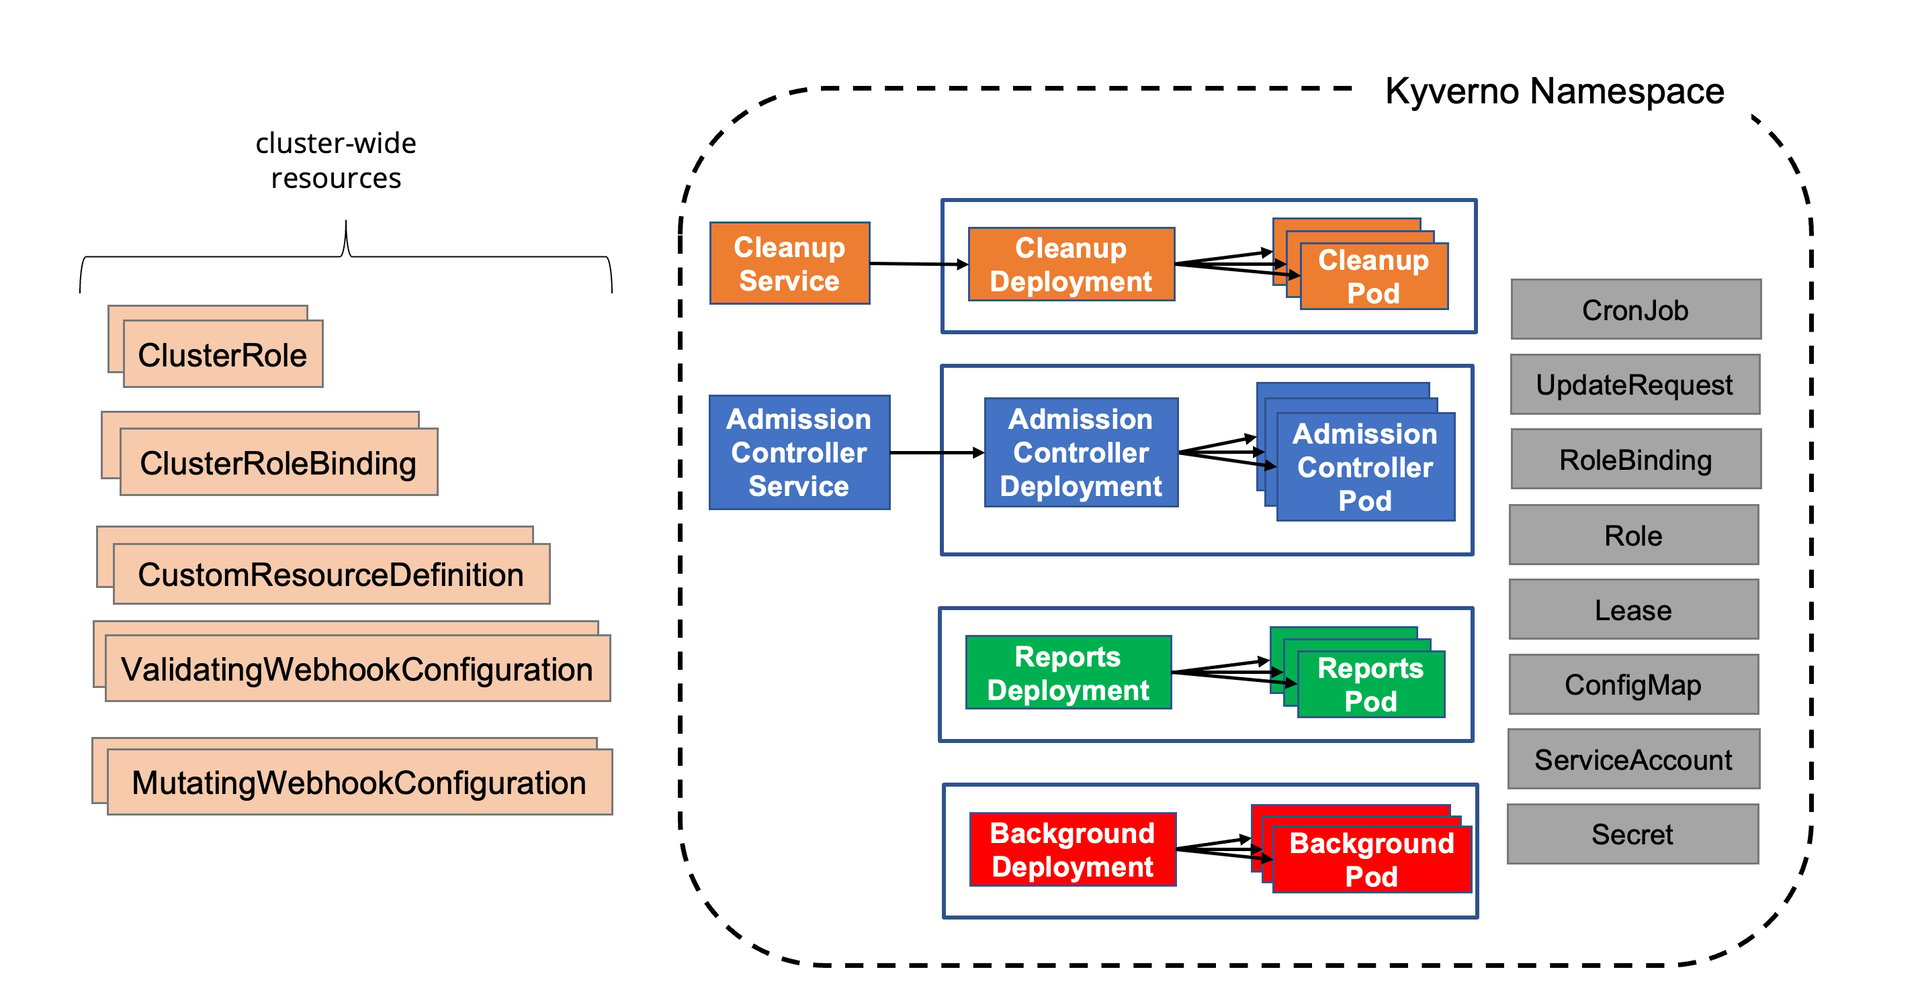 Copy
Copy# 설치 # EKS 설치 시 참고 https://kyverno.io/docs/installation/platform-notes/#notes-for-eks-users # 모니터링 참고 https://kyverno.io/docs/monitoring/ cat << EOF > kyverno-value.yaml config: resourceFiltersExcludeNamespaces: [ kube-system ] admissionController: serviceMonitor: enabled: true backgroundController: serviceMonitor: enabled: true cleanupController: serviceMonitor: enabled: true reportsController: serviceMonitor: enabled: true EOF kubectl create ns kyverno helm repo add kyverno https://kyverno.github.io/kyverno/ helm install kyverno kyverno/kyverno --version 3.3.7 -f kyverno-value.yaml -n kyverno # 확인 kubectl get all -n kyverno kubectl get crd | grep kyverno kubectl get pod,svc -n kyverno # (참고) 기본 인증서 확인 https://kyverno.io/docs/installation/customization/#default-certificates # step-cli 설치 https://smallstep.com/docs/step-cli/installation/ wget https://dl.smallstep.com/cli/docs-cli-install/latest/step-cli_amd64.rpm sudo rpm -i step-cli_amd64.rpm # kubectl -n kyverno get secret kubectl -n kyverno get secret kyverno-svc.kyverno.svc.kyverno-tls-ca -o jsonpath='{.data.tls\.crt}' | base64 -d kubectl -n kyverno get secret kyverno-svc.kyverno.svc.kyverno-tls-ca -o jsonpath='{.data.tls\.crt}' | base64 -d | step certificate inspect --short X.509v3 Root CA Certificate (RSA 2048) [Serial: 0] Subject: *.kyverno.svc Issuer: *.kyverno.svc Valid from: 2025-03-15T11:53:09Z to: 2026-03-15T12:53:09Z # kubectl get validatingwebhookconfiguration kyverno-policy-validating-webhook-cfg -o jsonpath='{.webhooks[0].clientConfig.caBundle}' | base64 -d | step certificate inspect --short X.509v3 Root CA Certificate (RSA 2048) [Serial: 0] Subject: *.kyverno.svc Issuer: *.kyverno.svc Valid from: 2025-03-15T11:53:09Z to: 2026-03-15T12:53:09Z5.2.2. 프로메테우스
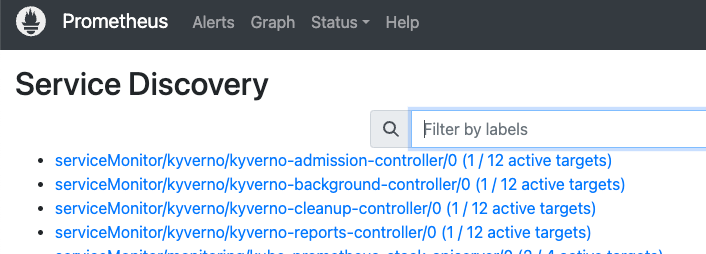

5.2.3. 그라파나 대시보드 : 15987, 15804 https://kyverno.io/docs/monitoring/bonus-grafana-dashboard/
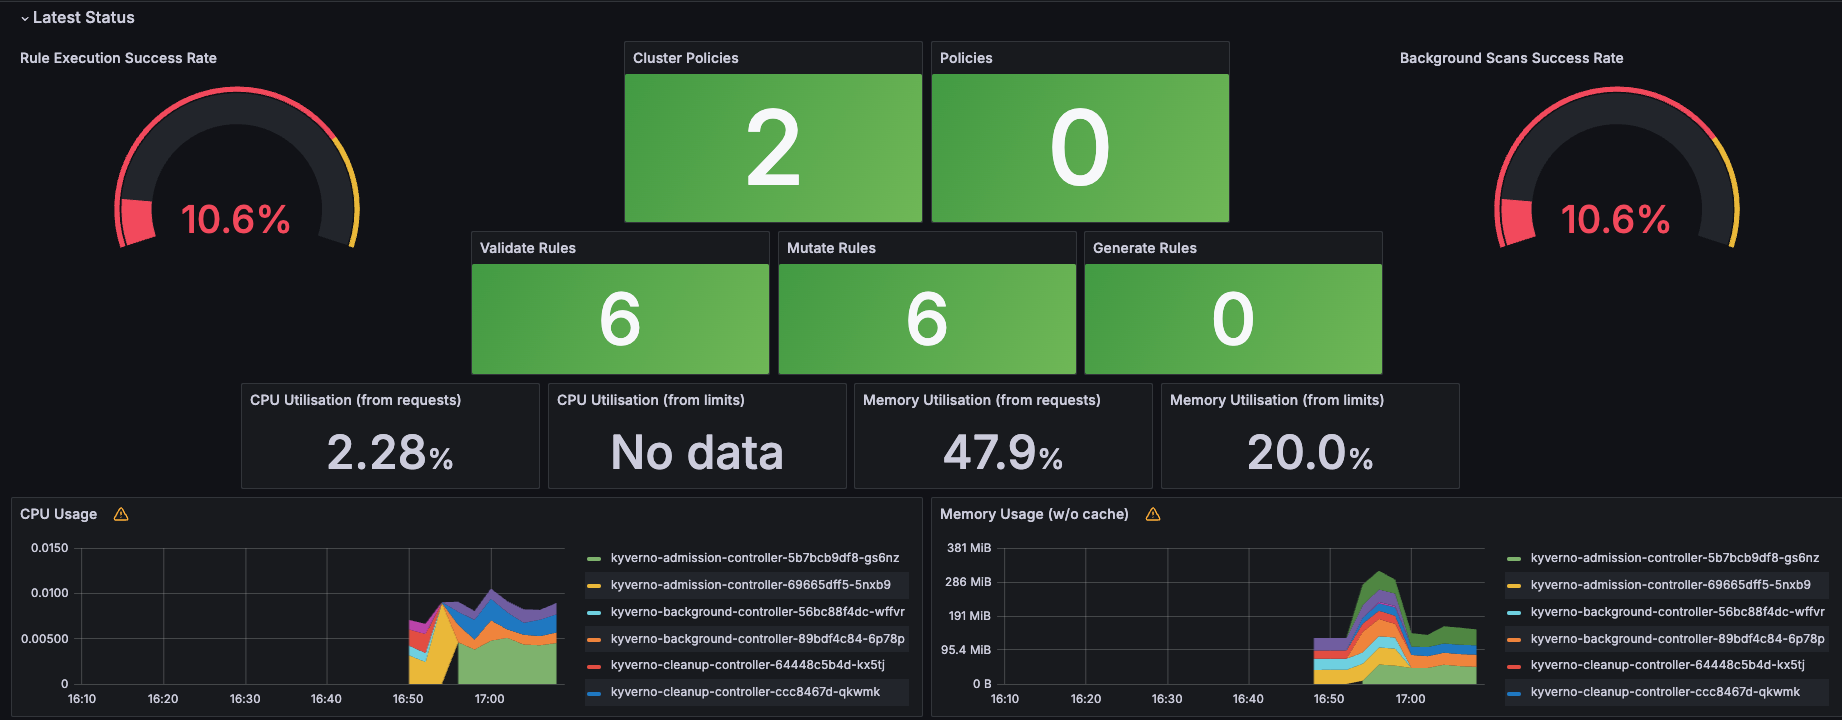
- Policy and Role : Kyverno Policy는 rules 모음 - Link
- Validation : 파드에 라벨(lables) 검증 - Link
- Mutation : 파드에 라벨(lables) 추가 - Link
- Generation : We will use a Kyverno generate policy to generate an image pull secret in a new Namespace - Link ⇒ 버전 차이로 현재 실습은 안됨, Role 권한 추가 필요로 보임..
- kyverno 모니터링 : 프로메테우스 - Link & 그라파나 대시보드 - Link
- Kyverno CLI - Link
'AWS' 카테고리의 다른 글
[AEWS 3기] 8주차 - K8S CI/CD (0) 2025.03.30 [AEWS 3기] 7주차 - EKS Mode/Nodes (0) 2025.03.23 [AEWS 3기] 5주차 - EKS Autoscaling (0) 2025.03.08 [AEWS 3기] 4주차 - EKS Observability (0) 2025.03.01 [AEWS 3기] 3주차 - EKS Storage & Managed Node Group (0) 2025.02.22