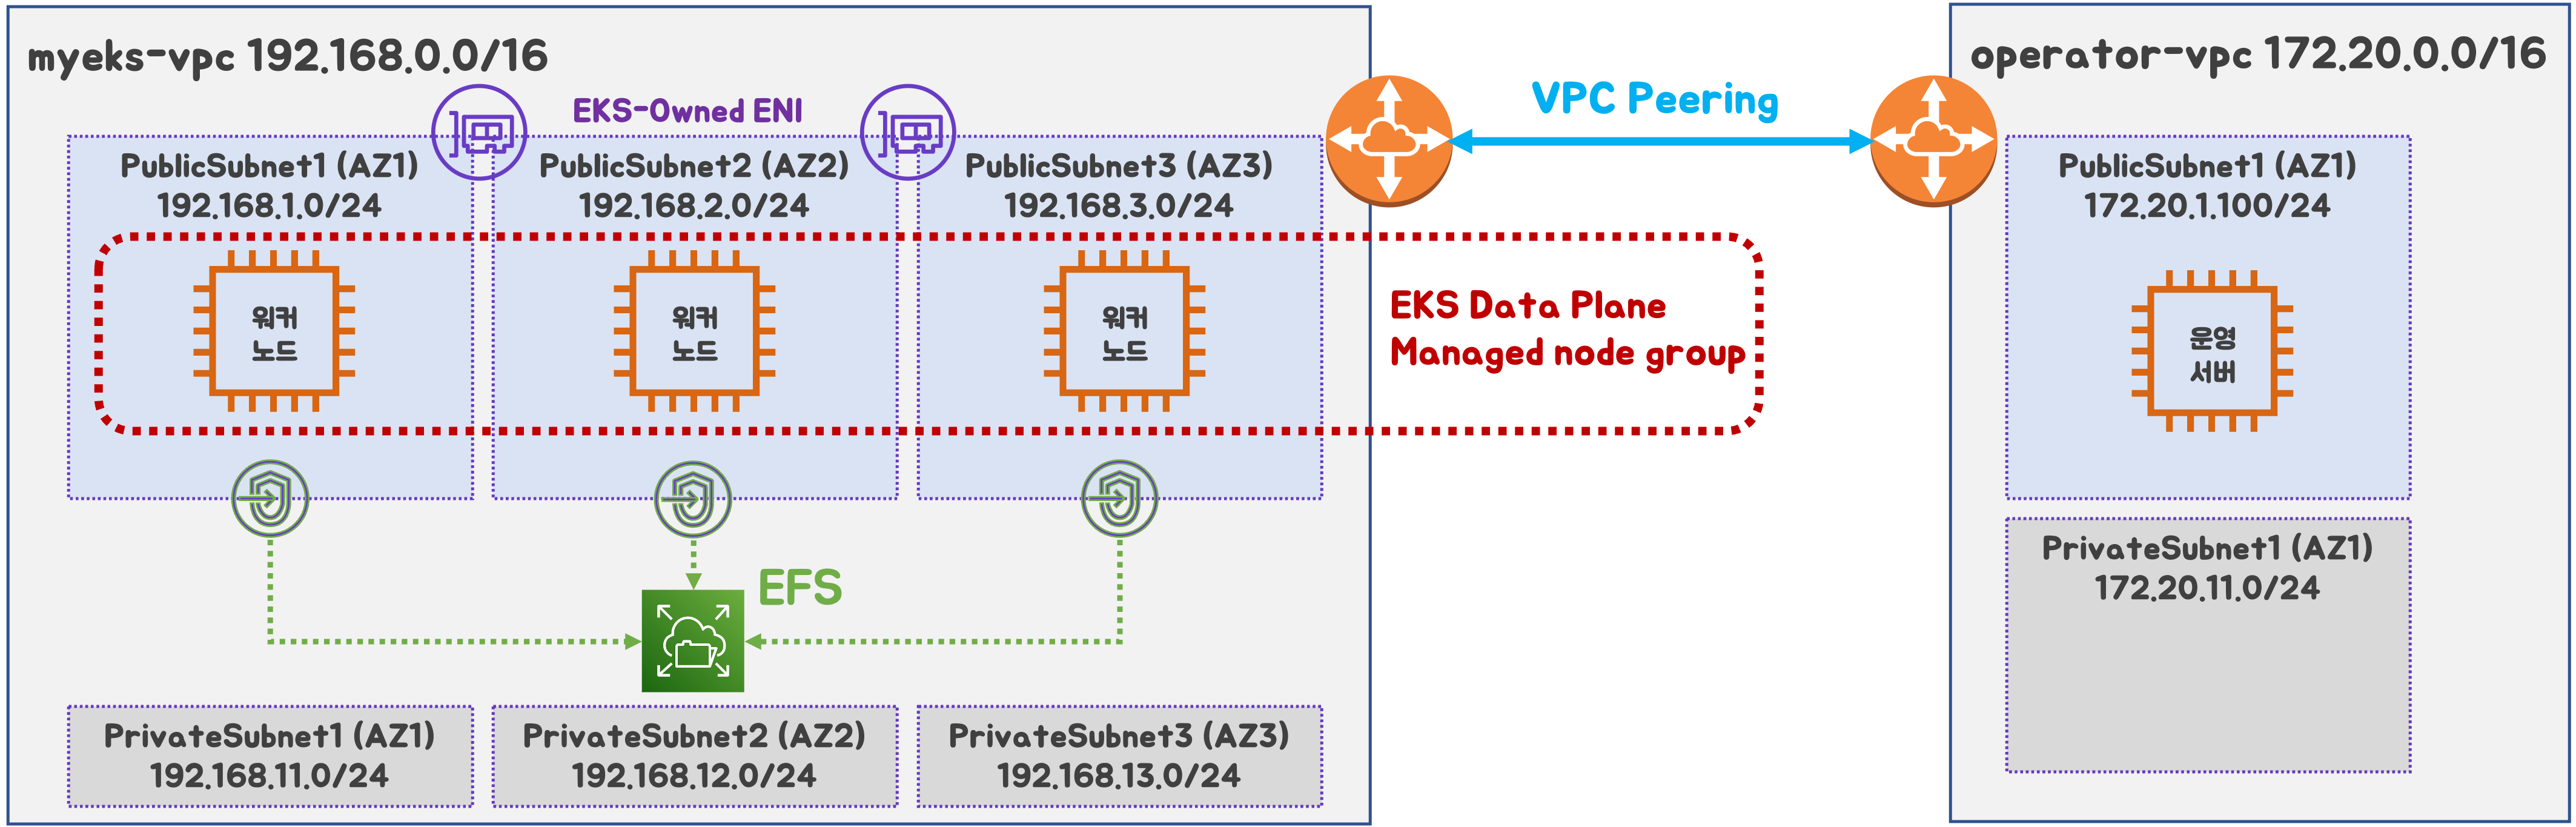
myeks.yaml 파일 작성 : vpc/subnet 과 ssh 키 이름 수정 (빨간색 부분)
cat << EOF > myeks.yaml
apiVersion: eksctl.io/v1alpha5
kind: ClusterConfig
metadata:
  name: myeks
  region: ap-northeast-2
  version: "1.31"

iam:
  withOIDC: true # enables the IAM OIDC provider as well as IRSA for the Amazon CNI plugin

  serviceAccounts: # service accounts to create in the cluster. See IAM Service Accounts
  - metadata:
      name: aws-load-balancer-controller
      namespace: kube-system
    wellKnownPolicies:
      awsLoadBalancerController: true

vpc:
  cidr: 192.168.0.0/16
  clusterEndpoints:
    privateAccess: true # if you only want to allow private access to the cluster
    publicAccess: true # if you want to allow public access to the cluster
  id: $VPCID
  subnets:
    public:
      ap-northeast-2a:
        az: ap-northeast-2a
        cidr: 192.168.1.0/24
        id: $PubSubnet1
      ap-northeast-2b:
        az: ap-northeast-2b
        cidr: 192.168.2.0/24
        id: $PubSubnet2
      ap-northeast-2c:
        az: ap-northeast-2c
        cidr: 192.168.3.0/24
        id: $PubSubnet3

addons:
  - name: vpc-cni # no version is specified so it deploys the default version
    version: latest # auto discovers the latest available
    attachPolicyARNs: # attach IAM policies to the add-on's service account
      - arn:aws:iam::aws:policy/AmazonEKS_CNI_Policy
    configurationValues: |-
      enableNetworkPolicy: "true"

  - name: kube-proxy
    version: latest

  - name: coredns
    version: latest

  - name: metrics-server
    version: latest

managedNodeGroups:
- amiFamily: AmazonLinux2023
  desiredCapacity: 3
  iam:
    withAddonPolicies:
      certManager: true # Enable cert-manager
      externalDNS: true # Enable ExternalDNS
  instanceType: t3.medium
  preBootstrapCommands:
    # install additional packages
    - "dnf install nvme-cli links tree tcpdump sysstat ipvsadm ipset bind-utils htop -y"
  labels:
    alpha.eksctl.io/cluster-name: myeks
    alpha.eksctl.io/nodegroup-name: ng1
  maxPodsPerNode: 100
  maxSize: 3
  minSize: 3
  name: ng1
  ssh:
    allow: true
    publicKeyName: $SSHKEYNAME
  tags:
    alpha.eksctl.io/nodegroup-name: ng1
    alpha.eksctl.io/nodegroup-type: managed
  volumeIOPS: 3000
  volumeSize: 120
  volumeThroughput: 125
  volumeType: gp3
EOF
최종 yaml 로 eks 배포
eksctl create cluster -f myeks.yaml --verbose 4
배포 후 기본 정보 확인
EKS 관리 콘솔 확인 : Overview, Compute, Networking, Add-ons, Access
EKS 정보 확인
#
kubectl cluster-info

# 네임스페이스 default 변경 적용
kubens default

#
kubectl ctx
kubectl config rename-context "<각자 자신의 IAM User>@myeks.ap-northeast-2.eksctl.io" "eksworkshop"
kubectl config rename-context "admin@myeks.ap-northeast-2.eksctl.io" "eksworkshop"

#
kubectl get node --label-columns=node.kubernetes.io/instance-type,eks.amazonaws.com/capacityType,topology.kubernetes.io/zone
kubectl get node -v=6

#
kubectl get pod -A
kubectl get pdb -n kube-system

# 관리형 노드 그룹 확인
eksctl get nodegroup --cluster $CLUSTER_NAME
aws eks describe-nodegroup --cluster-name $CLUSTER_NAME --nodegroup-name ng1 | jq

# eks addon 확인
eksctl get addon --cluster $CLUSTER_NAME

# aws-load-balancer-controller를 위한 iam service account 생성 확인 : AWS IAM role bound to a Kubernetes service account
eksctl get iamserviceaccount --cluster $CLUSTER_NAME
NAMESPACE	NAME				ROLE ARN
kube-system	aws-load-balancer-controller	arn:aws:iam::911283464785:role/eksctl-myeks-addon-iamserviceaccount-kube-sys-Role1-S60JsHI62pHB
EC2 관리 콘솔 확인 : type, az, IP, ec2 instance profile → iam role 확인
0.4. 관리형 노드 그룹(EC2) 접속 및 노드 정보 확인 : max-pods
관리 콘솔 EC2 서비스 : 관리형 노드 그룹(EC2) 에 보안그룹 ID 확인
해당 보안그룹 inbound 에 자신의 집 공인 IP 추가 후 접속 확인
# 인스턴스 정보 확인 1
aws ec2 describe-instances --query "Reservations[*].Instances[*].{InstanceID:InstanceId, PublicIPAdd:PublicIpAddress, PrivateIPAdd:PrivateIpAddress, InstanceName:Tags[?Key=='Name']|[0].Value, Status:State.Name}" --filters Name=instance-state-name,Values=running --output table

# 인스턴스 정보 확인 2 : AZ, ID, 공인IP
aws ec2 describe-instances \
    --filters "Name=tag:Name,Values=myeks-ng1-Node" \
    --query "Reservations[].Instances[].{InstanceID:InstanceId, PublicIP:PublicIpAddress, AZ:Placement.AvailabilityZone}" \
    --output table

# AZ1 배치된 EC2 공인 IP
aws ec2 describe-instances \
    --filters "Name=tag:Name,Values=myeks-ng1-Node" "Name=availability-zone,Values=ap-northeast-2a" \
    --query 'Reservations[*].Instances[*].PublicIpAddress' \
    --output text

# AZ2 배치된 EC2 공인 IP
aws ec2 describe-instances \
    --filters "Name=tag:Name,Values=myeks-ng1-Node" "Name=availability-zone,Values=ap-northeast-2b" \
    --query 'Reservations[*].Instances[*].PublicIpAddress' \
    --output text

# AZ3 배치된 EC2 공인 IP
aws ec2 describe-instances \
    --filters "Name=tag:Name,Values=myeks-ng1-Node" "Name=availability-zone,Values=ap-northeast-2c" \
    --query 'Reservations[*].Instances[*].PublicIpAddress' \
    --output text

# EC2 공인 IP 변수 지정
export N1=$(aws ec2 describe-instances --filters "Name=tag:Name,Values=myeks-ng1-Node" "Name=availability-zone,Values=ap-northeast-2a" --query 'Reservations[*].Instances[*].PublicIpAddress' --output text)
export N2=$(aws ec2 describe-instances --filters "Name=tag:Name,Values=myeks-ng1-Node" "Name=availability-zone,Values=ap-northeast-2b" --query 'Reservations[*].Instances[*].PublicIpAddress' --output text)
export N3=$(aws ec2 describe-instances --filters "Name=tag:Name,Values=myeks-ng1-Node" "Name=availability-zone,Values=ap-northeast-2c" --query 'Reservations[*].Instances[*].PublicIpAddress' --output text)
echo $N1, $N2, $N3


# *remoteAccess* 포함된 보안그룹 ID
aws ec2 describe-security-groups --filters "Name=group-name,Values=*remoteAccess*" | jq
export MNSGID=$(aws ec2 describe-security-groups --filters "Name=group-name,Values=*remoteAccess*" --query 'SecurityGroups[*].GroupId' --output text)

# 해당 보안그룹 inbound 에 자신의 집 공인 IP 룰 추가
aws ec2 authorize-security-group-ingress --group-id $MNSGID --protocol '-1' --cidr $(curl -s ipinfo.io/ip)/32

# 해당 보안그룹 inbound 에 운영서버 내부 IP 룰 추가
aws ec2 authorize-security-group-ingress --group-id $MNSGID --protocol '-1' --cidr 172.20.1.100/32


# ping 테스트
ping -c 2 $N1
ping -c 2 $N2
ping -c 2 $N3

# 워커 노드 SSH 접속
ssh -i <SSH 키> -o StrictHostKeyChecking=no ec2-user@$N1 hostname
for i in $N1 $N2 $N3; do echo ">> node $i <<"; ssh -o StrictHostKeyChecking=no ec2-user@$i hostname; echo; done

ssh ec2-user@$N1
exit
ssh ec2-user@$N2
exit
ssh ec2-user@$N2
exit
(옵션) AWS EC2 System Manager - Session Manager 로 관리형 노드 그룹(EC2) 접속
노드 정보 확인 & max-pods 정보 확인
# 노드 기본 정보 확인
for i in $N1 $N2 $N3; do echo ">> node $i <<"; ssh ec2-user@$i hostnamectl; echo; done
for i in $N1 $N2 $N3; do echo ">> node $i <<"; ssh ec2-user@$i sudo ip -c addr; echo; done

#
for i in $N1 $N2 $N3; do echo ">> node $i <<"; ssh ec2-user@$i lsblk; echo; done
for i in $N1 $N2 $N3; do echo ">> node $i <<"; ssh ec2-user@$i df -hT /; echo; done


# 스토리지클래스 및 CSI 노드 확인
kubectl get sc
kubectl describe sc gp2

kubectl get crd
kubectl get csinodes


# max-pods 정보 확인
kubectl describe node | grep Capacity: -A13
kubectl get nodes -o custom-columns="NAME:.metadata.name,MAXPODS:.status.capacity.pods"

# 노드에서 확인
for i in $N1 $N2 $N3; do echo ">> node $i <<"; ssh ec2-user@$i cat /etc/eks/bootstrap.sh; echo; done
ssh ec2-user@$N1 sudo cat /etc/kubernetes/kubelet/config.json | jq
for i in $N1 $N2 $N3; do echo ">> node $i <<"; ssh ec2-user@$i sudo cat /etc/kubernetes/kubelet/config.json | grep maxPods; echo; done
for i in $N1 $N2 $N3; do echo ">> node $i <<"; ssh ec2-user@$i sudo cat /etc/kubernetes/kubelet/config.json.d/00-nodeadm.conf | grep maxPods; echo; done
(참고) If you don’t specify an AMI ID for the bootstrap.sh file included with Amazon EKS optimized Linux or Bottlerocket, managed node groups enforce a maximum number on the value of maxPods. For instances with less than 30 vCPUs, the maximum number is 110. For instances with greater than 30 vCPUs, the maximum number jumps to 250. These numbers are based on Kubernetes scalability thresholds and recommended settings by internal Amazon EKS scalability team testing. For more information, see the Amazon VPC CNI plugin increases pods per node limits blog post.
0.5. 운영서버 EC2 : eks kubeconfig 설정, EFS 마운트 테스트
[운영서버 EC2] eks kubeconfig 설정
# eks 설치한 iam 자격증명을 설정하기
aws configure
...

# get-caller-identity 확인
aws sts get-caller-identity --query Arn

# kubeconfig 생성
aws eks update-kubeconfig --name myeks --user-alias <위 출력된 자격증명 사용자>
aws eks update-kubeconfig --name myeks --user-alias admin

#
kubectl cluster-info
kubectl ns default
kubectl get node -v6
[운영서버 EC2] EFS 마운트 테스트
# 현재 EFS 정보 확인
aws efs describe-file-systems | jq

# 파일 시스템 ID만 출력
aws efs describe-file-systems --query "FileSystems[*].FileSystemId" --output text
fs-040469b8fab273469

# EFS 마운트 대상 정보 확인
aws efs describe-mount-targets --file-system-id $(aws efs describe-file-systems --query "FileSystems[*].FileSystemId" --output text) | jq

# IP만 출력 :
aws efs describe-mount-targets --file-system-id $(aws efs describe-file-systems --query "FileSystems[*].FileSystemId" --output text) --query "MountTargets[*].IpAddress" --output text
192.168.2.102	192.168.1.71	192.168.3.184

# DNS 질의 : 안되는 이유가 무엇일까요?
# EFS 도메인 이름(예시) : fs-040469b8fab273469.efs.ap-northeast-2.amazonaws.com
dig +short $(aws efs describe-file-systems --query "FileSystems[*].FileSystemId" --output text).efs.ap-northeast-2.amazonaws.com

# DNS 질의가 되지 않는 이유는 현재 운영서버와 EFS가 생성된 VPC가 다른 VPC이므로 아래와 같이 172.20.0.2라는 local dns에는 위의 domain 정보가 등록되지 않아있기 때문이다.
[root@operator-host ~]# cat /etc/resolv.conf
options timeout:2 attempts:5
; generated by /usr/sbin/dhclient-script
search ap-northeast-2.compute.internal
nameserver 172.20.0.2

# EFS 마운트 테스트
EFSIP1=<IP만 출력에서 아무 IP나 지정>
EFSIP1=192.168.1.71

df -hT
mkdir /mnt/myefs
mount -t nfs4 -o nfsvers=4.1,rsize=1048576,wsize=1048576,hard,timeo=600,retrans=2,noresvport $EFSIP1:/ /mnt/myefs
findmnt -t nfs4
df -hT --type nfs4

# 파일 작성
nfsstat
echo "EKS Workshop" > /mnt/myefs/memo.txt
nfsstat
ls -l /mnt/myefs
cat /mnt/myefs/memo.txt

# EC2 재부팅 이후에도 mount 탑재가 될 수 있게 설정 해보자! : (힌트 : /etc/fstab)
# 아래와 같이 /etc/fstab에 mount 정보를 입력해주고 mount -a 설정 후 reboot해도 정보가 그대로 남아있다.
cat /etc/fstab
#
UUID=43b4f483-987f-429f-ad61-9e2993518248     /           xfs    defaults,noatime  1   1
192.168.2.90:/  /mnt/myefs nfs4 rw,relatime,vers=4.1,rsize=1048576,wsize=1048576,namlen=255,hard,proto=tcp,timeo=600,retrans=2,sec=sys,clientaddr=172.20.1.100,local_lock=none,addr=192.168.2.90 0 0

mount -a
NFS 서버가 192.168.1.100이고 공유 폴더가 /mnt/nfs_share, 로컬에서 마운트할 위치가 /mnt/nfs_mount라면, /etc/fstab에 다음과 같은 라인을 추가하면 된다:
# 설치된 파드 정보 확인
kubectl get pods -n kube-system

# service, ep, ingress 확인
kubectl get ingress,svc,ep -n kube-system

# Kube Ops View 접속 정보 확인
echo -e "Kube Ops View URL = https://kubeopsview.$MyDomain/#scale=1.5"
open "https://kubeopsview.$MyDomain/#scale=1.5" # macOS
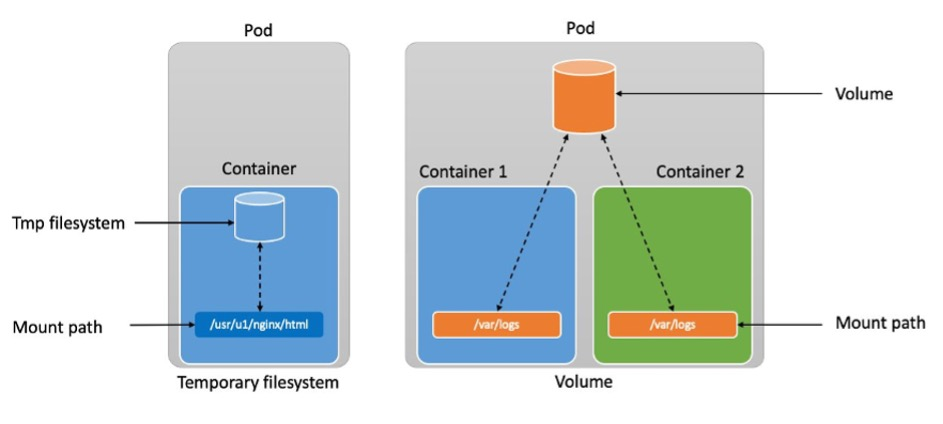
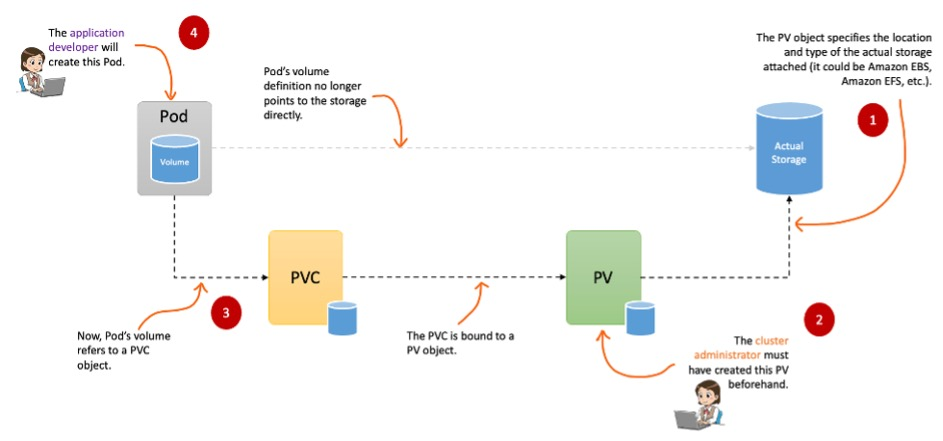
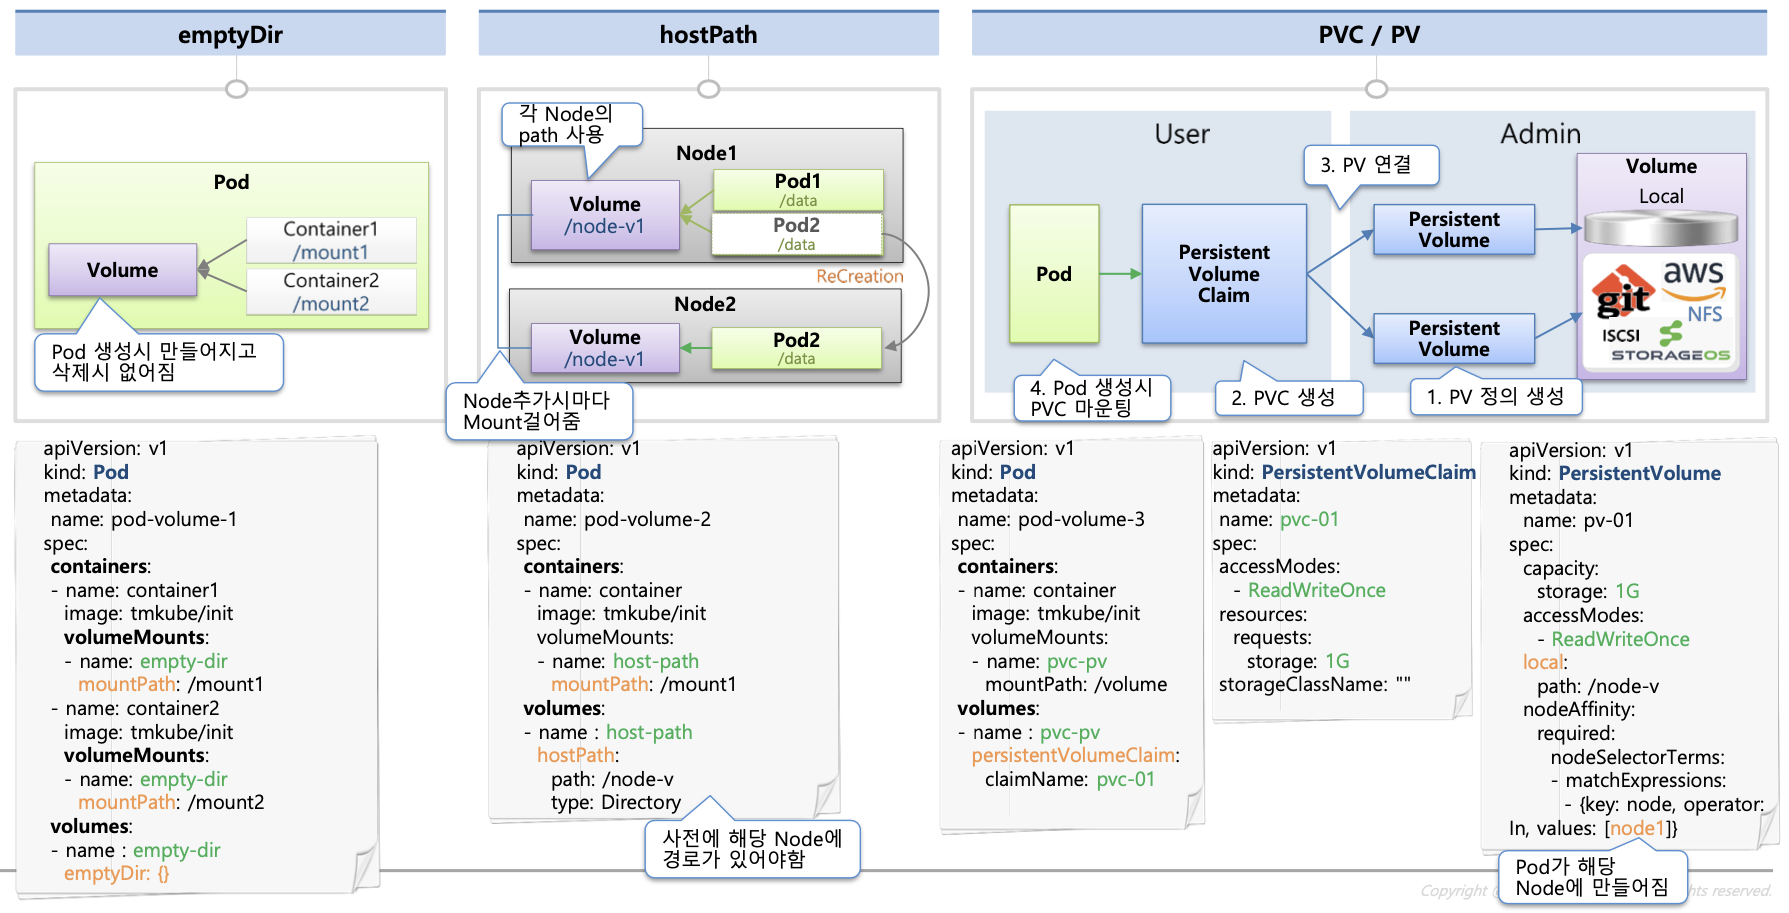
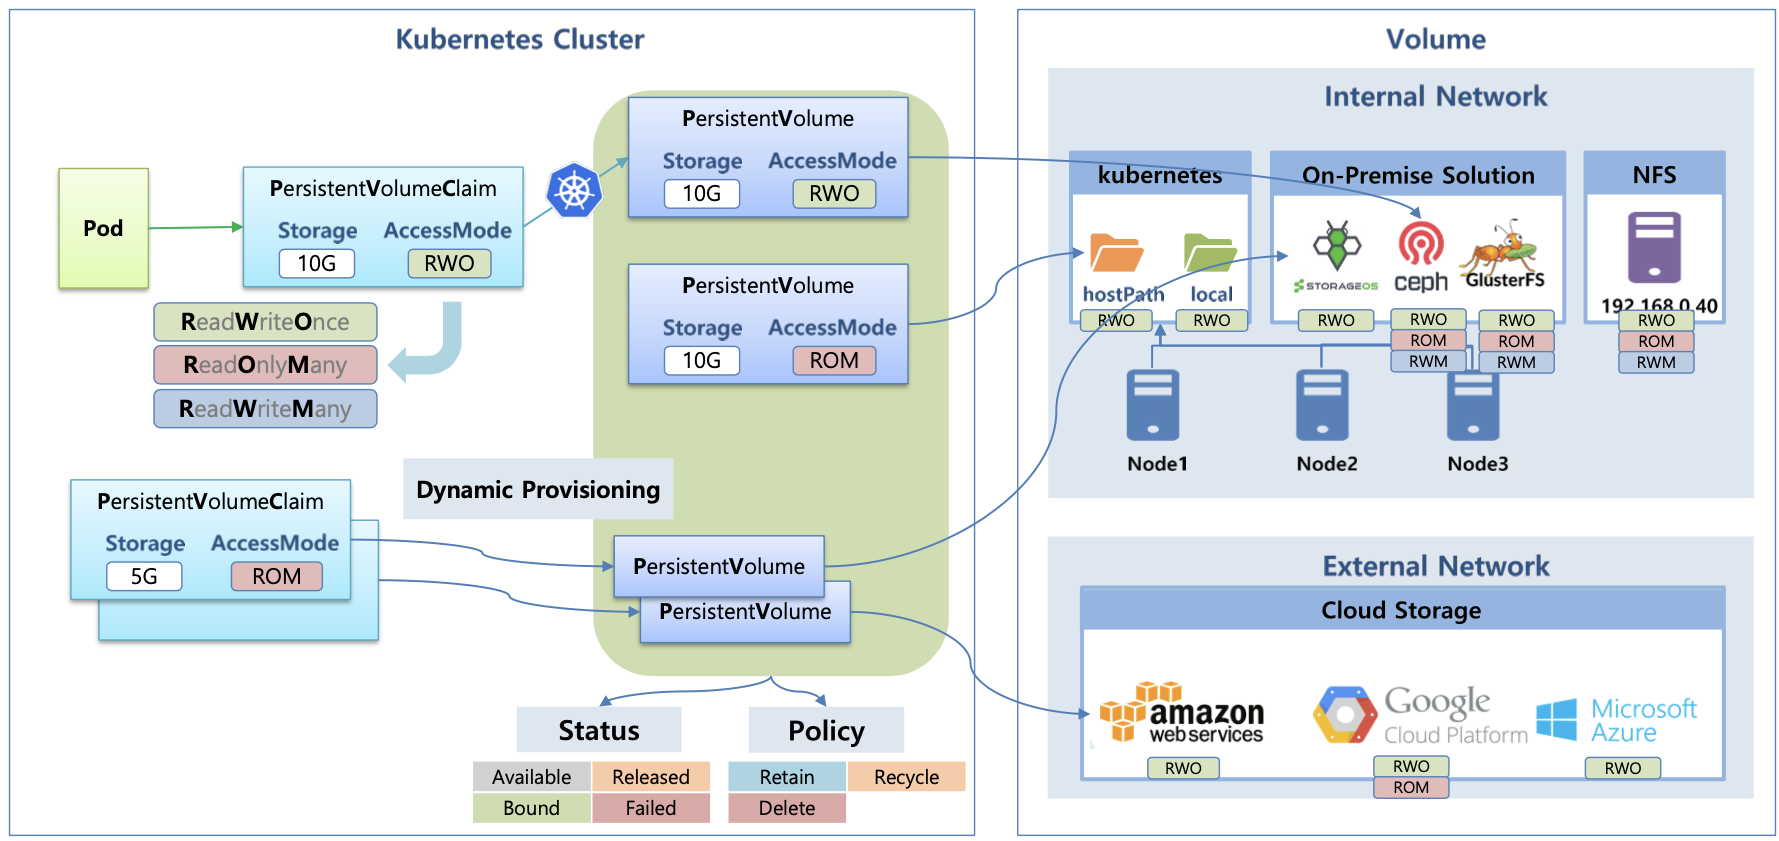
다양한 볼륨 사용 : K8S 자체 제공(hostPath, local), 온프렘 솔루션(ceph 등), NFS, 클라우드 스토리지(AWS EBS 등)
동적 프로비저닝 & 볼륨 상태 , ReclaimPolicy
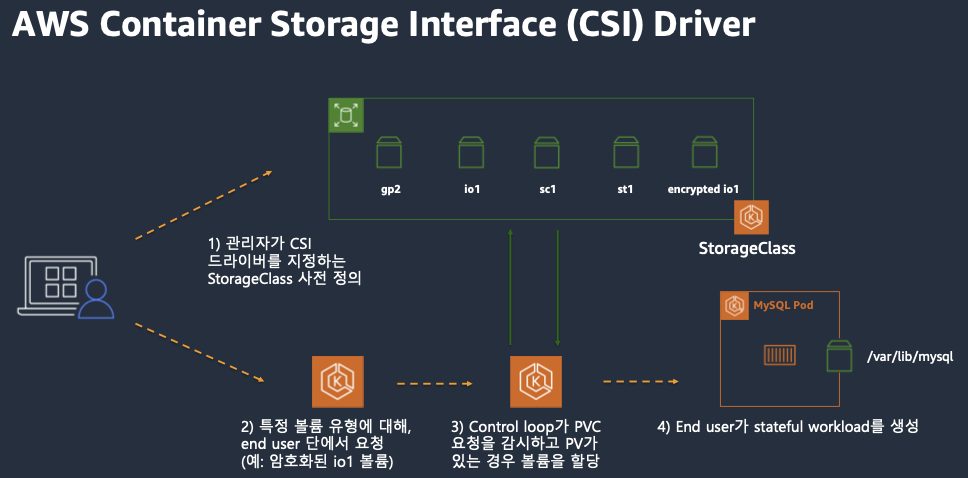
1.3. CSI (Contaier Storage Interface) 소개
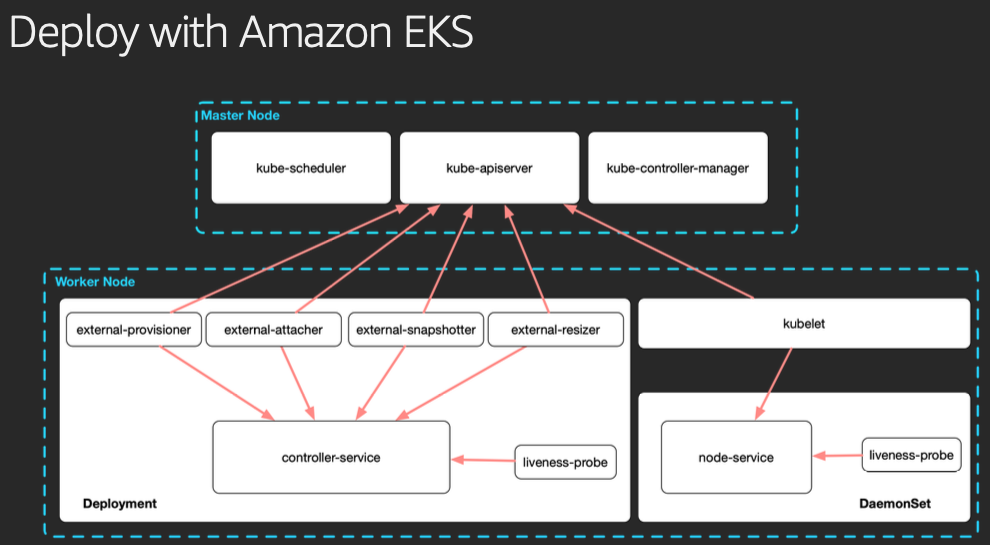
CSI Driver 배경 : Kubernetes source code 내부에 존재하는 AWS EBS provisioner는 당연히 Kubernetes release lifecycle을 따라서 배포되므로, provisioner 신규 기능을 사용하기 위해서는 Kubernetes version을 업그레이드해야 하는 제약 사항이 있습니다. 따라서, Kubernetes 개발자는 Kubernetes 내부에 내장된 provisioner (in-tree)를 모두 삭제하고, 별도의 controller Pod을 통해 동적 provisioning을 사용할 수 있도록 만들었습니다. 이것이 바로 CSI (Container Storage Interface) driver 입니다
CSI 를 사용하면, K8S 의 공통화된 CSI 인터페이스를 통해 다양한 프로바이더를 사용할 수 있다.
출처 : AWS 문서
일반적인 CSI driver의 구조입니다. AWS EBS CSI driver 역시 아래와 같은 구조를 가지는데, 오른쪽 StatefulSet 또는 Deployment로 배포된 controller Pod이 AWS API를 사용하여 실제 EBS volume을 생성하는 역할을 합니다. 왼쪽 DaemonSet으로 배포된 node Pod은 AWS API를 사용하여 Kubernetes node (EC2 instance)에 EBS volume을 attach 해줍니다.
# 배포
kubectl apply -f https://raw.githubusercontent.com/rancher/local-path-provisioner/v0.0.31/deploy/local-path-storage.yaml
...
apiVersion: storage.k8s.io/v1
kind: StorageClass
metadata:
  name: local-path
provisioner: rancher.io/local-path
volumeBindingMode: WaitForFirstConsumer
reclaimPolicy: Delete

---
apiVersion: v1
kind: ConfigMap
metadata:
  name: local-path-config
  namespace: local-path-storage
data:
  config.json: |-
    {
            "nodePathMap":[
            {
                    "node":"DEFAULT_PATH_FOR_NON_LISTED_NODES",
                    "paths":["/opt/local-path-provisioner"]
            }
            ]
    }
  setup: |-
    #!/bin/sh
    set -eu
    mkdir -m 0777 -p "$VOL_DIR"
  teardown: |-
    #!/bin/sh
    set -eu
    rm -rf "$VOL_DIR"
...

# 확인
kubectl get-all -n local-path-storage
kubectl get pod -n local-path-storage -owide
kubectl describe cm -n local-path-storage local-path-config
kubectl get sc
kubectl get sc local-path
NAME         PROVISIONER             RECLAIMPOLICY   VOLUMEBINDINGMODE      ALLOWVOLUMEEXPANSION   AGE
local-path   rancher.io/local-path   Delete          WaitForFirstConsumer   false                  34s
(참고) The provisioner supports automatic configuration reloading. Users can change the configuration using kubectl apply or kubectl edit with config map local-path-config
PV/PVC 를 사용하는 파드 생성
# PVC 생성
cat <<EOF | kubectl apply -f -
apiVersion: v1
kind: PersistentVolumeClaim
metadata:
  name: localpath-claim
spec:
  accessModes:
    - ReadWriteOnce
  storageClassName: local-path
  resources:
    requests:
      storage: 1Gi
EOF

# PVC 확인
kubectl get pvc
kubectl describe pvc


# 파드 생성
cat <<EOF | kubectl apply -f -
apiVersion: v1
kind: Pod
metadata:
  name: app
spec:
  terminationGracePeriodSeconds: 3
  containers:
  - name: app
    image: centos
    command: ["/bin/sh"]
    args: ["-c", "while true; do echo \$(date -u) >> /data/out.txt; sleep 5; done"]
    volumeMounts:
    - name: persistent-storage
      mountPath: /data
  volumes:
  - name: persistent-storage
    persistentVolumeClaim:
      claimName: localpath-claim
EOF

# 파드 확인
kubectl get pod,pv,pvc
kubectl describe pv    # Node Affinity 확인
kubectl exec -it app -- tail -f /data/out.txt
Thu Feb 13 09:33:53 UTC 2025
Thu Feb 13 09:33:58 UTC 2025
...

# 워커노드 중 현재 파드가 배포되어 있다만, 아래 경로에 out.txt 파일 존재 확인
for node in $N1 $N2 $N3; do ssh ec2-user@$node tree /opt/local-path-provisioner; done
/opt/local-path-provisioner
└── pvc-f1615862-e4cd-47d0-b89c-8d0e99270678_default_localpath-claim
    └── out.txt

# 해당 워커노드 자체에서 out.txt 파일 확인 : 아래 굵은 부분은 각자 실습 환경에 따라 다름
ssh ec2-user@$N1 tail -f /opt/local-path-provisioner/pvc-f1615862-e4cd-47d0-b89c-8d0e99270678_default_localpath-claim/out.txt
...
파드 삭제 후 파드 재생성해서 데이터 유지 되는지 확인
# 파드 삭제 후 PV/PVC 확인
kubectl delete pod app
kubectl get pod,pv,pvc
for node in $N1 $N2 $N3; do ssh ec2-user@$node tree /opt/local-path-provisioner; done

# 파드 다시 실행
cat <<EOF | kubectl apply -f -
apiVersion: v1
kind: Pod
metadata:
  name: app
spec:
  terminationGracePeriodSeconds: 3
  containers:
  - name: app
    image: centos
    command: ["/bin/sh"]
    args: ["-c", "while true; do echo \$(date -u) >> /data/out.txt; sleep 5; done"]
    volumeMounts:
    - name: persistent-storage
      mountPath: /data
  volumes:
  - name: persistent-storage
    persistentVolumeClaim:
      claimName: localpath-claim
EOF

# 확인
kubectl exec -it app -- head /data/out.txt
kubectl exec -it app -- tail -f /data/out.txt
다음 실습을 위해서 파드와 PVC 삭제
# 파드와 PVC 삭제
kubectl delete pod app
kubectl get pv,pvc
kubectl delete pvc localpath-claim

# 확인
kubectl get pv
for node in $N1 $N2 $N3; do ssh ec2-user@$node tree /opt/local-path-provisioner; done
Kubestr 이용한 성능 측정 - 링크 , Youtube , Blog ⇒ local-path 와 NFS 등 스토리지 클래스의 IOPS 차이를 확인
# [운영서버 EC2] kubestr 툴 다운로드 - Link
wget https://github.com/kastenhq/kubestr/releases/download/v0.4.48/kubestr_0.4.48_Linux_amd64.tar.gz
tar xvfz kubestr_0.4.48_Linux_amd64.tar.gz && mv kubestr /usr/local/bin/ && chmod +x /usr/local/bin/kubestr

# 스토리지클래스 점검
kubestr -h
kubestr

# 모니터링
watch 'kubectl get pod -owide;echo;kubectl get pv,pvc'

## 아래 서버 각각 접속 후 iostat 명령 실행 해두기 : 입출력(I/O) 통계 확인
ssh ec2-user@$N1
ssh ec2-user@$N2
ssh ec2-user@$N3
-----------------
iostat -xmdz 1
--------------------------------------------------------------
# rrqm/s : 초당 드라이버 요청 대기열에 들어가 병합된 읽기 요청 횟수
# wrqm/s : 초당 드라이버 요청 대기열에 들어가 병합된 쓰기 요청 횟수
# r/s : 초당 디스크 장치에 요청한 읽기 요청 횟수
# w/s : 초당 디스크 장치에 요청한 쓰기 요청 횟수
# rMB/s : 초당 디스크 장치에서 읽은 메가바이트 수
# wMB/s : 초당 디스크 장치에 쓴 메가바이트 수
# await : 가장 중요한 지표, 평균 응답 시간. 드라이버 요청 대기열에서 기다린 시간과 장치의 I/O 응답시간을 모두 포함 (단위: ms)
iostat -xmdz 1 -p xvdf
Device:         rrqm/s   wrqm/s     r/s     w/s    rMB/s    wMB/s avgrq-sz avgqu-sz   await r_await w_await  svctm  %util
xvdf              0.00     0.00 2637.93    0.00    10.30     0.00     8.00     6.01    2.28    2.28    0.00   0.33  86.21
--------------------------------------------------------------

# 랜덤 읽기 성능 테스트 수행 : 3분 정도 소요
# libaio 엔진과 다이렉트 I/O를 사용하여 고성능 스토리지의 랜덤 읽기 성능을 측정.
# OS 캐시를 사용하지 않고 직접 디스크 I/O 수행 (direct 플래그)
# numjobs=4, iodepth=16 : 총 4×16 = 64개의 I/O 요청이 동시에 발생
cat << EOF > fio-read.fio
[global]
ioengine=libaio
direct=1
bs=4k
runtime=120
time_based=1
iodepth=16
numjobs=4
group_reporting
size=1g
rw=randread
[read]
EOF
kubestr fio -f fio-read.fio -s local-path --size 10G  # size 미 지정시 기본 100G로 노드 Disk full 발생하니 유의
PVC created kubestr-fio-pvc-2vb4d
Pod created kubestr-fio-pod-qxk9n
Running FIO test (fio-read.fio) on StorageClass (local-path) with a PVC of Size (10G)
Elapsed time- 2m33.076009889s
FIO test results:

FIO version - fio-3.36
Global options - ioengine=libaio verify= direct=1 gtod_reduce=

JobName:
  blocksize= filesize= iodepth= rw=
read:
  IOPS=3023.104980 BW(KiB/s)=12092
  iops: min=2296 max=8990 avg=3025.083740
  bw(KiB/s): min=9184 max=35964 avg=12101.171875

Disk stats (read/write):
  nvme0n1: ios=362317/233 merge=0/46 ticks=6370991/4525 in_queue=6375516, util=96.027565%
  -  OK


# (참고) [NVMe] Read 평균 IOPS는 20300
kubestr fio -f fio-read.fio -s local-path --size 10G
...
read:
  IOPS=20300.531250 BW(KiB/s)=81202
  iops: min=17304 max=71653 avg=20309.919922
  bw(KiB/s): min=69216 max=286612 avg=81239.710938

# 랜덤 쓰기 성능 테스트 수행 : 5분 정도 소요
# numjobs=16, iodepth=16 : 총 16×16 = 256개의 I/O 요청이 동시에 발생
cat << EOF > fio-write.fio
[global]
ioengine=libaio
numjobs=16
iodepth=16
direct=1
bs=4k
runtime=120
time_based=1
size=1g
group_reporting
rw=randrw
rwmixread=0
rwmixwrite=100
[write]
EOF
kubestr fio -f fio-write.fio -s local-path --size 20G

PVC created kubestr-fio-pvc-gbhd7
Pod created kubestr-fio-pod-nnspc
Running FIO test (fio-write.fio) on StorageClass (local-path) with a PVC of Size (20G)
Elapsed time- 4m10.87950175s
FIO test results:

FIO version - fio-3.36
Global options - ioengine=libaio verify= direct=1 gtod_reduce=

JobName:
  blocksize= filesize= iodepth= rw=
write:
  IOPS=3024.519287 BW(KiB/s)=12098
  iops: min=1470 max=8884 avg=3023.916260
  bw(KiB/s): min=5885 max=35542 avg=12100.133789

Disk stats (read/write):
  nvme0n1: ios=0/362487 merge=0/6 ticks=0/7127615 in_queue=7127615, util=95.196365%
  -  OK
AWS EBS CSI Controller2.1. AWS EBS CSI Controller?2.2. 설치 : Amazon EBS CSI driver as an Amazon EKS add-on - Parameters
# 아래는 aws-ebs-csi-driver 전체 버전 정보와 기본 설치 버전(True) 정보 확인
aws eks describe-addon-versions \
    --addon-name aws-ebs-csi-driver \
    --kubernetes-version 1.31 \
    --query "addons[].addonVersions[].[addonVersion, compatibilities[].defaultVersion]" \
    --output text

# ISRA 설정 : AWS관리형 정책 AmazonEBSCSIDriverPolicy 사용
# Pod Identity 설정도 가능함!
eksctl create iamserviceaccount \
  --name ebs-csi-controller-sa \
  --namespace kube-system \
  --cluster ${CLUSTER_NAME} \
  --attach-policy-arn arn:aws:iam::aws:policy/service-role/AmazonEBSCSIDriverPolicy \
  --approve \
  --role-only \
  --role-name AmazonEKS_EBS_CSI_DriverRole

# IRSA 확인
eksctl get iamserviceaccount --cluster ${CLUSTER_NAME}
NAMESPACE	    NAME				            ROLE ARN
kube-system     ebs-csi-controller-sa           arn:aws:iam::[AWS_ACCOUNT_ID]:role/AmazonEKS_EBS_CSI_DriverRole
...

# Amazon EBS CSI driver addon 배포(설치)
export ACCOUNT_ID=$(aws sts get-caller-identity --query 'Account' --output text)
eksctl create addon --name aws-ebs-csi-driver --cluster ${CLUSTER_NAME} --service-account-role-arn arn:aws:iam::${ACCOUNT_ID}:role/AmazonEKS_EBS_CSI_DriverRole --force
kubectl get sa -n kube-system ebs-csi-controller-sa -o yaml | head -5

# 확인
eksctl get addon --cluster ${CLUSTER_NAME}
kubectl get deploy,ds -l=app.kubernetes.io/name=aws-ebs-csi-driver -n kube-system
kubectl get pod -n kube-system -l 'app in (ebs-csi-controller,ebs-csi-node)'
kubectl get pod -n kube-system -l app.kubernetes.io/component=csi-driver

# ebs-csi-controller 파드에 6개 컨테이너 확인
kubectl get pod -n kube-system -l app=ebs-csi-controller -o jsonpath='{.items[0].spec.containers[*].name}' ; echo
ebs-plugin csi-provisioner csi-attacher csi-snapshotter csi-resizer liveness-probe

# csinodes 확인
kubectl api-resources | grep -i csi
kubectl get csinodes

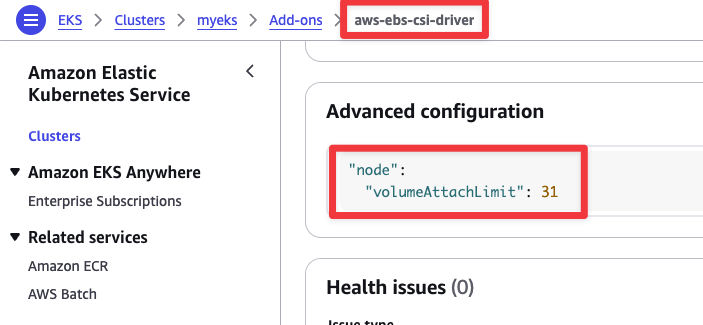
# .Spec.Drivers.ebs.csi.aws.com.Allocatable.Count: 25 는 해당 node에 attache 될 수 있는 ebs volume의 개수를 말한다.
# defautl가 25이며, 설정을 통해 변경할 수 있다. 하지만, 각 node마다 limit이 있으니 확인이 필요하다.
kubectl describe csinodes
...
Name:               ip-192-168-1-82.ap-northeast-2.compute.internal
Labels:             <none>
Annotations:        storage.alpha.kubernetes.io/migrated-plugins:
                      kubernetes.io/aws-ebs,kubernetes.io/azure-disk,kubernetes.io/azure-file,kubernetes.io/cinder,kubernetes.io/gce-pd,kubernetes.io/portworx-v...
CreationTimestamp:  Sat, 22 Feb 2025 12:22:56 +0900
Spec:
  Drivers:
    ebs.csi.aws.com:
      Node ID:  i-032400d65815f4b87
      Allocatables:
        Count:        25
      Topology Keys:  [kubernetes.io/os topology.ebs.csi.aws.com/zone topology.kubernetes.io/zone]
Events:               <none>
...

kubectl get csidrivers
NAME              ATTACHREQUIRED   PODINFOONMOUNT   STORAGECAPACITY   TOKENREQUESTS   REQUIRESREPUBLISH   MODES        AGE
ebs.csi.aws.com   true             false            false             <unset>         false               Persistent   109s
efs.csi.aws.com   false            false            false             <unset>         false               Persistent   40m

kubectl describe csidrivers ebs.csi.aws.com


# (참고) 노드에 최대 EBS 부착 수량 변경
aws eks update-addon --cluster-name ${CLUSTER_NAME} --addon-name aws-ebs-csi-driver \
  --addon-version v1.39.0-eksbuild.1 --configuration-values '{
    "node": {
      "volumeAttachLimit": 31,
      "enableMetrics": true
    }
  }'
혹은
cat << EOF > node-attachments.yaml
"node":
  "volumeAttachLimit": 31
  "enableMetrics": true
EOF
aws eks update-addon --cluster-name ${CLUSTER_NAME} --addon-name aws-ebs-csi-driver \
  --addon-version v1.39.0-eksbuild.1 --configuration-values 'file://node-attachments.yaml'


## 확인
kubectl get ds -n kube-system ebs-csi-node -o yaml
...
      containers:
      - args:
        - node
        - --endpoint=$(CSI_ENDPOINT)
        - --csi-mount-point-prefix=/var/lib/kubelet/plugins/kubernetes.io/csi/ebs.csi.aws.com/
        - --volume-attach-limit=31
        - --logging-format=text
        - --v=2

kubectl describe csinodes
...
Name:               ip-192-168-1-82.ap-northeast-2.compute.internal
Labels:             <none>
Annotations:        storage.alpha.kubernetes.io/migrated-plugins:
                      kubernetes.io/aws-ebs,kubernetes.io/azure-disk,kubernetes.io/azure-file,kubernetes.io/cinder,kubernetes.io/gce-pd,kubernetes.io/portworx-v...
CreationTimestamp:  Sat, 22 Feb 2025 12:22:56 +0900
Spec:
  Drivers:
    ebs.csi.aws.com:
      Node ID:  i-032400d65815f4b87
      Allocatables:
        Count:        31
      Topology Keys:  [kubernetes.io/os topology.ebs.csi.aws.com/zone topology.kubernetes.io/zone]
Events:               <none>
Volume (ebs-csi-controller) : EBS CSI driver 동작 : 볼륨 생성 및 파드에 볼륨 연결 - 링크 , Docs , EBS
AWS CSI 드라이버는 크게 2개 구성요소가 있습니다. AWS API를 호출하면서 AWS 스토리지를 관리하는 CSI-Controller와 kubelet과 상호작용하면서 AWS스토리지를 pod에 마운트하는 CSI-Node가 있습니다.
EFS와 같이 NFS의 경우는 여러명이 동시에 접근하는 ReadWriteMany가 가능하지만, EBS의 경우 결국 local storage처럼 사용하기 때문에 ReadWriteOnce로 설정해야 한다.
EBS스토리지 기본 설정이 동일 AZ에 있는 EC2 인스턴스(에 배포된 파드)에 연결해야 합니다 - Why? 파드 스케줄링 방안은?
EBS는 결국 Network storage이므로 Worker node와 같은 az에 존재하는 EBS를 사용해야 latency를 보장 받을 수 잇다.
AWS EBS CSI Controller를 통해 pv로 EBS를 생성하면, pv의 nodeAffinity에 의해서 특정 az에 있는 node에만 attach 될 수 있도록한다.
2.3. gp3 스토리지 클래스 생성 : AWS EBS 스토리지 클래스 파라미터 - 링크 , Parameters
# default로 gp2 sc가 생성되어있음
kubectl get sc
NAME         PROVISIONER             RECLAIMPOLICY   VOLUMEBINDINGMODE      ALLOWVOLUMEEXPANSION   AGE
gp2          kubernetes.io/aws-ebs   Delete          WaitForFirstConsumer   false                  38h

# gp3 스토리지 클래스 생성
cat <<EOF | kubectl apply -f -
kind: StorageClass
apiVersion: storage.k8s.io/v1
metadata:
  name: gp3
  annotations:
    storageclass.kubernetes.io/is-default-class: "true"
allowVolumeExpansion: true
provisioner: ebs.csi.aws.com
volumeBindingMode: WaitForFirstConsumer
parameters:
  type: gp3
  #iops: "5000"
  #throughput: "250"
  allowAutoIOPSPerGBIncrease: 'true'
  encrypted: 'true'
  fsType: xfs # 기본값이 ext4
EOF

# gp3 sc 생성 후 annotation을 통해 default를 gp3로 변경
kubectl get sc
NAME            PROVISIONER             RECLAIMPOLICY   VOLUMEBINDINGMODE      ALLOWVOLUMEEXPANSION   AGE
gp2             kubernetes.io/aws-ebs   Delete          WaitForFirstConsumer   false                  38h
gp3 (default)   ebs.csi.aws.com         Delete          WaitForFirstConsumer   true                   5s

kubectl describe sc gp3 | grep Parameters

# gp3 속도 테스트 : iops,bw 가 hostPath에서 테스트한 루트 볼륨(gp3)와 동일하여 아래 테스트도 동일함.
while true; do aws ec2 describe-volumes --filters Name=tag:ebs.csi.aws.com/cluster,Values=true --query "Volumes[].{VolumeId: VolumeId, VolumeType: VolumeType, InstanceId: Attachments[0].InstanceId, State: Attachments[0].State}" --output text; date; sleep 1; done
kubestr fio -f fio-read.fio -s gp3 --size 10G
volumeBindingMode 필드는 볼륨 바인딩과 동적 프로비저닝의 시작 시기를 제어합니다. 설정되어 있지 않으면, Immediate 모드가 기본으로 사용된다.
Immediate 모드는 퍼시스턴트볼륨클레임이 생성되면 볼륨 바인딩과 동적 프로비저닝이 즉시 발생하는 것을 나타냅니다. 토폴로지 제약이 있고 클러스터의 모든 노드에서 전역적으로 접근할 수 없는 스토리지 백엔드의 경우, 파드의 스케줄링 요구 사항에 대한 파악없이 퍼시스턴트볼륨이 바인딩되거나 프로비저닝되며, 이로 인해 스케줄되지 않은 파드가 발생할 수 있습니다.
WaitForFirstConsumer 모드를 지정해서 이 문제를 해결할 수 있는데 이 모드는 퍼시스턴트볼륨클레임을 사용하는 파드가 생성될 때까지 퍼시스턴트볼륨의 바인딩과 프로비저닝을 지연시킵니다. 퍼시스턴트볼륨은 파드의 스케줄링 제약 조건에 의해 지정된 토폴로지에 따라 선택되거나 프로비저닝 됩니다. 여기에는 리소스 요구 사항, 노드 셀렉터, 파드 어피니티(affinity)와 안티-어피니티(anti-affinity) 그리고 테인트(taint)와 톨러레이션(toleration)이 포함됩니다. → EBS CSI Controller의 StorageClass의 역우 WaitForFirstConsumer를 주로 사용
2.4. PVC/PV 파드 테스트
# 워커노드의 EBS 볼륨 확인 : tag(키/값) 필터링 - 링크
aws ec2 describe-volumes --filters Name=tag:Name,Values=$CLUSTER_NAME-ng1-Node --output table
aws ec2 describe-volumes --filters Name=tag:Name,Values=$CLUSTER_NAME-ng1-Node --query "Volumes[*].Attachments" | jq
aws ec2 describe-volumes --filters Name=tag:Name,Values=$CLUSTER_NAME-ng1-Node --query "Volumes[*].{ID:VolumeId,Tag:Tags}" | jq
aws ec2 describe-volumes --filters Name=tag:Name,Values=$CLUSTER_NAME-ng1-Node --query "Volumes[].[VolumeId, VolumeType, Attachments[].[InstanceId, State][]][]" | jq
aws ec2 describe-volumes --filters Name=tag:Name,Values=$CLUSTER_NAME-ng1-Node --query "Volumes[].{VolumeId: VolumeId, VolumeType: VolumeType, InstanceId: Attachments[0].InstanceId, State: Attachments[0].State}" | jq

# 워커노드에서 파드에 추가한 EBS 볼륨 확인
aws ec2 describe-volumes --filters Name=tag:ebs.csi.aws.com/cluster,Values=true --output table
aws ec2 describe-volumes --filters Name=tag:ebs.csi.aws.com/cluster,Values=true --query "Volumes[*].{ID:VolumeId,Tag:Tags}" | jq
aws ec2 describe-volumes --filters Name=tag:ebs.csi.aws.com/cluster,Values=true --query "Volumes[].{VolumeId: VolumeId, VolumeType: VolumeType, InstanceId: Attachments[0].InstanceId, State: Attachments[0].State}" | jq

# 워커노드에서 파드에 추가한 EBS 볼륨 모니터링
while true; do aws ec2 describe-volumes --filters Name=tag:ebs.csi.aws.com/cluster,Values=true --query "Volumes[].{VolumeId: VolumeId, VolumeType: VolumeType, InstanceId: Attachments[0].InstanceId, State: Attachments[0].State}" --output text; date; sleep 1; done

# PVC 생성
cat <<EOF | kubectl apply -f -
apiVersion: v1
kind: PersistentVolumeClaim
metadata:
  name: ebs-claim
spec:
  accessModes:
    - ReadWriteOnce
  resources:
    requests:
      storage: 4Gi
  storageClassName: gp3
EOF
kubectl get pvc,pv

# 파드 생성
cat <<EOF | kubectl apply -f -
apiVersion: v1
kind: Pod
metadata:
  name: app
spec:
  terminationGracePeriodSeconds: 3
  containers:
  - name: app
    image: centos
    command: ["/bin/sh"]
    args: ["-c", "while true; do echo \$(date -u) >> /data/out.txt; sleep 5; done"]
    volumeMounts:
    - name: persistent-storage
      mountPath: /data
  volumes:
  - name: persistent-storage
    persistentVolumeClaim:
      claimName: ebs-claim
EOF

# PVC, 파드 확인
kubectl get pvc,pv,pod
NAME                              STATUS   VOLUME                                     CAPACITY   ACCESS MODES   STORAGECLASS   VOLUMEATTRIBUTESCLASS   AGE
persistentvolumeclaim/ebs-claim   Bound    pvc-b589d963-81fd-491b-b5ff-795221b99dd8   4Gi        RWO            gp3            <unset>                 3m57s

NAME                                                        CAPACITY   ACCESS MODES   RECLAIM POLICY   STATUS   CLAIM               STORAGECLASS   VOLUMEATTRIBUTESCLASS   REASON   AGE
persistentvolume/pvc-b589d963-81fd-491b-b5ff-795221b99dd8   4Gi        RWO            Delete           Bound    default/ebs-claim   gp3            <unset>                          101s

NAME      READY   STATUS    RESTARTS   AGE
pod/app   1/1     Running   0          103s

kubectl get VolumeAttachment
NAME                                                                   ATTACHER          PV                                         NODE                                              ATTACHED   AGE
csi-63cf812a6be41206eea93af7bb2eba870e287106be5d1de369caba2fcfc70aa8   ebs.csi.aws.com   pvc-b589d963-81fd-491b-b5ff-795221b99dd8   ip-192-168-3-19.ap-northeast-2.compute.internal   true       100s

kubectl df-pv
 PV NAME                                   PVC NAME   NAMESPACE  NODE NAME                                        POD NAME  VOLUME MOUNT NAME   SIZE  USED  AVAILABLE  %USED  IUSED  IFREE    %IUSED
 pvc-b589d963-81fd-491b-b5ff-795221b99dd8  ebs-claim  default    ip-192-168-3-19.ap-northeast-2.compute.internal  app       persistent-storage  3Gi   60Mi  3Gi        1.50   3      2097149  0.00

# 추가된 EBS 볼륨 상세 정보 확인 : AWS 관리콘솔 EC2(EBS)에서 확인
aws ec2 describe-volumes --volume-ids $(kubectl get pv -o jsonpath="{.items[0].spec.csi.volumeHandle}") | jq

# PV 상세 확인 : nodeAffinity 내용의 의미는?
# 아래에서 pod와 node정보에서 볼 수 있듯이, 해당 pvc를 통해서 pv를 생성한 pod가 node3(apne2-az3 = apne2c)에 존재하므로
# pv도 자동으로 nodeAffinity를 통해서 apne2c에 생성되도록 설정된것이다.
kubectl get pv -o yaml
...
    nodeAffinity:
      required:
        nodeSelectorTerms:
        - matchExpressions:
          - key: topology.kubernetes.io/zone
            operator: In
            values:
            - ap-northeast-2c
...

kubectl get po -o wide
NAME   READY   STATUS    RESTARTS   AGE    IP              NODE                                              NOMINATED NODE   READINESS GATES
app    1/1     Running   0          4m1s   192.168.3.135   ip-192-168-3-19.ap-northeast-2.compute.internal   <none>           <none>

kubectl get node --label-columns=topology.ebs.csi.aws.com/zone,topology.k8s.aws/zone-id
NAME                                              STATUS   ROLES    AGE   VERSION               ZONE              ZONE-ID
ip-192-168-1-82.ap-northeast-2.compute.internal   Ready    <none>   94m   v1.31.5-eks-5d632ec   ap-northeast-2a   apne2-az1
ip-192-168-2-80.ap-northeast-2.compute.internal   Ready    <none>   94m   v1.31.5-eks-5d632ec   ap-northeast-2b   apne2-az2
ip-192-168-3-19.ap-northeast-2.compute.internal   Ready    <none>   94m   v1.31.5-eks-5d632ec   ap-northeast-2c   apne2-az3

kubectl describe node

# 파일 내용 추가 저장 확인
kubectl exec app -- tail -f /data/out.txt

## 파드 내에서 볼륨 정보 확인
kubectl exec -it app -- sh -c 'df -hT --type=overlay'
kubectl exec -it app -- sh -c 'df -hT --type=xfs'
# 현재 pv 의 이름을 기준하여 4G > 10G 로 증가 : .spec.resources.requests.storage의 4Gi 를 10Gi로 변경
kubectl get pvc ebs-claim -o jsonpath={.spec.resources.requests.storage} ; echo
kubectl get pvc ebs-claim -o jsonpath={.status.capacity.storage} ; echo
kubectl patch pvc ebs-claim -p '{"spec":{"resources":{"requests":{"storage":"10Gi"}}}}'
kubectl patch pvc ebs-claim -p '{"status":{"capacity":{"storage":"10Gi"}}}' # status 는 바로 위 커멘드 적용 후 EBS 10Gi 확장 후 알아서 10Gi 반영됨

# 확인 : 볼륨 용량 수정 반영이 되어야 되니, 수치 반영이 조금 느릴수 있다
kubectl exec -it app -- sh -c 'df -hT --type=xfs'

kubectl df-pv
 PV NAME                                   PVC NAME   NAMESPACE  NODE NAME                                        POD NAME  VOLUME MOUNT NAME   SIZE  USED   AVAILABLE  %USED  IUSED  IFREE    %IUSED
 pvc-b589d963-81fd-491b-b5ff-795221b99dd8  ebs-claim  default    ip-192-168-3-19.ap-northeast-2.compute.internal  app       persistent-storage  9Gi   104Mi  9Gi        1.02   4      5242876  0.00
aws ec2 describe-volumes --volume-ids $(kubectl get pv -o jsonpath="{.items[0].spec.csi.volumeHandle}") | jq
삭제
kubectl delete pod app & kubectl delete pvc ebs-claim
참고
Use multiple EBS volumes for containers : 파드를 위한 저장소를 신규 EBS 디스크 사용하게 설정 - 링크
# PVC 생성
cat <<EOF | kubectl apply -f -
apiVersion: v1
kind: PersistentVolumeClaim
metadata:
  name: ebs-claim
spec:
  accessModes:
    - ReadWriteOnce
  resources:
    requests:
      storage: 4Gi
  storageClassName: gp3
EOF
kubectl get pvc,pv

# 파드 생성
cat <<EOF | kubectl apply -f -
apiVersion: v1
kind: Pod
metadata:
  name: app
spec:
  terminationGracePeriodSeconds: 3
  containers:
  - name: app
    image: centos
    command: ["/bin/sh"]
    args: ["-c", "while true; do echo \$(date -u) >> /data/out.txt; sleep 5; done"]
    volumeMounts:
    - name: persistent-storage
      mountPath: /data
  volumes:
  - name: persistent-storage
    persistentVolumeClaim:
      claimName: ebs-claim
EOF

# 파일 내용 추가 저장 확인
kubectl exec app -- tail -f /data/out.txt

Sat Feb 22 05:24:49 UTC 2025
Sat Feb 22 05:24:54 UTC 2025
Sat Feb 22 05:24:59 UTC 2025
Sat Feb 22 05:25:04 UTC 2025

# VolumeSnapshot 생성 : Create a VolumeSnapshot referencing the PersistentVolumeClaim name
# AWS 관리 콘솔 EBS 스냅샷 확인
cat <<EOF | kubectl apply -f -
apiVersion: snapshot.storage.k8s.io/v1
kind: VolumeSnapshot
metadata:
  name: ebs-volume-snapshot
spec:
  volumeSnapshotClassName: csi-aws-vsc
  source:
    persistentVolumeClaimName: ebs-claim
EOF

# VolumeSnapshot 확인
kubectl get volumesnapshot
kubectl get volumesnapshot ebs-volume-snapshot -o jsonpath={.status.boundVolumeSnapshotContentName} ; echo

# 실제로 console에서 UID를 suffix로 하여 snapshot name(= myeks-dynamic-snapshot-7f895264-f123-492a-809b-6dd9edc2dbb3)과
# CSIVolumeSnapshotName(= snapshot-7f895264-f123-492a-809b-6dd9edc2dbb3) tag가 붙는다.
kubectl describe volumesnapshot.snapshot.storage.k8s.io ebs-volume-snapshot
Name:         ebs-volume-snapshot
Namespace:    default
Labels:       <none>
Annotations:  <none>
API Version:  snapshot.storage.k8s.io/v1
Kind:         VolumeSnapshot
Metadata:
  Creation Timestamp:  2025-02-22T05:25:49Z
  Finalizers:
    snapshot.storage.kubernetes.io/volumesnapshot-as-source-protection
    snapshot.storage.kubernetes.io/volumesnapshot-bound-protection
  Generation:        1
  Resource Version:  438278
  UID:               7f895264-f123-492a-809b-6dd9edc2dbb3
Spec:
  Source:
    Persistent Volume Claim Name:  ebs-claim
  Volume Snapshot Class Name:      csi-aws-vsc
Status:
  Bound Volume Snapshot Content Name:  snapcontent-7f895264-f123-492a-809b-6dd9edc2dbb3
  Creation Time:                       2025-02-22T05:25:50Z
  Ready To Use:                        true
  Restore Size:                        4Gi
# snapshot을 생성하는데 총 70s가 소요됨.
Events:
  Type    Reason            Age   From                 Message
  ----    ------            ----  ----                 -------
  Normal  CreatingSnapshot  70s   snapshot-controller  Waiting for a snapshot default/ebs-volume-snapshot to be created by the CSI driver.
  Normal  SnapshotCreated   69s   snapshot-controller  Snapshot default/ebs-volume-snapshot was successfully created by the CSI driver.
  Normal  SnapshotReady     3s    snapshot-controller  Snapshot default/ebs-volume-snapshot is ready to use

# cnosole에 있는 내용을 volumesnapshotcontents라는 cr를 통해서 확인 할 수 있다.
kubectl get volumesnapshotcontents
NAME                                               READYTOUSE   RESTORESIZE   DELETIONPOLICY   DRIVER            VOLUMESNAPSHOTCLASS   VOLUMESNAPSHOT        VOLUMESNAPSHOTNAMESPACE   AGE
snapcontent-7f895264-f123-492a-809b-6dd9edc2dbb3   true         4294967296    Delete           ebs.csi.aws.com   csi-aws-vsc           ebs-volume-snapshot   default                   6m3s

# VolumeSnapshot ID 확인 가능하며, console에서 id를 통해서 조회가 가능
kubectl get volumesnapshotcontents -o jsonpath='{.items[*].status.snapshotHandle}' ; echo
snap-0f4b2c906c8bcb149

# AWS EBS 스냅샷 확인
aws ec2 describe-snapshots --owner-ids self | jq
aws ec2 describe-snapshots --owner-ids self --query 'Snapshots[]' --output table
--------------------------------------------------------------------------------------------------------
|                                           DescribeSnapshots                                          |
+----------------+-------------------------------------------------------------------------------------+
|  CompletionTime|  2025-02-22T05:26:39.366000+00:00                                                   |
|  Description   |  Created by AWS EBS CSI driver for volume vol-028eaa7563844afb2                     |
|  Encrypted     |  True                                                                               |
|  KmsKeyId      |  arn:aws:kms:ap-northeast-2:[AWS_ACCOUNT_ID]:key/82e9dab9-5cd2-460d-86f1-958347fa89a1   |
|  OwnerId       |  [AWS_CCOUNT_ID]                                                                       |
|  Progress      |  100%                                                                               |
|  SnapshotId    |  snap-0f4b2c906c8bcb149                                                             |
|  StartTime     |  2025-02-22T05:25:50.124000+00:00                                                   |
|  State         |  completed                                                                          |
|  StorageTier   |  standard                                                                           |
|  TransferType  |  standard                                                                           |
|  VolumeId      |  vol-028eaa7563844afb2                                                              |
|  VolumeSize    |  4                                                                                  |
+----------------+-------------------------------------------------------------------------------------+
||                                                Tags                                                ||
|+--------------------------------+-------------------------------------------------------------------+|
||               Key              |                               Value                               ||
|+--------------------------------+-------------------------------------------------------------------+|
||  Name                          |  myeks-dynamic-snapshot-7f895264-f123-492a-809b-6dd9edc2dbb3      ||
||  ebs.csi.aws.com/cluster       |  true                                                             ||
||  CSIVolumeSnapshotName         |  snapshot-7f895264-f123-492a-809b-6dd9edc2dbb3                    ||
||  kubernetes.io/cluster/myeks   |  owned                                                            ||
|+--------------------------------+-------------------------------------------------------------------+|

# app & pvc 제거 : 강제로 장애 재현
kubectl delete pod app && kubectl delete pvc ebs-claim
스냅샷으로 복원
# 스냅샷에서 PVC 로 복원
# pvc를 생성시, .spec.dataSource에 volumesnapshot name을 지정해주면, pod가 pvc를 통해 pv를 생성할때 해당 snapshot을 통해서 ebs volume(=pv)를 생성한다.
kubectl get pvc,pv
cat <<EOF | kubectl apply -f -
apiVersion: v1
kind: PersistentVolumeClaim
metadata:
  name: ebs-snapshot-restored-claim
spec:
  storageClassName: gp3
  accessModes:
    - ReadWriteOnce
  resources:
    requests:
      storage: 4Gi
  dataSource:
    name: ebs-volume-snapshot
    kind: VolumeSnapshot
    apiGroup: snapshot.storage.k8s.io
EOF

# 확인
kubectl get pvc,pv

# 파드 생성
cat <<EOF | kubectl apply -f -
apiVersion: v1
kind: Pod
metadata:
  name: app
spec:
  terminationGracePeriodSeconds: 3
  containers:
  - name: app
    image: centos
    command: ["/bin/sh"]
    args: ["-c", "while true; do echo \$(date -u) >> /data/out.txt; sleep 5; done"]
    volumeMounts:
    - name: persistent-storage
      mountPath: /data
  volumes:
  - name: persistent-storage
    persistentVolumeClaim:
      claimName: ebs-snapshot-restored-claim
EOF

# 파일 내용 저장 확인 : 파드 삭제 전까지의 저장 기록이 남아 있다. 이후 파드 재생성 후 기록도 잘 저장되고 있다
# 중간에 약 12분정도의 데이터가 빈다. 이를 통해서 snapshot을 통해서 이전에 사용했던 데이터를 유지한 ebs volume이 생성 된것을 볼 수 있다.
kubectl exec app -- cat /data/out.txt
...

Sat Feb 22 05:25:09 UTC 2025
Sat Feb 22 05:25:14 UTC 2025
Sat Feb 22 05:25:19 UTC 2025
Sat Feb 22 05:25:24 UTC 2025
Sat Feb 22 05:25:29 UTC 2025
Sat Feb 22 05:25:34 UTC 2025
Sat Feb 22 05:37:25 UTC 2025
Sat Feb 22 05:37:30 UTC 2025
...

# 삭제
kubectl delete pod app && kubectl delete pvc ebs-snapshot-restored-claim && kubectl delete volumesnapshots ebs-volume-snapshot
AWS EFS Controller4.1. EFS 파일시스템 확인 및 EFS Controller Addon 설치 - Docs , Github
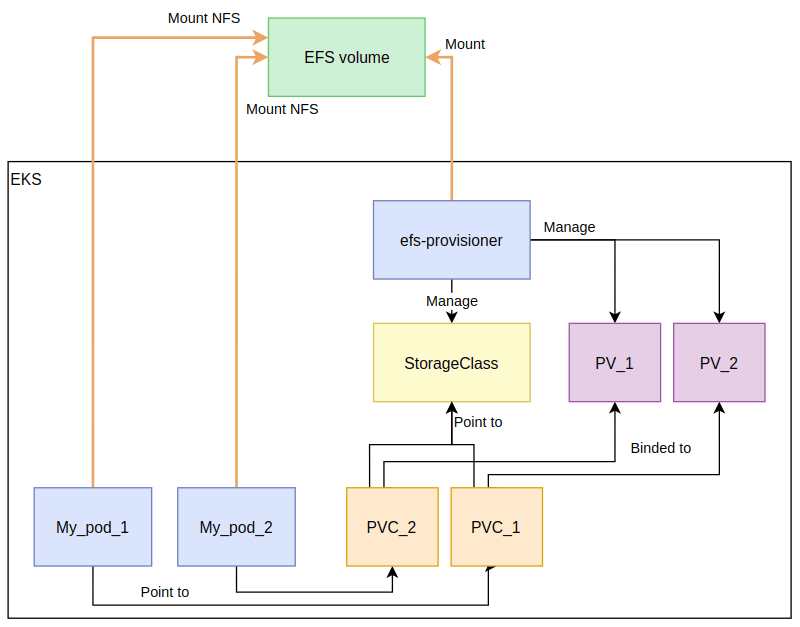
구성 아키텍처
# EFS 정보 확인
aws efs describe-file-systems --query "FileSystems[*].FileSystemId" --output text

# 아래는 aws-efs-csi-driver 전체 버전 정보와 기본 설치 버전(True) 정보 확인
aws eks describe-addon-versions \
    --addon-name aws-efs-csi-driver \
    --kubernetes-version 1.31 \
    --query "addons[].addonVersions[].[addonVersion, compatibilities[].defaultVersion]" \
    --output text

# IAM 정책 생성
curl -s -O https://raw.githubusercontent.com/kubernetes-sigs/aws-efs-csi-driver/master/docs/iam-policy-example.json
aws iam create-policy --policy-name AmazonEKS_EFS_CSI_Driver_Policy --policy-document file://iam-policy-example.json

# IRSA 설정 : 고객관리형 정책 AmazonEKS_EFS_CSI_Driver_Policy 사용
eksctl create iamserviceaccount \
  --name efs-csi-controller-sa \
  --namespace kube-system \
  --cluster ${CLUSTER_NAME} \
  --attach-policy-arn arn:aws:iam::aws:policy/service-role/AmazonEFSCSIDriverPolicy \
  --approve \
  --role-only \
  --role-name AmazonEKS_EFS_CSI_DriverRole

# ISRA 확인
eksctl get iamserviceaccount --cluster ${CLUSTER_NAME}

NAMESPACE       NAME                            ROLE ARN
kube-system     efs-csi-controller-sa           arn:aws:iam::[ACCOUNT_ID]:role/AmazonEKS_EFS_CSI_DriverRole

# Amazon EFS CSI driver addon 배포(설치)
export ACCOUNT_ID=$(aws sts get-caller-identity --query 'Account' --output text)
eksctl create addon --name aws-efs-csi-driver --cluster ${CLUSTER_NAME} --service-account-role-arn arn:aws:iam::${ACCOUNT_ID}:role/AmazonEKS_EFS_CSI_DriverRole --force
kubectl get sa -n kube-system efs-csi-controller-sa -o yaml | head -5

# 확인
# ebs csi driver는 pod identity 사용중. efs-csi-driver는 IRSA 사용.
eksctl get addon --cluster ${CLUSTER_NAME}
NAME                    VERSION                 STATUS  ISSUES  IAMROLE                                                                         UPDATE AVAILABLE        CONFIGURATION VALUES         POD IDENTITY ASSOCIATION ROLES
aws-ebs-csi-driver      v1.39.0-eksbuild.1      ACTIVE  0                                                                                                               {
    "node": {
      "volumeAttachLimit": 31,
      "enableMetrics": true
    }
  }
aws-efs-csi-driver      v2.1.4-eksbuild.1       ACTIVE  0       arn:aws:iam::715841333265:role/AmazonEKS_EFS_CSI_DriverRole

kubectl get pod -n kube-system -l "app.kubernetes.io/name=aws-efs-csi-driver,app.kubernetes.io/instance=aws-efs-csi-driver"
kubectl get pod -n kube-system -l app=efs-csi-controller -o jsonpath='{.items[0].spec.containers[*].name}' ; echo
kubectl get csidrivers efs.csi.aws.com -o yaml
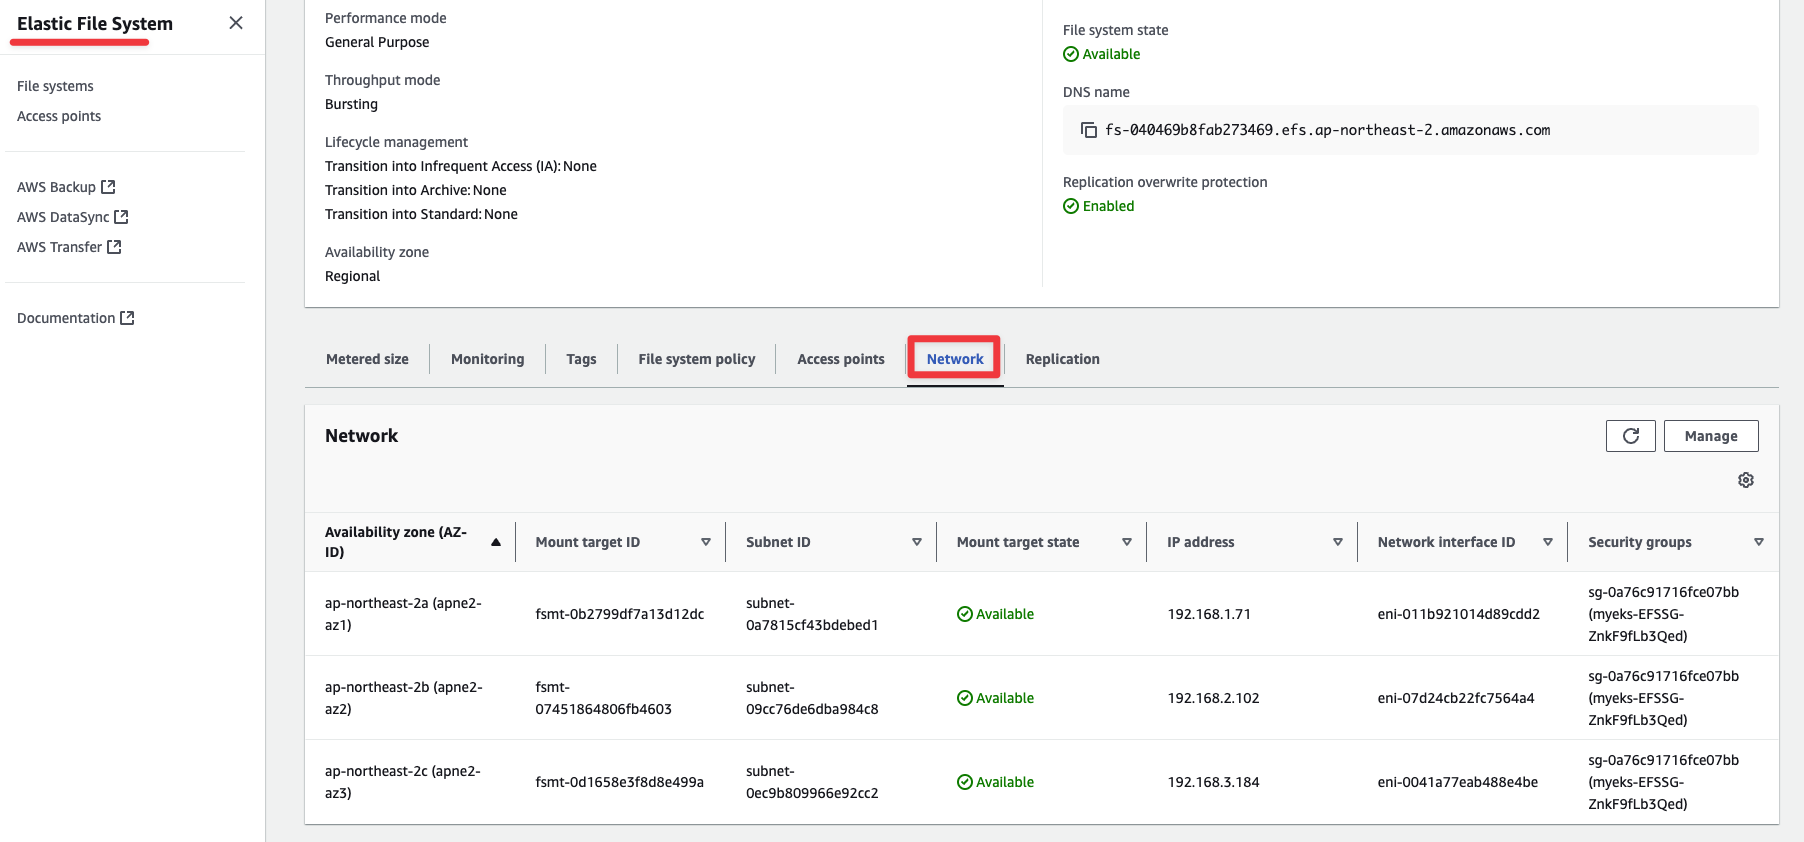
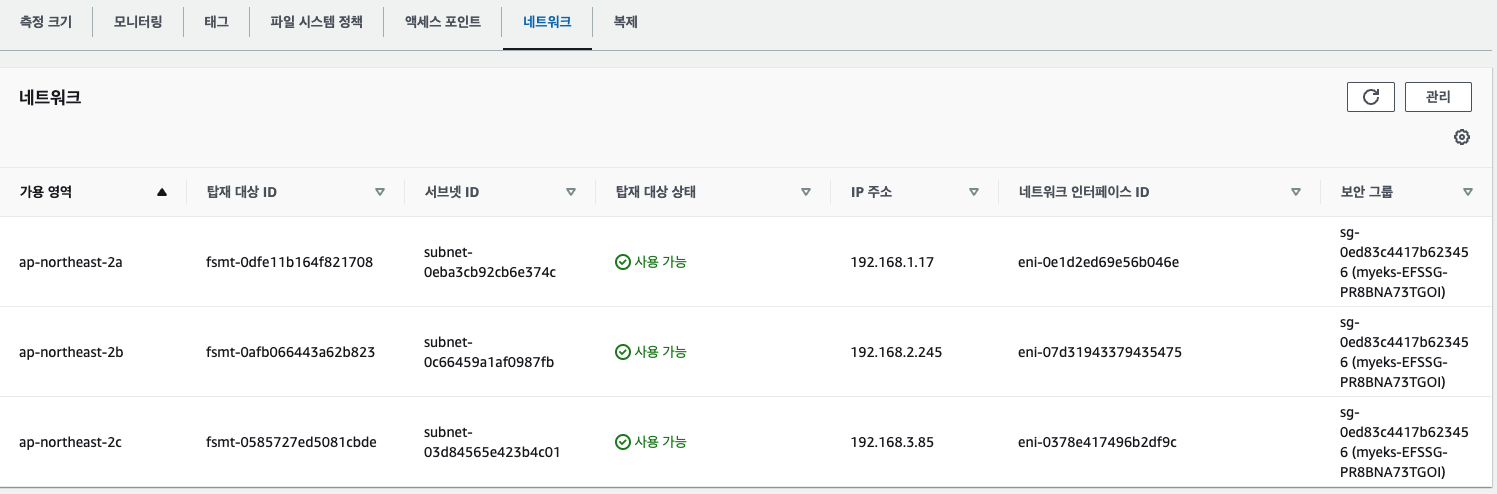
AWS → EFS → 파일 시스템 : 네트워크 확인
4.2. EFS 파일시스템을 파드가 사용하게 설정 : Add empty StorageClasses from static example - Workshop링크
# 모니터링
watch 'kubectl get sc efs-sc; echo; kubectl get pv,pvc,pod'

# [운영 서버 EC2]
# 실습 코드 clone
git clone https://github.com/kubernetes-sigs/aws-efs-csi-driver.git /root/efs-csi
cd /root/efs-csi/examples/kubernetes/multiple_pods/specs && tree
├── claim.yaml
├── pod1.yaml
├── pod2.yaml
├── pv.yaml
└── storageclass.yaml

# EFS 스토리지클래스 생성 및 확인
cat storageclass.yaml
kubectl apply -f storageclass.yaml
kubectl get sc efs-sc

# PV 생성 및 확인 : volumeHandle을 자신의 EFS 파일시스템ID로 변경
EfsFsId=$(aws efs describe-file-systems --query "FileSystems[*].FileSystemId" --output text)
sed -i "s/fs-4af69aab/$EfsFsId/g" pv.yaml
cat pv.yaml
apiVersion: v1
kind: PersistentVolume
metadata:
  name: efs-pv
spec:
  capacity:
    storage: 5Gi
  volumeMode: Filesystem
  accessModes:
    - ReadWriteMany
  persistentVolumeReclaimPolicy: Retain
  storageClassName: efs-sc
  csi:
    driver: efs.csi.aws.com
    volumeHandle: fs-0c17b0157f6735185
    #volumeAttributes:
    #  path: /your/specific/path  # Path within the EFS file system, Path should be exist on EFS System otherwise pods will not be created

kubectl apply -f pv.yaml

# NFS이므로 Access Modes가 EBS와 달리 RWX(ReadWriteMany)로 설정되어있음
kubectl get pv; kubectl describe pv

Name:            efs-pv
Labels:          <none>
Annotations:     <none>
Finalizers:      [kubernetes.io/pv-protection]
StorageClass:    efs-sc
Status:          Available
Claim:
Reclaim Policy:  Retain
Access Modes:    RWX
VolumeMode:      Filesystem
Capacity:        5Gi
Node Affinity:   <none>
Message:
Source:
    Type:              CSI (a Container Storage Interface (CSI) volume source)
    Driver:            efs.csi.aws.com
    FSType:
    VolumeHandle:      fs-0c17b0157f6735185
    ReadOnly:          false
    VolumeAttributes:  <none>
Events:                <none>

# PVC 생성 및 확인
cat claim.yaml
kubectl apply -f claim.yaml
kubectl get pvc

# 파드 생성 및 연동 : 파드 내에 /data 데이터는 EFS를 사용
# 추후에 파드1,2가 각기 다른 노드에 배포되게 추가해두자!
cat pod1.yaml pod2.yaml
kubectl apply -f pod1.yaml,pod2.yaml
kubectl df-pv

# 파드 정보 확인 : PV에 5Gi 와 파드 내에서 확인한 NFS4 볼륨 크기 8.0E의 차이는 무엇?
kubectl get pods
kubectl exec -ti app1 -- sh -c "df -hT -t nfs4"
kubectl exec -ti app2 -- sh -c "df -hT -t nfs4"
Filesystem           Type            Size      Used Available Use% Mounted on
127.0.0.1:/          nfs4            8.0E         0      8.0E   0% /data

# 공유 저장소 저장 동작 확인
tree /mnt/myefs              # 운영서버 EC2 에서 확인
tail -f /mnt/myefs/out1.txt  # 운영서버 EC2 에서 확인
tail -f /mnt/myefs/out2.txt  # 운영서버 EC2 에서 확인
kubectl exec -ti app1 -- tail -f /data/out1.txt
kubectl exec -ti app2 -- tail -f /data/out2.txt
위에서 설명했듯이 만약 .spec.csi.volumeAttributes에 특정 EFS path를 입력했을때, EFS상에 해당 path가 존재해야 한다. 만약 존재하지 않으면 해당 pv,pvc를 사용하여 pod 생성시 아래와 같은 error가 발생한다.
Events:
  Type     Reason       Age                  From               Message
  ----     ------       ----                 ----               -------
  Normal   Scheduled    2m15s                default-scheduler  Successfully assigned default/app1 to ip-192-168-2-80.ap-northeast-2.compute.internal
  Warning  FailedMount  67s (x8 over 2m15s)  kubelet            MountVolume.SetUp failed for volume "efs-pv" : rpc error: code = Internal desc = Could not mount "fs-0c17b0157f6735185:/k8s/pods" at "/var/lib/kubelet/pods/c37b79d6-d114-43cd-975b-f633797b4e9e/volumes/kubernetes.io~csi/efs-pv/mount": mount failed: exit status 32
Mounting command: mount
Mounting arguments: -t efs -o tls fs-0c17b0157f6735185:/k8s/pods /var/lib/kubelet/pods/c37b79d6-d114-43cd-975b-f633797b4e9e/volumes/kubernetes.io~csi/efs-pv/mount
Output: Could not start amazon-efs-mount-watchdog, unrecognized init system "aws-efs-csi-dri"
b'mount.nfs4: mounting 127.0.0.1:/k8s/pods failed, reason given by server: No such file or directory'
Warning: config file does not have fips_mode_enabled item in section mount.. You should be able to find a new config file in the same folder as current config file /etc/amazon/efs/efs-utils.conf. Consider update the new config file to latest config file. Use the default value [fips_mode_enabled = False].Warning: config file does not have retry_nfs_mount_command item in section mount.. You should be able to find a new config file in the same folder as current config file /etc/amazon/efs/efs-utils.conf. Consider update the new config file to latest config file. Use the default value [retry_nfs_mount_command = True].
# 모니터링
watch 'kubectl get sc efs-sc; echo; kubectl get pv,pvc,pod'

# [운영 서버 EC2]
# EFS 스토리지클래스 생성 및 확인
curl -s -O https://raw.githubusercontent.com/kubernetes-sigs/aws-efs-csi-driver/master/examples/kubernetes/dynamic_provisioning/specs/storageclass.yaml
cat storageclass.yaml
kind: StorageClass
apiVersion: storage.k8s.io/v1
metadata:
  name: efs-sc
provisioner: efs.csi.aws.com
parameters:
  provisioningMode: efs-ap #  The type of volume to be provisioned by Amazon EFS. Currently, only access point based provisioning is supported (efs-ap).
  fileSystemId: fs-92107410 # The file system under which the access point is created.
  directoryPerms: "700" # The directory permissions of the root directory created by the access point.
  gidRangeStart: "1000" # optional, The starting range of the Posix group ID to be applied onto the root directory of the access point. The default value is 50000.
  gidRangeEnd: "2000" # optional, The ending range of the Posix group ID. The default value is 7000000.
  basePath: "/dynamic_provisioning" # optional, The path on the file system under which the access point root directory is created. If the path isn't provided, the access points root directory is created under the root of the file system.
  subPathPattern: "${.PVC.namespace}/${.PVC.name}" # optional, A pattern that describes the subPath under which an access point should be created. So if the pattern were ${.PVC.namespace}/${PVC.name}, the PVC namespace is foo and the PVC name is pvc-123-456, and the basePath is /dynamic_provisioner the access point would be created at /dynamic_provisioner/foo/pvc-123-456
  ensureUniqueDirectory: "true" # optional # A boolean that ensures that, if set, a UUID is appended to the final element of any dynamically provisioned path, as in the above example. This can be turned off but this requires you as the administrator to ensure that your storage classes are set up correctly. Otherwise, it's possible that 2 pods could end up writing to the same directory by accident. Please think very carefully before setting this to false!
  reuseAccessPoint: "false" # optional

sed -i "s/fs-92107410/$EfsFsId/g" storageclass.yaml
kubectl apply -f storageclass.yaml
kubectl get sc efs-sc

# PVC/파드 생성 및 확인
curl -s -O https://raw.githubusercontent.com/kubernetes-sigs/aws-efs-csi-driver/master/examples/kubernetes/dynamic_provisioning/specs/pod.yaml
cat pod.yaml
apiVersion: v1
kind: PersistentVolumeClaim
metadata:
  name: efs-claim
spec:
  accessModes:
    - ReadWriteMany
  storageClassName: efs-sc
  resources:
    requests:
      storage: 5Gi
---
apiVersion: v1
kind: Pod
metadata:
  name: efs-app
spec:
  containers:
    - name: app
      image: centos
      command: ["/bin/sh"]
      args: ["-c", "while true; do echo $(date -u) >> /data/out; sleep 5; done"]
      volumeMounts:
        - name: persistent-storage
          mountPath: /data
  volumes:
    - name: persistent-storage
      persistentVolumeClaim:
        claimName: efs-claim

kubectl apply -f pod.yaml
kubectl get pvc,pv,pod

# PVC/PV 생성 로그 확인
kubectl krew install stern
kubectl stern -n kube-system -l app=efs-csi-controller -c csi-provisioner
혹은
kubectl logs  -n kube-system -l app=efs-csi-controller -c csi-provisioner -f

# 파드 정보 확인
kubectl exec -it efs-app -- sh -c "df -hT -t nfs4"
Filesystem           Type            Size      Used Available Use% Mounted on
127.0.0.1:/          nfs4            8.0E         0      8.0E   0% /data

# 공유 저장소 저장 동작 확인
tree /mnt/myefs              # 운영서버 EC2 에서 확인
kubectl exec efs-app -- bash -c "cat /data/out"
kubectl exec efs-app -- bash -c "ls -l /data/out"
kubectl exec efs-app -- bash -c "stat /data/"
EFS → Access Point 확인
EFS Access Point는 EFS의 특정 부분을 격리하고, UID/GID를 강제하여 보안성을 높임.
여러 팀, 여러 애플리케이션이 같은 EFS를 사용할 때 Access Point를 활용하면 보안과 관리가 용이.
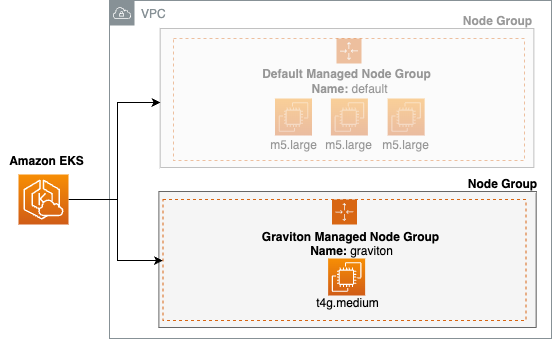
AWS Graviton 프로세서 : 64-bit Arm 프로세서 코어 기반의 AWS 커스텀 반도체 ⇒ 20~40% 향상된 가격대비 성능
#
kubectl get nodes -L kubernetes.io/arch

# 신규 노드 그룹 생성
eksctl create nodegroup --help
eksctl create nodegroup -c $CLUSTER_NAME -r ap-northeast-2 --subnet-ids "$PubSubnet1","$PubSubnet2","$PubSubnet3" \
  -n ng3 -t t4g.medium -N 1 -m 1 -M 1 --node-volume-size=30 --node-labels family=graviton --dry-run > myng3.yaml
cat myng3.yaml
eksctl create nodegroup -f myng3.yaml

# 확인
kubectl get nodes --label-columns eks.amazonaws.com/nodegroup,kubernetes.io/arch,eks.amazonaws.com/capacityType
kubectl describe nodes --selector family=graviton
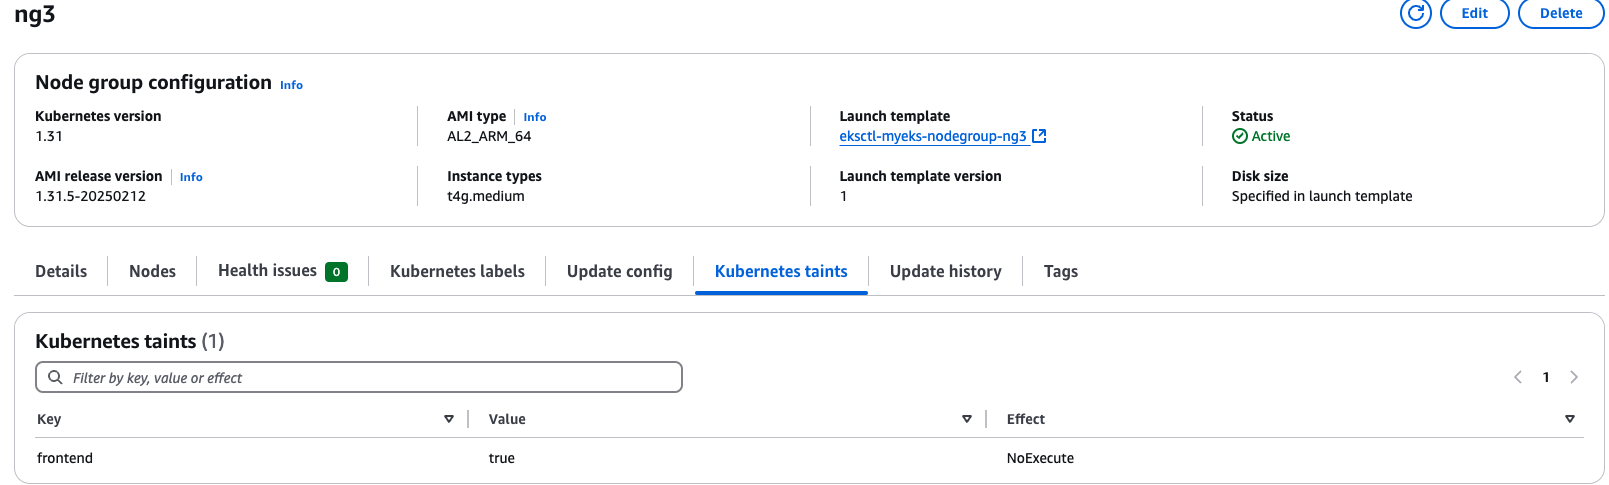
aws eks describe-nodegroup --cluster-name $CLUSTER_NAME --nodegroup-name ng3 | jq .nodegroup.taints

# taints 셋팅 -> 적용에 2~3분 정도 시간 소요
aws eks update-nodegroup-config --cluster-name $CLUSTER_NAME --nodegroup-name ng3 --taints "addOrUpdateTaints=[{key=frontend, value=true, effect=NO_EXECUTE}]"

# 확인
kubectl describe nodes --selector family=graviton | grep Taints
Taints:             frontend=true:NoExecute

aws eks describe-nodegroup --cluster-name $CLUSTER_NAME --nodegroup-name ng3 | jq .nodegroup.taints
# NO_SCHEDULE - This corresponds to the Kubernetes NoSchedule taint effect. This configures the managed node group with a taint that repels all pods that don't have a matching toleration. All running pods are not evicted from the manage node group's nodes.
# NO_EXECUTE - This corresponds to the Kubernetes NoExecute taint effect. Allows nodes configured with this taint to not only repel newly scheduled pods but also evicts any running pods without a matching toleration.
# PREFER_NO_SCHEDULE - This corresponds to the Kubernetes PreferNoSchedule taint effect. If possible, EKS avoids scheduling Pods that do not tolerate this taint onto the node.
Taints의 Effect 종류
NO_SCHEDULE - This corresponds to the Kubernetes NoSchedule taint effect. This configures the managed node group with a taint that repels all pods that don't have a matching toleration. All running pods are not evicted from the manage node group's nodes.
NO_EXECUTE - This corresponds to the Kubernetes NoExecute taint effect. Allows nodes configured with this taint to not only repel newly scheduled pods but also evicts any running pods without a matching toleration.
PREFER_NO_SCHEDULE - This corresponds to the Kubernetes PreferNoSchedule taint effect. If possible, EKS avoids scheduling Pods that do not tolerate this taint onto the node.
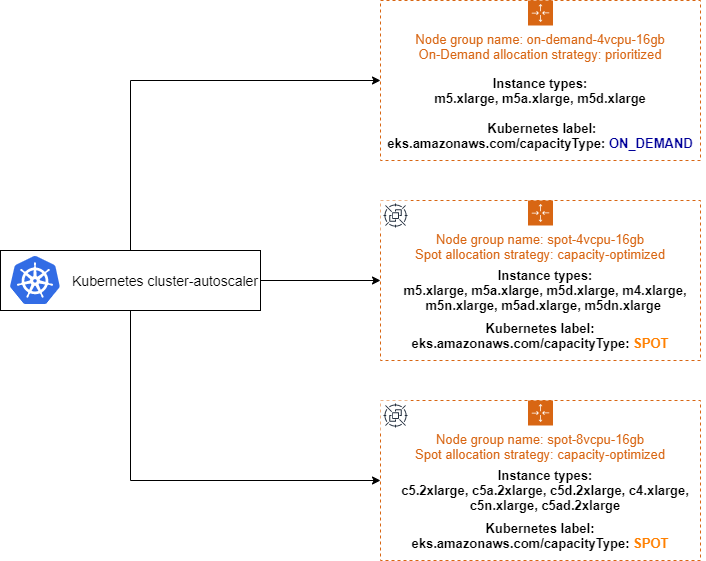
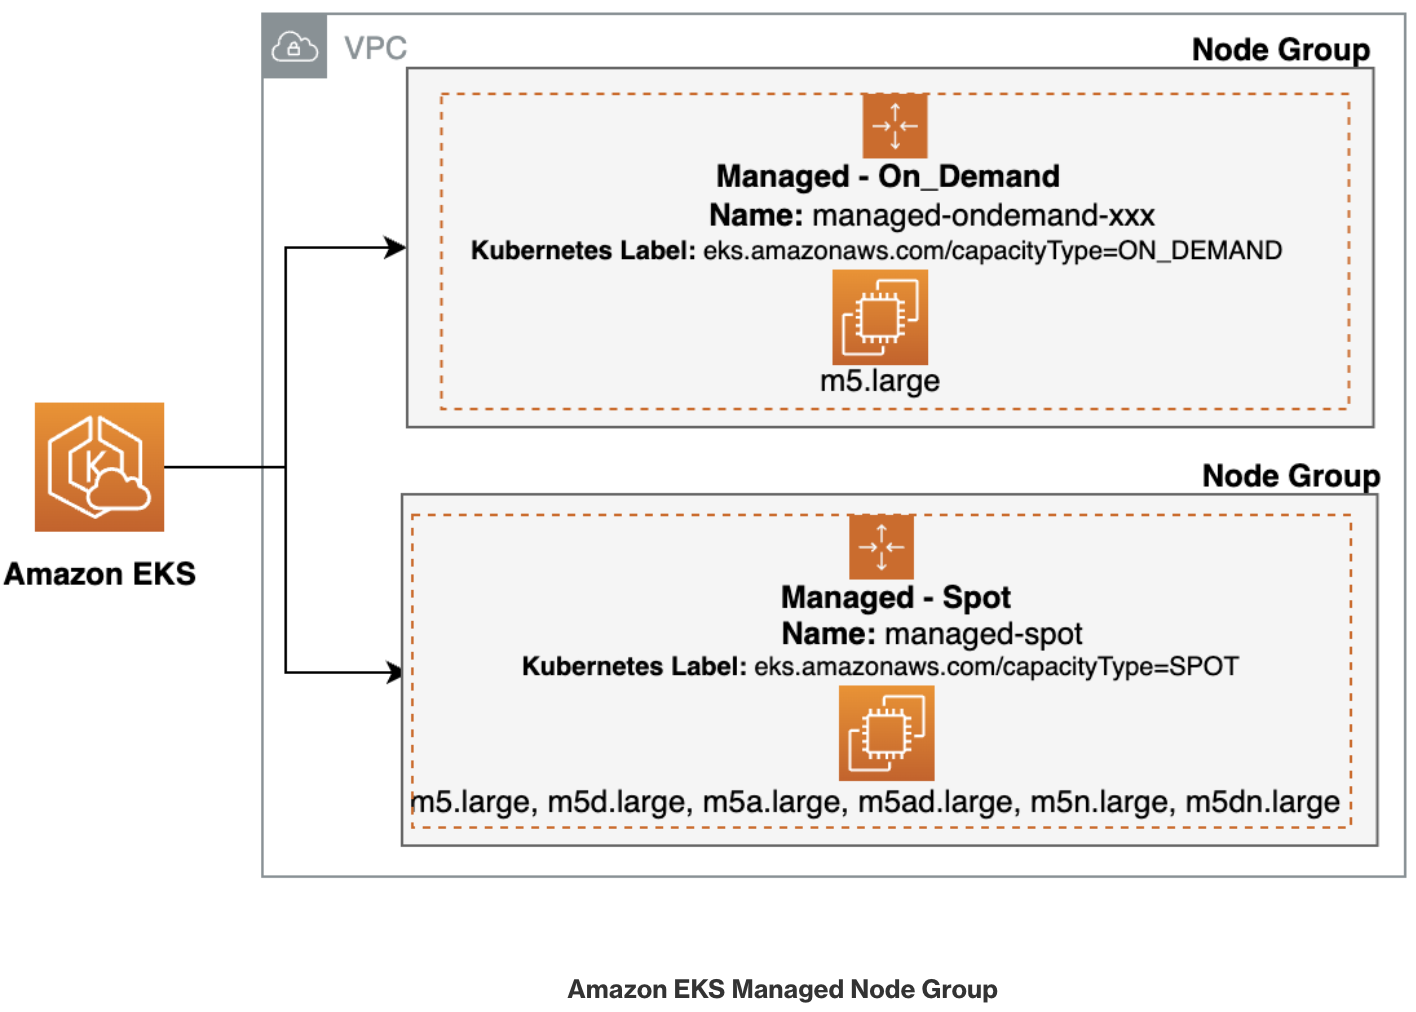
6.3.1. Spot instances 노드 그룹 (managed-spot) 생성 - Link , Blog
AWS 고객이 EC2 여유 용량 풀을 활용하여 엄청난 할인으로 EC2 인스턴스를 실행할 수 있습니다.
EC2에 용량이 다시 필요할 때 2분 알림으로 Spot Instances를 중단할 수 있습니다.
Kubernetes 워커 노드로 Spot Instances를 사용하는 것은 상태 비저장 API 엔드포인트, 일괄 처리, ML 학습 워크로드, Apache Spark를 사용한 빅데이터 ETL, 대기열 처리 애플리케이션, CI/CD 파이프라인과 같은 워크로드에 매우 인기 있는 사용 패턴입니다.
예를 들어 Kubernetes에서 상태 비저장 API 서비스를 실행하는 것은 Spot Instances를 워커 노드로 사용하기에 매우 적합합니다. Pod를 Gracefully shutdown 할 수 있고 Spot Instances가 중단되면 다른 워커 노드에서 대체 Pod를 예약할 수 있기 때문입니다.
# [운영서버 EC2] ec2-instance-selector 설치
curl -Lo ec2-instance-selector https://github.com/aws/amazon-ec2-instance-selector/releases/download/v2.4.1/ec2-instance-selector-`uname | tr '[:upper:]' '[:lower:]'`-amd64 && chmod +x ec2-instance-selector
mv ec2-instance-selector /usr/local/bin/
ec2-instance-selector --version

# 적절한 인스턴스 스펙 선택을 위한 도구 사용
ec2-instance-selector --vcpus 2 --memory 4 --gpus 0 --current-generation -a x86_64 --deny-list 't.*' --output table-wide
Instance Type   VCPUs   Mem (GiB)  Hypervisor  Current Gen  Hibernation Support  CPU Arch  Network Performance  ENIs    GPUs    GPU Mem (GiB)  GPU Info  On-Demand Price/Hr  Spot Price/Hr (30d avg)
-------------   -----   ---------  ----------  -----------  -------------------  --------  -------------------  ----    ----    -------------  --------  ------------------  -----------------------
c5.large        2       4          nitro       true         true                 x86_64    Up to 10 Gigabit     3       0       0              none      $0.096              $0.02837
c5a.large       2       4          nitro       true         false                x86_64    Up to 10 Gigabit     3       0       0              none      $0.086              $0.04022
c5d.large       2       4          nitro       true         true                 x86_64    Up to 10 Gigabit     3       0       0              none      $0.11               $0.03265
c6i.large       2       4          nitro       true         true                 x86_64    Up to 12.5 Gigabit   3       0       0              none      $0.096              $0.03425
c6id.large      2       4          nitro       true         true                 x86_64    Up to 12.5 Gigabit   3       0       0              none      $0.1155             $0.03172
c6in.large      2       4          nitro       true         true                 x86_64    Up to 25 Gigabit     3       0       0              none      $0.1281             $0.04267
c7i-flex.large  2       4          nitro       true         true                 x86_64    Up to 12.5 Gigabit   3       0       0              none      $0.09576            $0.02872
c7i.large       2       4          nitro       true         true                 x86_64    Up to 12.5 Gigabit   3       0       0              none      $0.1008             $0.02977

#Internally ec2-instance-selector is making calls to the DescribeInstanceTypes for the specific region and filtering the instances based on the criteria selected in the command line, in our case we filtered for instances that meet the following criteria:
- Instances with no GPUs
- of x86_64 Architecture (no ARM instances like A1 or m6g instances for example)
- Instances that have 2 vCPUs and 4 GB of RAM
- Instances of current generation (4th gen onwards)
- Instances that don’t meet the regular expression t.* to filter out burstable instance types
#
kubectl get nodes -l eks.amazonaws.com/capacityType=ON_DEMAND
kubectl get nodes -L eks.amazonaws.com/capacityType
NAME                                              STATUS   ROLES    AGE   VERSION               CAPACITYTYPE
ip-192-168-1-65.ap-northeast-2.compute.internal   Ready    <none>   75m   v1.28.5-eks-5e0fdde   ON_DEMAND
ip-192-168-2-89.ap-northeast-2.compute.internal   Ready    <none>   75m   v1.28.5-eks-5e0fdde   ON_DEMAND
ip-192-168-3-39.ap-northeast-2.compute.internal   Ready    <none>   75m   v1.28.5-eks-5e0fdde   ON_DEMAND

# 노드 그룹 생성
NODEROLEARN=$(aws iam list-roles --query "Roles[?contains(RoleName, 'nodegroup-ng1')].Arn" --output text)
echo $NODEROLEARN

aws eks create-nodegroup \
  --cluster-name $CLUSTER_NAME \
  --nodegroup-name managed-spot \
  --subnets $PubSubnet1 $PubSubnet2 $PubSubnet3 \
  --node-role $NODEROLEARN \
  --instance-types c5.large c5d.large c5a.large \
  --capacity-type SPOT \
  --scaling-config minSize=2,maxSize=3,desiredSize=2 \
  --disk-size 20

# The command can be used to wait until a specific EKS node group is active and ready for use.
aws eks wait nodegroup-active --cluster-name $CLUSTER_NAME --nodegroup-name managed-spot

# 확인
kubectl get nodes -L eks.amazonaws.com/capacityType,eks.amazonaws.com/nodegroup
NAME                                               STATUS   ROLES    AGE   VERSION               CAPACITYTYPE   NODEGROUP
ip-192-168-1-82.ap-northeast-2.compute.internal    Ready    <none>   6h    v1.31.5-eks-5d632ec   ON_DEMAND      ng1
ip-192-168-2-167.ap-northeast-2.compute.internal   Ready    <none>   59s   v1.31.5-eks-5d632ec   SPOT           managed-spot
ip-192-168-2-80.ap-northeast-2.compute.internal    Ready    <none>   6h    v1.31.5-eks-5d632ec   ON_DEMAND      ng1
ip-192-168-3-165.ap-northeast-2.compute.internal   Ready    <none>   59s   v1.31.5-eks-5d632ec   SPOT           managed-spot
ip-192-168-3-19.ap-northeast-2.compute.internal    Ready    <none>   6h    v1.31.5-eks-5d632ec   ON_DEMAND      ng1
6.3.2. Running a workload on Spot instances
#
cat <<EOF | kubectl apply -f -
apiVersion: v1
kind: Pod
metadata:
  name: busybox
spec:
  terminationGracePeriodSeconds: 3
  containers:
  - name: busybox
    image: busybox
    command:
    - "/bin/sh"
    - "-c"
    - "while true; do date >> /home/pod-out.txt; cd /home; sync; sync; sleep 10; done"
  nodeSelector:
    eks.amazonaws.com/capacityType: SPOT
EOF

# 파드가 배포된 노드 정보 확인
kubectl get pod -owide

# 삭제
kubectl delete pod busybox
6.3.3. Interruption Handling in EKS managed node groups with Spot capacity - Link
Spot 중단을 처리하기 위해 AWS Node Termination Handler와 같은 클러스터에 추가 자동화 도구를 설치할 필요가 없습니다. 관리형 노드 그룹은 사용자를 대신하여 Amazon EC2 Auto Scaling 그룹을 구성하고 다음과 같은 방식으로 Spot 중단을 처리합니다. To handle Spot interruptions, you do not need to install any extra automation tools on the cluster such as the AWS Node Termination Handler. A managed node group configures an Amazon EC2 Auto Scaling group on your behalf and handles the Spot interruption in following manner:
Amazon EC2 Spot 용량 재조정은 Amazon EKS가 Spot 노드를 우아하게 비우고 재조정하여 Spot 노드가 중단 위험이 높을 때 애플리케이션 중단을 최소화할 수 있도록 활성화됩니다.
Amazon EC2 Spot Capacity Rebalancing is enabled so that Amazon EKS can gracefully drain and rebalance your Spot nodes to minimize application disruption when a Spot node is at elevated risk of interruption. For more information, see Amazon EC2 Auto Scaling Capacity Rebalancing in the Amazon EC2 Auto Scaling User Guide.
교체 Spot 노드가 부트스트랩되고 Kubernetes에서 Ready 상태가 되면 Amazon EKS는 재조정 권장 사항을 수신한 Spot 노드를 cordons하고 drains합니다. Spot 노드를 cordons하면 노드가 예약 불가능으로 표시되고 kube-scheduler가 해당 노드에서 새 포드를 예약하지 않습니다.
When a replacement Spot node is bootstrapped and in the Ready state on Kubernetes, Amazon EKS cordons and drains the Spot node that received the rebalance recommendation. Cordoning the Spot node ensures that the node is marked as unschedulable and kube-scheduler will not schedule any new pods on it. It also removes it from its list of healthy, active Spot nodes. Draining the Spot node ensures that running pods are evicted gracefully.
교체 Spot 노드가 준비 상태가 되기 전에 Spot 2분 중단 알림이 도착하면 Amazon EKS는 재균형 권장 사항을 받은 Spot 노드의 드레이닝을 시작합니다.
If a Spot two-minute interruption notice arrives before the replacement Spot node is in a Ready state, Amazon EKS starts draining the Spot node that received the rebalance recommendation.
이 프로세스는 Spot 중단이 도착할 때까지 교체 Spot 노드를 기다리는 것을 피하고, 대신 사전에 교체 노드를 조달하여 보류 중인 Pod의 스케줄링 시간을 최소화하는 데 도움이 됨. This process avoids waiting for replacement Spot node till Spot interruption arrives, instead it procures replacement in advance and helps in minimizing the scheduling time for pending pods.
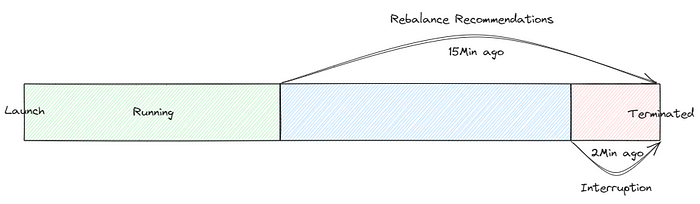
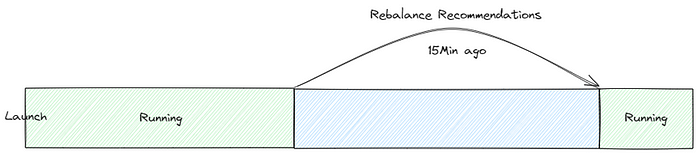
Spot Instance는 2분 전에 Interruption Event를 통해서 ‘내가 곧 종료된다’라는 것을 알 수 있다고 했습니다. 그러나 2분이라는 시간 안에 해당 WorkerNode에서 수행 중이던 Pod들이 모두 다른 WorkerNode로 이동하기에는 다소 부족할 수 있습니다. 그러면 이렇게 종료된다는 Event를 조금 더 빠르게 받을 수는 없을까요? 애매하긴 하지만 15분 전에 Rebalance Recommendation이라는 Event를 받을 수 있습니다. 제가 애매하다는 표현을 썼는데 그 이유는 Rebalance Recommendation Event를 받았다고해서 해당 Node가 반드시 죽는 것은 아니기 때문입니다.
Interruption Event가 발생할 경우
Interruption Event가 발생하지 않을 경우
같은 시간에 Launch된 Instance가 있다고 할 때 2개의 Instance가 모두 Rebalance Recommendation Event를 받았다고 가정해 보겠습니다. 첫 번째 Instance는 Interruption Event를 받아서 Terminated되었고 두 번째 Instance는 Interruption Event를 받지 않아서 계속해서 Running되고 있습니다. 결국 Rebalance Recommendation은 WorkerNode가 종료된다라는 의미가 아니라 Interruption의 대상 리스트에 올라갔다 정도로 생각할 수 있습니다. 그러면 Rebalance Recommendation이 발생할 때 해당 WorkerNode에서 수행중이던 Pod들을 종료하고 재배포 해주면 충분한 시간이 보장되면서 완벽하지 않을까? 라는 생각을 할 수 있습니다. 물론 저도 그렇게 생각하며 이러한 Event가 얼마나 발생하는지 뽑아보았습니다.
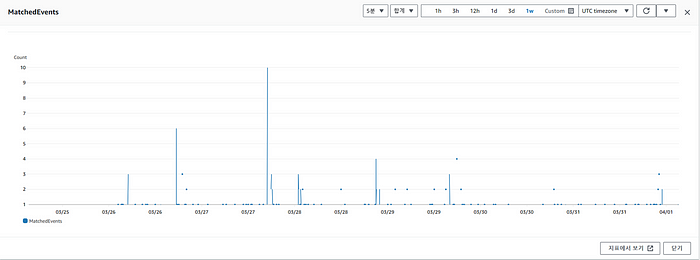
Interruption Event
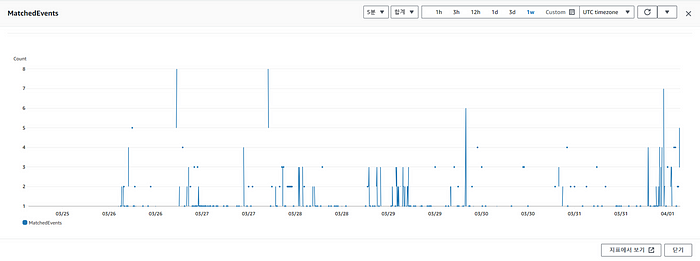
Rebalance Recommendation Event
Spot Instance를 사용해 보신 분들은 아시겠지만 생각보다 Instance의 교체가 자주 발생합니다. 위의 그래프는 Interruption과 Rebalance Recommendation의 약 일주일치 자료인데 비교도 안될 정도로 많은 Event가 발생하는 것을 확인할 수 있습니다. 이대로 Rebalance Recommendation Event에 대응하여 Pod들을 옮겨주기에는 너무나 많은 WorkerNode 교체가 발생할 것으로 예상된다.
Karpenter and Node Termination HandlerKarpenter publishes Kubernetes events to the node for all events listed above in addition to Spot Rebalance Recommendations. Karpenter does not currently support taint, drain, and terminate logic for Spot Rebalance Recommendations.참고: Karpenter interuption - https://karpenter.sh/docs/concepts/disruption/#interruption
If you require handling for Spot Rebalance Recommendations, you can use the AWS Node Termination Handler (NTH) alongside Karpenter; however, note that the AWS Node Termination Handler cordons and drains nodes on rebalance recommendations, potentially causing more node churn in the cluster than with interruptions alone. Further information can be found in the Troubleshooting Guide.
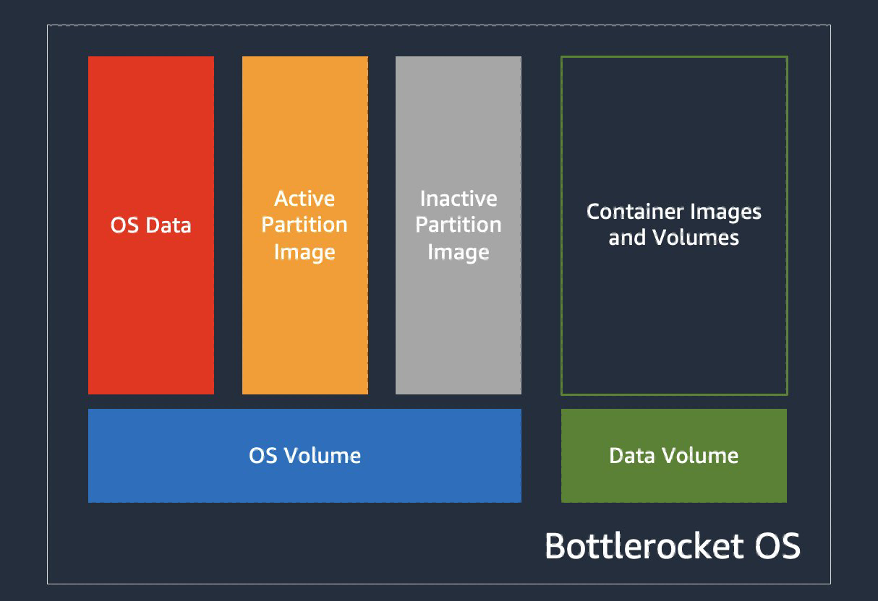
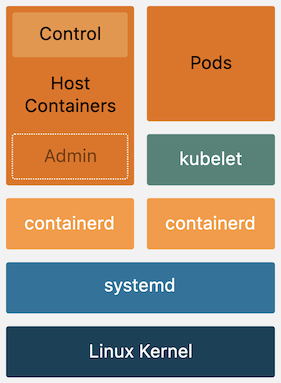
현재 이용되는 컨테이너는 대부분 다양한 형식으로 패키징된 애플리케이션을 지원하도록 설계된 범용 운영 체제(OS)에서 실행됩니다. 그와 같은 운영 체제에는 수백 가지 패키지가 포함되어 있으며, 컨테이너화된 애플리케이션 하나를 실행하는 데 사용되는 패키지는 몇 개 되지 않더라도 자주 보안 및 유지 관리 업데이트를 해야 합니다. Bottlerocket은 보안에 중점을 두고, 컨테이너 호스팅에 필수적인 소프트웨어만 포함하므로 공격에 대한 노출 위험을 줄입니다. 여기에는 SELinux(Security-Enhanced Linux)가 함께 제공되어 추가 격리 모드를 지원하며 Linux 커널 기능의 일종인 Device Mapper의 진실성 대상(dm-verity)을 사용하므로 루트킷 기반 공격을 예방하는 데 도움이 됩니다. 이러한 보안 강화 기능 외에도 Bottlerocket 업데이트를 적용하여 원자 단위 방식으로 롤백하므로 업데이트 관리가 한층 간소화됩니다.
운영 비용 절감 및 관리 복잡성 감소로 가동 시간 증가 – Bottlerocket은 다른 Linux 배포판보다 리소스 공간이 작고 부팅 시간이 짧으며 보안 위협에 덜 취약합니다. Bottlerocket은 공간이 작아 스토리지, 컴퓨팅 및 네트워킹 리소스를 적게 사용하여 비용을 절감할 수 있습니다.
자동 OS 업데이트로 보안 강화 – Bottlerocket 업데이트는 필요한 경우 롤백할 수 있는 단일 단위로 적용됩니다. 이렇게 하면 시스템을 사용 불가 상태로 둘 수 있는 손상되거나 실패한 업데이트의 위험이 제거됩니다. Bottlerocket을 사용하면 보안 업데이트를 사용할 수 있는 즉시 중단을 최소화하는 방식으로 자동 적용하고 장애 발생 시 롤백할 수 있습니다.
프리미엄 지원 – AWS에서 제공하는 Amazon EC2 기반 Bottlerocket 빌드에는 Amazon EC2, Amazon EKS, Amazon ECR 등의 AWS 서비스에도 적용되는 동일한 AWS Support 플랜이 적용됩니다
Bottlerocket의 설계 덕분에 OS 바이너리 업데이트와 보안 패치 주기를 분리하여 사전 페치된 이미지로 데이터 볼륨을 쉽게 연결할 수 있습니다.
#
cat ng-br.yaml
eksctl create nodegroup -f ng-br.yaml

# 노드의 OS 와 CRI 정보 등 확인
kubectl get node --label-columns=alpha.eksctl.io/nodegroup-name,ami,node.kubernetes.io/instance-type
kubectl get node -owide
NAME                                               STATUS   ROLES    AGE     VERSION               INTERNAL-IP     EXTERNAL-IP      OS-IMAGE                                KERNEL-VERSION                    CONTAINER-RUNTIME
ip-192-168-1-175.ap-northeast-2.compute.internal   Ready    <none>   24s     v1.31.4-eks-0f56d01   192.168.1.175   54.180.242.105   Bottlerocket OS 1.32.0 (aws-k8s-1.31)   6.1.124                           containerd://1.7.24+bottlerocket
ip-192-168-1-82.ap-northeast-2.compute.internal    Ready    <none>   6h33m   v1.31.5-eks-5d632ec   192.168.1.82    13.124.58.163    Amazon Linux 2023.6.20250203            6.1.127-135.201.amzn2023.x86_64   containerd://1.7.25
ip-192-168-2-169.ap-northeast-2.compute.internal   Ready    <none>   28s     v1.31.4-eks-0f56d01   192.168.2.169   43.203.130.30    Bottlerocket OS 1.32.0 (aws-k8s-1.31)   6.1.124                           containerd://1.7.24+bottlerocket
ip-192-168-2-80.ap-northeast-2.compute.internal    Ready    <none>   6h33m   v1.31.5-eks-5d632ec   192.168.2.80    43.201.41.112    Amazon Linux 2023.6.20250203            6.1.127-135.201.amzn2023.x86_64   containerd://1.7.25
ip-192-168-3-19.ap-northeast-2.compute.internal    Ready    <none>   6h33m   v1.31.5-eks-5d632ec   192.168.3.19    3.39.237.181     Amazon Linux 2023.6.20250203            6.1.127-135.201.amzn2023.x86_64   containerd://1.7.25# 인스턴스 IP 확인

aws ec2 describe-instances --query "Reservations[*].Instances[*].{InstanceID:InstanceId, PublicIPAdd:PublicIpAddress, PrivateIPAdd:PrivateIpAddress, InstanceName:Tags[?Key=='Name']|[0].Value, Status:State.Name}" --filters Name=instance-state-name,Values=running --output table

#
BRNode1=<ng-bottlerocket EC2 유동공인 IP>
BRNode2=<ng-bottlerocket-ssh EC2 유동공인 IP>
BRNode1=43.203.248.44
BRNode2=43.200.172.226
SSH 로 노드 접속
# SSH 접속 테스트
ssh $BRNode1
ssh ec2-user@$BRNode2
-----------------
# AL2 기반이여, 문제 해결을 위한 도구 포함.
# sudo sheltie 실행 시 you into a root shell in the Bottlerocket host's root filesystem.
whoami
pwd
ip -c a
lsblk
sudo yum install htop which -y
htop
which bash
which sh
ps
ps -ef
ps 1
sestatus
getenforce

sudo sheltie
whoami
pwd
ip -c a
lsblk
yum install jq -y
ps
ps -ef
ps 1
sestatus
getenforce

exit
exit
-----------------
# ng-bottlerocket 인스턴스 ID 필터링
aws ec2 describe-instances --filters "Name=tag:eks:nodegroup-name,Values=ng-bottlerocket" | jq -r '.[][0]["Instances"][0]["InstanceId"]'

# Run the below command to create an SSM session with bottlerocket node
aws ssm start-session --target $(aws ec2 describe-instances --filters "Name=tag:eks:nodegroup-name,Values=ng-bottlerocket" | jq -r '.[][0]["Instances"][0]["InstanceId"]')
-----------------
# Bottlerocket의 Control Container 진입
# 이 컨테이너는 Bottlerocket API에 접근할 수 있도록 해주며, 이를 통해 시스템을 점검하고 설정을 변경할 수 있음.
# 이를 위해 apiclient 도구를 사용하는 것이 일반적입니다. 예) 시스템 점검 apiclient -u /settings | jq
# 고급 디버깅을 위해서는 Admin Container를 사용 : 호스트에 대한 root 접근을 허용
# Admin Container를 활성화한 후, SSH로 접근 가능.

# apiclient 사용
apiclient --help
apiclient -u /settings | jq
apiclient get | jq
apiclient get | grep motd

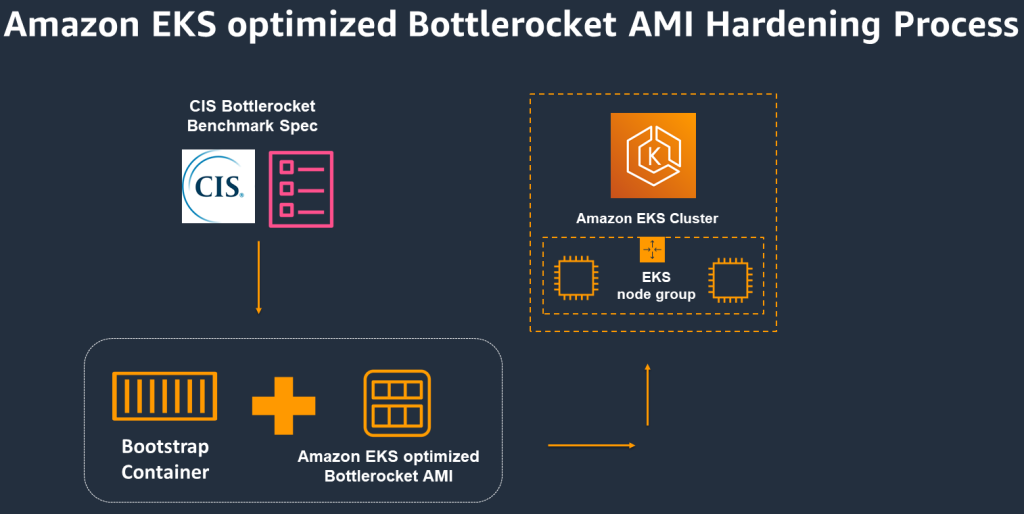
# CIS benchmark for Bottlerocket
apiclient report cis
Benchmark name:  CIS Bottlerocket Benchmark
Version:         v1.0.0
Reference:       https://www.cisecurity.org/benchmark/bottlerocket
Benchmark level: 1
Start time:      2025-02-22T13:56:36.360696726Z

[SKIP] 1.2.1     Ensure software update repositories are configured (Manual)
[PASS] 1.3.1     Ensure dm-verity is configured (Automatic)
[PASS] 1.4.1     Ensure setuid programs do not create core dumps (Automatic)
[PASS] 1.4.2     Ensure address space layout randomization (ASLR) is enabled (Automatic)
[PASS] 1.4.3     Ensure unprivileged eBPF is disabled (Automatic)
[PASS] 1.5.1     Ensure SELinux is configured (Automatic)
[SKIP] 1.6       Ensure updates, patches, and additional security software are installed (Manual)
[PASS] 2.1.1.1   Ensure chrony is configured (Automatic)
[PASS] 3.2.5     Ensure broadcast ICMP requests are ignored (Automatic)
[PASS] 3.2.6     Ensure bogus ICMP responses are ignored (Automatic)
[PASS] 3.2.7     Ensure TCP SYN Cookies is enabled (Automatic)
[SKIP] 3.4.1.3   Ensure IPv4 outbound and established connections are configured (Manual)
[SKIP] 3.4.2.3   Ensure IPv6 outbound and established connections are configured (Manual)
[PASS] 4.1.1.1   Ensure journald is configured to write logs to persistent disk (Automatic)
[PASS] 4.1.2     Ensure permissions on journal files are configured (Automatic)

Passed:          11
Failed:          0
Skipped:         4
Total checks:    15

Compliance check result: PASS

# Level 2 checks
apiclient report cis -l 2


# CIS Kubernetes benchmark : Level 1 of the CIS Benchmark.
apiclient report cis-k8s
Benchmark name:  CIS Kubernetes Benchmark (Worker Node)
Version:         v1.8.0
Reference:       https://www.cisecurity.org/benchmark/kubernetes
Benchmark level: 1
Start time:      2025-02-22T13:57:17.375425719Z

[PASS] 4.1.1     Ensure that the kubelet service file permissions are set to 644 or more restrictive (Automatic)
[PASS] 4.1.2     Ensure that the kubelet service file ownership is set to root:root (Automatic)
[SKIP] 4.1.3     If proxy kubeconfig file exists ensure permissions are set to 644 or more restrictive (Manual)
[SKIP] 4.1.4     If proxy kubeconfig file exists ensure ownership is set to root:root (Manual)
[PASS] 4.1.5     Ensure that the --kubeconfig kubelet.conf file permissions are set to 644 or more restrictive (Automatic)
[PASS] 4.1.6     Ensure that the --kubeconfig kubelet.conf file ownership is set to root:root (Automatic)
[PASS] 4.1.7     Ensure that the certificate authorities file permissions are set to 600 or more restrictive (Automatic)
[PASS] 4.1.8     Ensure that the client certificate authorities file ownership is set to root:root (Automatic)
[PASS] 4.1.9     If the kubelet config.yaml configuration file is being used validate permissions set to 600 or more restrictive (Automatic)
[PASS] 4.1.10    If the kubelet config.yaml configuration file is being used validate file ownership is set to root:root (Automatic)
[PASS] 4.2.1     Ensure that the --anonymous-auth argument is set to false (Automatic)
[PASS] 4.2.2     Ensure that the --authorization-mode argument is not set to AlwaysAllow (Automatic)
[PASS] 4.2.3     Ensure that the --client-ca-file argument is set as appropriate (Automatic)
[PASS] 4.2.4     Verify that the --read-only-port argument is set to 0 (Automatic)
[PASS] 4.2.5     Ensure that the --streaming-connection-idle-timeout argument is not set to 0 (Automatic)
[PASS] 4.2.6     Ensure that the --make-iptables-util-chains argument is set to true (Automatic)
[SKIP] 4.2.7     Ensure that the --hostname-override argument is not set (not valid for Bottlerocket) (Manual)
[PASS] 4.2.9     Ensure that the --tls-cert-file and --tls-private-key-file arguments are set as appropriate (Automatic)
[SKIP] 4.2.10    Ensure that the --rotate-certificates argument is not set to false (not valid for Bottlerocket) (Manual)
[PASS] 4.2.11    Verify that the RotateKubeletServerCertificate argument is set to true (Automatic)
[PASS] 4.2.12    Ensure that the Kubelet only makes use of Strong Cryptographic Ciphers (Automatic)
[PASS] 4.2.13    Ensure that a limit is set on pod PIDs (Automatic)

Passed:          18
Failed:          0
Skipped:         4
Total checks:    22

Compliance check result: PASS

#
enable-admin-container
enter-admin-container
whoami
pwd
ip -c a
lsblk
sudo yum install htop -y
htop
ps
ps -ef
ps 1
sestatus
getenforce

sudo sheltie
whoami
pwd
ip -c a
lsblk
yum install jq -y
ps
ps -ef
ps 1
sestatus
getenforce
exit
exit

#
disable-admin-container
whoami
pwd
ip -c a
sudo yum install git -y
sestatus
getenforce
exit
-----------------
# checks to see whether there is a new version of the installed variant
apiclient update check | jq

# downloads the update and verifies that it has been staged
apiclient update apply

# activates the update and reboots the system
apiclient reboot
6.4.3. 파드 배포
#
cat <<EOF | kubectl apply -f -
apiVersion: v1
kind: Pod
metadata:
  name: busybox
spec:
  terminationGracePeriodSeconds: 3
  containers:
  - name: busybox
    image: busybox
    command:
    - "/bin/sh"
    - "-c"
    - "while true; do date >> /home/pod-out.txt; cd /home; sync; sync; sleep 10; done"
  nodeSelector:
    ami: bottlerocket
EOF

# 파드가 배포된 노드 정보 확인
kubectl get pod -owide

#
kubectl exec -it busybox -- tail -f /home/pod-out.txt

# 삭제
kubectl delete pod busybox
6.4.4.
호스트 네임스페이스로 탈옥하는 파드
를 Bottlerocket AMI 노드에서 배포되게 실행 해보기!
ng1 노드 그룹에 탈취용 파드 배포 : 파드 권한과 호스트 네임스페이스 공유로 호스트 탈취 - Blog
Bottlerocket AMI 노드에 apiclient 파드를 배포하여 enter-admin-container 진입
# kube-system 네임스페이스에 파드 배포
cat <<EOF | kubectl apply -f -
apiVersion: v1
kind: Pod
metadata:
  name: apiclient
  namespace: kube-system
spec:
  containers:
  - command:
    - sleep
    - infinity
    image: fedora
    imagePullPolicy: Always
    name: regain-access
    securityContext:
      seLinuxOptions:
        level: s0
        role: system_r
        type: control_t
        user: system_u
    volumeMounts:
    - mountPath: /usr/bin/apiclient
      name: apiclient
      readOnly: true
    - mountPath: /run/api.sock
      name: apiserver-socket
  restartPolicy: Always
  terminationGracePeriodSeconds: 0
  volumes:
  - hostPath:
      path: /usr/bin/apiclient
      type: File
    name: apiclient
  - hostPath:
      path: /run/api.sock
      type: Socket
    name: apiserver-socket
  nodeSelector:
    ami: bottlerocket
EOF

# 파드 배포 확인
kubectl get pod -n kube-system apiclient

# 관리 컨테이너 활성화 및 진입
kubectl exec -i -t -n kube-system apiclient -- apiclient exec -t control enter-admin-container
--------------------------------------------
Confirming admin container is enabled...
Waiting for admin container to start...
Entering admin container
          Welcome to Bottlerocket's admin container!
    ╱╲
   ╱┄┄╲   This container provides access to the Bottlerocket host
   │▗▖│   filesystems (see /.bottlerocket/rootfs) and contains common
  ╱│  │╲  tools for inspection and troubleshooting.  It is based on
  │╰╮╭╯│  Amazon Linux 2, and most things are in the same places you
    ╹╹    would find them on an AL2 host.

To permit more intrusive troubleshooting, including actions that mutate the
running state of the Bottlerocket host, we provide a tool called "sheltie"
(`sudo sheltie`).  When run, this tool drops you into a root shell in the
Bottlerocket host's root filesystem.
[root@admin]# sudo sheltie
bash-5.1# whoami
root

exit
exit
--------------------------------------------

# 파드 삭제
kubectl delete pod -n kube-system apiclient