ABOUT ME

-

Today
-
Yesterday
-
Total
-
  • [AEWS 3기] 2주차 - EKS Network
    AWS 2025. 2. 15. 13:27


    2주차 EKS Network


    1. 실습환경 배포
      • myeks-vpc 에 각기 AZ를 사용하는 퍼블릭/프라이빗 서브넷 배치
        • 로그밸런서 배포를 위한 퍼블릭/프라이빗 서브넷에 태그 설정 - Docs
        • Amazon EKS optimized Amazon Linux 2023 accelerated AMIs now available - Link
      • operator-vpc 에 AZ1를 사용하는 퍼블릭/프라이빗 서브넷 배치
      • 내부 통신을 위한 VPC Peering 배치
      • 0.1. 자신의 PC에 실습을 위한 툴 및 설정 : macOS
        1. 필수 툴 설치 with brew - Link
          # Install awscli
          brew install awscli
          aws --version
          
          # Install eksctl
          brew install eksctl
          eksctl version
          
          # Install kubectl
          brew install kubernetes-cli
          kubectl version --client=true
          
          # Install Helm
          brew install helm
          helm version
          
          # krew 툴 및 플러그인 설치
          brew install krew
          kubectl krew version
          
          krew install neat get-all df-pv stern
          kubectl krew list
          
          # 편리성 툴 설치
          brew install kube-ps1
          brew install kubectx
          
          # kubectl 단축 및 하이라이트 설정
          brew install kubecolor
          echo "alias k=kubectl" >> ~/.zshrc
          echo "alias kubectl=kubecolor" >> ~/.zshrc
          echo "compdef kubecolor=kubectl" >> ~/.zshrc
          • (옵션) 유용한 툴 설치
          # AWS 세션매니저로 관리 노드 EC2 접속 시 사용
          brew install --cask session-manager-plugin
          
          # Install sshpass
          brew install sshpass
          
          # Install Wireshark : 패킷 캡쳐 및 캡쳐된 파일에서 패킷 내용 확인
          brew install --cask wireshark
        1. AWS Configure 자격 증명 설정 ⇒ 업무용 PC일 경우 aws profile 를 구별해서 사용을 권장
          # 자격 구성 설정 없이 확인
          aws ec2 describe-instances
          
          # IAM User 자격 구성 : 실습 편리를 위해 administrator 권한을 가진 IAM User 의 자격 증명 입력
          aws configure
          AWS Access Key ID [None]: AKIA5...
          AWS Secret Access Key [None]: CVNa2...
          Default region name [None]: ap-northeast-2
          Default output format [None]: json
          
          # 자격 구성 적용 확인 : 노드 IP 확인
          aws ec2 describe-instances
        • (옵션) AWS EC2 접속을 위한 ssh 키 생성 ⇒ 해당 방법 대신 현재 ec2 ssh keypair 이름을 직접 지정해도됨
          • ssh-keygen 을 사용하여 키 페어 생성 : ssh-keygen -t rsa -b 4096chmod 600 ~/.ssh/id_rsa
          • 퍼블릭 키 정보 확인 (복사해두기) : cat ~/.ssh/id_rsa.pub , 아래는 예시 파일 내용
            ssh-rsa AAAAB3NzaC1yc2EAAAADAQABAAACAQCpPcQf1Beqxmab/r3RtwCuPdQJUbL2rahky46ZrkgBKNhyxfwaXJNax778fwnGHEZdBxsJFatEHCP1QgcrNh1moyK/aKprY2wmvnzQ1tw5yuShZtfpr4XreExgGSbrlCDLK2/up95t9FpkosrRr+cP2Z2YVZhI+iQuOxb44ddGELGk5/TvKG/vHAeJiVJMdNVOaLq98Lyz85g1q6lBhGCGt9nh+Tl41pqXL+2XxPWHH4emp9XAi+gVyaxMaYxAFegxKwlrv/ELuFos/EtMbnGI6shR66RdOZv/mh4Q5D/2J5DYMXXKhMwnCfgwcgGQlAiy71iG9HZm+h7yYscfweBXrjdraH/B2GJMgI+2mm1FgF2vIrmlHV32BZ0sbWhEdWEpaASBqTHFEHvqhd4Vpqbg8fTMPpJAesbVvrTh1euRKwgmLu51R3uCwCREdx4u8jOGRnsgL0FaoEhIy6icXBDaK3yQeCHjglKT2QU5mvGfhE0AEZdggL+Rtl6TPY0lc/zbvfwmtFcWj6Q9VVUxUQVxb6mvg6dFYlJNPm+mdCHtEiP7q4NHBajTkS2l9mcPOuchgVZADyrtzfaNUa4QkfojK0yXTUWZMm4GF+lSfVXnvOuvZ3FvQ4nO10mHwG5kHfOTe63L1bPaHcNIWSaRwE1MSdxtnfy87wgUWj7X9rk9Yw== gasida@JongHo-Mac.local
          • AWS EC2 에 Key pairs 클릭 → Import key pair : 이름(Name)은 편하게 설정


      • 0.2. AWS CloudFormation 을 통해 기본 실습 환경 배포
        # yaml 파일 다운로드
        curl -O https://s3.ap-northeast-2.amazonaws.com/cloudformation.cloudneta.net/K8S/myeks-2week.yaml
        
        # 배포
        # aws cloudformation deploy --template-file ~/Downloads/myeks-1week.yaml --stack-name mykops --parameter-overrides KeyName=<My SSH Keyname> SgIngressSshCidr=<My Home Public IP Address>/32 --region <리전>
        예시) aws cloudformation deploy --template-file ~/Downloads/myeks-2week.yaml \
             --stack-name myeks --parameter-overrides KeyName=kp-gasida SgIngressSshCidr=$(curl -s ipinfo.io/ip)/32 --region ap-northeast-2
        
        # CloudFormation 스택 배포 완료 후 운영서버 EC2 IP 출력
        aws cloudformation describe-stacks --stack-name myeks --query 'Stacks[*].Outputs[*].OutputValue' --output text
        예시) 3.35.137.31
        
        # 운영서버 EC2 에 SSH 접속
        예시) ssh ec2-user@3.35.137.31
        ssh -i <ssh 키파일> ec2-user@$(aws cloudformation describe-stacks --stack-name myeks --query 'Stacks[*].Outputs[0].OutputValue' --output text)
        • 배포된 리소스 정보 확인 : 운영서버 EC2, VPC(DNS 설정 옵션), VPC Peering, Routing Table


      • 0.3. eksctl 을 통해 EKS 배포
        • 배포할 YAML 파일 작성
          #
          export CLUSTER_NAME=myeks
          
          # AWS Account 정보 확인 및 변수 지정
          export ACCOUNT_ID=$(aws sts get-caller-identity --query 'Account' --output text)
          echo $ACCOUNT_ID
          
          # myeks-VPC/Subnet 정보 확인 및 변수 지정
          export VPCID=$(aws ec2 describe-vpcs --filters "Name=tag:Name,Values=$CLUSTER_NAME-VPC" --query 'Vpcs[*].VpcId' --output text)
          echo $VPCID
          
          export PubSubnet1=$(aws ec2 describe-subnets --filters Name=tag:Name,Values="$CLUSTER_NAME-Vpc1PublicSubnet1" --query "Subnets[0].[SubnetId]" --output text)
          export PubSubnet2=$(aws ec2 describe-subnets --filters Name=tag:Name,Values="$CLUSTER_NAME-Vpc1PublicSubnet2" --query "Subnets[0].[SubnetId]" --output text)
          export PubSubnet3=$(aws ec2 describe-subnets --filters Name=tag:Name,Values="$CLUSTER_NAME-Vpc1PublicSubnet3" --query "Subnets[0].[SubnetId]" --output text)
          echo $PubSubnet1 $PubSubnet2 $PubSubnet3
          
          export PrivateSubnet1=$(aws ec2 describe-subnets --filters Name=tag:Name,Values="$CLUSTER_NAME-Vpc1PrivateSubnet1" --query "Subnets[0].[SubnetId]" --output text)
          export PrivateSubnet2=$(aws ec2 describe-subnets --filters Name=tag:Name,Values="$CLUSTER_NAME-Vpc1PrivateSubnet2" --query "Subnets[0].[SubnetId]" --output text)
          export PrivateSubnet3=$(aws ec2 describe-subnets --filters Name=tag:Name,Values="$CLUSTER_NAME-Vpc1PrivateSubnet3" --query "Subnets[0].[SubnetId]" --output text)
          echo $PrivateSubnet1 $PrivateSubnet2 $PrivateSubnet3
          
          # ssh 퍼블릭 키 경로 지정
          SshPublic=<각자 자신의 ssh 퍼블릭 키 경로>
          SshPublic=~/.ssh/kp-gasida.pub
          echo $SshPublic
          
          # 출력된 내용 참고 : 아래 yaml 파일 참고해서 vpc/subnet id, ssh key 경로 수정
          eksctl create cluster --name $CLUSTER_NAME --region=ap-northeast-2 --nodegroup-name=ng1 --node-type=t3.medium --nodes 3 --node-volume-size=30 --vpc-public-subnets "$PubSubnet1","$PubSubnet2","$PubSubnet3" --version 1.31 --with-oidc --external-dns-access --full-ecr-access --alb-ingress-access --node-ami-family AmazonLinux2023 --ssh-access --dry-run > myeks.yaml
          eksctl create cluster --name $CLUSTER_NAME --region=ap-northeast-2 --nodegroup-name=ng1 --node-type=t3.medium --nodes 3 --node-volume-size=30 --vpc-public-subnets "$PubSubnet1","$PubSubnet2","$PubSubnet3" --version 1.31 --with-oidc --external-dns-access --full-ecr-access --alb-ingress-access --node-ami-family AmazonLinux2023 --ssh-access --ssh-public-key $SshPublic --dry-run > myeks.yaml
        • myeks.yaml 파일 작성 : ssm 접속은 기본값 적용됨 → ssh.publicKeyName 으로 이름 지정 가능..
          apiVersion: eksctl.io/v1alpha5
          kind: ClusterConfig
          metadata:
            name: myeks
            region: ap-northeast-2
            version: "1.31"
          
          kubernetesNetworkConfig:
            ipFamily: IPv4
          
          iam:
            vpcResourceControllerPolicy: true
            withOIDC: true
          
          accessConfig:
            authenticationMode: API_AND_CONFIG_MAP
          
          vpc:
            autoAllocateIPv6: false
            cidr: 192.168.0.0/16
            clusterEndpoints:
              privateAccess: true # if you only want to allow private access to the cluster
              publicAccess: true # if you want to allow public access to the cluster
            id: vpc-0ab40d2acbda845d8  # 각자 환경 정보로 수정
            manageSharedNodeSecurityGroupRules: true # if you want to manage the rules of the shared node security group
            nat:
              gateway: Disable
            subnets:
              public:
                ap-northeast-2a:
                  az: ap-northeast-2a
                  cidr: 192.168.1.0/24
                  id: subnet-014dc12ab7042f604  # 각자 환경 정보로 수정
                ap-northeast-2b:
                  az: ap-northeast-2b
                  cidr: 192.168.2.0/24
                  id: subnet-01ba554d3b16a15a7  # 각자 환경 정보로 수정
                ap-northeast-2c:
                  az: ap-northeast-2c
                  cidr: 192.168.3.0/24
                  id: subnet-0868f7093cbb17c34  # 각자 환경 정보로 수정
          
          addons:
            - name: vpc-cni # no version is specified so it deploys the default version
              version: latest # auto discovers the latest available
              attachPolicyARNs: # attach IAM policies to the add-on's service account
                - arn:aws:iam::aws:policy/AmazonEKS_CNI_Policy
              configurationValues: |-
                enableNetworkPolicy: "true"
          
            - name: kube-proxy
              version: latest
          
            - name: coredns
              version: latest
          
            - name: metrics-server
              version: latest
          
          privateCluster:
            enabled: false
            skipEndpointCreation: false
          
          managedNodeGroups:
          - amiFamily: AmazonLinux2023
            desiredCapacity: 3
            disableIMDSv1: true
            disablePodIMDS: false
            iam:
              withAddonPolicies:
                albIngress: false # Disable ALB Ingress Controller
                appMesh: false
                appMeshPreview: false
                autoScaler: false
                awsLoadBalancerController: true # Enable AWS Load Balancer Controller
                certManager: true # Enable cert-manager
                cloudWatch: false
                ebs: false
                efs: false
                externalDNS: true # Enable ExternalDNS
                fsx: false
                imageBuilder: true
                xRay: false
            instanceSelector: {}
            instanceType: t3.medium
            preBootstrapCommands:
              # install additional packages
              - "dnf install nvme-cli links tree tcpdump sysstat ipvsadm ipset bind-utils htop -y"
              # disable hyperthreading
              - "for n in $(cat /sys/devices/system/cpu/cpu*/topology/thread_siblings_list | cut -s -d, -f2- | tr ',' '\n' | sort -un); do echo 0 > /sys/devices/system/cpu/cpu${n}/online; done"
            labels:
              alpha.eksctl.io/cluster-name: myeks
              alpha.eksctl.io/nodegroup-name: ng1
            maxSize: 3
            minSize: 3
            name: ng1
            privateNetworking: false
            releaseVersion: ""
            securityGroups:
              withLocal: null
              withShared: null
            ssh:
              allow: true
              #publicKeyPath: /Users/gasida/.ssh/kp-gasida.pub  # 각자 환경 정보로 수정 <- 해당 방식 보다는 아래 방식 사용이 편함
              publicKeyName: [PUB_KEY_NAME] # 각자 환경 정보로 수정
            tags:
              alpha.eksctl.io/nodegroup-name: ng1
              alpha.eksctl.io/nodegroup-type: managed
            volumeIOPS: 3000
            volumeSize: 30
            volumeThroughput: 125
            volumeType: gp3
        • 최종 yaml 로 eks 배포
          # kubeconfig 파일 경로 위치 지정 : 
          export KUBECONFIG=$HOME/kubeconfig
          혹은 각자 편한 경로 위치에 파일 지정
          export KUBECONFIG=~/Downloads/kubeconfig
          
          # 배포
          eksctl create cluster -f myeks.yaml --verbose 4
        • 배포 후 기본 정보 확인
          • EKS 관리 콘솔 확인
            • Overview : API server endpoint, Open ID Connect provider URL기본 정보(oidc)
            • Compute : Node groups 클릭 → AMI(AL2023)..
            • Networking : access(public and private)..
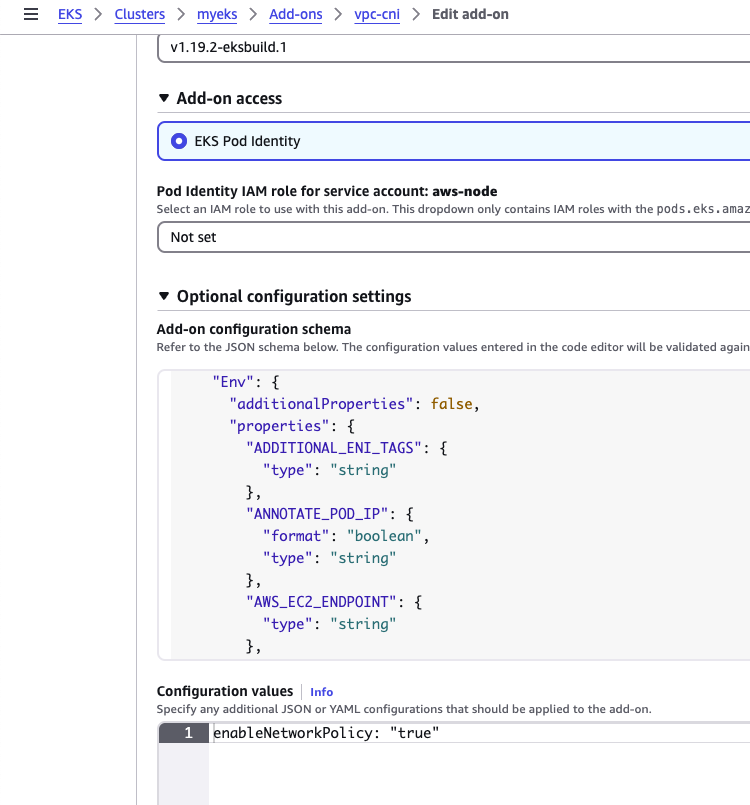
            • Add-ons : VPC CNI 클릭 → edit 후 권한 설정 확인(IRSA) ⇒ 해당 IAM Role 확인 ← 보안 진행 주차에서 상세히 소개
            • Access : IAM access entries (설치 시 사용한 자격증명 username 확인) ← 보안 진행 주차에서 상세히 소개
          • EKS 정보 확인
            #
            kubectl cluster-info
            eksctl get cluster
            
            # 네임스페이스 default 변경 적용
            kubens default
            
            #
            kubectl ctx
            cat $KUBECONFIG | grep current-context
            kubectl config rename-context "<각자 자신의 IAM User>@myeks.ap-northeast-2.eksctl.io" "eksworkshop"
            kubectl config rename-context "admin@myeks.ap-northeast-2.eksctl.io" "eksworkshop"
            cat $KUBECONFIG | grep current-context
            
            #
            kubectl get node --label-columns=node.kubernetes.io/instance-type,eks.amazonaws.com/capacityType,topology.kubernetes.io/zone
            kubectl get node -v=6
            
            #
            kubectl get pod -A
            kubectl get pdb -n kube-system
            NAME             MIN AVAILABLE   MAX UNAVAILABLE   ALLOWED DISRUPTIONS   AGE
            coredns          N/A             1                 1                     28m
            metrics-server   N/A             1                 1                     28m
            
            # 관리형 노드 그룹 확인
            eksctl get nodegroup --cluster $CLUSTER_NAME
            aws eks describe-nodegroup --cluster-name $CLUSTER_NAME --nodegroup-name ng1 | jq
            
            # eks addon 확인
            eksctl get addon --cluster $CLUSTER_NAME
            NAME            VERSION                 STATUS  ISSUES  IAMROLE                                                                         UPDATE AVAILABLE                                                CONFIGURATION VALUES    POD IDENTITY ASSOCIATION ROLES
            coredns         v1.11.3-eksbuild.1      ACTIVE  0                                                                                       v1.11.4-eksbuild.2,v1.11.4-eksbuild.1,v1.11.3-eksbuild.2
            kube-proxy      v1.31.2-eksbuild.3      ACTIVE  0                                                                                       v1.31.3-eksbuild.2
            metrics-server  v0.7.2-eksbuild.1       ACTIVE  0
            vpc-cni         v1.19.0-eksbuild.1      ACTIVE  0       arn:aws:iam::[IAM_ACCOUNT]:role/eksctl-myeks-addon-vpc-cni-Role1-E7LtWFyJlJNm    v1.19.2-eksbuild.1                             enableNetworkPolicy: "true
          • EC2 관리 콘솔 확인 : type, az, IP, ec2 instance profile → iam role 확인


      • 0.4. 관리형 노드 그룹(EC2) 접속 및 노드 정보 확인
        • 관리 콘솔 EC2 서비스 : 관리형 노드 그룹(EC2) 에 보안그룹 ID 확인
        • 해당 보안그룹 inbound 에 자신의 집 공인 IP 추가 후 접속 확인
          # 인스턴스 공인 IP 확인
          aws ec2 describe-instances --query "Reservations[*].Instances[*].{InstanceID:InstanceId, PublicIPAdd:PublicIpAddress, PrivateIPAdd:PrivateIpAddress, InstanceName:Tags[?Key=='Name']|[0].Value, Status:State.Name}" --filters Name=instance-state-name,Values=running --output table
          
          # 인스턴스 공인 IP 변수 지정
          export N1=<az1 배치된 EC2 공인 IP>
          export N2=<az2 배치된 EC2 공인 IP>
          export N3=<az3 배치된 EC2 공인 IP>
          echo $N1, $N2, $N3
          
          # ping 테스트
          ping -c 2 $N1
          ping -c 2 $N2
          
          # *nodegroup-ng1* 포함된 보안그룹 ID
          export MNSGID=<각자 자신의 관리형 노드 그룹(EC2) 에 보안그룹 ID>
          export MNSGID=sg-075e2e6178557c95a
          
          # 해당 보안그룹 inbound 에 자신의 집 공인 IP 룰 추가
          aws ec2 authorize-security-group-ingress --group-id $MNSGID --protocol '-1' --cidr $(curl -s ipinfo.io/ip)/32
          
          # 해당 보안그룹 inbound 에 운영서버 내부 IP 룰 추가
          aws ec2 authorize-security-group-ingress --group-id $MNSGID --protocol '-1' --cidr 172.20.1.100/32
          
          # AWS EC2 관리 콘솔에서 EC2에 보안 그룹에 inbound rule 에 추가된 규칙 정보 확인
          
          
          # ping 테스트
          ping -c 2 $N1
          ping -c 2 $N2
          
          # 워커 노드 SSH 접속
          ssh -i <SSH 키> -o StrictHostKeyChecking=no ec2-user@$N1 hostname
          for i in $N1 $N2 $N3; do echo ">> node $i <<"; ssh -o StrictHostKeyChecking=no ec2-user@$i hostname; echo; done
          
          # 위의 설정이 안된다면 설정
          # 방법1.
          eval "$(ssh-agent -s)"
          ssh-add /path/to/your/private-key.pem
          ssh ec2-user@your-ec2-public-ip
          
          # 방법2.
          nano ~/.ssh/config
          
          Host my-ec2-instance
            HostName your-ec2-public-ip
            User ec2-user
            IdentityFile /path/to/your/private-key.pem
          
          ssh my-ec2-instance
          
          
          ssh ec2-user@$N1
          exit
          ssh ec2-user@$N2
          exit
          ssh ec2-user@$N2
          exit
          
          ------------------
          # 운영서버 EC2에서 접속 시
          
          ## 인스턴스 공인 IP 변수 지정
          echo N1=<az1 배치된 EC2 내부 IP> >> .bash_profile
          echo N2=<az1 배치된 EC2 내부 IP> >> .bash_profile
          echo N3=<az1 배치된 EC2 내부 IP> >> .bash_profile
          source .bash_profile
          
          echo $N1, $N2, $N3
          
          ## ping 테스트
          ping -c 2 $N1
          ping -c 2 $N2
        • (옵션) AWS EC2 System Manager - Session Manager 로 관리형 노드 그룹(EC2) 접속
          • 방안1 : 터미널에서 접속
            # 인스턴스 ID 확인
            aws ec2 describe-instances --query "Reservations[*].Instances[*].{InstanceID:InstanceId, PublicIPAdd:PublicIpAddress, PrivateIPAdd:PrivateIpAddress, InstanceName:Tags[?Key=='Name']|[0].Value, Status:State.Name}" --filters Name=instance-state-name,Values=running --output text
            
            # Session Manager 를 통한 접속
            aws ssm start-session --target i-08de73b8e3d968f24
            --------------------------------------------------
            # 기본 사용자 정보 확인
            whoami
            pwd
            
            # bash shell 적용
            bash
            whoami
            pwd
            
            # 기본 정보 확인
            hostnamectl
            
            # sudo 권한 사용 확인 >> 가능한 이유는? ChatGPT 등에 물어보시라!
            sudo cat /etc/passwd
            
            # 빠져나오기
            exit
            exit
            --------------------------------------------------
          • 방안2 : 관리 콘솔 AWS EC2 System Manager - Session Manager 에서 접속 - Link
            • 세션 종료 후 로깅 확인해보기
        • 노드 정보 확인
          # 노드 정보 확인
          for i in $N1 $N2 $N3; do echo ">> node $i <<"; ssh ec2-user@$i hostnamectl; echo; done
          for i in $N1 $N2 $N3; do echo ">> node $i <<"; ssh ec2-user@$i sudo ip -c addr; echo; done
          for i in $N1 $N2 $N3; do echo ">> node $i <<"; ssh ec2-user@$i sudo ip -c route; echo; done
          for i in $N1 $N2 $N3; do echo ">> node $i <<"; ssh ec2-user@$i sudo iptables -t nat -S; echo; done
          
          # Node cgroup version : v1(tmpfs), v2(cgroup2fs) - Link
          for i in $N1 $N2 $N3; do echo ">> node $i <<"; ssh ec2-user@$i stat -fc %T /sys/fs/cgroup/; echo; done
          for i in $N1 $N2 $N3; do echo ">> node $i <<"; ssh ec2-user@$i findmnt -t cgroup2; echo; done
          
          #
          for i in $N1 $N2 $N3; do echo ">> node $i <<"; ssh ec2-user@$i sudo systemctl status kubelet; echo; done
          for i in $N1 $N2 $N3; do echo ">> node $i <<"; ssh ec2-user@$i ps axf |grep /usr/bin/containerd; echo; done
          for i in $N1 $N2 $N3; do echo ">> node $i <<"; ssh ec2-user@$i sudo tree /etc/kubernetes/kubelet/; echo; done
          for i in $N1 $N2 $N3; do echo ">> node $i <<"; ssh ec2-user@$i sudo cat /etc/kubernetes/kubelet/config.json | jq; echo; done
          for i in $N1 $N2 $N3; do echo ">> node $i <<"; ssh ec2-user@$i sudo cat /etc/kubernetes/kubelet/config.json.d/00-nodeadm.conf | jq; echo; done
          
          #
          for i in $N1 $N2 $N3; do echo ">> node $i <<"; ssh ec2-user@$i lsblk; echo; done
          for i in $N1 $N2 $N3; do echo ">> node $i <<"; ssh ec2-user@$i df -hT /; echo; done
          
          # 컨테이너 리스트 확인
          for i in $N1 $N2 $N3; do echo ">> node $i <<"; ssh ec2-user@$i sudo ctr -n k8s.io container list; echo; done
          CONTAINER                                                           IMAGE                                                                                          RUNTIME
          28b6a15c475e32cd8777c1963ba684745573d0b6053f80d2d37add0ae841eb45    602401143452.dkr.ecr-fips.us-east-1.amazonaws.com/eks/pause:3.5                                io.containerd.runc.v2
          4f266ebcee45b133c527df96499e01ec0c020ea72785eb10ef63b20b5826cf7c    602401143452.dkr.ecr-fips.us-east-1.amazonaws.com/eks/pause:3.5                                io.containerd.runc.v2
          ...
          
          # 컨테이너 이미지 확인
          for i in $N1 $N2 $N3; do echo ">> node $i <<"; ssh ec2-user@$i sudo ctr -n k8s.io image list --quiet; echo; done
          ...
          
          # 태스크 리스트 확인
          for i in $N1 $N2 $N3; do echo ">> node $i <<"; ssh ec2-user@$i sudo ctr -n k8s.io task list; echo; done


      • 0.5. 실습에서 자주 사용하는 변수
        #
        export KUBECONFIG=~/Downloads/kubeconfig
        export CLUSTER_NAME=myeks
        
        # eks api server kubeconfig 설정
        aws eks update-kubeconfig --name [EKS_CLUSTER_NAME]
        
        # myeks-VPC/Subnet 정보 확인 및 변수 지정
        export VPCID=$(aws ec2 describe-vpcs --filters "Name=tag:Name,Values=$CLUSTER_NAME-VPC" --query 'Vpcs[*].VpcId' --output text)
        echo $VPCID
        
        export PubSubnet1=$(aws ec2 describe-subnets --filters Name=tag:Name,Values="$CLUSTER_NAME-Vpc1PublicSubnet1" --query "Subnets[0].[SubnetId]" --output text)
        export PubSubnet2=$(aws ec2 describe-subnets --filters Name=tag:Name,Values="$CLUSTER_NAME-Vpc1PublicSubnet2" --query "Subnets[0].[SubnetId]" --output text)
        export PubSubnet3=$(aws ec2 describe-subnets --filters Name=tag:Name,Values="$CLUSTER_NAME-Vpc1PublicSubnet3" --query "Subnets[0].[SubnetId]" --output text)
        echo $PubSubnet1 $PubSubnet2 $PubSubnet3
        
        # 인스턴스 IP 확인
        aws ec2 describe-instances --query "Reservations[*].Instances[*].{InstanceID:InstanceId, PublicIPAdd:PublicIpAddress, PrivateIPAdd:PrivateIpAddress, InstanceName:Tags[?Key=='Name']|[0].Value, Status:State.Name}" --filters Name=instance-state-name,Values=running --output table
        
        # 인스턴스 공인 IP 변수 지정
        #export N1=<az1 배치된 EC2 공인 IP>
        #export N2=<az2 배치된 EC2 공인 IP>
        #export N3=<az3 배치된 EC2 공인 IP>
        
        echo $N1, $N2, $N3
        
        
        # 노드 정보 확인
        for i in $N1 $N2 $N3; do echo ">> node $i <<"; ssh ec2-user@$i hostnamectl; echo; done
        for i in $N1 $N2 $N3; do echo ">> node $i <<"; ssh ec2-user@$i sudo ip -c addr; echo; done
        for i in $N1 $N2 $N3; do echo ">> node $i <<"; ssh ec2-user@$i sudo ip -c route; echo; done
        for i in $N1 $N2 $N3; do echo ">> node $i <<"; ssh ec2-user@$i sudo iptables -t nat -S; echo; done
        
        
        # 파드 이름 변수 지정
        PODNAME1=$(kubectl get pod -l app=netshoot-pod -o jsonpath='{.items[0].metadata.name}')
        PODNAME2=$(kubectl get pod -l app=netshoot-pod -o jsonpath='{.items[1].metadata.name}')
        PODNAME3=$(kubectl get pod -l app=netshoot-pod -o jsonpath='{.items[2].metadata.name}')
        
        # 파드 IP 변수 지정
        PODIP1=$(kubectl get pod -l app=netshoot-pod -o jsonpath='{.items[0].status.podIP}')
        PODIP2=$(kubectl get pod -l app=netshoot-pod -o jsonpath='{.items[1].status.podIP}')
        PODIP3=$(kubectl get pod -l app=netshoot-pod -o jsonpath='{.items[2].status.podIP}')
        
        # 자신의 도메인 변수 지정 : 소유하고 있는 자신의 도메인을 입력하시면 됩니다
        MyDomain=<자신의 도메인>
        MyDomain=gasida.link
        
        MyDnzHostedZoneId=`aws route53 list-hosted-zones-by-name --dns-name "${MyDomain}." --query "HostedZones[0].Id" --output text`
        echo $MyDnzHostedZoneId
        
        # A 레코드 값 반복 조회
        while true; do aws route53 list-resource-record-sets --hosted-zone-id "${MyDnzHostedZoneId}" --query "ResourceRecordSets[?Type == 'A']" | jq ; date ; echo ; sleep 1; done


      • 0.6. 운영서버 EC2에서 eks 를 사용 할 수 있게 설정 해보자. 이후 eks api endpoint 접속 흐름 알아보기
        # eks 설치한 iam 자격증명을 설정하기
        aws configure
        ...
        
        # get-caller-identity 확인
        aws sts get-caller-identity --query Arn
        
        # kubeconfig 생성
        cat ~/.kube/config
        aws eks update-kubeconfig --name myeks --user-alias <위 출력된 자격증명 사용자>
        aws eks update-kubeconfig --name myeks --user-alias admin
        
        # 추가된 kubeconfig 정보 확인
        cat ~/.kube/config
        
        # eks api dig 조회 : VPC 내부에서 질의하는데 왜 그럴까? private hosted zone 의 특징을 알아보자
        APIDNS=$(aws eks describe-cluster --name myeks | jq -r .cluster.endpoint | cut -d '/' -f 3)
        dig +short $APIDNS
        
        # 
        kubectl cluster-info
        kubectl ns default
        kubectl get node -v6


      1. AWS VPC CNI
        • Amazon EKS는 클러스터 네트워킹을 Amazon VPC Container Network Interface(CNI) 플러그인을 통해 구현한다. 이 플러그인은 Kubernetes Pods가 VPC 네트워크에서와 동일한 IP 주소를 가지도록 한다. 좀 더 구체적으로 말하면, Pod 내의 모든 컨테이너는 동일한 네트워크 네임스페이스를 공유하며, 로컬 포트를 사용해 서로 통신할 수 있다.
        • Amazon VPC CNI에는 두 가지 구성 요소가 있다:
          1. CNI Binary: 이는 Pod 네트워크를 설정하여 Pod 간 통신을 가능하게 한다. CNI Binary는 노드의 루트 파일 시스템에서 실행되며, 새로운 Pod가 노드에 추가되거나 기존 Pod가 제거될 때 kubelet에 의해 호출된다.
          1. ipamd: 이는 long-running node-local IP Address Management (IPAM) daemon으로, 다음 작업을 담당한다:
            • 노드의 ENI 관리
            • 사용 가능한 IP 주소 또는 prefix의 warm-pool(=예비 풀) 관리
        • 인스턴스가 생성되면 EC2는 기본 서브넷에 연결된 기본 ENI를 생성하고 연결한다. 기본 서브넷은 public 또는 private일 수 있다. hostNetwork 모드에서 실행되는 Pods는 노드의 기본 ENI에 할당된 기본 IP 주소를 사용하며, 호스트와 동일한 Network Namespace를 공유한다.
        • CNI Plugin은 노드에서 Elastic Network Interfaces(ENI)를 관리한다. 노드가 프로비저닝되면 CNI Plugin은 자동으로 노드의 서브넷에서 기본 ENI에 IP 주소 또는 prefix를 할당하는 슬롯 풀을 할당한다. 이 풀은 warm pool(= 예비 풀)이라고 하며, 크기는 노드의 인스턴스 유형에 의해 결정된다. CNI 설정에 따라 슬롯은 IP 주소나 프리픽스일 수 있다. ENI의 슬롯이 할당되면, CNI는 노드에 추가 ENI를 연결하여 warm pool의 슬롯을 할당할 수 있다. 이 추가 ENI는 Secondary ENI라고 한다. 각 ENI는 인스턴스 유형에 따라 지원할 수 있는 슬롯 수가 제한된다. CNI는 필요한 슬롯 수에 따라 인스턴스에 추가 ENI를 연결하며, 이는 일반적으로 Pod 수에 해당한다. 이 과정은 노드가 더 이상 추가 ENI를 지원할 수 없을 때까지 계속된다. CNI는 빠른 Pod 시작을 위해 예비 ENI와 슬롯을 미리 할당하기도 한다. 각 인스턴스 유형에는 최대 연결 가능한 ENI 수가 있으므로, 이는 노드당 Pod 밀도의 제한 요소가 된다. hostNetwork를 사용하는 Pods는 이 계산에서 제외된다. EKS 사용자는 최대 Pods 수를 설정하여 인스턴스의 CPU와 메모리 자원 고갈을 피하는 것이 좋다. 최대 Pods 수를 계산하기 위해 max-pod-calculator.sh라는 스크립트를 사용하는 것을 고려할 수 있다.

        aws docs 참고: https://docs.aws.amazon.com/eks/latest/userguide/cni-increase-ip-addresses.html오해 할 수 있는게 최대 IP 개수 만큼 data plane(ec2 instance)가 pod를 갖을 수 있다는 의미는 아닐 수 있다. 해당 data plane의 instance spec에 따라 배포 될 수 있는 pod의 개수는 다를 수 있다는 점을 명시하자.
        • Secondary IPv4 addresses : 인스턴스 유형에 최대 ENI 갯수와 할당 가능 IP 수를 조합하여 선정 ← default 설정임
        • IPv4 Prefix Delegation : IPv4 28bit 서브넷(prefix)를 위임하여 할당 가능 IP 수와 인스턴스 유형에 권장하는 최대 갯수로 선정 - 설정 실습
        • AWS VPC CNI Custom Networking : 노드와 파드 대역 분리, 파드에 별도 서브넷 부여 후 사용 - AWS Docs설정 실습
        참고: EKS CNI Custom Network를 이용한 Pod 대역 분리
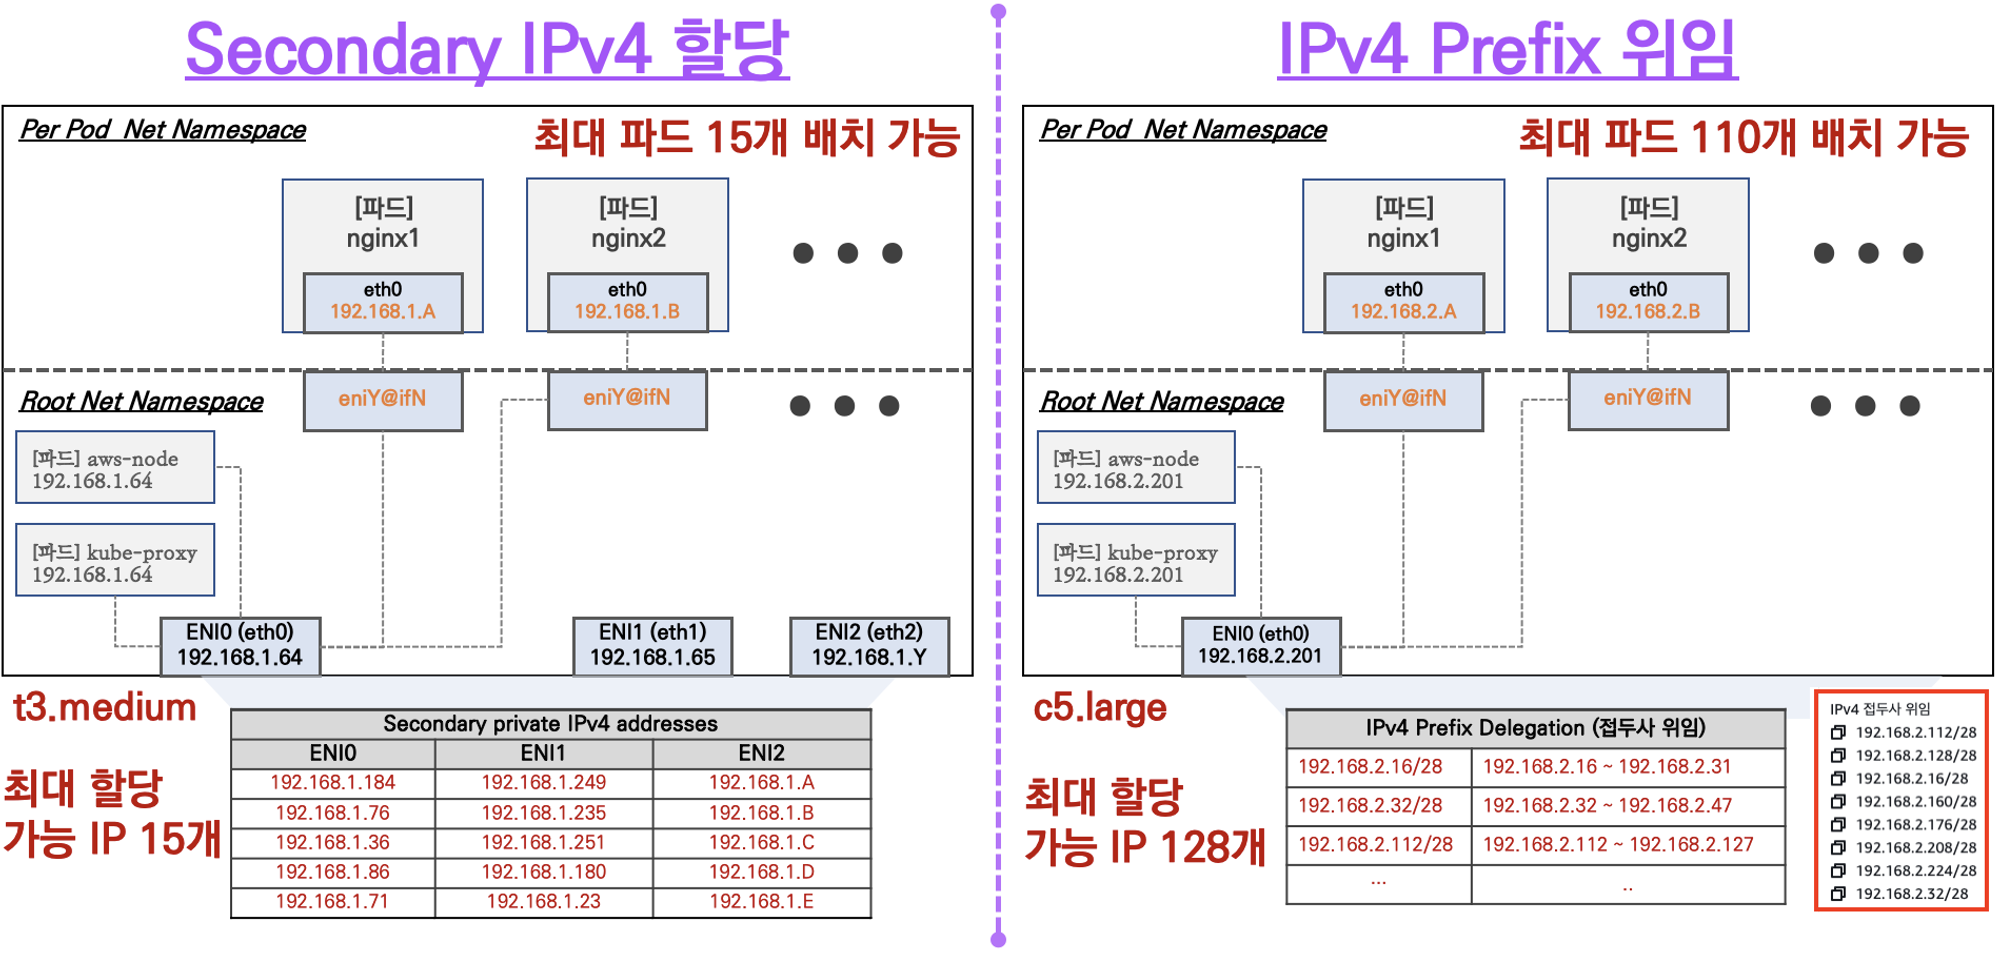
        [그림 1] Secondary IPv4(default) vs IPv4 Prefix 위임

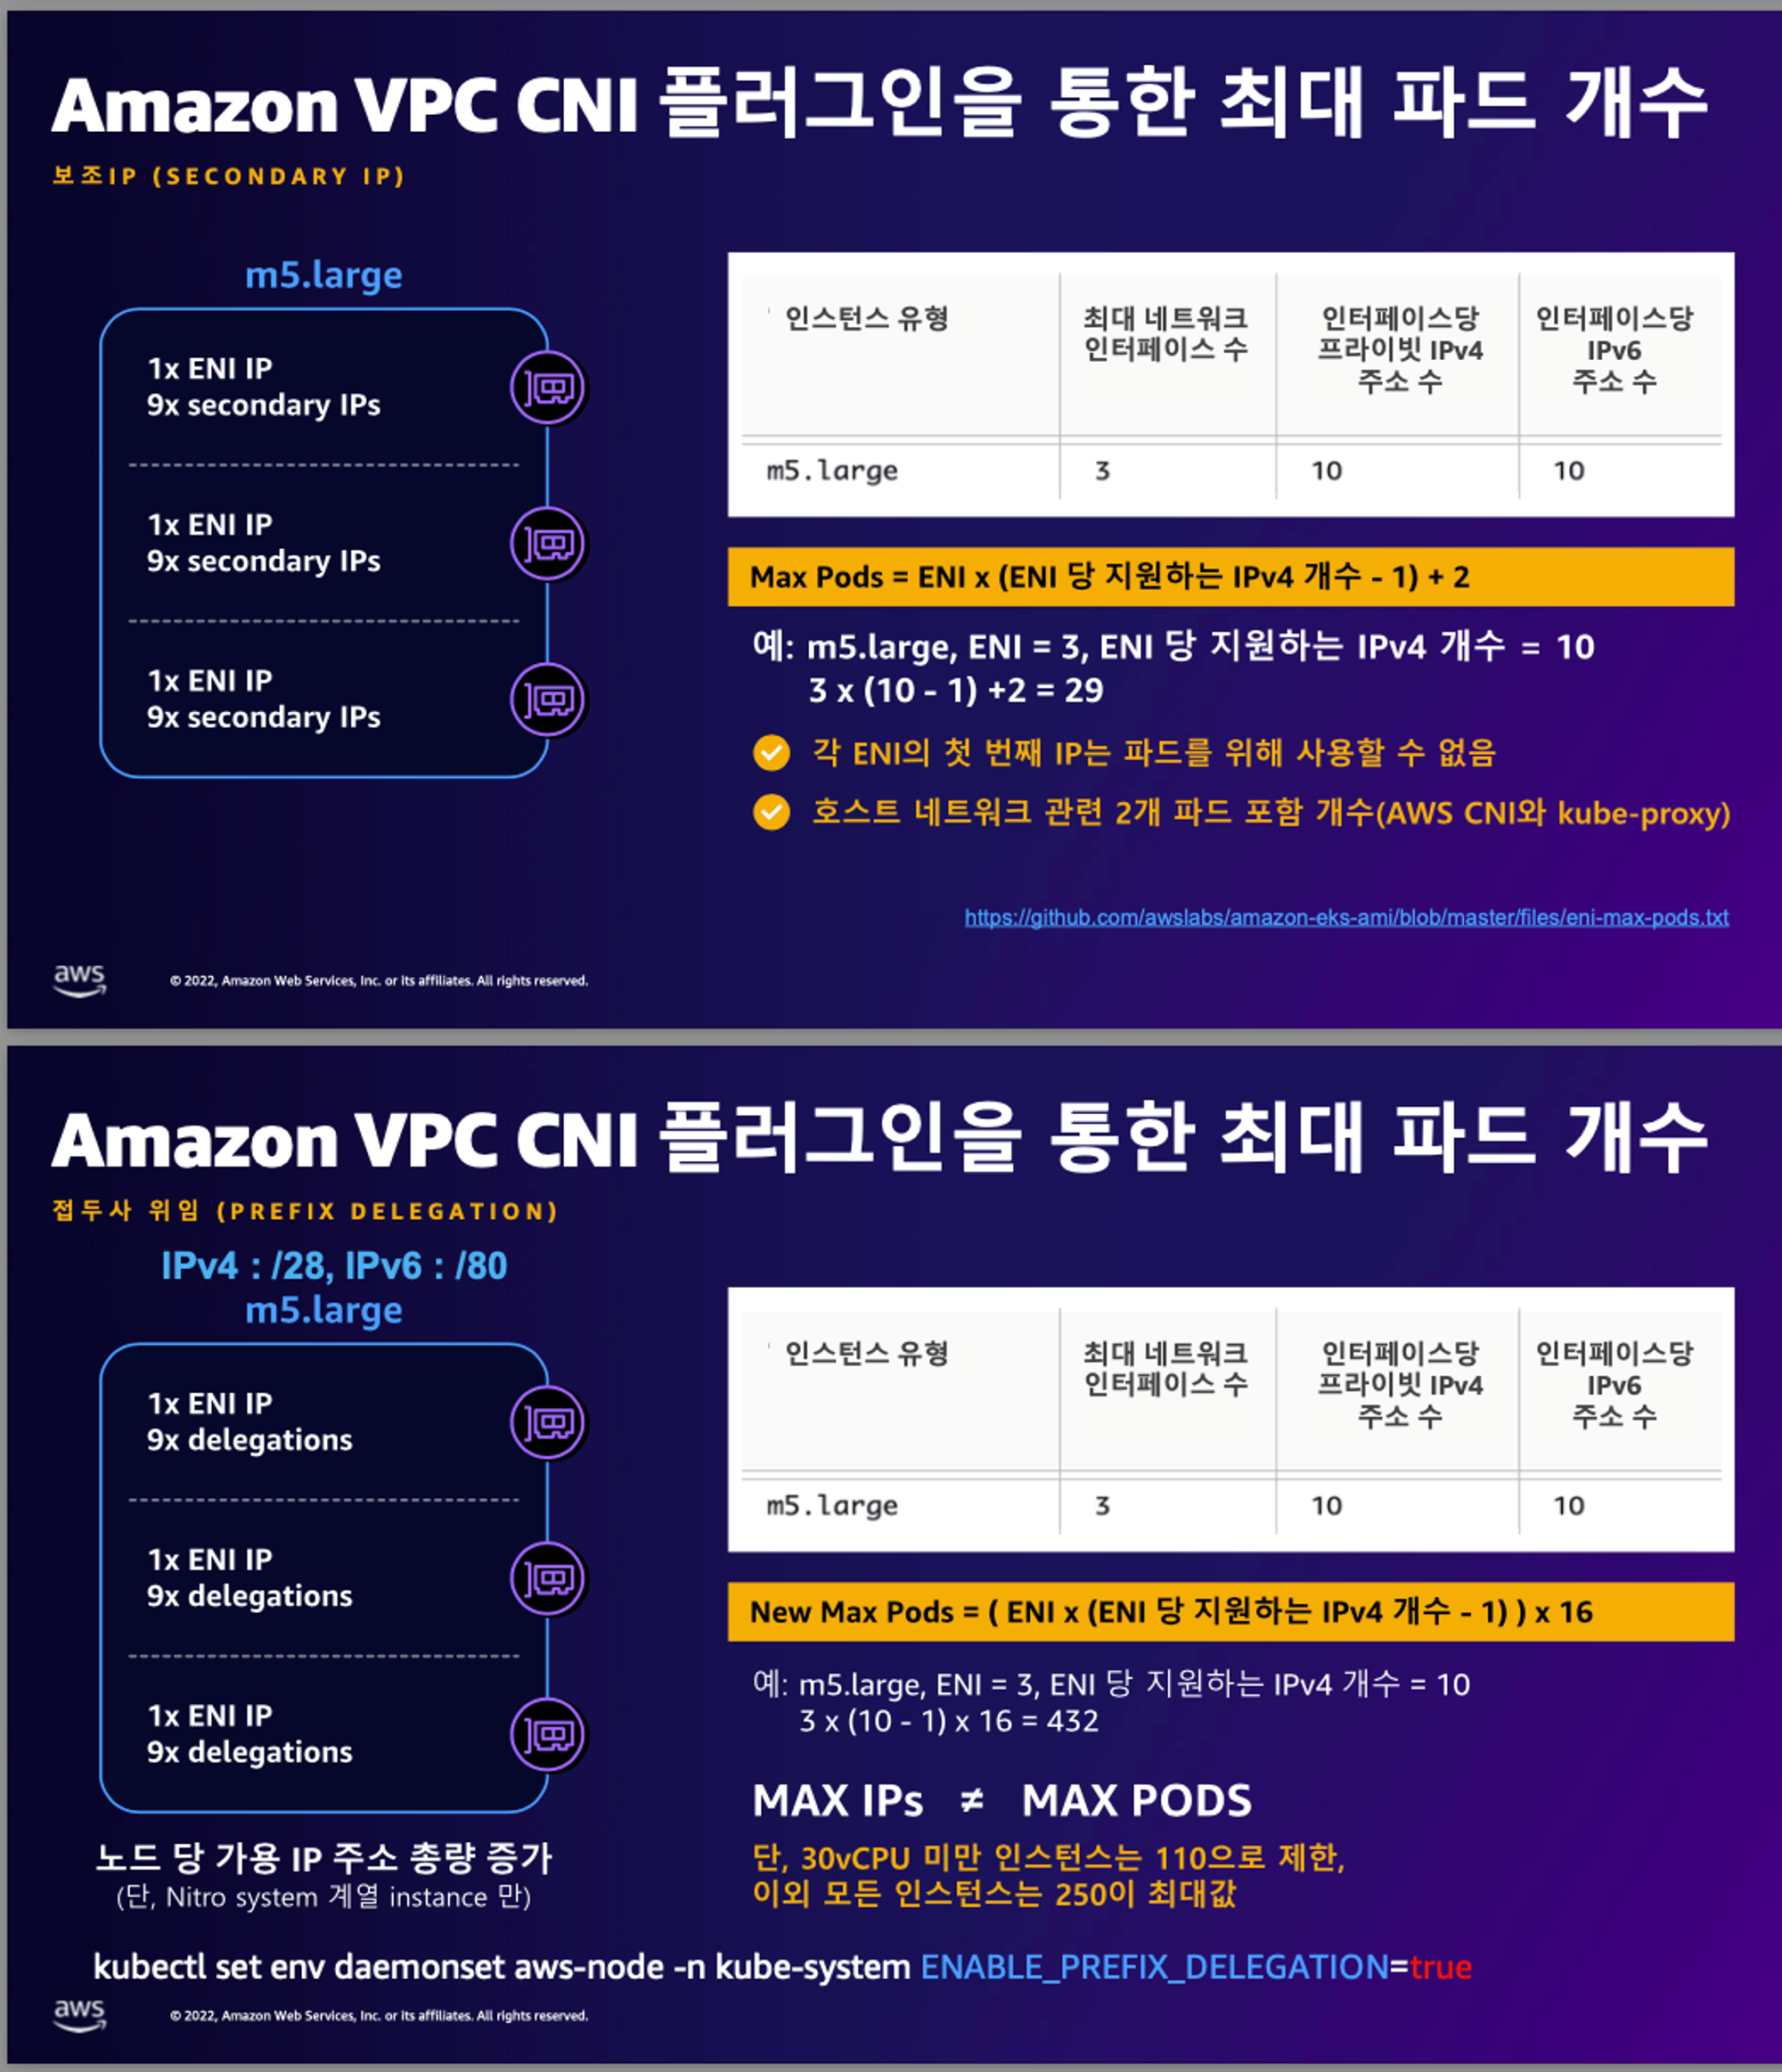
        하지만 IPv4 Prefix 위임 방식을 사용하게 되면, ENI에 secondary ip로 32bit의 ip address가 할당되는 것이 아닌 /28 bit의 ip range가 할당된다. 그러면 c5.large 기준으로 8개의 secondary ip를 가질 수 있고 각 ip range가 16개의 32bit ip address를 가질 수 있으므로, 8 * 16 = 128개의 ip를 가질 수 있다. 즉, c5.large ec2 instance기준으로 해당 data plane은 128개의 pod가 배포될 수 있는 것이다.
        [그림 2] Data plane(EC2 instance)에 배포 될 수 있는 최대 Pod 개수 계산

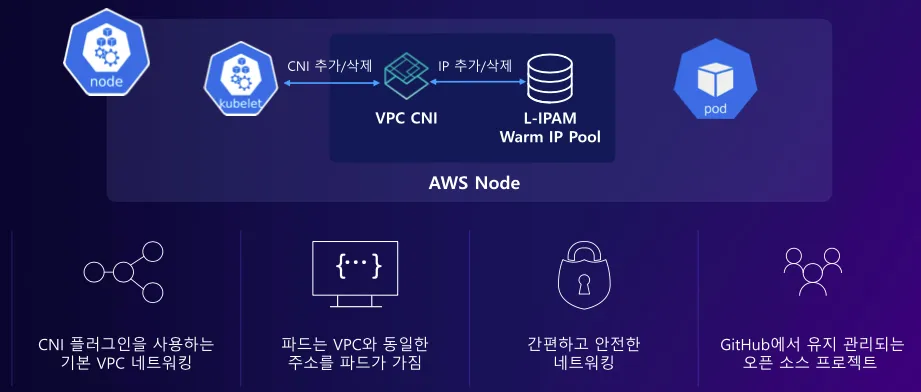
        VPC CNI가 동작하는 방식을 도식화하면 아래와 같이 표현 할 수 있다. 앞서 말했듯이 VPC CNI는 ENI에 미리 할당된 IP(warm pool)를 파드에서 사용 할 수 있도록 한다.
        • supports native VPC networking with the Amazon VPC Container Network Interface (CNI) plugin for Kubernetes.
        • VPC 와 통합 : VPC Flow logs , VPC 라우팅 정책, 보안 그룹(Security group) 을 사용 가능함
        • This plugin assigns an IP address from your VPC to each pod.
        • VPC ENI 에 미리 할당된 IP(=Local-IPAM Warm IP Pool)를 파드에서 사용할 수 있음 ← 파드의 빠른 시작을 위해서

        참고: https://docs.aws.amazon.com/eks/latest/best-practices/vpc-cni.html
        • 최초 EKS Cluster setup후 VPC CNI와 L-IPAM 동작
          aws-node라는 daemonset형태의 pod가 각 DataPlane에 배포되고 해당 pod안에 vpc cni controller가 동작하면서 L-IPAM에 warm pool을 세팅하고 각 Data Plane node의 iptables rules와 route table을 설정한다.
        •  
        • Pod가 생성될때 VPC CNI 및 L-IPAM 동작
        • Warm pool이 모두 사용되면 아래와 같이 동작한다.
          만약 Data Plane의 EC2 Node가 ENI를 더 할당할 수 있다면, 위와 같이 새로운 ENI를 추가하고 Warm pool을 추가로 설정하여 ip를 확보한다.
        • VPC CNI 확인하기(= aws-node Daemonset)
          
          # CNI 정보 확인
          kubectl describe daemonset aws-node --namespace kube-system | grep Image | cut -d "/" -f 2
          
          # kube-proxy config 확인 : 모드 iptables 사용 >> ipvs 모드로 변경 해보자!
          kubectl describe cm -n kube-system kube-proxy-config
          ...
          mode: "iptables"
          ...
          
          # 노드 IP 확인
          aws ec2 describe-instances --query "Reservations[*].Instances[*].{PublicIPAdd:PublicIpAddress,PrivateIPAdd:PrivateIpAddress,InstanceName:Tags[?Key=='Name']|[0].Value,Status:State.Name}" --filters Name=instance-state-name,Values=running --output table
          
          # 파드 IP 확인
          kubectl get pod -n kube-system -o=custom-columns=NAME:.metadata.name,IP:.status.podIP,STATUS:.status.phase
          
          # 파드 이름 확인
          kubectl get pod -A -o name
          
          # 파드 갯수 확인
          kubectl get pod -A -o name | wc -l
          
          # CNI 정보 확인
          for i in $N1 $N2 $N3; do echo ">> node $i <<"; ssh ec2-user@$i tree /var/log/aws-routed-eni; echo; done
          ssh ec2-user@$N1 sudo cat /var/log/aws-routed-eni/plugin.log | jq
          ssh ec2-user@$N1 sudo cat /var/log/aws-routed-eni/ipamd.log | jq
          ssh ec2-user@$N1 sudo cat /var/log/aws-routed-eni/egress-v6-plugin.log | jq
          ssh ec2-user@$N1 sudo cat /var/log/aws-routed-eni/ebpf-sdk.log | jq
          ssh ec2-user@$N1 sudo cat /var/log/aws-routed-eni/network-policy-agent.log | jq
          
          # 네트워크 정보 확인 : eniY는 pod network 네임스페이스와 veth pair
          for i in $N1 $N2 $N3; do echo ">> node $i <<"; ssh ec2-user@$i sudo ip -br -c addr; echo; done
          for i in $N1 $N2 $N3; do echo ">> node $i <<"; ssh ec2-user@$i sudo ip -c addr; echo; done
          for i in $N1 $N2 $N3; do echo ">> node $i <<"; ssh ec2-user@$i sudo ip -c route; echo; done
          ssh ec2-user@$N1 sudo iptables -t nat -S
          ssh ec2-user@$N1 sudo iptables -t nat -L -n -v
      2. 1.2.1. AWS VPC CNI & L-IPAM
      3. VPC CNI의 특징은 아래와 같이 설명 할 수 있다.
    1. 1.2. VPC CNI 동작방식(feat. L-IPAM)
    2. 아래 그림을 보면 좀 더 쉽게 이해 할 수 있다.
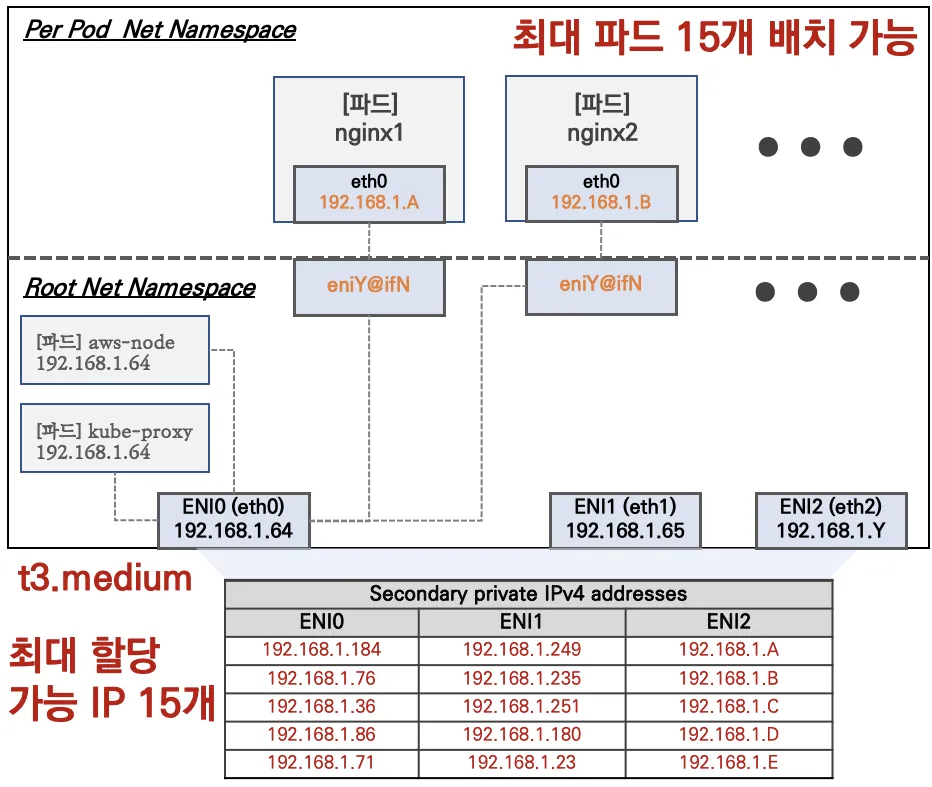
    3. t3.medium 기준 하나의 data plane은 3개의 ENI를 갖을 수 있고 각 ENI 마다 5개의 secondary ip를 가질 수 있으므로(+primary ip 1개) 총 15개의 pod를 배포 할 수 있는 것이다.
    4. 위 처럼 총 3가지의 방식으로 ip를 할당하는 방식을 설정 할 수 있으며, Secondary IPv4 addresses가 default 설정이다. 이렇게하면 Data plane에 배포 가능한 pod 개수가 아주 제한적이게 된다. 아래 그림을 보면 이해가 빠르다.
    5.  
    6. 1.1. Data Plane에 할당 할 수 있는 최대 IP 개수


    1. Data Plane Node에서 네트워크 정보 확인
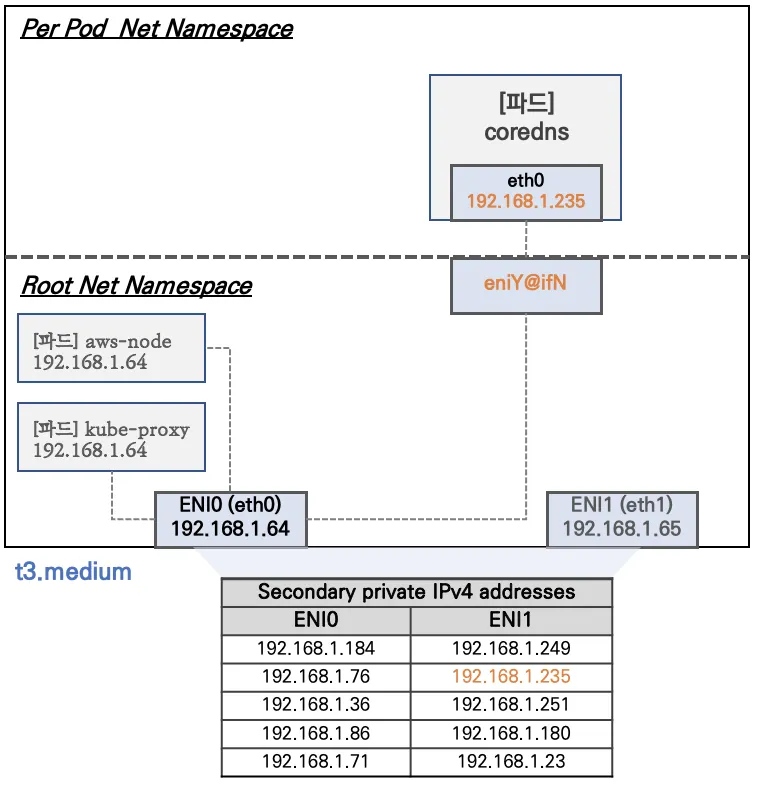
      • Network 네임스페이스는 호스트(Root)와 파드 별(Per Pod)로 구분된다
      • t3.medium 의 경우 ENI 마다 최대 6개의 IP를 가질 수 있다
      • ENI0, ENI1 으로 2개의 ENI는 자신의 IP 이외에 추가적으로 5개의 보조 프라이빗 IP를 가질수 있다
      • coredns 파드는 veth 으로 호스트에는 eniY@ifN 인터페이스와 파드에 eth0 과 연결되어 있다


      • 네트워크인터페이스(ENI)에 설명 내용 확인 → Primary ENI와 Secondary ENI의 설명 차이점 확인 - Link
        • Primary ENI는 amazon linux 2의 경우 eth0, eth1/ amazon linux 2023의 경우 ens5, ens6 과 같이 실제 ec2 instance에 장착되는 ENI를 말한다.
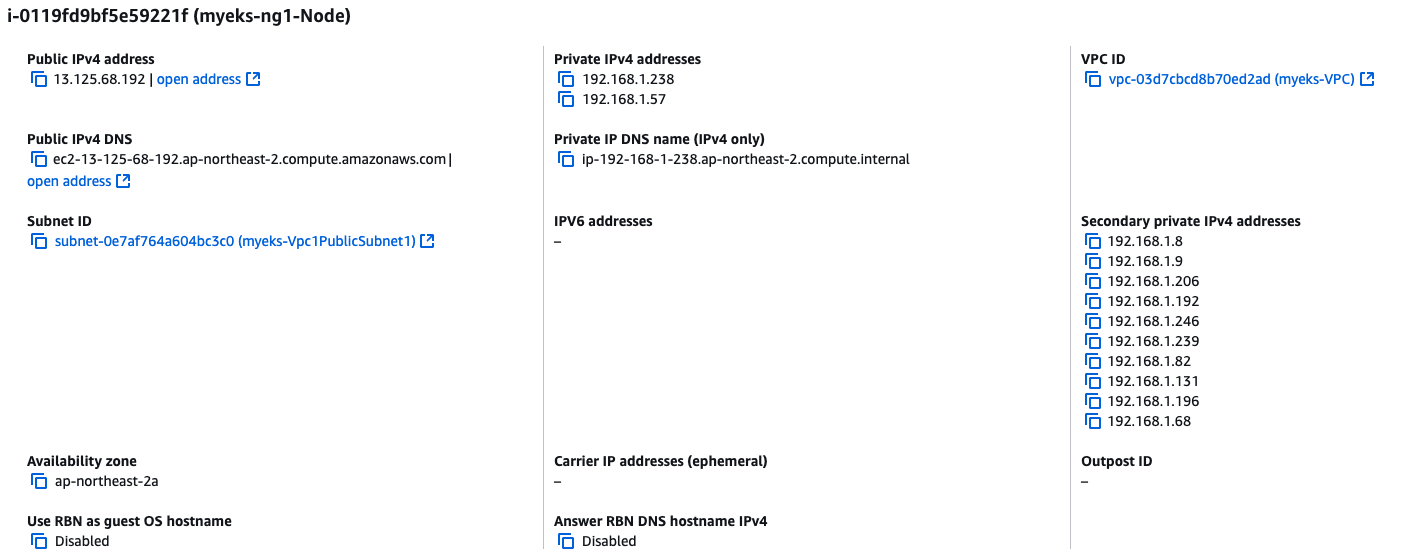
        • Secondary는 하나의 NIC에 추가적으로 할당 될 수 있는 private ip들을 말한다. → 위의 t3.medium의 경우 하나의 primary ENI당 5개의 secondary private ip를 가질 수 있다.
    2. worker node 1 인스턴스의 네트워크 정보 확인 : 프라이빗 IP와 보조 프라이빗 IP 확인
    3. 2.1. Worker Node 기본 네트워크 구성

    2.2. 보조 IPv4 주소를 파드가 사용하는지 확인

    # coredns 파드 IP 정보 확인
    kubectl get pod -n kube-system -l k8s-app=kube-dns -owide
    NAME                      READY   STATUS    RESTARTS   AGE   IP              NODE                                               NOMINATED NODE   READINESS GATES
    coredns-9b5bc9468-bntlb   1/1     Running   0          94m   192.168.1.8     ip-192-168-1-238.ap-northeast-2.compute.internal   <none>           <none>
    coredns-9b5bc9468-vgwnq   1/1     Running   0          94m   192.168.1.192   ip-192-168-1-238.ap-northeast-2.compute.internal   <none>           <none>
    
    # 노드의 라우팅 정보 확인 >> EC2 네트워크 정보의 '보조 프라이빗 IPv4 주소'와 비교해보자
    for i in $N1 $N2 $N3; do echo ">> node $i <<"; ssh ec2-user@$i sudo ip -c route; echo; done

    2.3. 테스트용 netshoot-pod 디플로이먼트 생성 - nicolaka/netshoot

    # [터미널1~3] 노드 모니터링
    ssh ec2-user@$N1
    watch -d "ip link | egrep 'ens|eni' ;echo;echo "[ROUTE TABLE]"; route -n | grep eni"
    
    ssh ec2-user@$N2
    watch -d "ip link | egrep 'ens|eni' ;echo;echo "[ROUTE TABLE]"; route -n | grep eni"
    
    ssh ec2-user@$N3
    watch -d "ip link | egrep 'ens|eni' ;echo;echo "[ROUTE TABLE]"; route -n | grep eni"
    
    # 테스트용 netshoot-pod 디플로이먼트 생성
    cat <<EOF | kubectl apply -f -
    apiVersion: apps/v1
    kind: Deployment
    metadata:
      name: netshoot-pod
    spec:
      replicas: 3
      selector:
        matchLabels:
          app: netshoot-pod
      template:
        metadata:
          labels:
            app: netshoot-pod
        spec:
          containers:
          - name: netshoot-pod
            image: nicolaka/netshoot
            command: ["tail"]
            args: ["-f", "/dev/null"]
          terminationGracePeriodSeconds: 0
    EOF
    
    # 파드 이름 변수 지정
    PODNAME1=$(kubectl get pod -l app=netshoot-pod -o jsonpath='{.items[0].metadata.name}')
    PODNAME2=$(kubectl get pod -l app=netshoot-pod -o jsonpath='{.items[1].metadata.name}')
    PODNAME3=$(kubectl get pod -l app=netshoot-pod -o jsonpath='{.items[2].metadata.name}')
    
    # 파드 확인
    kubectl get pod -o wide
    kubectl get pod -o=custom-columns=NAME:.metadata.name,IP:.status.podIP
    
    # 노드에 라우팅 정보 확인
    for i in $N1 $N2 $N3; do echo ">> node $i <<"; ssh ec2-user@$i sudo ip -c route; echo; done
    
    # Worker Node 1에 현재 총 3개의 pod가 떠있고 아래 내용을 보면 veth(=eniY@ifN)가 총 3개 생성되어 3개의 secondary ip를 사용중이다.
    2: ens5: <BROADCAST,MULTICAST,UP,LOWER_UP> mtu 9001 qdisc mq state
     UP mode DEFAULT group default qlen 1000
    3: eniaa4a0423bfb@if3: <BROADCAST,MULTICAST,UP,LOWER_UP> mtu 9001
    qdisc noqueue state UP mode DEFAULT group default
    4: eniec5dbd1e5a8@if3: <BROADCAST,MULTICAST,UP,LOWER_UP> mtu 9001
    qdisc noqueue state UP mode DEFAULT group default
    5: ens6: <BROADCAST,MULTICAST,UP,LOWER_UP> mtu 9001 qdisc mq state
     UP mode DEFAULT group default qlen 1000
    6: eni95888c61451@if3: <BROADCAST,MULTICAST,UP,LOWER_UP> mtu 9001
    qdisc noqueue state UP mode DEFAULT group default
    7: eni689e0467be2@if3: <BROADCAST,MULTICAST,UP,LOWER_UP> mtu 9001
    qdisc noqueue state UP mode DEFAULT group default
    
    [ROUTE TABLE]
    192.168.1.8     0.0.0.0         255.255.255.255 UH    0      0
        0 eniec5dbd1e5a8
    192.168.1.9     0.0.0.0         255.255.255.255 UH    0      0
        0 eni689e0467be2
    192.168.1.192   0.0.0.0         255.255.255.255 UH    0      0
        0 eniaa4a0423bfb
    192.168.1.246   0.0.0.0         255.255.255.255 UH    0      0
        0 eni95888c61451
    • 파드가 생성되면, 워커 노드eniY@ifN 추가되고 라우팅 테이블에도 정보가 추가된다
    • 테스트용 파드 eniY 정보 확인 - 워커 노드 EC2
    # 노드3에서 네트워크 인터페이스 정보 확인
    ssh ec2-user@$N3
    ----------------
    ip -br -c addr show
    ip -c link
    ip -c addr
    ip route # 혹은 route -n
    
    # 네임스페이스 정보 출력 -t net(네트워크 타입)
    sudo lsns -t net
    
    # PID 정보로 파드 정보 확인
    PID=<PID>  # PID 높은 것 중 COMMAND가 pause 인것
    sudo nsenter -t $PID -n ip -c addr
    sudo nsenter -t $PID -n ip -c route
    
    exit
    ----------------
    • 테스트용 파드 접속(exec) 후 확인
    # 테스트용 파드 접속(exec) 후 Shell 실행
    kubectl exec -it $PODNAME1 -- zsh
    
    # 아래부터는 pod-1 Shell 에서 실행 : 네트워크 정보 확인
    ----------------------------
    ip -c addr
    ip -c route
    route -n
    ping -c 1 <pod-2 IP>
    ps
    cat /etc/resolv.conf
    exit
    ----------------------------
    
    # 파드2 Shell 실행
    kubectl exec -it $PODNAME2 -- ip -c addr
    
    # 파드3 Shell 실행
    kubectl exec -it $PODNAME3 -- ip -br -c addr


      1. Node간 Pod 통신3.1. 파드간 통신 흐름 : AWS VPC CNI 경우 별도의
        오버레이
        (Overlay) 통신 기술 없이, VPC Native 하게 파드간 직접 통신이 가능하다3.1.1. 파드간 통신 시 과정 참고참고: https://github.com/aws/amazon-vpc-cni-k8s/blob/master/docs/cni-proposal.md3.2. 파드간 통신 테스트 및 확인 : 별도의 NAT 동작 없이 통신 가능!
        # 파드 IP 변수 지정
        PODIP1=$(kubectl get pod -l app=netshoot-pod -o jsonpath='{.items[0].status.podIP}')
        PODIP2=$(kubectl get pod -l app=netshoot-pod -o jsonpath='{.items[1].status.podIP}')
        PODIP3=$(kubectl get pod -l app=netshoot-pod -o jsonpath='{.items[2].status.podIP}')
        
        # 워커 노드 EC2 : TCPDUMP 확인
        ## For Pod to external (outside VPC) traffic, we will program iptables to SNAT using Primary IP address on the Primary ENI.
        sudo tcpdump -i any -nn icmp
        sudo tcpdump -i ens5 -nn icmp
        sudo tcpdump -i ens6 -nn icmp
        sudo tcpdump -i eniYYYYYYYY -nn icmp
        
        ## 파드1 Shell 에서 파드2로 ping 테스트
        kubectl exec -it $PODNAME1 -- ping -c 2 $PODIP2
        
        ## 각 N1과 N2에서 primary eni인 ens5에 대해서 tcpdump 확인
        NAME                            READY   STATUS    RESTARTS   AGE   IP              NODE                                               NOMINATED NODE   READINESS GATES
        netshoot-pod-744bd84b46-fxmf5   1/1     Running   0          19h   192.168.1.139   ip-192-168-1-171.ap-northeast-2.compute.internal   <none>           <none>
        netshoot-pod-744bd84b46-s744l   1/1     Running   0          19h   192.168.2.228   ip-192-168-2-90.ap-northeast-2.compute.internal    <none>           <none>
        netshoot-pod-744bd84b46-wdfpd   1/1     Running   0          19h   192.168.3.61    ip-192-168-3-123.ap-northeast-2.compute.internal   <none>           <none>
        
        ## N1
        [ec2-user@ip-192-168-1-171 ~]$ sudo tcpdump -i ens5 -nn icmp
        dropped privs to tcpdump
        tcpdump: verbose output suppressed, use -v[v]... for full protocol decode
        listening on ens5, link-type EN10MB (Ethernet), snapshot length 262144 bytes
        11:39:23.922347 IP 192.168.1.139 > 192.168.2.228: ICMP echo request, id 12, seq 1, length 64
        11:39:23.922945 IP 192.168.2.228 > 192.168.1.139: ICMP echo reply, id 12, seq 1, length 64
        11:39:24.927445 IP 192.168.1.139 > 192.168.2.228: ICMP echo request, id 12, seq 2, length 64
        11:39:24.928331 IP 192.168.2.228 > 192.168.1.139: ICMP echo reply, id 12, seq 2, length 64
        
        
        # route table에서 볼 수 있듯이 N1의 ip 대역이 아니면 default rule에 match되어 ens5로 나간다.
        # 즉, N2 Node로 traffic이 갈때는 ens5를 거쳐서 나간다.
        [ec2-user@ip-192-168-1-171 ~]$ ip route
        default via 192.168.1.1 dev ens5 proto dhcp src 192.168.1.171 metric 1024 
        192.168.0.2 via 192.168.1.1 dev ens5 proto dhcp src 192.168.1.171 metric 1024 
        192.168.1.0/24 dev ens5 proto kernel scope link src 192.168.1.171 metric 1024 
        192.168.1.1 dev ens5 proto dhcp scope link src 192.168.1.171 metric 1024 
        192.168.1.125 dev eni9d6b388c329 scope link 
        192.168.1.139 dev enicb7ee0ffe62 scope link
        
        ## N2
        [ec2-user@ip-192-168-2-90 ~]$ sudo tcpdump -i ens5 -nn icmp
        dropped privs to tcpdump
        tcpdump: verbose output suppressed, use -v[v]... for full protocol decode
        listening on ens5, link-type EN10MB (Ethernet), snapshot length 262144 bytes
        11:39:23.922620 IP 192.168.1.139 > 192.168.2.228: ICMP echo request, id 12, seq 1, length 64
        11:39:23.922700 IP 192.168.2.228 > 192.168.1.139: ICMP echo reply, id 12, seq 1, length 64
        11:39:24.928027 IP 192.168.1.139 > 192.168.2.228: ICMP echo request, id 12, seq 2, length 64
        11:39:24.928084 IP 192.168.2.228 > 192.168.1.139: ICMP echo reply, id 12, seq 2, length 64
        
        # route table에서 볼 수 있듯이 N2의 ip 대역이 아니면 default rule에 match되어 ens5로 나간다.
        # 즉, N1 Node로 traffic이 갈때는 ens5를 거쳐서 나간다.
        [ec2-user@ip-192-168-2-90 ~]$ ip route
        default via 192.168.2.1 dev ens5 proto dhcp src 192.168.2.90 metric 1024 
        192.168.0.2 via 192.168.2.1 dev ens5 proto dhcp src 192.168.2.90 metric 1024 
        192.168.2.0/24 dev ens5 proto kernel scope link src 192.168.2.90 metric 1024 
        192.168.2.1 dev ens5 proto dhcp scope link src 192.168.2.90 metric 1024 
        192.168.2.163 dev eni337d76c2aff scope link 
        192.168.2.228 dev enia2fac769b5b scope link 
        192.168.2.253 dev enif4eaea955f1 scope link
        
        [워커 노드1]
        # routing policy database management 확인
        ip rule
        
        # routing table management 확인
        ip route show table local
        
        # 디폴트 네트워크 정보를 ens5 을 통해서 빠져나간다
        ip route show table main
        default via 192.168.1.1 dev ens5
        ...
      2.  


      1. Pod에서 외부 통신(Not in Same Network)4.1. 파드에서 외부 통신 흐름 : iptable 에 SNAT 을 통하여 노드의 eth0(ens5) IP로 변경되어서 외부와 통신됨참고: https://github.com/aws/amazon-vpc-cni-k8s/blob/master/docs/cni-proposal.md
        • VPC CNI 의 External source network address translation (SNAT) 설정에 따라, 외부(인터넷) 통신 시 SNAT 하거나 혹은 SNAT 없이 통신을 할 수 있다 - 링크
      2.  

    4.2. [실습] 파드에서 외부 통신 테스트 및 확인

    • 파드 shell 실행 후 외부로 ping 테스트 & 워커 노드에서 tcpdump 및 iptables 정보 확인
    # pod-1 Shell 에서 외부로 ping
    kubectl exec -it $PODNAME1 -- ping -c 1 www.google.com
    kubectl exec -it $PODNAME1 -- ping -i 0.1 www.google.com
    kubectl exec -it $PODNAME1 -- ping -i 0.1 8.8.8.8
    
    # 워커 노드 EC2 : TCPDUMP 확인
    sudo tcpdump -i any -nn icmp
    sudo tcpdump -i ens5 -nn icmp
    
    # pod ip가 192.168.1.139이고 172.217.25.164가 google public ip이다.
    # pod -> EC2 ENI -> google 이렇게 traffic이 흐르고, out으로 밖으로 나갈때는 ec2의 ens5 primary ip로 nat되어 나간다. 
    [ec2-user@ip-192-168-1-171 ~]$ sudo tcpdump -i any -nn icmp
    tcpdump: data link type LINUX_SLL2
    dropped privs to tcpdump
    tcpdump: verbose output suppressed, use -v[v]... for full protocol decode
    listening on any, link-type LINUX_SLL2 (Linux cooked v2), snapshot length 262144 bytes
    12:33:56.220693 enicb7ee0ffe62 In  IP 192.168.1.139 > 172.217.25.164: ICMP echo request, id 31, seq 1, length 64
    12:33:56.220712 ens5  Out IP 192.168.1.171 > 172.217.25.164: ICMP echo request, id 32805, seq 1, length 64
    12:33:56.249027 ens5  In  IP 172.217.25.164 > 192.168.1.171: ICMP echo reply, id 32805, seq 1, length 64
    12:33:56.249059 enicb7ee0ffe62 Out IP 172.217.25.164 > 192.168.1.139: ICMP echo reply, id 31, seq 1, length 64
    
    [ec2-user@ip-192-168-1-171 ~]$ ip route
    default via 192.168.1.1 dev ens5 proto dhcp src 192.168.1.171 metric 1024 
    192.168.0.2 via 192.168.1.1 dev ens5 proto dhcp src 192.168.1.171 metric 1024 
    192.168.1.0/24 dev ens5 proto kernel scope link src 192.168.1.171 metric 1024 
    192.168.1.1 dev ens5 proto dhcp scope link src 192.168.1.171 metric 1024 
    192.168.1.125 dev eni9d6b388c329 scope link 
    192.168.1.139 dev enicb7ee0ffe62 scope link 
    
    # 퍼블릭IP 확인
    for i in $N1 $N2 $N3; do echo ">> node $i <<"; ssh ec2-user@$i curl -s ipinfo.io/ip; echo; echo; done
    
    # 작업용 EC2 : pod-1 Shell 에서 외부 접속 확인 - 공인IP는 어떤 주소인가?
    ## The right way to check the weather - 링크
    for i in $PODNAME1 $PODNAME2 $PODNAME3; do echo ">> Pod : $i <<"; kubectl exec -it $i -- curl -s ipinfo.io/ip; echo; echo; done
    kubectl exec -it $PODNAME1 -- curl -s wttr.in/seoul
    kubectl exec -it $PODNAME1 -- curl -s wttr.in/seoul?format=3
    kubectl exec -it $PODNAME1 -- curl -s wttr.in/Moon
    kubectl exec -it $PODNAME1 -- curl -s wttr.in/:help
    
    
    # 워커 노드 EC2
    ## 출력된 결과를 보고 어떻게 빠져나가는지 고민해보자!
    ip rule
    ip route show table main
    sudo iptables -L -n -v -t nat
    sudo iptables -t nat -S
    
    # 파드가 외부와 통신시에는 아래 처럼 'AWS-SNAT-CHAIN-0' 룰(rule)에 의해서 SNAT 되어서 외부와 통신!
    # 참고로 뒤 IP는 eth0(ENI 첫번째)의 IP 주소이다
    # --random-fully 동작 - 링크1  링크2
    [ec2-user@ip-192-168-1-171 ~]$ sudo iptables -t nat -S | grep 'A AWS-SNAT-CHAIN'
    -A AWS-SNAT-CHAIN-0 -d 192.168.0.0/16 -m comment --comment "AWS SNAT CHAIN" -j RETURN
    -A AWS-SNAT-CHAIN-0 ! -o vlan+ -m comment --comment "AWS, SNAT" -m addrtype ! --dst-type LOCAL -j SNAT --to-source 192.168.1.171 --random-fully
    
    ## 아래 'mark 0x4000/0x4000' 매칭되지 않아서 RETURN 됨!
    -A KUBE-POSTROUTING -m mark ! --mark 0x4000/0x4000 -j RETURN
    -A KUBE-POSTROUTING -j MARK --set-xmark 0x4000/0x0
    -A KUBE-POSTROUTING -m comment --comment "kubernetes service traffic requiring SNAT" -j MASQUERADE --random-fully
    ...
    
    # 카운트 확인 시 AWS-SNAT-CHAIN-0에 매칭되어, 목적지가 192.168.0.0/16 아니고 외부 빠져나갈때 SNAT 192.168.1.171(EC2 노드1 IP) 변경되어 나간다!
    sudo iptables -t filter --zero; sudo iptables -t nat --zero; sudo iptables -t mangle --zero; sudo iptables -t raw --zero
    watch -d 'sudo iptables -v --numeric --table nat --list AWS-SNAT-CHAIN-0; echo ; sudo iptables -v --numeric --table nat --list KUBE-POSTROUTING; echo ; sudo iptables -v --numeric --table nat --list POSTROUTING'
    
    # conntrack 확인 : EC2 메타데이터 주소(169.254.169.254) 제외 출력
    for i in $N1 $N2 $N3; do echo ">> node $i <<"; ssh ec2-user@$i sudo conntrack -L -n |grep -v '169.254.169'; echo; done
    conntrack v1.4.5 (conntrack-tools): 
    icmp     1 28 src=172.30.66.58 dst=8.8.8.8 type=8 code=0 id=34392 src=8.8.8.8 dst=172.30.85.242 type=0 code=0 id=50705 mark=128 use=1
    tcp      6 23 TIME_WAIT src=172.30.66.58 dst=34.117.59.81 sport=58144 dport=80 src=34.117.59.81 dst=172.30.85.242 sport=80 dport=44768 [ASSURED] mark=128 use=1


    4.3. [실습] 파드 ↔ 운영서버 EC2 간 통신 확인

    • 운영서버 EC2 → 파드 IP 통신 : 통신이 가능한 이유는? 통신 경로를 알아보자
    # 운영서버 EC2 SSH 접속
    ssh <운영서버 EC2 공인 IP>
    -----------------------
    POD1IP=<파드1 IP 지정>
    POD1IP=192.168.1.101
    
    ping -c 1 $POD1IP
    
    exit
    -----------------------
    
    # 워커노드1 에서 tcpdump 확인 : NAT 동작 적용 여유 확인
    sudo tcpdump -i any -nn icmp
    • 파드1 → 운영서버 EC2 통신 : 통신이 가능한 이유는? 통신 경로를 알아보자 - Docs
    # vpc cni env 정보 확인
    kubectl get ds aws-node -n kube-system -o json | jq '.spec.template.spec.containers[0].env'
    ...
      {
        "name": "AWS_VPC_K8S_CNI_EXTERNALSNAT",
        "value": "false"
      },
    ...
    
    # 운영서버 EC2 SSH 접속
    kubectl exec -it $PODNAME1 -- ping 172.20.1.100
    
    # 파드1 배치 워커노드에서 tcpdump 확인 : NAT 동작 적용 여유 확인
    # ens5의 ip로 NAT되어서 나간다.
    [ec2-user@ip-192-168-1-171 ~]$ sudo tcpdump -i any -nn icmp
    tcpdump: data link type LINUX_SLL2
    dropped privs to tcpdump
    tcpdump: verbose output suppressed, use -v[v]... for full protocol decode
    listening on any, link-type LINUX_SLL2 (Linux cooked v2), snapshot length 262144 bytes
    13:16:43.377048 enicb7ee0ffe62 In  IP 192.168.1.139 > 172.20.1.100: ICMP echo request, id 464, seq 1, length 64
    13:16:43.378057 ens5  Out IP 192.168.1.171 > 172.20.1.100: ICMP echo request, id 15132, seq 1, length 64
    13:16:43.379017 ens5  In  IP 172.20.1.100 > 192.168.1.171: ICMP echo reply, id 15132, seq 1, length 64
    13:16:43.379042 enicb7ee0ffe62 Out IP 172.20.1.100 > 192.168.1.139: ICMP echo reply, id 464, seq 1, length 64
    
    # 운영서버 EC2 에서 tcpdump 확인 : NAT 동작 적용 여유 확인
    # N1의 ens5 primary ip로 NAT되어 operator-host로 들어온다.
    (CCSAdmin:N/A) [root@operator-host ~]# sudo tcpdump -i any -nn icmp
    tcpdump: verbose output suppressed, use -v or -vv for full protocol decode
    listening on any, link-type LINUX_SLL (Linux cooked), capture size 262144 bytes
    22:16:43.378749 IP 192.168.1.171 > 172.20.1.100: ICMP echo request, id 15132, seq 1, length 64
    22:16:43.378786 IP 172.20.1.100 > 192.168.1.171: ICMP echo reply, id 15132, seq 1, length 64
    
    -----------------------------------------------------
    
    # 파드1 배치 워커노드 : NAT 적용 정책 확인
    sudo iptables -t filter --zero; sudo iptables -t nat --zero; sudo iptables -t mangle --zero; sudo iptables -t raw --zero
    watch -d 'sudo iptables -v --numeric --table nat --list AWS-SNAT-CHAIN-0; echo ; sudo iptables -v --numeric --table nat --list KUBE-POSTROUTING; echo ; sudo iptables -v --numeric --table nat --list POSTROUTING'


    • 사내 내부에 연결 확장된 네트워크 대역과 SNAT 없이 통신 가능하게 설정 해보기 - Docs , Blog
      # 파드 상태 모니터링
      # kubectl set env 명령어는 내부적으로 kubectl patch를 실행하여 PodSpec을 변경 → 이로 인해 aws-node 데몬셋이 자동으로 롤링 업데이트
      watch -d kubectl get pod -n kube-system
      
      # 파드1 배치 워커노드 iptables rule 모니터링 : iptables rule 추가됨
      watch -d 'sudo iptables -v --numeric --table nat --list AWS-SNAT-CHAIN-0; echo ; sudo iptables -v --numeric --table nat --list KUBE-POSTROUTING; echo ; sudo iptables -v --numeric --table nat --list POSTROUTING'
      
      # 사내 내부에 연결 확장된 네트워크 대역과 SNAT 없이 통신 가능하게 설정
      kubectl set env daemonset aws-node -n kube-system AWS_VPC_K8S_CNI_EXCLUDE_SNAT_CIDRS=172.20.0.0/16
      
      #
      kubectl get ds aws-node -n kube-system -o json | jq '.spec.template.spec.containers[0].env'
      ...
        {
          "name": "AWS_VPC_K8S_CNI_EXCLUDE_SNAT_CIDRS",
          "value": "172.20.0.0/16"
        }
      
      # 운영서버 EC2 SSH 접속
      kubectl exec -it $PODNAME1 -- ping 172.20.1.100
      
      # N1에서 tcpdump결과 pod ip로 operator-host와 통신함
      [ec2-user@ip-192-168-1-171 ~]$ sudo tcpdump -i any -nn icmp
      tcpdump: data link type LINUX_SLL2
      dropped privs to tcpdump
      tcpdump: verbose output suppressed, use -v[v]... for full protocol decode
      listening on any, link-type LINUX_SLL2 (Linux cooked v2), snapshot length 262144 bytes
      13:25:11.407581 enicb7ee0ffe62 In  IP 192.168.1.139 > 172.20.1.100: ICMP echo request, id 495, seq 7, length 64
      13:25:11.407611 ens5  Out IP 192.168.1.139 > 172.20.1.100: ICMP echo request, id 495, seq 7, length 64
      
      # operator-host에서 tcpdump해도 pod ip로 들어옴
      (CCSAdmin:N/A) [root@operator-host ~]# sudo tcpdump -i any -nn icmp
      tcpdump: verbose output suppressed, use -v or -vv for full protocol decode
      listening on any, link-type LINUX_SLL (Linux cooked), capture size 262144 bytes
      22:25:31.007770 IP 192.168.1.139 > 172.20.1.100: ICMP echo request, id 495, seq 26, length 64
      22:25:31.007787 IP 172.20.1.100 > 192.168.1.139: ICMP echo reply, id 495, seq 26, length 64
      
      # 파드1 배치 워커노드 : NAT 적용 정책 확인
      sudo iptables -t filter --zero; sudo iptables -t nat --zero; sudo iptables -t mangle --zero; sudo iptables -t raw --zero
      watch -d 'sudo iptables -v --numeric --table nat --list AWS-SNAT-CHAIN-0; echo ; sudo iptables -v --numeric --table nat --list KUBE-POSTROUTING; echo ; sudo iptables -v --numeric --table nat --list POSTROUTING'
      Chain AWS-SNAT-CHAIN-0 (1 references)
       pkts bytes target     prot opt in     out     source               destination
          1    84 RETURN     all  --  *      *       0.0.0.0/0            172.20.0.0/16        /* AWS SNAT CHAIN EXCLUSION */
        730 45228 RETURN     all  --  *      *       0.0.0.0/0            192.168.0.0/16	 /* AWS SNAT CHAIN */
      ...
      • env 에 설정을 영구 유지하려면 어떻게 해야 될까요? - Link


    1. Node에 Pod 생성 갯수 제한5.1. 사전 준비 : kube-ops-view 설치
      # kube-ops-view
      helm repo add geek-cookbook https://geek-cookbook.github.io/charts/
      helm install kube-ops-view geek-cookbook/kube-ops-view --version 1.2.2 --set service.main.type=LoadBalancer --set env.TZ="Asia/Seoul" --namespace kube-system
      
      # kube-ops-view 접속 URL 확인 (1.5 배율)
      kubectl get svc -n kube-system kube-ops-view -o jsonpath='{.status.loadBalancer.ingress[0].hostname}' | awk '{ print "KUBE-OPS-VIEW URL = http://"$1":8080/#scale=1.5"}'

      • Secondary IPv4 addresses (기본값) : 인스턴스 유형에 최대 ENI 갯수와 할당 가능 IP 수를 조합하여 선정
      • 인스턴스 타입 별 ENI 최대 갯수와 할당 가능한 최대 IP 갯수에 따라서 파드 배치 갯수가 결정됨
      • 단, aws-node 와 kube-proxy 파드는 호스트의 IP를 사용함으로 최대 갯수에서 제외함
      • 최대 파드 생성 갯수 : (Number of network interfaces for the instance type × (the number of IP addressess per network interface - 1)) + 2
      5.3. 워커 노드의 인스턴스 정보 확인 : t3.medium 사용 시
      # t3 타입의 정보(필터) 확인
      aws ec2 describe-instance-types --filters Name=instance-type,Values=t3.\* \
       --query "InstanceTypes[].{Type: InstanceType, MaxENI: NetworkInfo.MaximumNetworkInterfaces, IPv4addr: NetworkInfo.Ipv4AddressesPerInterface}" \
       --output table
      --------------------------------------
      |        DescribeInstanceTypes       |
      +----------+----------+--------------+
      | IPv4addr | MaxENI   |    Type      |
      +----------+----------+--------------+
      |  15      |  4       |  t3.2xlarge  |
      |  6       |  3       |  t3.medium   |
      |  12      |  3       |  t3.large    |
      |  15      |  4       |  t3.xlarge   |
      |  2       |  2       |  t3.micro    |
      |  2       |  2       |  t3.nano     |
      |  4       |  3       |  t3.small    |
      +----------+----------+--------------+
      
      # c5 타입의 정보(필터) 확인
      aws ec2 describe-instance-types --filters Name=instance-type,Values=c5\*.\* \
       --query "InstanceTypes[].{Type: InstanceType, MaxENI: NetworkInfo.MaximumNetworkInterfaces, IPv4addr: NetworkInfo.Ipv4AddressesPerInterface}" \
       --output table
      
      # 파드 사용 가능 계산 예시 : aws-node 와 kube-proxy 파드는 host-networking 사용으로 IP 2개 남음
      ((MaxENI * (IPv4addr-1)) + 2)
      t3.medium 경우 : ((3 * (6 - 1) + 2 ) = 17개 >> aws-node 와 kube-proxy 2개 제외하면 15개
      
      # 워커노드 상세 정보 확인 : 노드 상세 정보의 Allocatable 에 pods 에 17개 정보 확인
      kubectl describe node | grep Allocatable: -A6
      Allocatable:
        cpu:                         1930m
        ephemeral-storage:           27905944324
        hugepages-1Gi:               0
        hugepages-2Mi:               0
        memory:                      3388360Ki
        pods:                        17

      # 워커 노드 3대 EC2 - 모니터링
      while true; do ip -br -c addr show && echo "--------------" ; date "+%Y-%m-%d %H:%M:%S" ; sleep 1; done
      
      # 터미널1
      watch -d 'kubectl get pods -o wide'
      
      # 터미널2
      ## 디플로이먼트 생성
      cat <<EOF | kubectl apply -f -
      apiVersion: apps/v1
      kind: Deployment
      metadata:
        name: nginx-deployment
        labels:
          app: nginx
      spec:
        replicas: 2
        selector:
          matchLabels:
            app: nginx
        template:
          metadata:
            labels:
              app: nginx
          spec:
            containers:
            - name: nginx
              image: nginx:alpine
              ports:
              - containerPort: 80
      EOF
      
      # 파드 확인
      kubectl get pod -o wide
      kubectl get pod -o=custom-columns=NAME:.metadata.name,IP:.status.podIP
      
      # 파드 증가 테스트 >> 파드 정상 생성 확인, 워커 노드에서 eth, eni 갯수 확인
      kubectl scale deployment nginx-deployment --replicas=8
      
      # 파드 증가 테스트 >> 파드 정상 생성 확인, 워커 노드에서 eth, eni 갯수 확인 >> 어떤일이 벌어졌는가?
      kubectl scale deployment nginx-deployment --replicas=15
      
      # 파드 증가 테스트 >> 파드 정상 생성 확인, 워커 노드에서 eth, eni 갯수 확인 >> 어떤일이 벌어졌는가?
      kubectl scale deployment nginx-deployment --replicas=30
      
      # 파드 증가 테스트 >> 파드 정상 생성 확인, 워커 노드에서 eth, eni 갯수 확인 >> 어떤일이 벌어졌는가?
      kubectl scale deployment nginx-deployment --replicas=50
      
      # 파드 생성 실패!
      kubectl get pods | grep Pending
      nginx-deployment-7fb7fd49b4-d4bk9   0/1     Pending   0          3m37s
      nginx-deployment-7fb7fd49b4-qpqbm   0/1     Pending   0          3m37s
      ...
      
      kubectl describe pod <Pending 파드> | grep Events: -A5
      Events:
        Type     Reason            Age   From               Message
        ----     ------            ----  ----               -------
        Warning  FailedScheduling  45s   default-scheduler  0/3 nodes are available: 1 node(s) had untolerated taint {node-role.kubernetes.io/control-plane: }, 2 Too many pods. preemption: 0/3 nodes are available: 1 Preemption is not helpful for scheduling, 2 No preemption victims found for incoming pod.
      
      # 디플로이먼트 삭제
      kubectl delete deploy nginx-deployment
      • 위에서 볼 수 있듯이 Node의 최대 생성 가능 제한을 넘어가면 pod들이 pending 상태로 scheduling이 안된 상태로 남아있는다. 이를 해결 할 수 있는 방법은 여러가지가 있다.
        • 해결 방안 : Prefix Delegation, WARM & MIN IP/Prefix Targets, Custom Network
    2. 5.4. 실습
    3. 5.2. Worker Node의 인스턴스 타입 별 파드 생성 갯수 제한


    1. K8S Service & AWS Loadbalancer Controller6.1. k8s kube-proxy mode
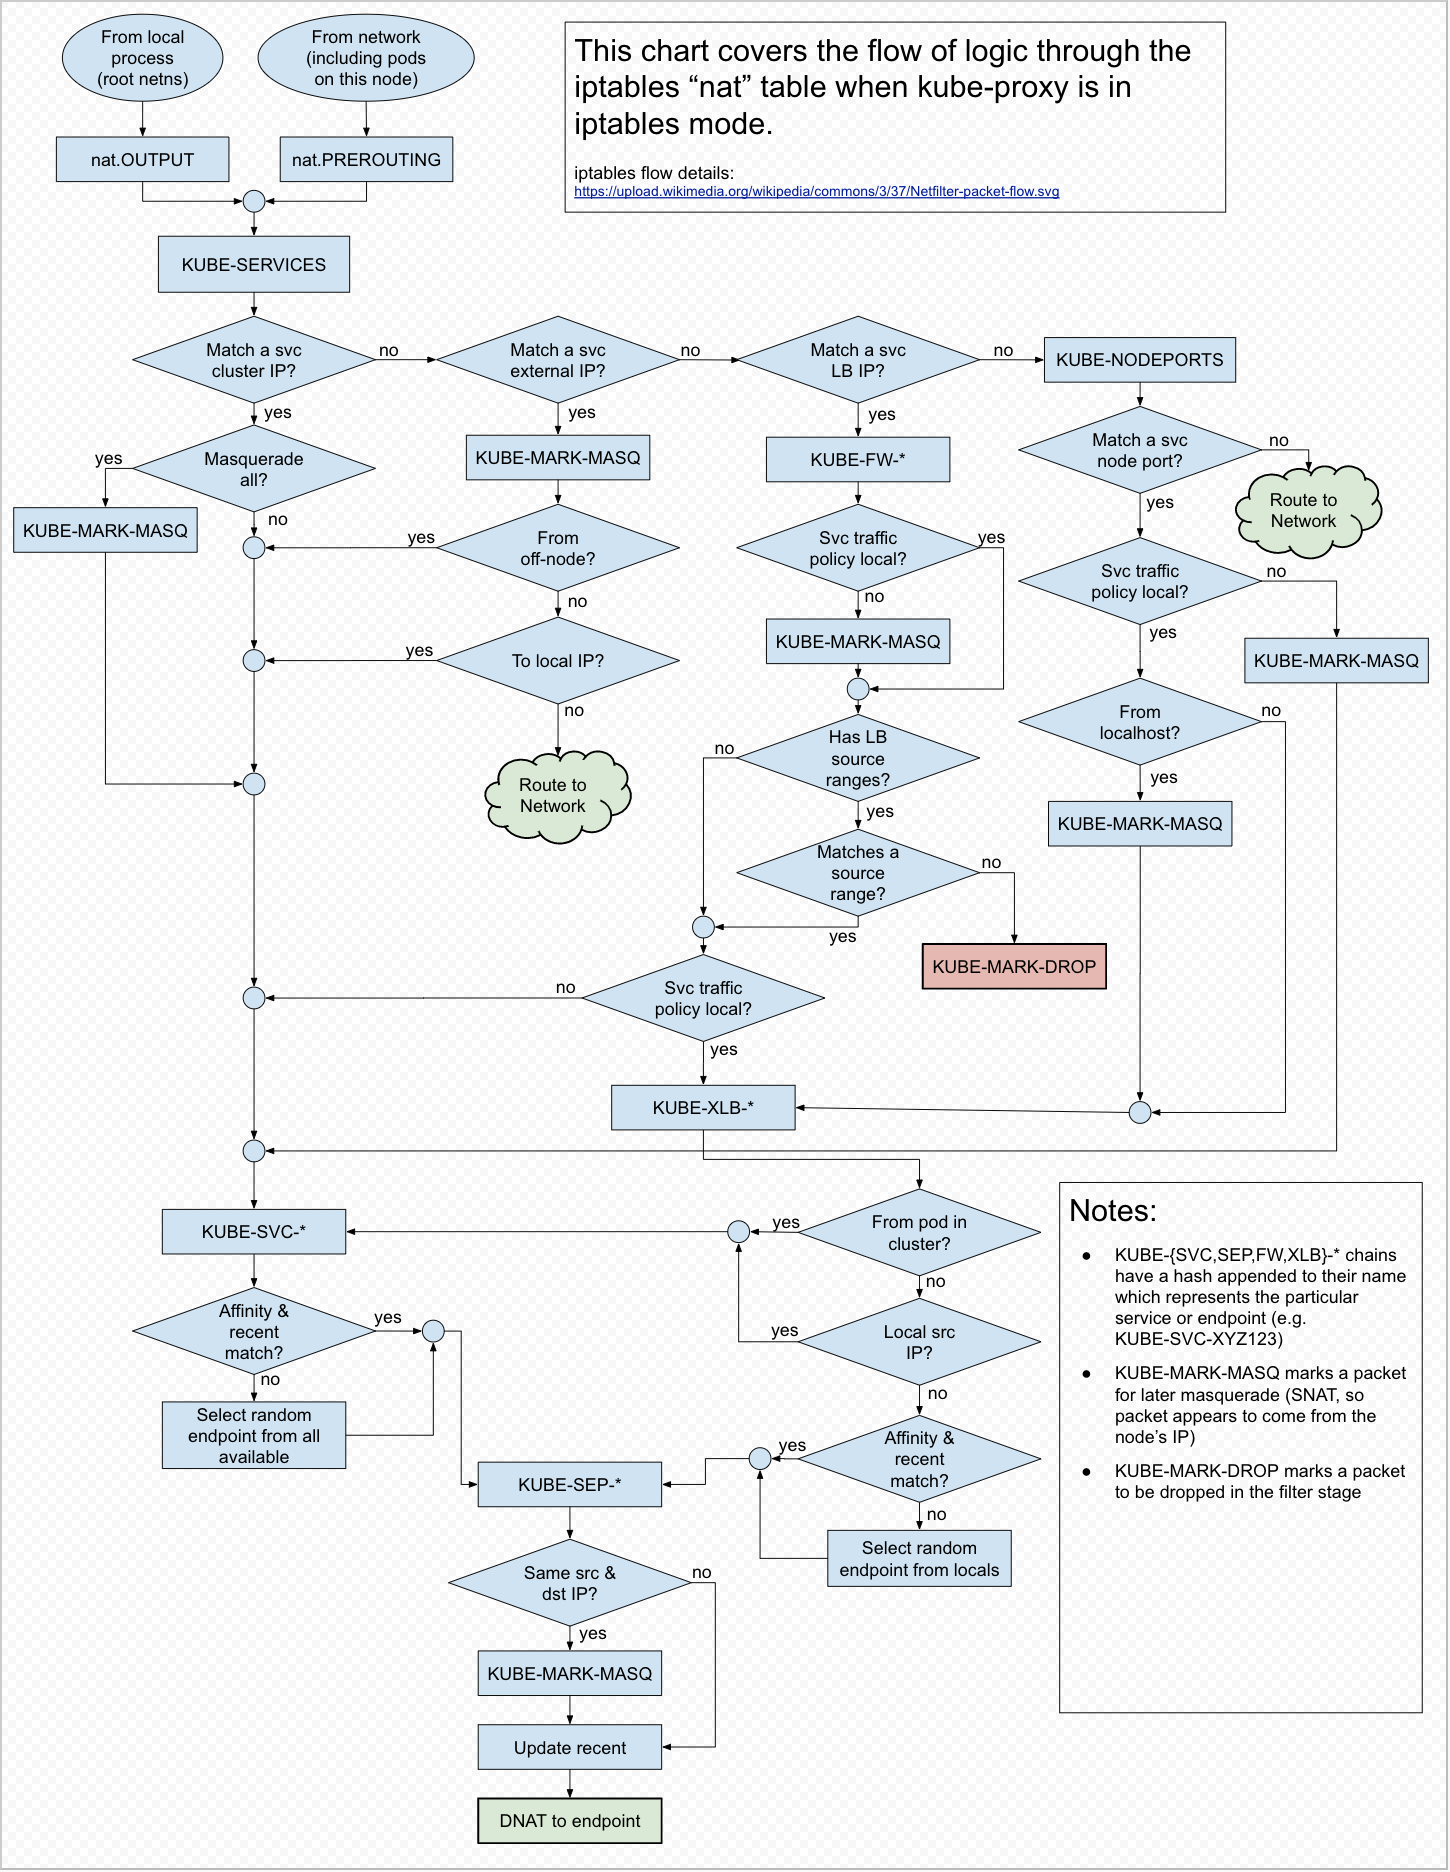
      1. iptables 모드는 클러스터 내 서비스의 트래픽을 iptables 규칙을 사용하여 관리하며, 높은 성능과 안정성을 제공한다.
      1. ipvs 모드는 더 정교하고 효율적인 로드 밸런싱을 제공하며, ipvs(virtual server)를 사용하여 트래픽을 라우팅한다.
      1. userspace 모드는 사용자가 정의한 포트를 통해 트래픽을 전달하는 방식으로, 성능이 낮고 현재는 잘 사용되지 않는다.

      iptables 모드는 Kubernetes의 기본적인 kube-proxy 동작 모드로, iptables라는 리눅스 내장 방화벽을 사용하여 네트워크 트래픽을 처리한다.
      • 동작 원리:
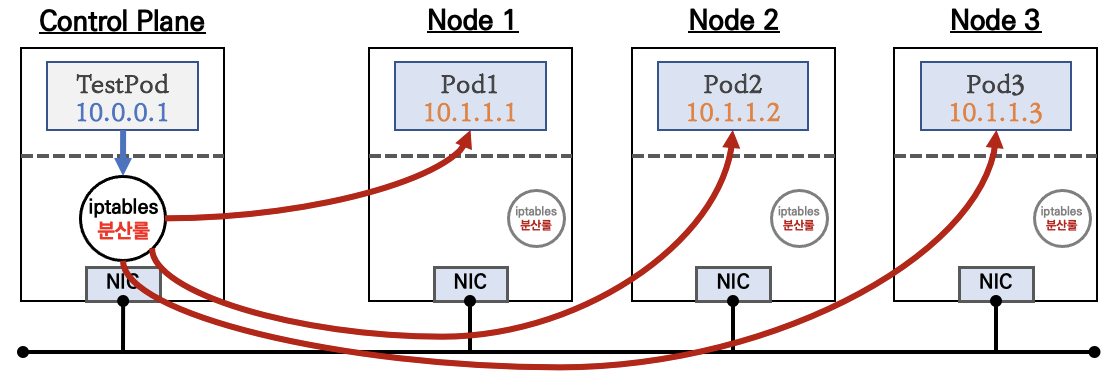
        • kube-proxy는 각 노드에서 iptables rules를 생성하고, 이를 통해 서비스의 트래픽을 적절한 Pod로 라우팅한다.
        • 각 Service에 대한 iptables rules을 설정하여, 클러스터 내 서비스의 IP와 포트로 들어오는 트래픽을 각 Service의 백엔드 Pod로 전달한다.
        • kube-proxy는 주기적으로 클러스터 상태를 모니터링하고, 서비스가 추가되거나 삭제되면 해당하는 iptables rules를 업데이트한다.
        참조: https://serenafeng.github.io/2020/03/26/kube-proxy-in-iptables-mode/?utm_source=chatgpt.com
      • 장점:
        • 간단한 구조로, 별도의 고급 기능 없이 기본적인 서비스 간 트래픽 라우팅이 가능하다.
        • 성능이 안정적이고, 기본적으로 지원되는 기능이 많다.
        • kernel단에서 traffic을 처리하므로, uesrspace mode보다 안정적이며 빠르다.
        • 클러스터의 크기와 상관없이 적당히 잘 동작한다.(비교적 작은 규모의 클러스터)
      • 단점:
        • 대규모 클러스터에서는 성능 이슈가 발생할 수 있다. 서비스가 많아지면 iptables rules이 많아지고, 성능이 저하될 가능성이 있다.
        • iptables의 동적 업데이트가 어려운 점이 있을 수 있다.
    2. kube-proxy는 iptables rules를 설정하는 역할만 하며 실제로 traffic처리는 kernel단에서 처리된다.
    3. 6.1.1. iptables mode
    4. Kubernetes의 kube-proxy는 클러스터 내 서비스의 네트워크 트래픽을 관리하는 핵심 컴포넌트로, 여러 가지 모드에서 동작할 수 있다. kube-proxy 에는 총 3가지가 있으다.


    6.1.2. ipvs mode

    ipvs 모드는 Kubernetes의 고급 로드 밸런싱 기능을 제공하는 모드로, IP Virtual Server (ipvs)를 사용하여 네트워크 트래픽을 라우팅한다. ipvs는 linux kernel의 로드 밸런서 기능으로, 더 효율적인 트래픽 분배와 관리가 가능하다.

    • 동작 원리:
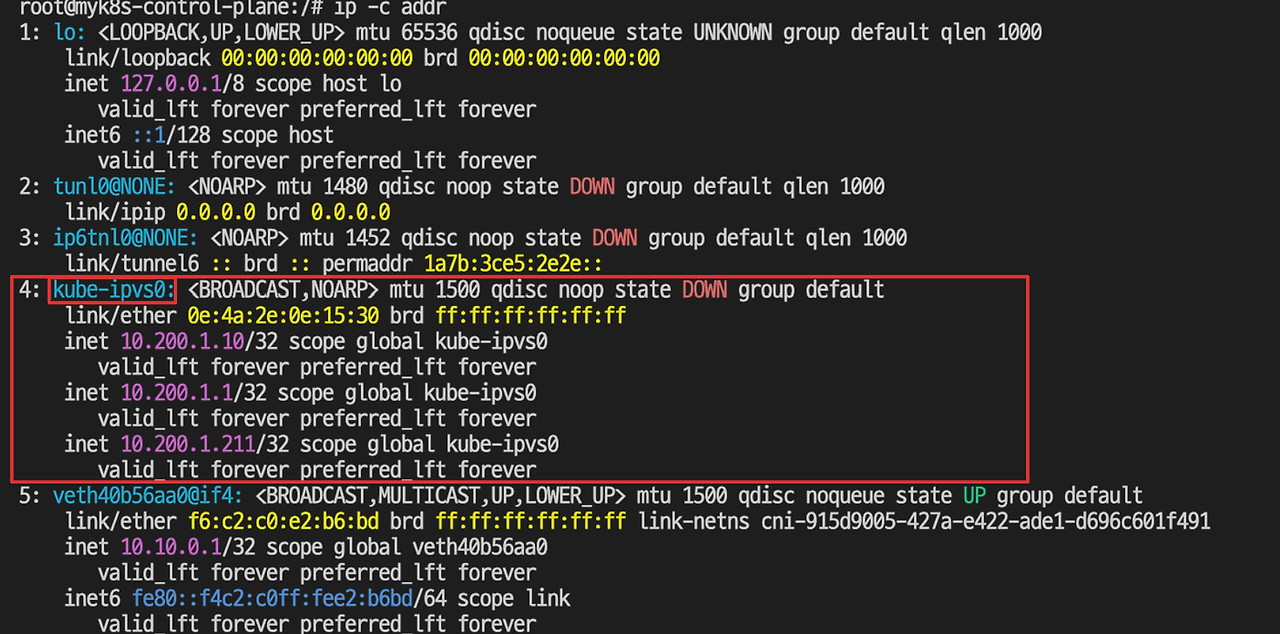
      • ipvs mode를 사용하면 Worker Node에 kube-ipvs0라는 virtual interface가 하나 생성이되고, 해당 interface에 kubernetes cluster에서 생성하는 service의 virtual ip가 추가된다.
      • IPVS Mode는 Linue Kernel에서 제공하는 L4 Load Balacner인 IPVS가 Service Proxy 역할을 수행하는 Mode이다.
      • Packet Load Balancing 수행시 IPVS가 iptables보다 높은 성능을 보이기 때문에 IPVS Mode는 iptables Mode보다 높은 성능을 보여준다
      • IPVS 프록시 모드는 iptables 모드와 유사한 넷필터 후크 기능을 기반으로 하지만, 해시 테이블을 기본 데이터 구조로 사용하고 커널 스페이스에서 동작한다.
      • 이는 IPVS 모드의 kube-proxy는 iptables 모드의 kube-proxy보다 지연 시간이 짧은 트래픽을 리다이렉션하고, 프록시 규칙을 동기화할 때 성능이 훨씬 향상됨을 의미한다.
      • 다른 프록시 모드와 비교했을 때, IPVS 모드는 높은 네트워크 트래픽 처리량도 지원한다.
      • ipvs다양한 로드 밸런싱 알고리즘을 제공하며, 서비스 트래픽을 효율적으로 분배한다. 예를 들어, 라운드로빈(Round Robin), 최소 연결(Least Connections), 해시 기반(Weighted Least Connections) 등이 있다.
    • 장점:
      • 성능이 뛰어나다. iptables보다 훨씬 더 빠르고 효율적이다. ipvs는 커널 모드에서 작동하기 때문에 성능이 우수하다.
      • 고급 로드 밸런싱 기능을 제공하여, 복잡한 트래픽 패턴을 처리할 수 있다.
      • 대규모 클러스터에서 우수한 성능을 발휘하며, 더 많은 트래픽을 처리할 수 있다.
    • 단점:
      • 구성 및 설정이 복잡하다. ipvs를 사용하려면 별도의 커널 모듈을 로드해야 하고, 추가적인 설정이 필요하다.
      • EKS에서는 kube-proxy mode가 default로 iptables이므로 kube-proxy ds의 재시작이 필요하므로 주의가 필요하다.
      • ipvs리눅스 커널 3.3 이상에서만 지원되므로, 구형 커널에서는 사용이 불가능하다.


    6.1.4. eBPF 모드 + XDP

    • 기존 netfilter/iptables 기반 통신
    • eBPF + XDP 네트워킹 모듈


    6.1.4. iptables mode와 ipvs mode 비교

    특징 iptables 모드 ipvs 모드
    동작 방식 iptables 규칙을 사용한 라우팅 IP Virtual Server (ipvs) 사용, 고급 로드 밸런싱
    성능 상대적으로 낮음, 대규모 클러스터에서 성능 저하 가능 매우 우수, 대규모 클러스터에 적합
    설정 복잡도 비교적 간단 상대적으로 복잡
    로드 밸런싱 알고리즘 라운드로빈만 지원 다양한 알고리즘 (라운드로빈, 최소 연결 등) 지원
    적합한 클러스터 규모 작은 규모에서 적합 대규모 클러스터에 적합
    지원 커널 리눅스 커널의 기본 기능 사용 리눅스 커널 3.3 이상에서 지원


    6.2. Service 종류와 AWS Loadbalcner Controller

    ClusterIP 타입

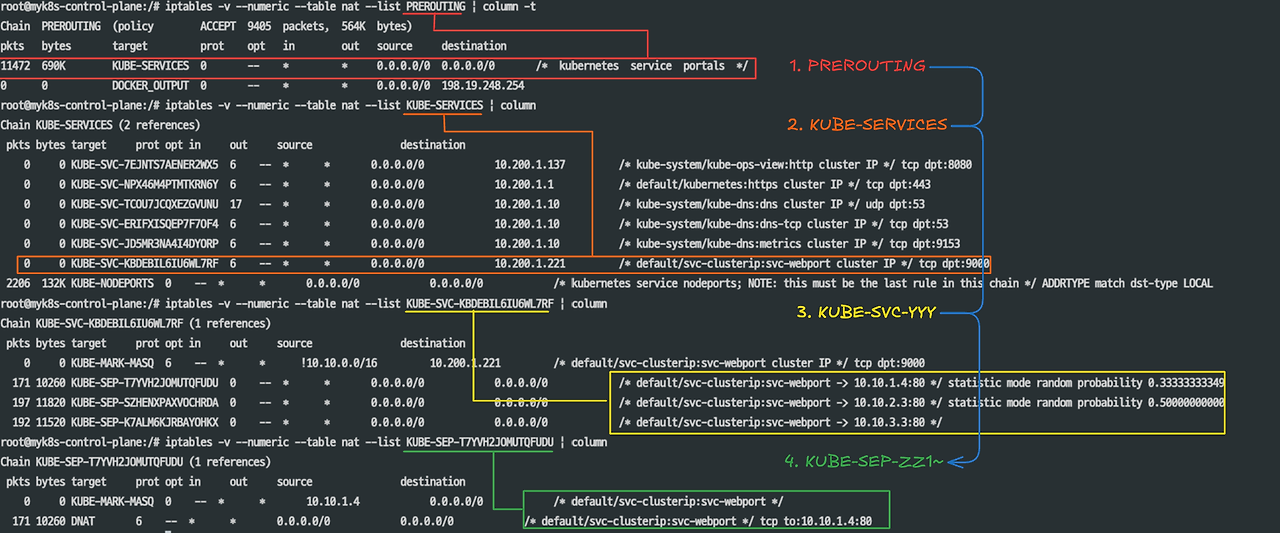
    ClusterIP type의 Service를 생성하면 iptables chain가 추가되며 아래와 같이 동작을 하게 된다.

    iptables chain은 iptables rules의 연결된 그룹이다.

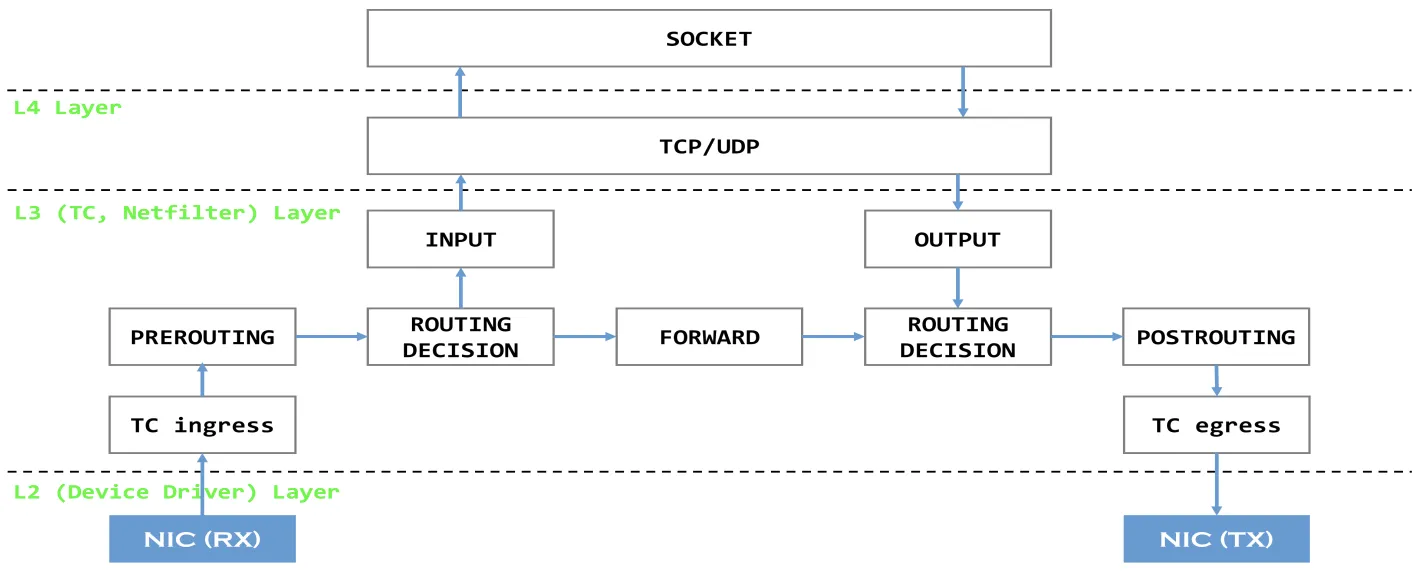
    PREROUTING → KUBE-SERVICES →

    KUBE-SVC-###

    → KUBE-SEP-#<

    파드1

    > , KUBE-SEP-#<

    파드2

    > , KUBE-SEP-#<

    파드3

    >


    조금 더 자세한 동작을 살펴보면 아래와 같다.


    • 결론 : Kubernetes Cluster 내에서 Cluster IP로 접속 시, PREROUTE(nat) 에서 DNAT(3개 파드) 되고, POSTROUTE(nat) 에서 SNAT 되지 않고 나간다!
    참조:https://hackjsp.tistory.com/64


    • 실습: kube-system의 metrics-server service(ClusterIP) traffic flow
      # iptables 확인
      iptables -t filter -S
      iptables -t nat -S
      iptables -t nat -S | wc -l
      iptables -t mangle -S
      
      # iptables 상세 확인 - 매칭 패킷 카운트, 인터페이스 정보 등 포함
      iptables -nvL -t filter
      iptables -nvL -t nat
      iptables -nvL -t mangle
      
      # rule 갯수 확인
      iptables -nvL -t filter | wc -l
      iptables -nvL -t nat | wc -l
      
      # 규칙 패킷 바이트 카운트 초기화
      iptables -t filter --zero; iptables -t nat --zero; iptables -t mangle --zero
      
      # 정책 확인 : 아래 정책 내용은 핵심적인 룰(rule)만 표시했습니다!
      iptables -t nat -nvL
      
      [root@ip-192-168-1-54 ~]# iptables -v --numeric --table nat --list PREROUTING | column -t
      Chain  PREROUTING  (policy               ACCEPT  0    packets,  0    bytes)                                                                                  
      pkts   bytes       target                prot    opt  in        out  source     destination                                                                  
      41     2435        KUBE-SERVICES         all     --   *         *    0.0.0.0/0  0.0.0.0/0    /*  kubernetes  service   portals      */                       
      4      263         AWS-CONNMARK-CHAIN-0  all     --   eni+      *    0.0.0.0/0  0.0.0.0/0    /*  AWS,        outbound  connections  */                       
      36     2131        CONNMARK              all     --   *         *    0.0.0.0/0  0.0.0.0/0    /*  AWS,        CONNMARK  */           CONNMARK  restore  mask  0x80
      
      # iptables -v --numeric --table nat --list KUBE-SERVICES | column
      # 바로 아래 룰(rule)에 의해서 서비스(ClusterIP)를 인지하고 처리를 합니다
      [root@ip-192-168-1-54 ~]# iptables -v --numeric --table nat --list KUBE-SERVICES | column
      Chain KUBE-SERVICES (2 references)
       pkts bytes target     prot opt in     out     source               destination         
          0     0 KUBE-SVC-I7SKRZYQ7PWYV5X7  tcp  --  *      *       0.0.0.0/0            10.100.242.1         /* kube-system/eks-extension-metrics-api:metrics-api cluster IP */ tcp dpt:443
          0     0 KUBE-SVC-ERIFXISQEP7F7OF4  tcp  --  *      *       0.0.0.0/0            10.100.0.10          /* kube-system/kube-dns:dns-tcp cluster IP */ tcp dpt:53
          0     0 KUBE-SVC-JD5MR3NA4I4DYORP  tcp  --  *      *       0.0.0.0/0            10.100.0.10          /* kube-system/kube-dns:metrics cluster IP */ tcp dpt:9153
          0     0 KUBE-SVC-TCOU7JCQXEZGVUNU  udp  --  *      *       0.0.0.0/0            10.100.0.10          /* kube-system/kube-dns:dns cluster IP */ udp dpt:53
          0     0 KUBE-SVC-Z4ANX4WAEWEBLCTM  tcp  --  *      *       0.0.0.0/0            10.100.91.252        /* kube-system/metrics-server:https cluster IP */ tcp dpt:443
          0     0 KUBE-SVC-NPX46M4PTMTKRN6Y  tcp  --  *      *       0.0.0.0/0            10.100.0.1           /* default/kubernetes:https cluster IP */ tcp dpt:443
         58  3472 KUBE-NODEPORTS  all  --  *      *       0.0.0.0/0            0.0.0.0/0            /* kubernetes service nodeports; NOTE: this must be the last rule in this chain */ ADDRTYPE match dst-type LOCAL
      
      ## Service에 mapping된 SEP(ServiceEndPoint)가 2개일 경우에는 아래와 같이 50%의 확률로 routing 된다.
      # iptables -v --numeric --table nat --list [KUBE-SVC-*] | column
      [root@ip-192-168-1-54 ~]# iptables -v --numeric --table nat --list KUBE-SVC-Z4ANX4WAEWEBLCTM | column                         
      Chain KUBE-SVC-Z4ANX4WAEWEBLCTM (1 references)
       pkts bytes target     prot opt in     out     source               destination         
          0     0 KUBE-SEP-IA5OEOMXBLJGWAHT  all  --  *      *       0.0.0.0/0            0.0.0.0/0            /* kube-system/metrics-server:https -> 192.168.1.27:10250 */ statistic mode random probability 0.50000000000
          0     0 KUBE-SEP-63RSSQWX3GJIEQO6  all  --  *      *       0.0.0.0/0            0.0.0.0/0            /* kube-system/metrics-server:https -> 192.168.2.190:10250 */
          
      watch -d 'iptables -v --numeric --table nat --list KUBE-SVC-Z4ANX4WAEWEBLCTM'
      
      SVC1=$(kubectl get svc svc-clusterip -o jsonpath={.spec.clusterIP})
      kubectl exec -it net-pod -- zsh -c "for i in {1..100};   do curl -s $SVC1:PORT | grep Hostname; sleep 1; done"
      
      ## Service에 mapping된 SEP(ServiceEndPoint)가 3개일 경우
      ## SVC-### 에서 랜덤 확률(대략 33%)로 SEP(Service EndPoint)인 각각 파드 IP로 DNAT 됩니다!
      ## 첫번째 룰에 일치 확률은 33% 이고, 매칭되지 않을 경우 아래 2개 남을때는 룰 일치 확률은 50%가 됩니다. 이것도 매칭되지 않으면 마지막 룰로 100% 일치됩니다
      Chain KUBE-SVC-KBDEBIL6IU6WL7RF (1 references)
       pkts bytes target                     prot opt in     out     source               destination
         38  2280 KUBE-SEP-6TM74ZFOWZXXYQW6  all  --  *      *       0.0.0.0/0            0.0.0.0/0            /* default/svc-clusterip:svc-webport */ statistic mode random probability 0.33333333349
         29  1740 KUBE-SEP-354QUAZJTL5AR6RR  all  --  *      *       0.0.0.0/0            0.0.0.0/0            /* default/svc-clusterip:svc-webport */ statistic mode random probability 0.50000000000
         25  1500 KUBE-SEP-PY4VJNJPBUZ3ATEL  all  --  *      *       0.0.0.0/0            0.0.0.0/0            /* default/svc-clusterip:svc-webport */
      
      # iptables -v --numeric --table nat --list KUBE-SEP-<각자 값 입력>
      [root@ip-192-168-1-54 ~]# iptables -v --numeric --table nat --list KUBE-SEP-IA5OEOMXBLJGWAHT | column -t                         
      Chain  KUBE-SEP-IA5OEOMXBLJGWAHT  (1              references)                                                                                          
      pkts   bytes                      target          prot         opt  in  out  source        destination                                                 
      0      0                          KUBE-MARK-MASQ  all          --   *   *    192.168.1.27  0.0.0.0/0    /*  kube-system/metrics-server:https  */       
      0      0                          DNAT            tcp          --   *   *    0.0.0.0/0     0.0.0.0/0    /*  kube-system/metrics-server:https  */  tcp  to:192.168.1.27:10250
      [root@ip-192-168-1-54 ~]# iptables -v --numeric --table nat --list KUBE-SEP-63RSSQWX3GJIEQO6 | column -t
      Chain  KUBE-SEP-63RSSQWX3GJIEQO6  (1              references)                                                                                           
      pkts   bytes                      target          prot         opt  in  out  source         destination                                                 
      0      0                          KUBE-MARK-MASQ  all          --   *   *    192.168.2.190  0.0.0.0/0    /*  kube-system/metrics-server:https  */       
      0      0                          DNAT            tcp          --   *   *    0.0.0.0/0      0.0.0.0/0    /*  kube-system/metrics-server:https  */  tcp  to:192.168.2.190:10250
      
      ## kubectl 통해서 metrics-server 정보 확인
      ## SEP에서 보이는것처럼 두개의 pod ip가 출력되는 것을 볼 수 있다.
      ## 즉, 위의 iptable chain의 rules에 따라서 service -> pod로 traffic이 routing 된다.
      gylee@GYLEEui-Macmini week2 % kubectl get po -n kube-system -l app.kubernetes.io/name=metrics-server -o wide
      NAME                              READY   STATUS    RESTARTS   AGE   IP              NODE                                              NOMINATED NODE   READINESS GATES
      metrics-server-86bbfd75bb-shnzz   1/1     Running   0          22h   192.168.1.27    ip-192-168-1-54.ap-northeast-2.compute.internal   <none>           <none>
      metrics-server-86bbfd75bb-xt77w   1/1     Running   0          22h   192.168.2.190   ip-192-168-2-56.ap-northeast-2.compute.internal   <none>           <none>
      
      iptables -t nat --zero
      iptables -v --numeric --table nat --list POSTROUTING | column; echo ; iptables -v --numeric --table nat --list KUBE-POSTROUTING | column
      watch -d 'iptables -v --numeric --table nat --list POSTROUTING; echo ; iptables -v --numeric --table nat --list KUBE-POSTROUTING'
      # POSTROUTE(nat) : 0x4000(2진수로 0100 0000 0000 0000, 10진수 16384) 마킹 되어 있지 않으니 RETURN 되고 그냥 빠져나가서 SNAT 되지 않는다!
      Chain KUBE-POSTROUTING (1 references)
       pkts bytes target     prot opt in     out     source               destination
        572 35232 RETURN     all  --  *      *       0.0.0.0/0            0.0.0.0/0            mark match ! 0x4000/0x4000
          0     0 MARK       all  --  *      *       0.0.0.0/0            0.0.0.0/0            MARK xor 0x4000
          0     0 MASQUERADE  all  --  *      *       0.0.0.0/0            0.0.0.0/0            /* kubernetes service traffic requiring SNAT */ random-fully
      
      iptables -t nat -S | grep KUBE-POSTROUTING
      -A KUBE-POSTROUTING -m mark ! --mark 0x4000/0x4000 -j RETURN
      -A KUBE-POSTROUTING -j MARK --set-xmark 0x4000/0x0
      -A KUBE-POSTROUTING -m comment --comment "kubernetes service traffic requiring SNAT" -j MASQUERADE --random-fully
      ...


    NodePort 타입


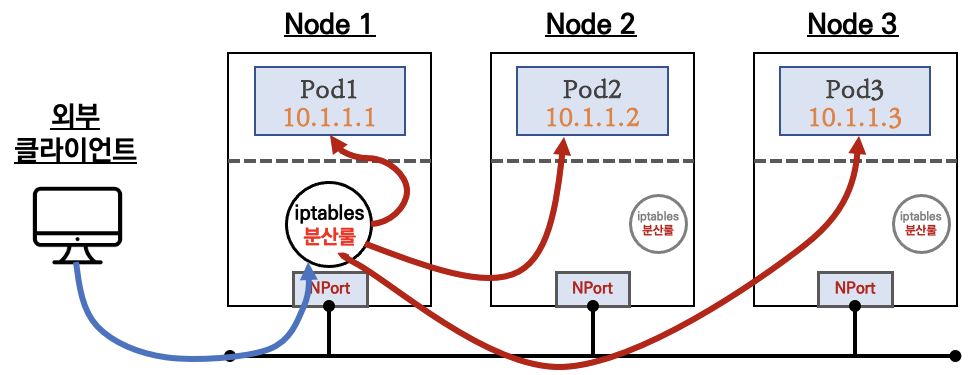
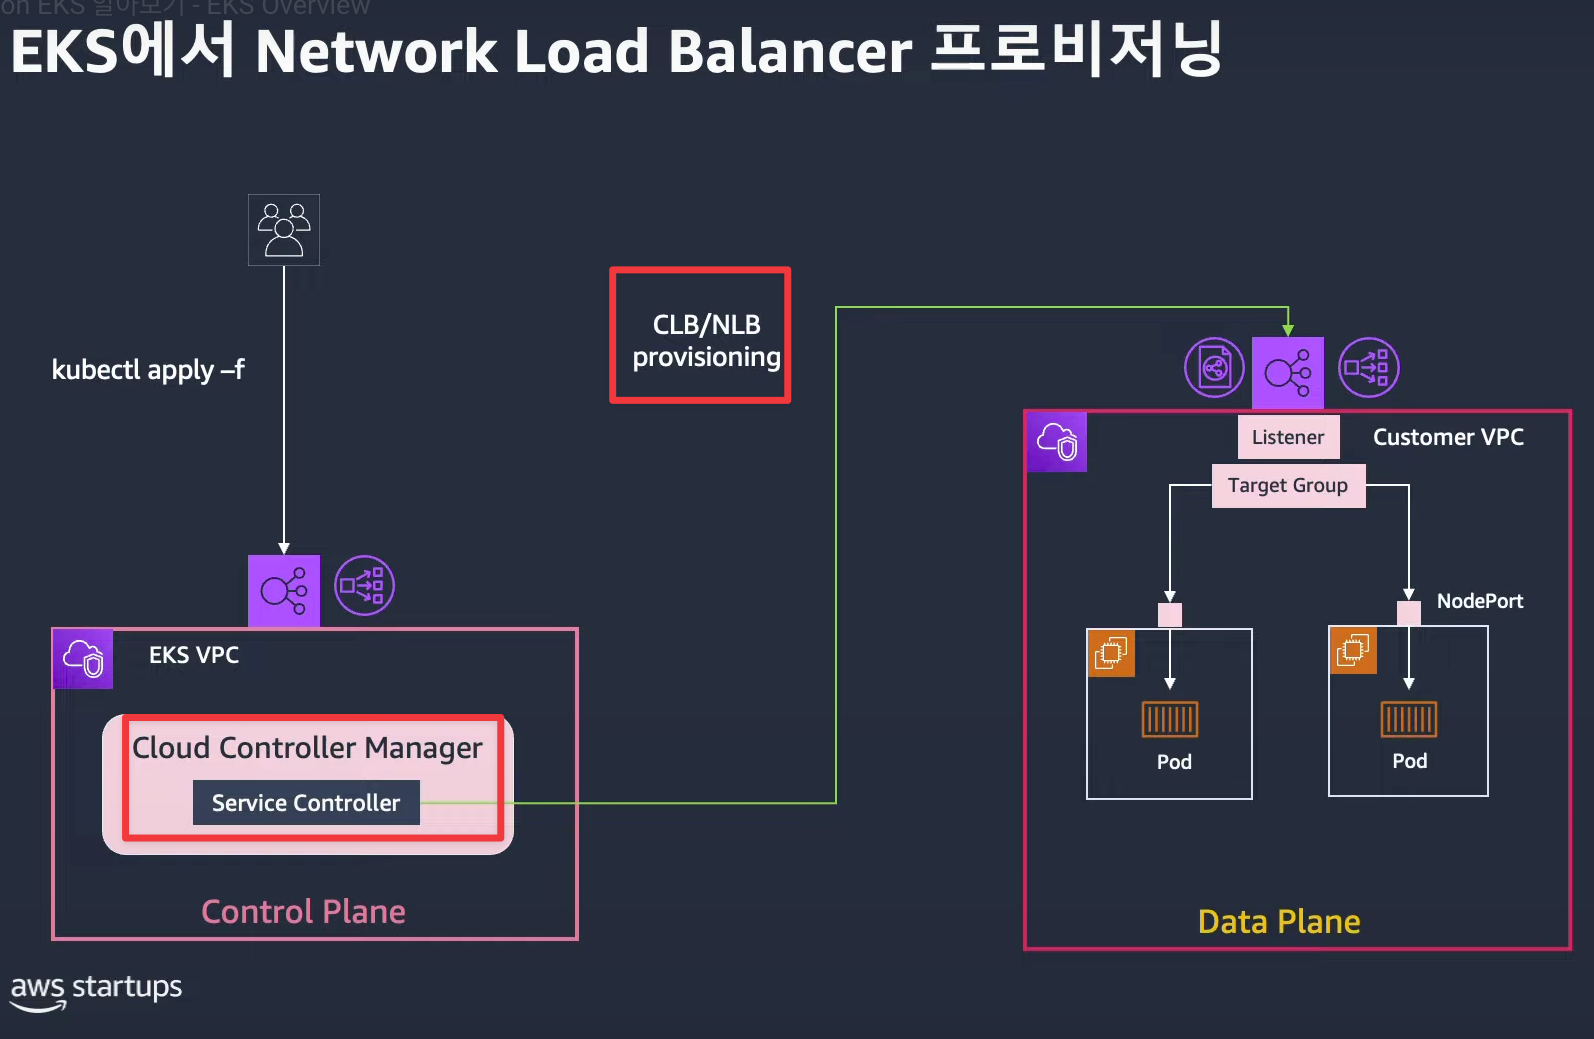
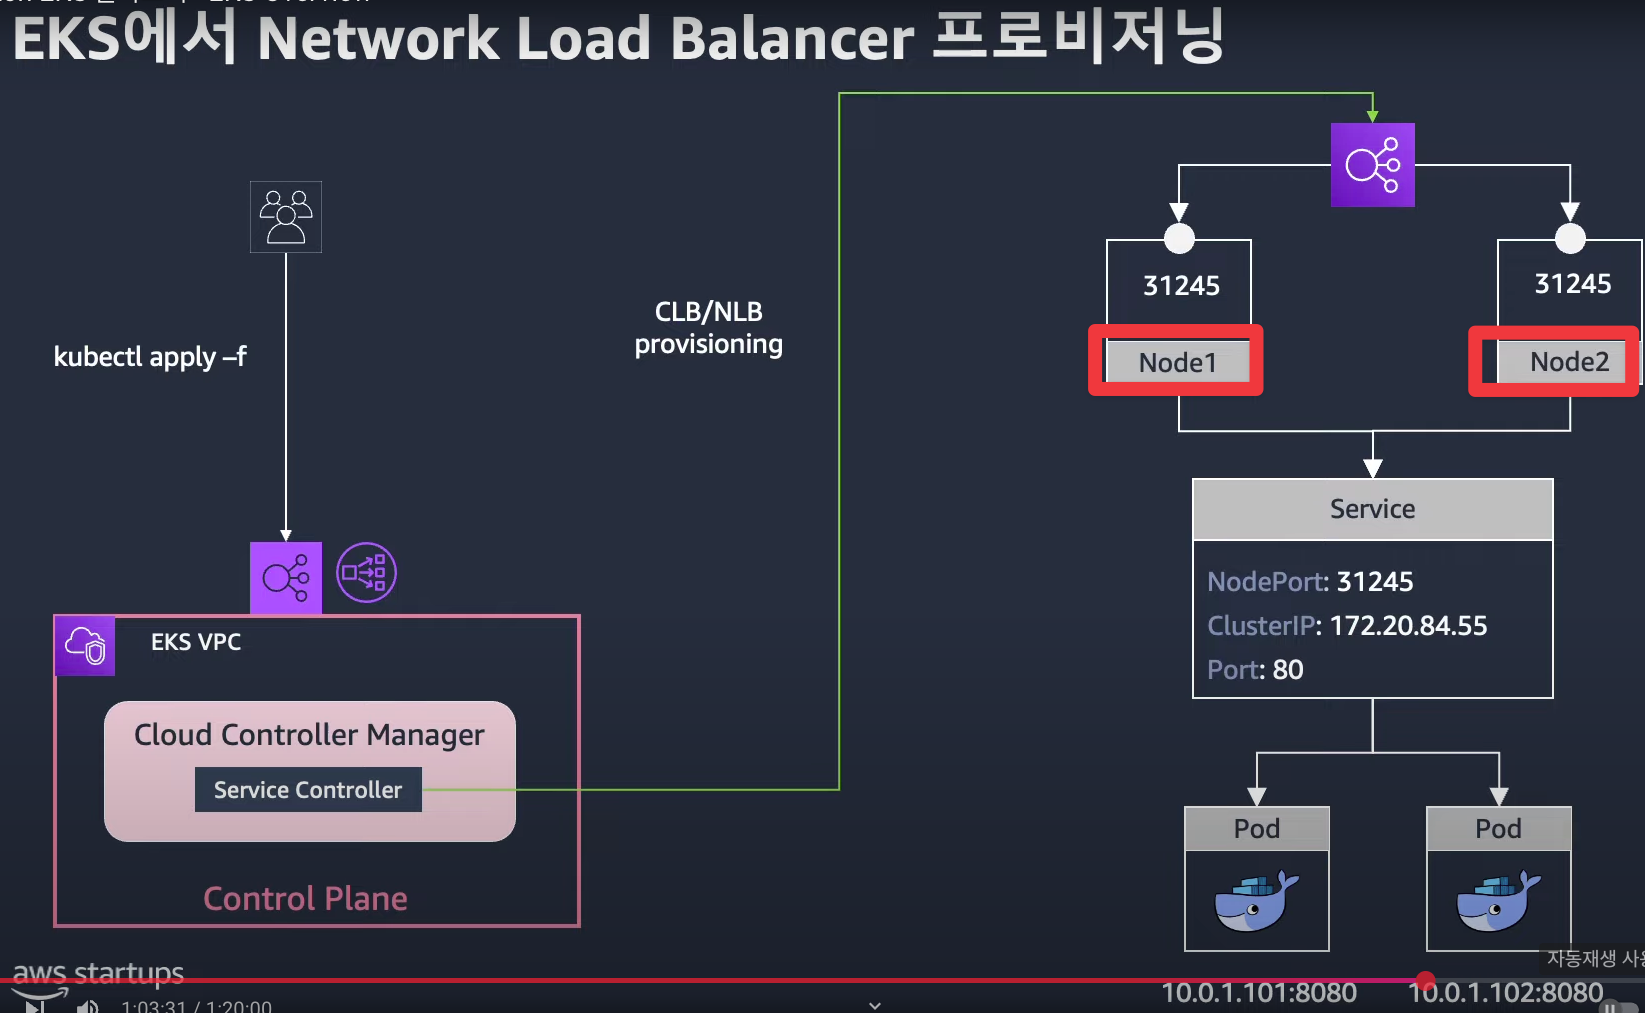
    LoadBalancer 타입 (기본 모드) : NLB 인스턴스 유형 ⇒

    노드IP:노드포트


    Cloud Controller Manager 를 통해 K8S NodePort 정보를 사용하는 CLB/NLB 프로비저닝


    Service (LoadBalancer Controller) : AWS Load Balancer Controller + NLB 

    (파드) IP

    모드 동작 with AWS VPC CNI

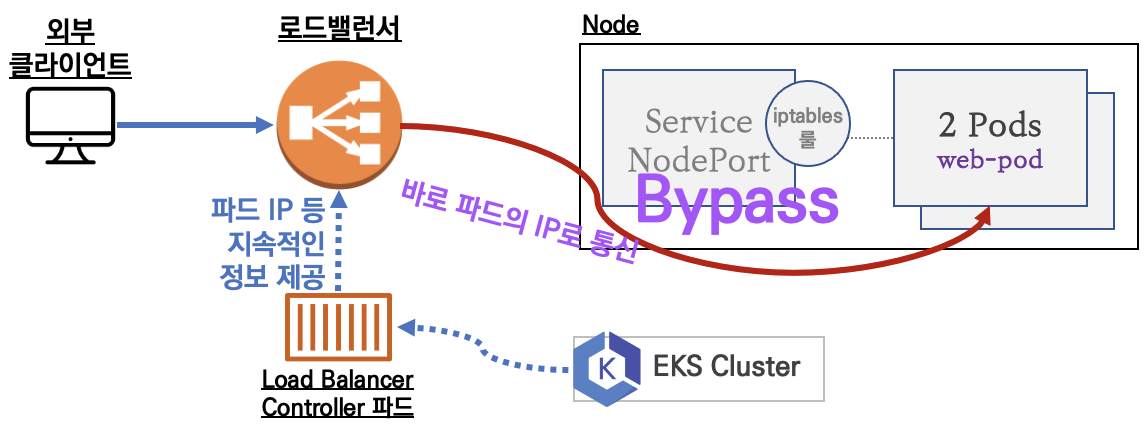
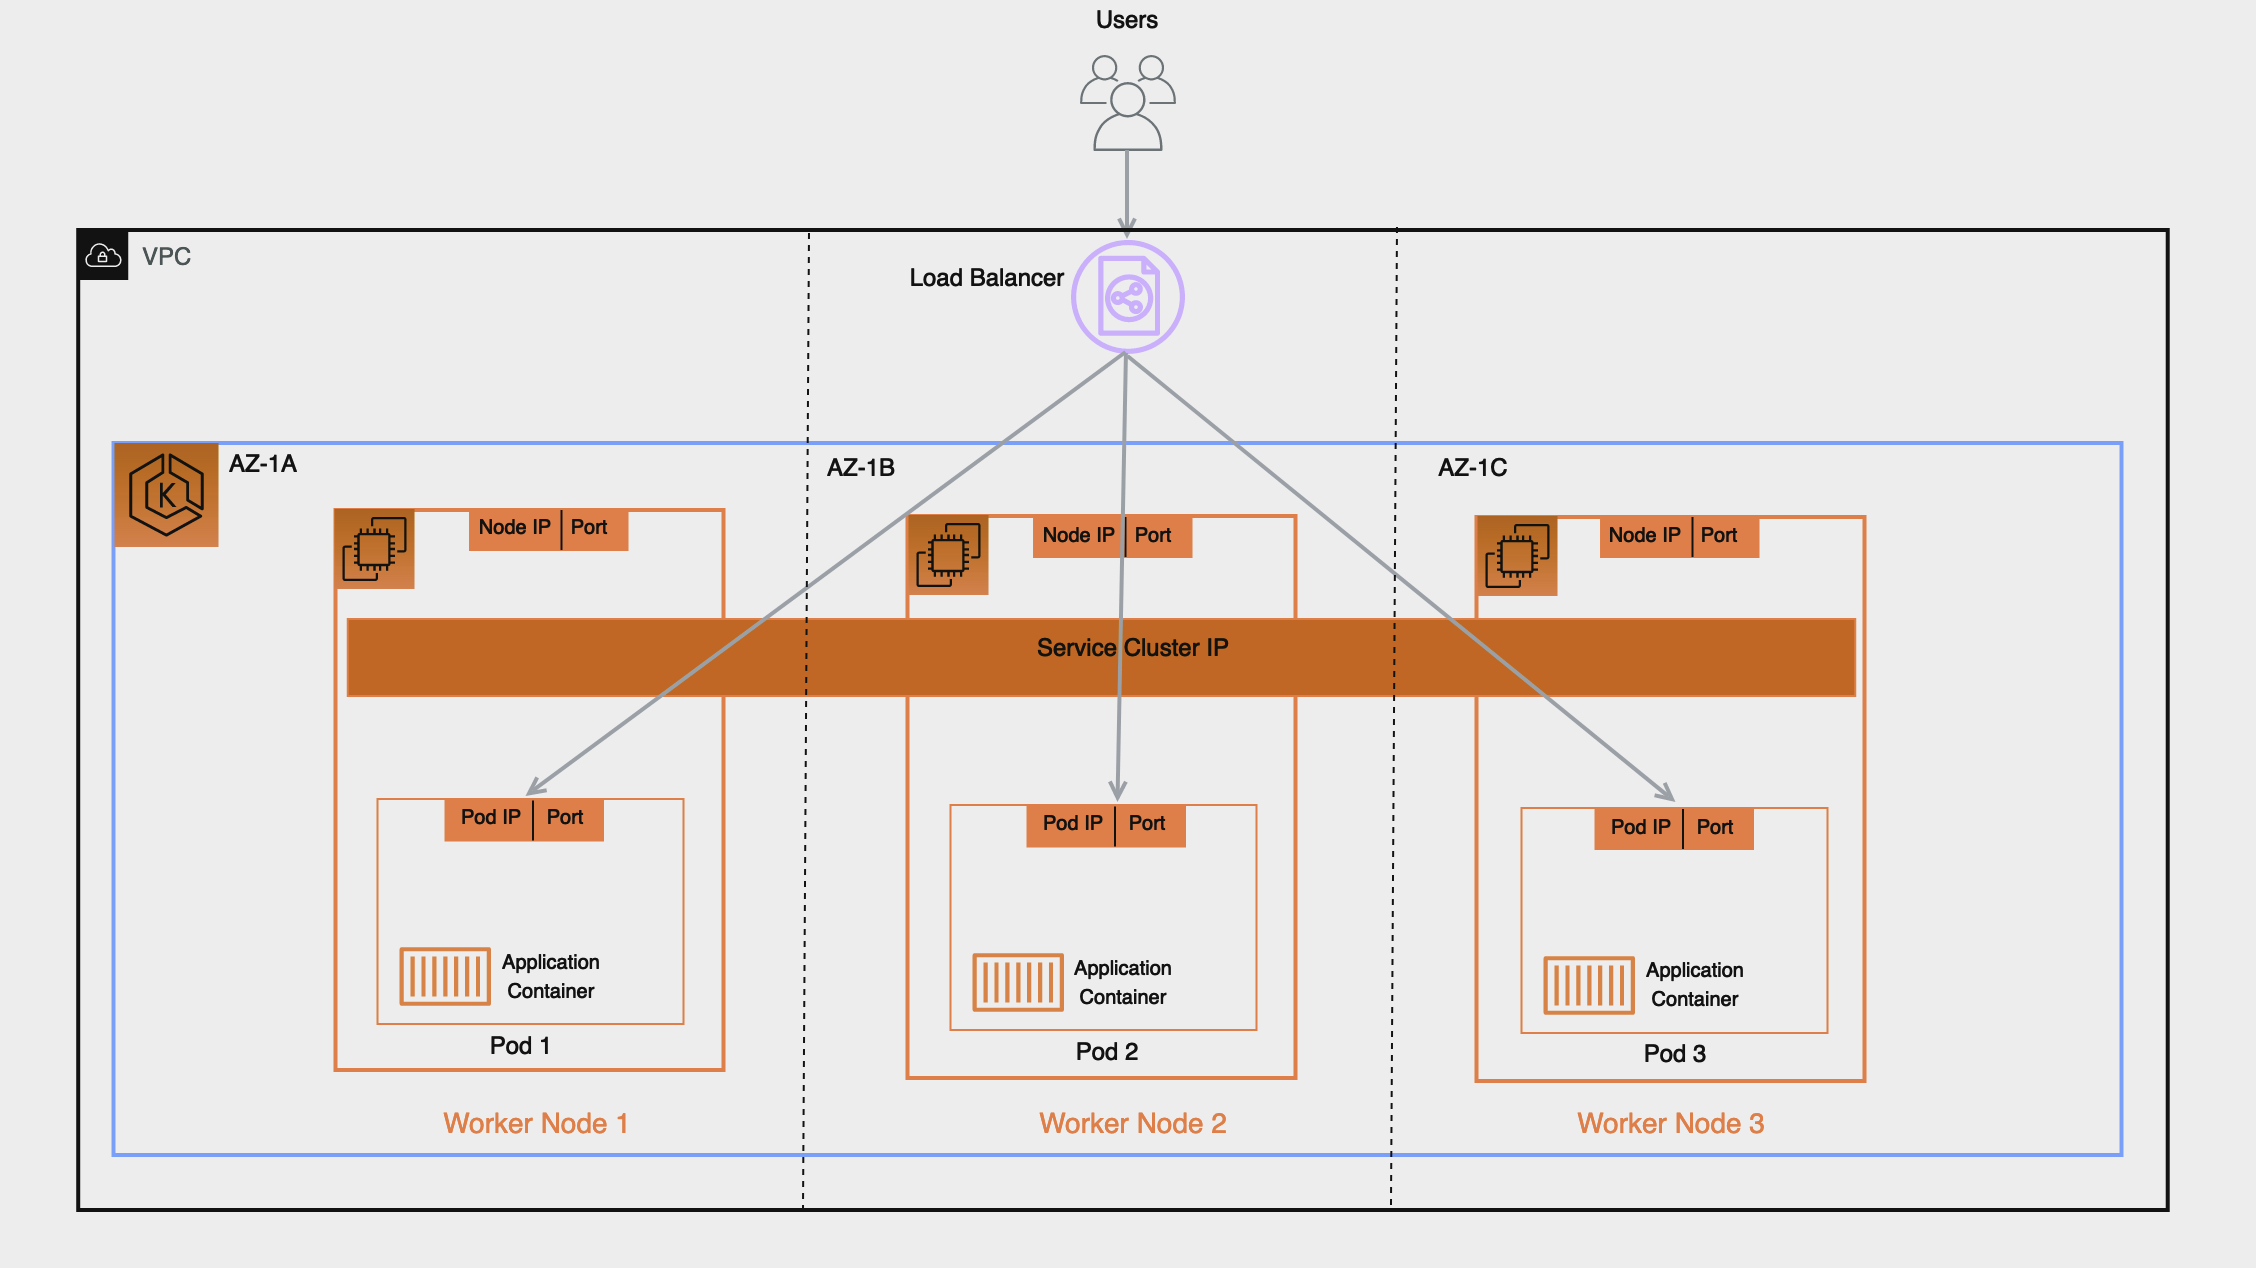
    AWS Loadbalancer Controller를 통해서 loadbalancer type의 servcie를 생성하면 NLB가 생성되고 IP Mode로 설정하면 NLB가 바로 pod ip로 통신을 한다.

    이는 VPC CNI에 의해서 NLB와 Pod IP 대역이 같기 때문에 가능하며 instance type보다 훨씬 network hop을 줄일 수 있어 성능적으로도 우수하다.


    6.4. NLB TargetGroup Mode(instance type, IP type)

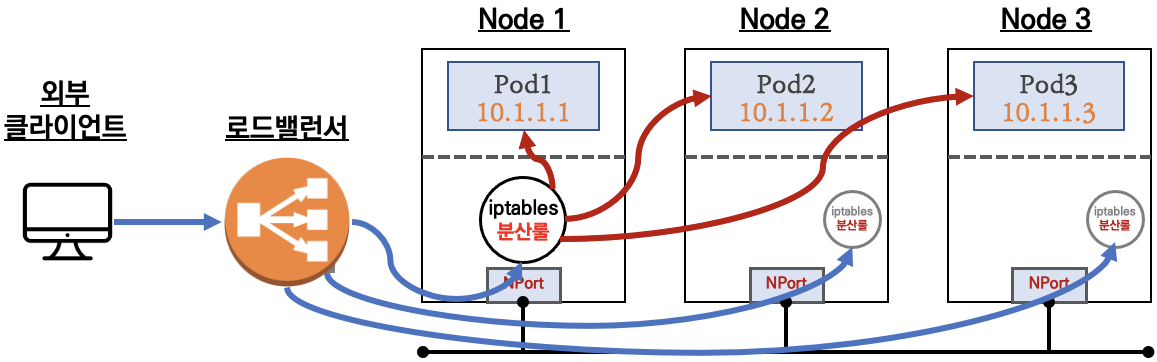
    6.4.1. 인스턴스 유형 : 노드에 NodePort로 전달

    • externalTrafficPolicy : ClusterIP ⇒ 2번 분산 및 SNAT으로 Client IP 확인 불가능 ← LoadBalancer 타입 (기본 모드) 동작
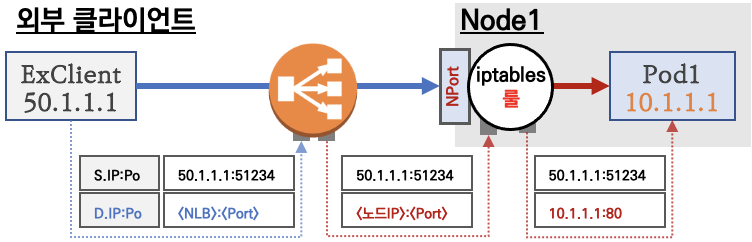
    • externalTrafficPolicy : Local ⇒ 1번 분산 및 ClientIP 유지, 워커 노드의 iptables 사용함요약 : 외부
      클라이언트
      가 '
      로드밸런서
      ' 접속 시 부하분산 되어 노드 도달 후
      iptables 룰
      목적지
      파드와 통신됨

      • 노드는 외부에 공개되지 않고 로드밸런서만 외부에 공개되어, 외부 클라이언트는 로드밸랜서에 접속을 할 뿐 내부 노드의 정보를 알 수 없다
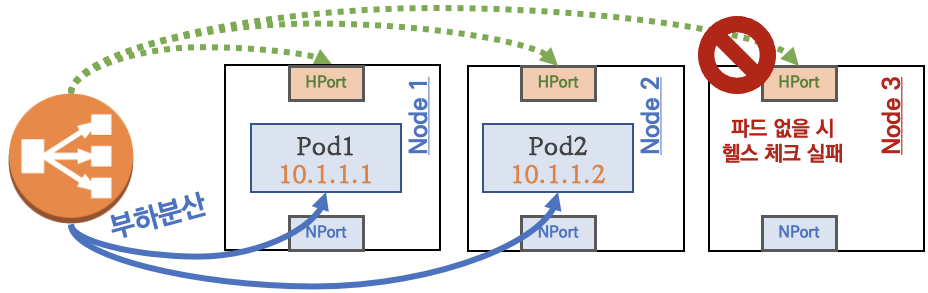
      • 로드밸런서부하분산하여 파드가 존재하는 노드들에게 전달한다, iptables 룰에서는 자신의 노드에 있는 파드만 연결한다 (externalTrafficPolicy: local)
      • DNAT 2번 동작 : 첫번째(로드밸런서 접속 후 빠져 나갈때), 두번째(노드의 iptables 룰에서 파드IP 전달 시)
      • 외부 클라이언트 IP 보존(유지) : AWS NLB 는 타켓인스턴스일 경우 클라이언트 IP를 유지, iptables 룰 경우도 externalTrafficPolicy 로 클라이언트 IP를 보존
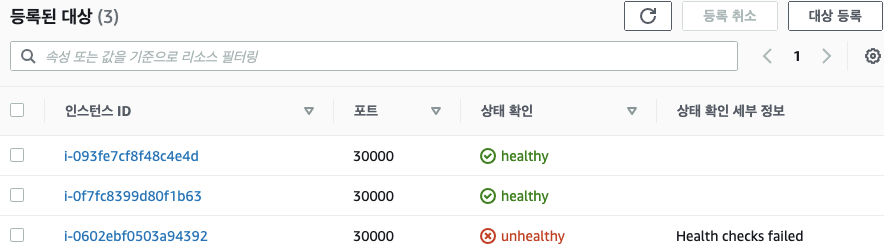
    • 부하분산 최적화 : 노드에 파드가 없을 경우 '로드밸런서'에서 노드에
      헬스 체크(상태 검사)
      실패
      하여 해당 노드로는 외부 요청
      트래픽을 전달하지 않는다
      3번째 인스턴스(Node3)은 상태 확인 실패로 외부 요청 트래픽 전달하지 않는다

    6.4.2. IP 유형 ⇒

    반드시 AWS LoadBalancer 컨트롤러 파드 및 정책 설정이 필요함!
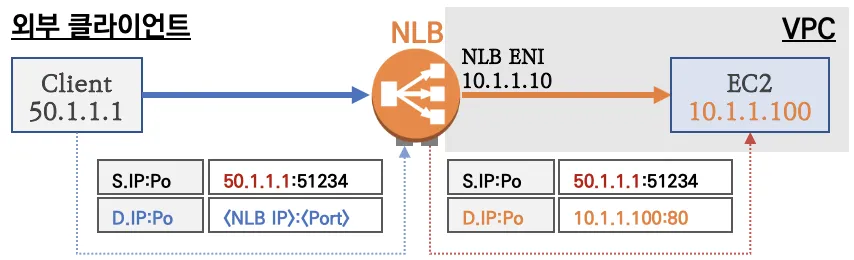
    • Proxy Protocol v2 비활성화 ⇒ NLB에서 바로 파드로 인입, 단 ClientIP가 NLB로 SNAT 되어 Client IP 확인 불가능
    • Proxy Protocol v2 활성화 ⇒ NLB에서 바로 파드로 인입 및 ClientIP 확인 가능(→ 단 PPv2 를 애플리케이션이 인지할 수 있게 설정 필요)


    6.3. Optimizing iptables mode

    performance

    - Docs

    In iptables mode, kube-proxy creates a few iptables rules for every Service, and a few iptables rules for each endpoint IP address. In clusters with tens of

    thousands of Pods and Services

    , this means tens of

    thousands of iptables rules

    , and

    kube-proxy may take a long time to update the rules

    in the kernel when Services (or their EndpointSlices) change. You can adjust the syncing behavior of kube-proxy via options in the iptables section of the kube-proxy configuration file (which you specify via kube-proxy --config <path>):

    kubectl describe cm -n kube-system kube-proxy | grep iptables: -A5
    iptables:
      ...
      minSyncPeriod: 1s
      syncPeriod: 30s

    minSyncPeriod

    • The minSyncPeriod parameter sets the minimum duration between attempts to resynchronize iptables rules with the kernel. If it is 0s, then kube-proxy will always immediately synchronize the rules every time any Service or Endpoint changes. This works fine in very small clusters, but it results in a lot of redundant work when lots of things change in a small time period. For example, if you have a Service backed by a Deployment with 100 pods, and you delete the Deployment, then with minSyncPeriod: 0s, kube-proxy would end up removing the Service's endpoints from the iptables rules one by one, for a total of 100 updates. With a larger minSyncPeriod, multiple Pod deletion events would get aggregated together, so kube-proxy might instead end up making, say, 5 updates, each removing 20 endpoints, which will be much more efficient in terms of CPU, and result in the full set of changes being synchronized faster.
    • The larger the value of minSyncPeriod, the more work that can be aggregated, but the downside is that each individual change may end up waiting up to the full minSyncPeriod before being processed, meaning that the iptables rules spend more time being out-of-sync with the current API server state.
    • The default value of 1s should work well in most clusters, but in very large clusters it may be necessary to set it to a larger value. Especially, if kube-proxy's sync_proxy_rules_duration_seconds metric indicates an average time much larger than 1 second, then bumping up minSyncPeriod may make updates more efficient.

    Updating legacy minSyncPeriod configuration

    • Older versions of kube-proxy updated all the rules for all Services on every sync; this led to performance issues (update lag) in large clusters, and the recommended solution was to set a larger minSyncPeriod. Since Kubernetes v1.28, the iptables mode of kube-proxy uses a more minimal approach, only making updates where Services or EndpointSlices have actually changed.
    • If you were previously overriding minSyncPeriod, you should try removing that override and letting kube-proxy use the default value (1s) or at least a smaller value than you were using before upgrading.
    • If you are not running kube-proxy from Kubernetes 1.31, check the behavior and associated advice for the version that you are actually running.

    syncPeriod

    • The syncPeriod parameter controls a handful of synchronization operations that are not directly related to changes in individual Services and EndpointSlices. In particular, it controls how quickly kube-proxy notices if an external component has interfered with kube-proxy's iptables rules. In large clusters, kube-proxy also only performs certain cleanup operations once every syncPeriod to avoid unnecessary work.
    • For the most part, increasing syncPeriod is not expected to have much impact on performance, but in the past, it was sometimes useful to set it to a very large value (eg, 1h). This is no longer recommended, and is likely to hurt functionality more than it improves performance.

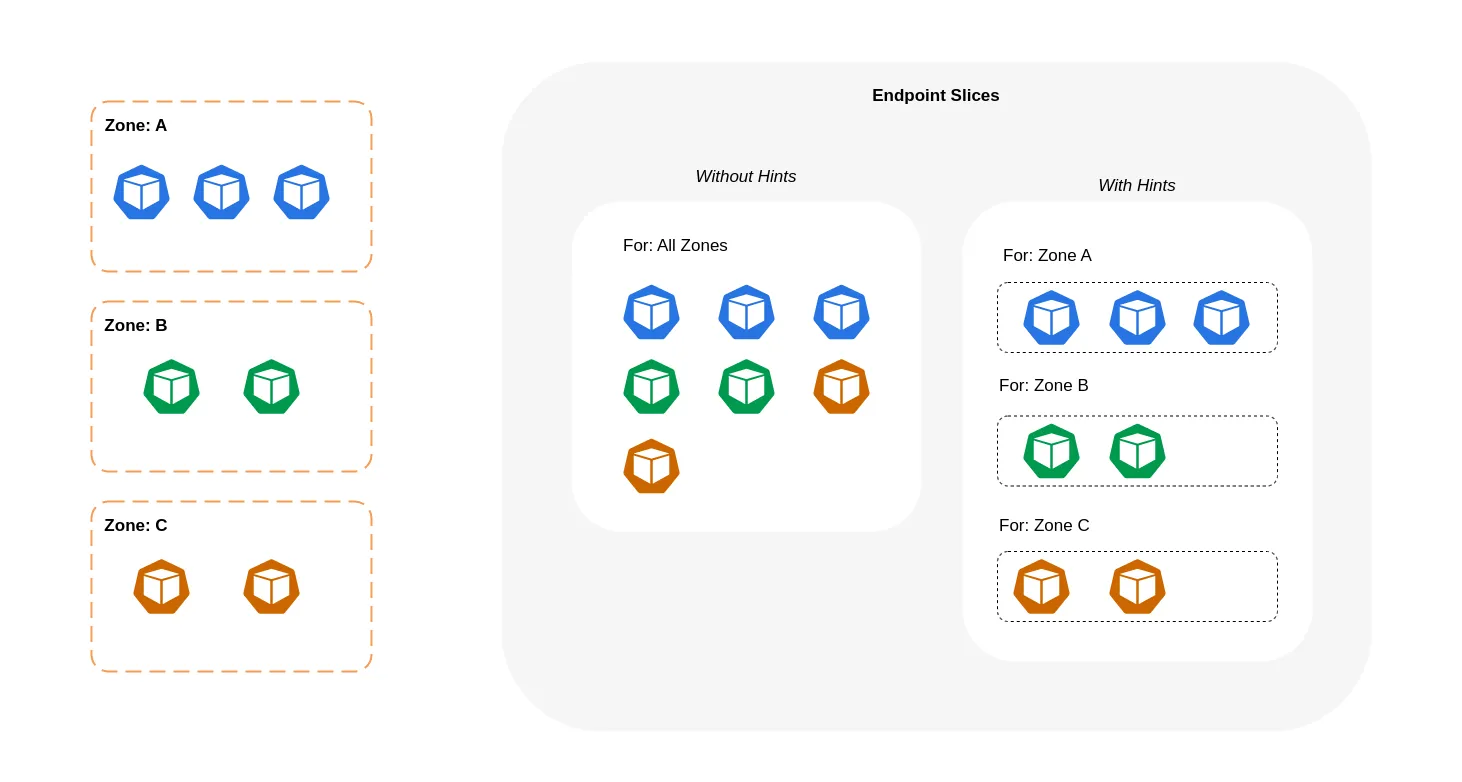
    6.4. EndpointEndpointSlice 관계 및 소스 코드 분석 - Blog1 , Blog2 , Blog3

    6.5. AWS LoadBalancer Controller 배포 및 실습

    # 설치 전 CRD 확인
    kubectl get crd
    
    # Helm Chart 설치
    helm repo add eks https://aws.github.io/eks-charts
    helm repo update
    helm install aws-load-balancer-controller eks/aws-load-balancer-controller -n kube-system --set clusterName=$CLUSTER_NAME
    
    
    ## 설치 확인
    kubectl get crd
    kubectl explain ingressclassparams.elbv2.k8s.aws
    kubectl explain targetgroupbindings.elbv2.k8s.aws
    
    kubectl get deployment -n kube-system aws-load-balancer-controller
    kubectl describe deploy -n kube-system aws-load-balancer-controller
    kubectl describe deploy -n kube-system aws-load-balancer-controller | grep 'Service Account'
      Service Account:  aws-load-balancer-controller
     
    # 클러스터롤, 롤 확인
    kubectl describe clusterrolebindings.rbac.authorization.k8s.io aws-load-balancer-controller-rolebinding
    kubectl describe clusterroles.rbac.authorization.k8s.io aws-load-balancer-controller-role
    ...
    PolicyRule:
      Resources                                     Non-Resource URLs  Resource Names  Verbs
      ---------                                     -----------------  --------------  -----
      targetgroupbindings.elbv2.k8s.aws             []                 []              [create delete get list patch update watch]
      events                                        []                 []              [create patch]
      ingresses                                     []                 []              [get list patch update watch]
      services                                      []                 []              [get list patch update watch]
      ingresses.extensions                          []                 []              [get list patch update watch]
      services.extensions                           []                 []              [get list patch update watch]
      ingresses.networking.k8s.io                   []                 []              [get list patch update watch]
      services.networking.k8s.io                    []                 []              [get list patch update watch]
      endpoints                                     []                 []              [get list watch]
      namespaces                                    []                 []              [get list watch]
      nodes                                         []                 []              [get list watch]
      pods                                          []                 []              [get list watch]
      endpointslices.discovery.k8s.io               []                 []              [get list watch]
      ingressclassparams.elbv2.k8s.aws              []                 []              [get list watch]
      ingressclasses.networking.k8s.io              []                 []              [get list watch]
      ingresses/status                              []                 []              [update patch]
      pods/status                                   []                 []              [update patch]
      services/status                               []                 []              [update patch]
      targetgroupbindings/status                    []                 []              [update patch]
      ingresses.elbv2.k8s.aws/status                []                 []              [update patch]
      pods.elbv2.k8s.aws/status                     []                 []              [update patch]
      services.elbv2.k8s.aws/status                 []                 []              [update patch]
      targetgroupbindings.elbv2.k8s.aws/status      []                 []              [update patch]
      ingresses.extensions/status                   []                 []              [update patch]
      pods.extensions/status                        []                 []              [update patch]
      services.extensions/status                    []                 []              [update patch]
      targetgroupbindings.extensions/status         []                 []              [update patch]
      ingresses.networking.k8s.io/status            []                 []              [update patch]
      pods.networking.k8s.io/status                 []                 []              [update patch]
      services.networking.k8s.io/status             []                 []              [update patch]
      targetgroupbindings.networking.k8s.io/status  []                 []              [update patch]


    6.5.1. 서비스/파드 배포 테스트 with NLB - Docs , NLB

    # 모니터링
    watch -d kubectl get pod,svc,ep,endpointslices
    
    # 디플로이먼트 & 서비스 생성
    cat << EOF > echo-service-nlb.yaml
    apiVersion: apps/v1
    kind: Deployment
    metadata:
      name: deploy-echo
    spec:
      replicas: 2
      selector:
        matchLabels:
          app: deploy-websrv
      template:
        metadata:
          labels:
            app: deploy-websrv
        spec:
          terminationGracePeriodSeconds: 0
          containers:
          - name: aews-websrv
            image: k8s.gcr.io/echoserver:1.5
            ports:
            - containerPort: 8080
    ---
    apiVersion: v1
    kind: Service
    metadata:
      name: svc-nlb-ip-type
      annotations:
        service.beta.kubernetes.io/aws-load-balancer-nlb-target-type: ip
        service.beta.kubernetes.io/aws-load-balancer-scheme: internet-facing
        service.beta.kubernetes.io/aws-load-balancer-healthcheck-port: "8080"
        service.beta.kubernetes.io/aws-load-balancer-cross-zone-load-balancing-enabled: "true"
    spec:
      ports:
        - port: 80
          targetPort: 8080
          protocol: TCP
      type: LoadBalancer
      loadBalancerClass: service.k8s.aws/nlb
      selector:
        app: deploy-websrv
    EOF
    kubectl apply -f echo-service-nlb.yaml
    
    
    # 확인
    aws elbv2 describe-load-balancers --query 'LoadBalancers[*].State.Code' --output text
    kubectl get deploy,pod
    kubectl get svc,ep,ingressclassparams,targetgroupbindings
    kubectl get targetgroupbindings -o json | jq
    
    # AWS 관리콘솔에서 NLB 정보 확인
    # 빠른 실습을 위해서 등록 취소 지연(드레이닝 간격) 수정 : 기본값 300초
    echo-service-nlb.yaml 파일 IDE(VS code)에서 수정
    ..
    apiVersion: v1
    kind: Service
    metadata:
      name: svc-nlb-ip-type
      annotations:
        service.beta.kubernetes.io/aws-load-balancer-nlb-target-type: ip
        service.beta.kubernetes.io/aws-load-balancer-scheme: internet-facing
        service.beta.kubernetes.io/aws-load-balancer-healthcheck-port: "8080"
        service.beta.kubernetes.io/aws-load-balancer-cross-zone-load-balancing-enabled: "true"
        service.beta.kubernetes.io/aws-load-balancer-target-group-attributes: deregistration_delay.timeout_seconds=60
    ...
    kubectl apply -f echo-service-nlb.yaml
    
    # AWS ELB(NLB) 정보 확인
    aws elbv2 describe-load-balancers | jq
    aws elbv2 describe-load-balancers --query 'LoadBalancers[*].State.Code' --output text
    NLB_ARN=$(aws elbv2 describe-load-balancers --query 'LoadBalancers[?contains(LoadBalancerName, `k8s-default-svcnlbip`) == `true`].LoadBalancerArn' | jq -r '.[0]')
    aws elbv2 describe-target-groups --load-balancer-arn $NLB_ARN | jq
    TARGET_GROUP_ARN=$(aws elbv2 describe-target-groups --load-balancer-arn $NLB_ARN | jq -r '.TargetGroups[0].TargetGroupArn')
    aws elbv2 describe-target-health --target-group-arn $TARGET_GROUP_ARN | jq
    {
      "TargetHealthDescriptions": [
        {
          "Target": {
            "Id": "192.168.3.42",
            "Port": 8080,
            "AvailabilityZone": "ap-northeast-2c"
          },
          "HealthCheckPort": "8080",
          "TargetHealth": {
            "State": "healthy"
          },
          "AdministrativeOverride": {
            "State": "no_override",
            "Reason": "AdministrativeOverride.NoOverride",
            "Description": "No override is currently active on target"
          }
        },
        {
          "Target": {
            "Id": "192.168.1.220",
            "Port": 8080,
            "AvailabilityZone": "ap-northeast-2a"
          },
          "HealthCheckPort": "8080",
          "TargetHealth": {
            "State": "healthy"
          },
          "AdministrativeOverride": {
            "State": "no_override",
            "Reason": "AdministrativeOverride.NoOverride",
            "Description": "No override is currently active on target"
          }
        }
      ]
    }
    
    # 웹 접속 주소 확인
    kubectl get svc svc-nlb-ip-type -o jsonpath='{.status.loadBalancer.ingress[0].hostname}' | awk '{ print "Pod Web URL = http://"$1 }'
    
    # 파드 로깅 모니터링
    kubectl logs -l app=deploy-websrv -f
    kubectl stern -l  app=deploy-websrv
    
    # 분산 접속 확인
    NLB=$(kubectl get svc svc-nlb-ip-type -o jsonpath='{.status.loadBalancer.ingress[0].hostname}')
    curl -s $NLB
    for i in {1..100}; do curl -s $NLB | grep Hostname ; done | sort | uniq -c | sort -nr
      54 Hostname: deploy-echo-bf9bdb8bc-2dgjj
      46 Hostname: deploy-echo-bf9bdb8bc-jjxl5
    
    # 지속적인 접속 시도 : 아래 상세 동작 확인 시 유용(패킷 덤프 등)
    while true; do curl -s --connect-timeout 1 $NLB | egrep 'Hostname|client_address'; echo "----------" ; date "+%Y-%m-%d %H:%M:%S" ; sleep 1; done


    1. Ingress7.1. Ingress란?7.1.1. Ingress with ALB(AWS Load Balancer Controller)
      # 게임 파드와 Service, Ingress 배포
      cat <<EOF | kubectl apply -f -
      apiVersion: v1
      kind: Namespace
      metadata:
        name: game-2048
      ---
      apiVersion: apps/v1
      kind: Deployment
      metadata:
        namespace: game-2048
        name: deployment-2048
      spec:
        selector:
          matchLabels:
            app.kubernetes.io/name: app-2048
        replicas: 2
        template:
          metadata:
            labels:
              app.kubernetes.io/name: app-2048
          spec:
            containers:
            - image: public.ecr.aws/l6m2t8p7/docker-2048:latest
              imagePullPolicy: Always
              name: app-2048
              ports:
              - containerPort: 80
      ---
      apiVersion: v1
      kind: Service
      metadata:
        namespace: game-2048
        name: service-2048
      spec:
        ports:
          - port: 80
            targetPort: 80
            protocol: TCP
        type: NodePort
        selector:
          app.kubernetes.io/name: app-2048
      ---
      apiVersion: networking.k8s.io/v1
      kind: Ingress
      metadata:
        namespace: game-2048
        name: ingress-2048
        annotations:
          alb.ingress.kubernetes.io/scheme: internet-facing
          alb.ingress.kubernetes.io/target-type: ip
      spec:
        ingressClassName: alb
        rules:
          - http:
              paths:
              - path: /
                pathType: Prefix
                backend:
                  service:
                    name: service-2048
                    port:
                      number: 80
      EOF
      
      # 모니터링
      watch -d kubectl get pod,ingress,svc,ep,endpointslices -n game-2048
      
      # 생성 확인
      kubectl get ingress,svc,ep,pod -n game-2048
      kubectl get-all -n game-2048
      kubectl get targetgroupbindings -n game-2048
      
      # ALB 생성 확인
      aws elbv2 describe-load-balancers --query 'LoadBalancers[?contains(LoadBalancerName, `k8s-game2048`) == `true`]' | jq
      ALB_ARN=$(aws elbv2 describe-load-balancers --query 'LoadBalancers[?contains(LoadBalancerName, `k8s-game2048`) == `true`].LoadBalancerArn' | jq -r '.[0]')
      aws elbv2 describe-target-groups --load-balancer-arn $ALB_ARN
      TARGET_GROUP_ARN=$(aws elbv2 describe-target-groups --load-balancer-arn $ALB_ARN | jq -r '.TargetGroups[0].TargetGroupArn')
      aws elbv2 describe-target-health --target-group-arn $TARGET_GROUP_ARN | jq
      
      # Ingress 확인
      kubectl describe ingress -n game-2048 ingress-2048
      kubectl get ingress -n game-2048 ingress-2048 -o jsonpath="{.status.loadBalancer.ingress[*].hostname}{'\n'}"
      
      # 게임 접속 : ALB 주소로 웹 접속
      kubectl get ingress -n game-2048 ingress-2048 -o jsonpath='{.status.loadBalancer.ingress[0].hostname}' | awk '{ print "Game URL = http://"$1 }'
      
      # 파드 IP 확인
      kubectl get pod -n game-2048 -owide
      위의 ingress 설정에서 .metadat.annotations.alb.ingress.kubernetes.io/target-type: ip 에 의해서 targetGroup이 ip로 등록되게 된다. 이렇게되면 위에서 설명한 것처럼 ALB에서 바로 같은 대역에 있는 pod ip로 traffic이 routing되어 network hop을 줄여 효율을 높일 수 있다.7.3. 참고 사항
      • Exposing Kubernetes Applications, Part 1: Service and Ingress Resources - 링크
      • AWS Load Balancer Controller Blue/Green Split Traffic - Link
      • AWS LB Controller 에서 Service(NLB)와 Ingress(ALB)를 MultiCluster Target Groups 사용 - Docs
      • Target Groups CRD를 분리 사용하여, EKS 업그레이드에 활용하기
        • Ingress를 제거하고 별도로 ALB를 구성 후 파드를 TargetGroupBinding으로 직접 연결
        • ALB가 Kubernetes와 독립적으로 구성되니 Route 53이나 CloudFront나 WAF에 대한 조정이 필요 없음!!!
        • Ingress 구성이 아닌 TargetGroupBinding으로 생성된 ALB로 지정해서 서비스
          • 두개의 클러스터의 자원 모두 기존에 생성한 ALB를 활용
            • Terraform을 통해 ALB 관련 자원을 생성하고 제어
          • ALB의 Target Group을 클러스터 별로 분리해서 사용
            • ALB Listener에 2개의 Target Group을 등록하고 Weight를 조정해서 사용
              • (일반적인 서비스) v1 TG 50% : v2 TG 50%
              • (v1 클러스터 업그레이드 전) v1 TG 0% : v2 TG 100% ⇒ v1 클러스터 업그레이드 진행
              • (v2 클러스터 업그레이드 전) v1 TG 100% : v2 TG 0% ⇒ v2 클러스터 업그레이드 진행
              • (두 클러스터 모두 업그레이드 완료) v1 TG 50% : v2 TG 50%
    2.  
    3. 7.2. 서비스/파드 배포 테스트 with Ingress(ALB) - ALB
    4. AWS Load Balancer Controller + Ingress (ALB) IP 모드 동작 with AWS VPC CNI
    5. 클러스터 내부의 서비스(ClusterIP, NodePort, Loadbalancer)를 외부로 노출(HTTP/HTTPS) - Web Proxy 역할


      1. External DNSK8S 서비스/인그레스 생성 시 도메인을 설정하면, AWS(Route 53), Azure(DNS), GCP(Cloud DNS) 에 A 레코드(TXT 레코드)로 자동 생성/삭제
        • ExternalDNS CTRL 권한 주는 방법 4가지 : Node IAM Role, Static credentials, IRSA, Pod Identity
        • AWS Route 53 정보 확인 & 변수 지정 : Public 도메인 소유 필요
          # 자신의 도메인 변수 지정 : 소유하고 있는 자신의 도메인을 입력하시면 됩니다
          MyDomain=<자신의 도메인>
          MyDomain=gasida.link
          
          # 자신의 Route 53 도메인 ID 조회 및 변수 지정
          aws route53 list-hosted-zones-by-name --dns-name "${MyDomain}." | jq
          aws route53 list-hosted-zones-by-name --dns-name "${MyDomain}." --query "HostedZones[0].Name"
          aws route53 list-hosted-zones-by-name --dns-name "${MyDomain}." --query "HostedZones[0].Id" --output text
          MyDnzHostedZoneId=`aws route53 list-hosted-zones-by-name --dns-name "${MyDomain}." --query "HostedZones[0].Id" --output text`
          echo $MyDnzHostedZoneId
          
          # (옵션) NS 레코드 타입 첫번째 조회
          aws route53 list-resource-record-sets --output json --hosted-zone-id "${MyDnzHostedZoneId}" --query "ResourceRecordSets[?Type == 'NS']" | jq -r '.[0].ResourceRecords[].Value'
          # (옵션) A 레코드 타입 모두 조회
          aws route53 list-resource-record-sets --output json --hosted-zone-id "${MyDnzHostedZoneId}" --query "ResourceRecordSets[?Type == 'A']"
          
          # A 레코드 타입 조회
          aws route53 list-resource-record-sets --hosted-zone-id "${MyDnzHostedZoneId}" --query "ResourceRecordSets[?Type == 'A']" | jq
          aws route53 list-resource-record-sets --hosted-zone-id "${MyDnzHostedZoneId}" --query "ResourceRecordSets[?Type == 'A'].Name" | jq
          aws route53 list-resource-record-sets --hosted-zone-id "${MyDnzHostedZoneId}" --query "ResourceRecordSets[?Type == 'A'].Name" --output text
          
          # A 레코드 값 반복 조회
          while true; do aws route53 list-resource-record-sets --hosted-zone-id "${MyDnzHostedZoneId}" --query "ResourceRecordSets[?Type == 'A']" | jq ; date ; echo ; sleep 1; done

    8.1. ExternalDNS 설치 - 링크

    # EKS 배포 시 Node IAM Role 설정되어 있음
    # eksctl create cluster ... --external-dns-access ...
    
    # 
    MyDomain=<자신의 도메인>
    MyDomain=gasida.link
    
    # 자신의 Route 53 도메인 ID 조회 및 변수 지정
    MyDnzHostedZoneId=$(aws route53 list-hosted-zones-by-name --dns-name "${MyDomain}." --query "HostedZones[0].Id" --output text)
    
    # 변수 확인
    echo $MyDomain, $MyDnzHostedZoneId
    
    # ExternalDNS 배포
    curl -s -O https://raw.githubusercontent.com/gasida/PKOS/main/aews/externaldns.yaml
    cat externaldns.yaml
    MyDomain=$MyDomain MyDnzHostedZoneId=$MyDnzHostedZoneId envsubst < externaldns.yaml | kubectl apply -f -
    
    # 확인 및 로그 모니터링
    kubectl get pod -l app.kubernetes.io/name=external-dns -n kube-system
    kubectl logs deploy/external-dns -n kube-system -f
    • (참고) 기존에 ExternalDNS를 통해 사용한 A/TXT 레코드가 있는 존의 경우에 policy 정책을 upsert-only 로 설정 후 사용 하자 - Link
     - #--policy=upsert-only # would prevent ExternalDNS from deleting any records, omit to enable full synchronization


    8.2. 실습: Service(NLB) + 도메인 연동(ExternalDNS) - 도메인체크

    # 터미널1 (모니터링)
    watch -d 'kubectl get pod,svc'
    kubectl logs deploy/external-dns -n kube-system -f
    혹은
    kubectl stern -l app.kubernetes.io/name=external-dns -n kube-system
    
    # 테트리스 디플로이먼트 배포
    cat <<EOF | kubectl apply -f -
    apiVersion: apps/v1
    kind: Deployment
    metadata:
      name: tetris
      labels:
        app: tetris
    spec:
      replicas: 1
      selector:
        matchLabels:
          app: tetris
      template:
        metadata:
          labels:
            app: tetris
        spec:
          containers:
          - name: tetris
            image: bsord/tetris
    ---
    apiVersion: v1
    kind: Service
    metadata:
      name: tetris
      annotations:
        service.beta.kubernetes.io/aws-load-balancer-nlb-target-type: ip
        service.beta.kubernetes.io/aws-load-balancer-scheme: internet-facing
        service.beta.kubernetes.io/aws-load-balancer-cross-zone-load-balancing-enabled: "true"
        service.beta.kubernetes.io/aws-load-balancer-backend-protocol: "http"
        #service.beta.kubernetes.io/aws-load-balancer-healthcheck-port: "80"
    spec:
      selector:
        app: tetris
      ports:
      - port: 80
        protocol: TCP
        targetPort: 80
      type: LoadBalancer
      loadBalancerClass: service.k8s.aws/nlb
    EOF
    
    # 배포 확인
    kubectl get deploy,svc,ep tetris
    
    # NLB에 ExternanDNS 로 도메인 연결
    kubectl annotate service tetris "external-dns.alpha.kubernetes.io/hostname=tetris.$MyDomain"
    while true; do aws route53 list-resource-record-sets --hosted-zone-id "${MyDnzHostedZoneId}" --query "ResourceRecordSets[?Type == 'A']" | jq ; date ; echo ; sleep 1; done
    
    # Route53에 A레코드 확인
    aws route53 list-resource-record-sets --hosted-zone-id "${MyDnzHostedZoneId}" --query "ResourceRecordSets[?Type == 'A']" | jq
    
    # 확인
    dig +short tetris.$MyDomain @8.8.8.8
    dig +short tetris.$MyDomain
    
    # 도메인 체크
    echo -e "My Domain Checker Site1 = https://www.whatsmydns.net/#A/tetris.$MyDomain"
    echo -e "My Domain Checker Site2 = https://dnschecker.org/#A/tetris.$MyDomain"
    
    # 웹 접속 주소 확인 및 접속
    echo -e "Tetris Game URL = http://tetris.$MyDomain"


    1. Topology Aware RoutingTopology Aware Routing: Understanding the Tradeoffs - Rob Scott, Google - 링크
      • Deploy와 Service 배포
        # 현재 노드 AZ 배포 확인
        kubectl get node --label-columns=topology.kubernetes.io/zone
        NAME                                              STATUS   ROLES    AGE    VERSION               ZONE
        ip-192-168-1-54.ap-northeast-2.compute.internal   Ready    <none>   156m   v1.31.4-eks-aeac579   ap-northeast-2a
        ip-192-168-2-56.ap-northeast-2.compute.internal   Ready    <none>   156m   v1.31.4-eks-aeac579   ap-northeast-2b
        ip-192-168-3-31.ap-northeast-2.compute.internal   Ready    <none>   156m   v1.31.4-eks-aeac579   ap-northeast-2c
        
        # 테스트를 위한 디플로이먼트와 서비스 배포
        cat <<EOF | kubectl apply -f -
        apiVersion: apps/v1
        kind: Deployment
        metadata:
          name: deploy-echo
        spec:
          replicas: 3
          selector:
            matchLabels:
              app: deploy-websrv
          template:
            metadata:
              labels:
                app: deploy-websrv
            spec:
              terminationGracePeriodSeconds: 0
              containers:
              - name: websrv
                image: registry.k8s.io/echoserver:1.5
                ports:
                - containerPort: 8080
        ---
        apiVersion: v1
        kind: Service
        metadata:
          name: svc-clusterip
        spec:
          ports:
            - name: svc-webport
              port: 80
              targetPort: 8080
          selector:
            app: deploy-websrv
          type: ClusterIP
        EOF
        
        # 확인
        kubectl get deploy,svc,ep,endpointslices
        kubectl get pod -owide
        kubectl get svc,ep svc-clusterip
        kubectl get endpointslices -l kubernetes.io/service-name=svc-clusterip
        kubectl get endpointslices -l kubernetes.io/service-name=svc-clusterip -o yaml
        
        # 접속 테스트를 수행할 클라이언트 파드 배포
        cat <<EOF | kubectl apply -f -
        apiVersion: v1
        kind: Pod
        metadata:
          name: netshoot-pod
        spec:
          containers:
          - name: netshoot-pod
            image: nicolaka/netshoot
            command: ["tail"]
            args: ["-f", "/dev/null"]
          terminationGracePeriodSeconds: 0
        EOF
        
        # 확인
        kubectl get pod -owide

      • 테스트 파드(netshoot-pod)에서 ClusterIP 접속 시 부하분산 확인 : AZ(zone) 상관없이 랜덤 확률 부하분산 동작
        # 디플로이먼트 파드가 배포된 AZ(zone) 확인
        kubectl get pod -l app=deploy-websrv -owide
        
        # 테스트 파드(netshoot-pod)에서 ClusterIP 접속 시 부하분산 확인
        # iptables rules에 의해서 randomly 부하 분산 하는것을 확인 할 수 있다.
        kubectl exec -it netshoot-pod -- curl svc-clusterip | grep Hostname
        Hostname: deploy-echo-75b7b9558c-rfn6h
        
        kubectl exec -it netshoot-pod -- curl svc-clusterip | grep Hostname
        Hostname: deploy-echo-75b7b9558c-x8gmz
        
        # 100번 반복 접속 : 3개의 파드로 AZ(zone) 상관없이 랜덤 확률 부하분산 동작
        kubectl exec -it netshoot-pod -- zsh -c "for i in {1..100}; do curl -s svc-clusterip | grep Hostname; done | sort | uniq -c | sort -nr"
         35 Hostname: deploy-echo-75b7b9558c-x8gmz
         35 Hostname: deploy-echo-75b7b9558c-rfn6h
         30 Hostname: deploy-echo-75b7b9558c-vlcrd
    2. 9.1. 실습
    • (심화) IPTables 정책 확인 : ClusterIP는 KUBE-SVC-Y → KUBE-SEP-Z… (3곳) ⇒ 즉, 3개의 파드로 랜덤 확률 부하분산 동작
      # ClusterIP Traffic Flow 확인
      ssh ec2-user@$N1 sudo iptables -t nat -nvL
      ssh ec2-user@$N1 sudo iptables -v --numeric --table nat --list PREROUTING
      Chain PREROUTING (policy ACCEPT 0 packets, 0 bytes)
       pkts bytes target     prot opt in     out     source               destination         
       3626  231K KUBE-SERVICES  all  --  *      *       0.0.0.0/0            0.0.0.0/0            /* kubernetes service portals */
         32  3253 AWS-CONNMARK-CHAIN-0  all  --  eni+   *       0.0.0.0/0            0.0.0.0/0            /* AWS, outbound connections */
       3413  215K CONNMARK   all  --  *      *       0.0.0.0/0            0.0.0.0/0            /* AWS, CONNMARK */ CONNMARK restore mask 0x80
       
      ssh ec2-user@$N1 sudo iptables -v --numeric --table nat --list KUBE-SERVICES
      Chain KUBE-SERVICES (2 references)
       pkts bytes target     prot opt in     out     source               destination         
          0     0 KUBE-SVC-UAGC4PYEYZJJEW6D  tcp  --  *      *       0.0.0.0/0            10.100.247.244       /* kube-system/aws-load-balancer-webhook-service:webhook-server cluster IP */ tcp dpt:443
        104  6240 KUBE-SVC-KBDEBIL6IU6WL7RF  tcp  --  *      *       0.0.0.0/0            10.100.105.175       /* default/svc-clusterip:svc-webport cluster IP */ tcp dpt:80
        ...
      
      # 노드1에서 SVC 정책 확인 : SEP(Endpoint) 파드 3개 확인 >> 즉, 3개의 파드로 랜덤 확률 부하분산 동작
      ssh ec2-user@$N1 sudo iptables -v --numeric --table nat --list KUBE-SVC-KBDEBIL6IU6WL7RF
      Chain KUBE-SVC-KBDEBIL6IU6WL7RF (1 references)
       pkts bytes target     prot opt in     out     source               destination         
         36  2160 KUBE-SEP-A7LFL5ET4EX3DX63  all  --  *      *       0.0.0.0/0            0.0.0.0/0            /* default/svc-clusterip:svc-webport -> 192.168.1.13:8080 */ statistic mode random probability 0.33333333349
         32  1920 KUBE-SEP-R7INTUS4DYZFVE7Y  all  --  *      *       0.0.0.0/0            0.0.0.0/0            /* default/svc-clusterip:svc-webport -> 192.168.2.102:8080 */ statistic mode random probability 0.50000000000
         36  2160 KUBE-SEP-M2ACEZFYI2HM64VA  all  --  *      *       0.0.0.0/0            0.0.0.0/0            /* default/svc-clusterip:svc-webport -> 192.168.3.42:8080 */
      
      # 노드2에서 동일한 SVC 이름 정책 확인 : 상동
      ssh ec2-user@$N2 sudo iptables -v --numeric --table nat --list KUBE-SVC-KBDEBIL6IU6WL7RF
      (상동)
      
      # 노드3에서 동일한 SVC 이름 정책 확인 : 상동
      ssh ec2-user@$N3 sudo iptables -v --numeric --table nat --list KUBE-SVC-KBDEBIL6IU6WL7RF
      (상동)
      
      # 3개의 SEP는 각각 개별 파드 접속 정보
      ssh ec2-user@$N1 sudo iptables -v --numeric --table nat --list KUBE-SEP-A7LFL5ET4EX3DX63
      Chain KUBE-SEP-A7LFL5ET4EX3DX63 (1 references)
       pkts bytes target     prot opt in     out     source               destination         
          0     0 KUBE-MARK-MASQ  all  --  *      *       192.168.1.13         0.0.0.0/0            /* default/svc-clusterip:svc-webport */
         36  2160 DNAT       tcp  --  *      *       0.0.0.0/0            0.0.0.0/0            /* default/svc-clusterip:svc-webport */ tcp to:192.168.1.13:8080
      
      ssh ec2-user@$N1 sudo iptables -v --numeric --table nat --list KUBE-SEP-R7INTUS4DYZFVE7Y
      Chain KUBE-SEP-R7INTUS4DYZFVE7Y (1 references)
       pkts bytes target     prot opt in     out     source               destination         
          0     0 KUBE-MARK-MASQ  all  --  *      *       192.168.2.102        0.0.0.0/0            /* default/svc-clusterip:svc-webport */
         32  1920 DNAT       tcp  --  *      *       0.0.0.0/0            0.0.0.0/0            /* default/svc-clusterip:svc-webport */ tcp to:192.168.2.102:8080
      
      ssh ec2-user@$N1 sudo iptables -v --numeric --table nat --list KUBE-SEP-M2ACEZFYI2HM64VA
      Chain KUBE-SEP-M2ACEZFYI2HM64VA (1 references)
       pkts bytes target     prot opt in     out     source               destination         
          0     0 KUBE-MARK-MASQ  all  --  *      *       192.168.3.42         0.0.0.0/0            /* default/svc-clusterip:svc-webport */
         36  2160 DNAT       tcp  --  *      *       0.0.0.0/0            0.0.0.0/0            /* default/svc-clusterip:svc-webport */ tcp to:192.168.3.42:8080
    • Topology Mode(구 Aware Hint) 설정 후 테스트 파드(netshoot-pod)에서 ClusterIP 접속 시 부하분산 확인 : 같은 AZ(zone)의 목적지 파드로만 접속
      • 힌트는 엔드포인트가 트래픽을 제공해야 하는 영역을 설명합니다. 그런 다음 적용된 힌트kube-proxy 에 따라 영역에서 엔드포인트로 트래픽을 라우팅.
        • When topology aware routing is enabled and implemented on a Kubernetes Service, the EndpointSlice controller will proportionally allocate endpoints to the different zones that your cluster is spread across. For each of those endpoints, the EndpointSlice controller will also set a hint for the zoneHints describe which zone an endpoint should serve traffic for. kube-proxy will then route traffic from a zone to an endpoint based on the hints that get applied.
    • Service에 Topology Aware Route 정책 추가
      # Topology Aware Routing 설정 : 서비스에 annotate에 아래처럼 추가
      kubectl annotate service svc-clusterip "service.kubernetes.io/topology-mode=auto"
      
      # endpointslices 확인 시, 기존에 없던 hints 가 추가되어 있음 >> 참고로 describe로는 hints 정보가 출력되지 않음
      kubectl get endpointslices -l kubernetes.io/service-name=svc-clusterip -o yaml
      apiVersion: v1
      items:
      - addressType: IPv4
        apiVersion: discovery.k8s.io/v1
        endpoints:
        - addresses:
          - 192.168.1.13
          conditions:
            ready: true
            serving: true
            terminating: false
          hints:
            forZones:
            - name: ap-northeast-2a
          nodeName: ip-192-168-1-54.ap-northeast-2.compute.internal
          targetRef:
            kind: Pod
            name: deploy-echo-75b7b9558c-x8gmz
            namespace: default
            uid: 04b60b02-6ab0-454c-a39d-0d33bf5f88d2
          zone: ap-northeast-2a
        - addresses:
          - 192.168.3.42
          conditions:
            ready: true
            serving: true
            terminating: false
          hints:
            forZones:
            - name: ap-northeast-2c
          nodeName: ip-192-168-3-31.ap-northeast-2.compute.internal
          targetRef:
            kind: Pod
            name: deploy-echo-75b7b9558c-rfn6h
            namespace: default
            uid: dc307714-547b-44cc-bab8-9c4d1d69e6e2
          zone: ap-northeast-2c
        - addresses:
          - 192.168.2.102
          conditions:
            ready: true
            serving: true
            terminating: false
          hints:
            forZones:
            - name: ap-northeast-2b
          nodeName: ip-192-168-2-56.ap-northeast-2.compute.internal
          targetRef:
            kind: Pod
            name: deploy-echo-75b7b9558c-vlcrd
            namespace: default
            uid: 253f71c0-fd54-4651-9550-6b8cd35aba58
          zone: ap-northeast-2b
        kind: EndpointSlice
      ...
      
      # 100번 반복 접속 : 테스트 파드(netshoot-pod)와 같은 AZ(zone)의 목적지 파드로만 접속
      kubectl exec -it netshoot-pod -- zsh -c "for i in {1..100}; do curl -s svc-clusterip | grep Hostname; done | sort | uniq -c | sort -nr"
        100 Hostname: deploy-echo-7f67d598dc-45trg


    • Topology Aware Route 추가 후 IPTables 정책 확인 : ClusterIP는 KUBE-SVC-Y → KUBE-SEP-Z… (1곳, 해당 노드와 같은 AZ에 배포된 파드만 출력) ⇒ 동일 AZ간 접속
      ssh ec2-user@$N1 sudo iptables -v --numeric --table nat --list KUBE-SERVICES
      
      ## 노드1에서 SVC 정책 확인 : SEP(Endpoint) 파드 1개 확인(해당 노드와 같은 AZ에 배포된 파드만 출력) >> 동일 AZ간 접속
      ## 각 az별 node의 iptables rules를 확인해보면 이전의 0.33333333으로 3개의 pod에 분산되던 traffic이
      ## 아래와 같이 자신의 속한 az에 있는 node로만 routing 하도록 iptalbes rule이 변경됨
      ssh ec2-user@$N1 sudo iptables -v --numeric --table nat --list KUBE-SVC-KBDEBIL6IU6WL7RF
      Chain KUBE-SVC-KBDEBIL6IU6WL7RF (1 references)
       pkts bytes target     prot opt in     out     source               destination         
          0     0 KUBE-SEP-A7LFL5ET4EX3DX63  all  --  *      *       0.0.0.0/0            0.0.0.0/0            /* default/svc-clusterip:svc-webport -> 192.168.1.13:8080 */
      
      ssh ec2-user@$N2 sudo iptables -v --numeric --table nat --list KUBE-SVC-KBDEBIL6IU6WL7RF
      Chain KUBE-SVC-KBDEBIL6IU6WL7RF (1 references)
       pkts bytes target     prot opt in     out     source               destination         
          0     0 KUBE-SEP-R7INTUS4DYZFVE7Y  all  --  *      *       0.0.0.0/0            0.0.0.0/0            /* default/svc-clusterip:svc-webport -> 192.168.2.102:8080 */
      
      ssh ec2-user@$N3 sudo iptables -v --numeric --table nat --list KUBE-SVC-KBDEBIL6IU6WL7RF
      Chain KUBE-SVC-KBDEBIL6IU6WL7RF (1 references)
       pkts bytes target     prot opt in     out     source               destination         
          0     0 KUBE-SEP-M2ACEZFYI2HM64VA  all  --  *      *       0.0.0.0/0            0.0.0.0/0            /* default/svc-clusterip:svc-webport -> 192.168.3.42:8080 */
          
      
      ## 만약 Node 자신이 속한 az에 pod가 없다면 아래와 같이 기존 iptables rules처럼 random probability로 분산된다.
      kubectl scale deployment deploy-echo --replicas 2
      
      ## 50% 확률로 첫번째 rule에의해 N1으로 routing되고 나머지는 N3로 routing 된다.
      ssh ec2-user@$N1 sudo iptables -v --numeric --table nat --list KUBE-SVC-KBDEBIL6IU6WL7RF                                               
      Chain KUBE-SVC-KBDEBIL6IU6WL7RF (1 references)
       pkts bytes target     prot opt in     out     source               destination         
          0     0 KUBE-SEP-RPXYAWUPDHFGKE6I  all  --  *      *       0.0.0.0/0            0.0.0.0/0            /* default/svc-clusterip:svc-webport -> 192.168.1.166:8080 */ statistic mode random probability 0.50000000000
          0     0 KUBE-SEP-M2ACEZFYI2HM64VA  all  --  *      *       0.0.0.0/0            0.0.0.0/0            /* default/svc-clusterip:svc-webport -> 192.168.3.42:8080 */
      
      ssh ec2-user@$N2 sudo iptables -v --numeric --table nat --list KUBE-SVC-KBDEBIL6IU6WL7RF
      Chain KUBE-SVC-KBDEBIL6IU6WL7RF (1 references)
       pkts bytes target     prot opt in     out     source               destination         
          0     0 KUBE-SEP-RPXYAWUPDHFGKE6I  all  --  *      *       0.0.0.0/0            0.0.0.0/0            /* default/svc-clusterip:svc-webport -> 192.168.1.166:8080 */ statistic mode random probability 0.50000000000
          0     0 KUBE-SEP-M2ACEZFYI2HM64VA  all  --  *      *       0.0.0.0/0            0.0.0.0/0            /* default/svc-clusterip:svc-webport -> 192.168.3.42:8080 */
      
      ssh ec2-user@$N3 sudo iptables -v --numeric --table nat --list KUBE-SVC-KBDEBIL6IU6WL7RF
      Chain KUBE-SVC-KBDEBIL6IU6WL7RF (1 references)
       pkts bytes target     prot opt in     out     source               destination         
          0     0 KUBE-SEP-RPXYAWUPDHFGKE6I  all  --  *      *       0.0.0.0/0            0.0.0.0/0            /* default/svc-clusterip:svc-webport -> 192.168.1.166:8080 */ statistic mode random probability 0.50000000000
          0     0 KUBE-SEP-M2ACEZFYI2HM64VA  all  --  *      *       0.0.0.0/0            0.0.0.0/0            /* default/svc-clusterip:svc-webport -> 192.168.3.42:8080 */


    • 만약 kube-proxy mode를 iptables가 아닌 ipvs를 사용한다면 어떻게 될까?
      # kube-prxoy mode를 위의 링크를 통해 변경하면 최종적으로 아래와 같이 kube-proxy-config라는 configMap에 적용 된것을 볼 수 있다.
      # mode: "ipvs"
      kubectl -n kube-system get cm kube-proxy-config -o yaml
      apiVersion: v1
      data:
        config: |-
          apiVersion: kubeproxy.config.k8s.io/v1alpha1
          bindAddress: 0.0.0.0
          clientConnection:
            acceptContentTypes: ""
            burst: 10
            contentType: application/vnd.kubernetes.protobuf
            kubeconfig: /var/lib/kube-proxy/kubeconfig
            qps: 5
          clusterCIDR: ""
          configSyncPeriod: 15m0s
          conntrack:
            maxPerCore: 32768
            min: 131072
            tcpCloseWaitTimeout: 1h0m0s
            tcpEstablishedTimeout: 24h0m0s
          enableProfiling: false
          healthzBindAddress: 0.0.0.0:10256
          hostnameOverride: ""
          iptables:
            masqueradeAll: false
            masqueradeBit: 14
            minSyncPeriod: 0s
            syncPeriod: 30s
          ipvs:
            excludeCIDRs: null
            minSyncPeriod: 0s
            scheduler: "rr"
            syncPeriod: 30s
          kind: KubeProxyConfiguration
          metricsBindAddress: 0.0.0.0:10249
          mode: "ipvs"
          nodePortAddresses: null
          oomScoreAdj: -998
          portRange: ""
      kind: ConfigMap
      metadata:
        creationTimestamp: "2025-02-10T14:26:51Z"
        labels:
          eks.amazonaws.com/component: kube-proxy
          k8s-app: kube-proxy
        name: kube-proxy-config
        namespace: kube-system
        resourceVersion: "473712"
        uid: e94eecd8-da9b-4ba6-a94c-79121b1bb06c
      이제 TopologyAwareRoute 동작을 확인해보자. 먼저 deploy의 replicas: 3으로 주어 모든 3개의 az의 node에 pod가 존재하게 한 후 기존과 같이 확인해보자.
      kubectl scale deployment deploy-echo --replicas 3                           
      deployment.apps/deploy-echo scaled
      
      ## iptables rules를 확인해보니 기존에 KUBE-SERVICE --> KUBE-SEP-* 로 향하던 rules가 사라진 것을 볼 수 있다.
      ## 이는 kube-proxy mode가 ipvs로 변경되어 service의 routing 정보가 iptables chain으로 등록되는것이 아닌 ipvs의 table에 등록이 되기떄문이다.
      ssh ec2-user@$N1 sudo iptables -v --numeric --table nat --list KUBE-SERVICES
      
      Chain KUBE-SERVICES (2 references)
       pkts bytes target     prot opt in     out     source               destination         
          3   180 RETURN     all  --  *      *       127.0.0.0/8          0.0.0.0/0           
          0     0 KUBE-MARK-MASQ  all  --  *      *       0.0.0.0/0            0.0.0.0/0            /* Kubernetes service cluster ip + port for masquerade purpose */ match-set KUBE-CLUSTER-IP src,dst
          1    64 KUBE-NODE-PORT  all  --  *      *       0.0.0.0/0            0.0.0.0/0            ADDRTYPE match dst-type LOCAL
          0     0 ACCEPT     all  --  *      *       0.0.0.0/0            0.0.0.0/0            match-set KUBE-CLUSTER-IP dst,dst
          
      ## 이제 각 서버에서 ipvsadm을 통해 ipvs table(가상 서버 리스트. 즉 service의 list이다.)을 확인해보자
      ## 아래 결과에서 볼 수 있듯이 ipvs mode에서도 TopologyAwareRoute는 정상적으로 동작하는 것을 볼 수 있다.
      ssh ec2-user@$N1 sudo ipvsadm -Ln 
      IP Virtual Server version 1.2.1 (size=4096)
      Prot LocalAddress:Port Scheduler Flags
        -> RemoteAddress:Port           Forward Weight ActiveConn InActConn
      TCP  10.100.0.1:443 rr
        -> 192.168.1.72:443             Masq    1      0          0         
        -> 192.168.3.224:443            Masq    1      0          0         
      TCP  10.100.0.10:53 rr
        -> 192.168.1.168:53             Masq    1      0          0         
        -> 192.168.3.157:53             Masq    1      0          0         
      TCP  10.100.0.10:9153 rr
        -> 192.168.1.168:9153           Masq    1      0          0         
        -> 192.168.3.157:9153           Masq    1      0          0         
      TCP  10.100.91.252:443 rr
        -> 192.168.1.27:10250           Masq    1      0          0         
        -> 192.168.2.190:10250          Masq    1      0          0         
      TCP  10.100.105.175:80 rr
        -> 192.168.1.166:8080           Masq    1      0          0         
      TCP  10.100.242.1:443 rr
        -> 172.0.32.0:10443             Masq    1      0          0         
      TCP  10.100.247.244:443 rr
        -> 192.168.2.149:9443           Masq    1      0          0         
        -> 192.168.3.239:9443           Masq    1      0          0         
      UDP  10.100.0.10:53 rr
        -> 192.168.1.168:53             Masq    1      0          0         
        -> 192.168.3.157:53             Masq    1      0          0         
      
      ssh ec2-user@$N2 sudo ipvsadm -Ln
      IP Virtual Server version 1.2.1 (size=4096)
      Prot LocalAddress:Port Scheduler Flags
        -> RemoteAddress:Port           Forward Weight ActiveConn InActConn
      TCP  10.100.0.1:443 rr
        -> 192.168.1.72:443             Masq    1      0          0         
        -> 192.168.3.224:443            Masq    1      0          0         
      TCP  10.100.0.10:53 rr
        -> 192.168.1.168:53             Masq    1      0          0         
        -> 192.168.3.157:53             Masq    1      0          0         
      TCP  10.100.0.10:9153 rr
        -> 192.168.1.168:9153           Masq    1      0          0         
        -> 192.168.3.157:9153           Masq    1      0          0         
      TCP  10.100.91.252:443 rr
        -> 192.168.1.27:10250           Masq    1      0          0         
        -> 192.168.2.190:10250          Masq    1      0          0         
      TCP  10.100.105.175:80 rr
        -> 192.168.2.102:8080           Masq    1      0          0         
      TCP  10.100.242.1:443 rr
        -> 172.0.32.0:10443             Masq    1      0          0         
      TCP  10.100.247.244:443 rr
        -> 192.168.2.149:9443           Masq    1      0          0         
        -> 192.168.3.239:9443           Masq    1      0          0         
      UDP  10.100.0.10:53 rr
        -> 192.168.1.168:53             Masq    1      0          25        
        -> 192.168.3.157:53             Masq    1      0          25        
      
      ssh ec2-user@$N3 sudo ipvsadm -Ln
      IP Virtual Server version 1.2.1 (size=4096)
      Prot LocalAddress:Port Scheduler Flags
        -> RemoteAddress:Port           Forward Weight ActiveConn InActConn
      TCP  10.100.0.1:443 rr
        -> 192.168.1.72:443             Masq    1      0          0         
        -> 192.168.3.224:443            Masq    1      0          0         
      TCP  10.100.0.10:53 rr
        -> 192.168.1.168:53             Masq    1      0          0         
        -> 192.168.3.157:53             Masq    1      0          0         
      TCP  10.100.0.10:9153 rr
        -> 192.168.1.168:9153           Masq    1      0          0         
        -> 192.168.3.157:9153           Masq    1      0          0         
      TCP  10.100.91.252:443 rr
        -> 192.168.1.27:10250           Masq    1      0          0         
        -> 192.168.2.190:10250          Masq    1      0          0         
      TCP  10.100.105.175:80 rr
        -> 192.168.3.42:8080            Masq    1      0          0         
      TCP  10.100.242.1:443 rr
        -> 172.0.32.0:10443             Masq    1      0          0         
      TCP  10.100.247.244:443 rr
        -> 192.168.2.149:9443           Masq    1      0          0         
        -> 192.168.3.239:9443           Masq    1      0          0         
      UDP  10.100.0.10:53 rr
        -> 192.168.1.168:53             Masq    1      0          0         
        -> 192.168.3.157:53             Masq    1      0          0 
      
      ## 만약 iptables mode에서 처럼 worker node가 속한 az에 pod가 존재하지 않는다면 똑같이 동작할까?
      ## ipvs mode 역시 iptables mode에서 처럼 cluster의 모든 pod를 각 Node의 ipvs service의 endpoint로 등록하고 routing한다.
      kubectl scale deployment deploy-echo --replicas 2                           
      deployment.apps/deploy-echo scaled
      
      ssh ec2-user@$N1 sudo ipvsadm -Ln                
      IP Virtual Server version 1.2.1 (size=4096)
      Prot LocalAddress:Port Scheduler Flags
        -> RemoteAddress:Port           Forward Weight ActiveConn InActConn
      TCP  10.100.0.1:443 rr
        -> 192.168.1.72:443             Masq    1      0          0         
        -> 192.168.3.224:443            Masq    1      0          0         
      TCP  10.100.0.10:53 rr
        -> 192.168.1.168:53             Masq    1      0          0         
        -> 192.168.3.157:53             Masq    1      0          0         
      TCP  10.100.0.10:9153 rr
        -> 192.168.1.168:9153           Masq    1      0          0         
        -> 192.168.3.157:9153           Masq    1      0          0         
      TCP  10.100.91.252:443 rr
        -> 192.168.1.27:10250           Masq    1      0          0         
        -> 192.168.2.190:10250          Masq    1      0          0         
      TCP  10.100.105.175:80 rr
        -> 192.168.1.166:8080           Masq    1      0          0         
        -> 192.168.3.42:8080            Masq    1      0          0         
      TCP  10.100.242.1:443 rr
        -> 172.0.32.0:10443             Masq    1      0          0         
      TCP  10.100.247.244:443 rr
        -> 192.168.2.149:9443           Masq    1      0          0         
        -> 192.168.3.239:9443           Masq    1      0          0         
      UDP  10.100.0.10:53 rr
        -> 192.168.1.168:53             Masq    1      0          0         
        -> 192.168.3.157:53             Masq    1      0          0         
      
      ssh ec2-user@$N2 sudo ipvsadm -Ln                
      IP Virtual Server version 1.2.1 (size=4096)
      Prot LocalAddress:Port Scheduler Flags
        -> RemoteAddress:Port           Forward Weight ActiveConn InActConn
      TCP  10.100.0.1:443 rr
        -> 192.168.1.72:443             Masq    1      0          0         
        -> 192.168.3.224:443            Masq    1      0          0         
      TCP  10.100.0.10:53 rr
        -> 192.168.1.168:53             Masq    1      0          0         
        -> 192.168.3.157:53             Masq    1      0          0         
      TCP  10.100.0.10:9153 rr
        -> 192.168.1.168:9153           Masq    1      0          0         
        -> 192.168.3.157:9153           Masq    1      0          0         
      TCP  10.100.91.252:443 rr
        -> 192.168.1.27:10250           Masq    1      0          0         
        -> 192.168.2.190:10250          Masq    1      0          0         
      TCP  10.100.105.175:80 rr
        -> 192.168.1.166:8080           Masq    1      0          0         
        -> 192.168.3.42:8080            Masq    1      0          0         
      TCP  10.100.242.1:443 rr
        -> 172.0.32.0:10443             Masq    1      0          0         
      TCP  10.100.247.244:443 rr
        -> 192.168.2.149:9443           Masq    1      0          0         
        -> 192.168.3.239:9443           Masq    1      0          0         
      UDP  10.100.0.10:53 rr
        -> 192.168.1.168:53             Masq    1      0          25        
        -> 192.168.3.157:53             Masq    1      0          25        
      
      ssh ec2-user@$N3 sudo ipvsadm -Ln                
      IP Virtual Server version 1.2.1 (size=4096)
      Prot LocalAddress:Port Scheduler Flags
        -> RemoteAddress:Port           Forward Weight ActiveConn InActConn
      TCP  10.100.0.1:443 rr
        -> 192.168.1.72:443             Masq    1      0          0         
        -> 192.168.3.224:443            Masq    1      0          0         
      TCP  10.100.0.10:53 rr
        -> 192.168.1.168:53             Masq    1      0          0         
        -> 192.168.3.157:53             Masq    1      0          0         
      TCP  10.100.0.10:9153 rr
        -> 192.168.1.168:9153           Masq    1      0          0         
        -> 192.168.3.157:9153           Masq    1      0          0         
      TCP  10.100.91.252:443 rr
        -> 192.168.1.27:10250           Masq    1      0          0         
        -> 192.168.2.190:10250          Masq    1      0          0         
      TCP  10.100.105.175:80 rr
        -> 192.168.1.166:8080           Masq    1      0          0         
        -> 192.168.3.42:8080            Masq    1      0          0         
      TCP  10.100.242.1:443 rr
        -> 172.0.32.0:10443             Masq    1      0          0         
      TCP  10.100.247.244:443 rr
        -> 192.168.2.149:9443           Masq    1      0          0         
        -> 192.168.3.239:9443           Masq    1      0          0         
      UDP  10.100.0.10:53 rr
        -> 192.168.1.168:53             Masq    1      0          0         
        -> 192.168.3.157:53             Masq    1      0          0 


Designed by Tistory.