Self-managed nodes : Custom AMI를 사용, ASG 직접 관리, OS 기본구성/패치를 고객이 직접 관리 - 링크
Karpenter(Nodepool, EC2NodeClass) : 유연한 고성능 Kubernetes 클러스터 자동 규모 조정기로 애플리케이션 가용성과 클러스터 효율성 개선에 도움이 됩니다.Karpenter는 변화하는 애플리케이션 로드에 대응하여 적절한 크기의 컴퓨팅 리소스를 시작합니다. 이 옵션은 워크로드의 요구 사항을 충족하는 적시 컴퓨팅 리소스를 프로비저닝. EC2 Fleet을 통해서 Data Plane이 관리되며, EKS Cluster Autoscaler보다 빠르게 Node를 확장 할 수 있다.
EKS Auto Mode : 컨트롤 플레인을 넘어 데이터 영역을 포함하도록 AWS 관리를 확장하여 클러스터 인프라 관리를 자동화합니다. 컴퓨팅 오토 스케일링, 네트워킹, 로드 밸런싱, DNS, 스토리지, GPU 지원을 포함하여 핵심 Kubernetes 기능을 기본 구성 요소로 통합합니다. EKS Auto Mode는 향상된 보안 기능과 함께 변경할 수 없는 AMI를 사용하여 워크로드 수요에 따라 노드를 동적으로 관리.
EKS Hybrid Nodes : 온프레미스 및 엣지 인프라를 Amazon EKS 클러스터의 노드로 사용할 수 있습니다. Amazon EKS Hybrid Nodes는 환경 전반의 Kubernetes 관리를 통합하고 온프레미스 및 엣지 애플리케이션을 위해 Kubernetes 컨트롤 플레인 관리를 AWS로 오프로드.
AWS Fargate (서버리스) : 고객은 별도의 EC2관리할 필요 없이, AWS Fargate 환경에서 제공하는 Micro VM을 이용하여 Pod 별 VM 할당 - 링크
ClusterBaseName: EKS 클러스터의 기본 이름 (생성되는 리소스들의 주석에 접두어로 활용), EKS 클러스터 이름에 '_(밑줄)' 사용 불가!
KeyName: EC2 접속에 사용하는 SSH 키페어 지정
SgIngressSshCidr: eksctl 작업을 수행할 EC2 인스턴스를 접속할 수 있는 IP 주소 입력 (집 공인IP/32 입력)
MyInstanceType: eksctl 작업을 수행할 EC2 인스턴스의 타입 (기본 t3.medium)
<<<<< Region AZ >>>>> : 리전과 가용영역을 지정
<<<<< VPC Subnet >>>>> : VPC, 서브넷 정보 지정
Bastion 및 VPC 배포 with CloudFormation
# yaml 파일 다운로드
curl -O https://s3.ap-northeast-2.amazonaws.com/cloudformation.cloudneta.net/K8S/myeks-1week.yaml

# 배포
# aws cloudformation deploy --template-file ~/Downloads/myeks-1week.yaml --stack-name mykops --parameter-overrides KeyName=<My SSH Keyname> SgIngressSshCidr=<My Home Public IP Address>/32 --region <리전>
예시) aws cloudformation deploy --template-file ~/Downloads/myeks-1week.yaml \
     --stack-name myeks --parameter-overrides KeyName=[MY_KEY_NAME] SgIngressSshCidr=$(curl -s ipinfo.io/ip)/32 --region ap-northeast-2

# CloudFormation 스택 배포 완료 후 EC2 IP 출력
aws cloudformation describe-stacks --stack-name myeks --query 'Stacks[*].Outputs[*].OutputValue' --output text
예시) 3.34.146.169

# ec2 에 SSH 접속 : root / qwe123
예시) ssh root@3.34.146.169 or ssh -i [KEY_PATH] ec2-user@3.34.146.169
ssh root@$(aws cloudformation describe-stacks --stack-name myeks --query 'Stacks[*].Outputs[0].OutputValue' --output text)
root@@X.Y.Z.A's password: qwe123
환경병수 설정
# 자격 구성 설정 없이 확인
aws ec2 describe-instances

# IAM User 자격 구성 : 실습 편리를 위해 administrator 권한을 가진 IAM User 의 자격 증명 입력
aws configure
AWS Access Key ID [None]: AKIA5...
AWS Secret Access Key [None]: CVNa2...
Default region name [None]: ap-northeast-2
Default output format [None]: json

# 자격 구성 적용 확인 : 노드 IP 확인
aws ec2 describe-instances

# EKS 배포할 VPC 정보 확인
aws ec2 describe-vpcs --filters "Name=tag:Name,Values=$CLUSTER_NAME-VPC" | jq
aws ec2 describe-vpcs --filters "Name=tag:Name,Values=$CLUSTER_NAME-VPC" | jq Vpcs[]
aws ec2 describe-vpcs --filters "Name=tag:Name,Values=$CLUSTER_NAME-VPC" | jq Vpcs[].VpcId
aws ec2 describe-vpcs --filters "Name=tag:Name,Values=$CLUSTER_NAME-VPC" | jq -r .Vpcs[].VpcId
export VPCID=$(aws ec2 describe-vpcs --filters "Name=tag:Name,Values=$CLUSTER_NAME-VPC" | jq -r .Vpcs[].VpcId)
echo "export VPCID=$VPCID" >> /etc/profile
echo $VPCID

# EKS 배포할 VPC에 속한 Subnet 정보 확인
aws ec2 describe-subnets --filters "Name=vpc-id,Values=$VPCID" --output json | jq
aws ec2 describe-subnets --filters "Name=vpc-id,Values=$VPCID" --output yaml

## 퍼블릭 서브넷 ID 확인
aws ec2 describe-subnets --filters Name=tag:Name,Values="$CLUSTER_NAME-PublicSubnet1" | jq
aws ec2 describe-subnets --filters Name=tag:Name,Values="$CLUSTER_NAME-PublicSubnet1" --query "Subnets[0].[SubnetId]" --output text
export PubSubnet1=$(aws ec2 describe-subnets --filters Name=tag:Name,Values="$CLUSTER_NAME-PublicSubnet1" --query "Subnets[0].[SubnetId]" --output text)
export PubSubnet2=$(aws ec2 describe-subnets --filters Name=tag:Name,Values="$CLUSTER_NAME-PublicSubnet2" --query "Subnets[0].[SubnetId]" --output text)
echo "export PubSubnet1=$PubSubnet1" >> /etc/profile
echo "export PubSubnet2=$PubSubnet2" >> /etc/profile
echo $PubSubnet1
echo $PubSubnet2

# EKS Addon 정보 확인
aws eks describe-addon-versions --kubernetes-version 1.32  --query 'addons[].{MarketplaceProductUrl: marketplaceInformation.productUrl, Name: addonName, Owner: owner Publisher: publisher, Type: type}' --output table
aws eks describe-addon-versions --kubernetes-version 1.31  --query 'addons[].{MarketplaceProductUrl: marketplaceInformation.productUrl, Name: addonName, Owner: owner Publisher: publisher, Type: type}' --output table
aws eks describe-addon-versions --kubernetes-version 1.30  --query 'addons[].{MarketplaceProductUrl: marketplaceInformation.productUrl, Name: addonName, Owner: owner Publisher: publisher, Type: type}' --output table
aws eks describe-addon-versions --kubernetes-version 1.29  --query 'addons[].{MarketplaceProductUrl: marketplaceInformation.productUrl, Name: addonName, Owner: owner Publisher: publisher, Type: type}' --output table

## wc -l 로 갯수 비교
aws eks describe-addon-versions --kubernetes-version 1.32  --query 'addons[].{MarketplaceProductUrl: marketplaceInformation.productUrl, Name: addonName, Owner: owner Publisher: publisher, Type: type}' --output text | wc -l
aws eks describe-addon-versions --kubernetes-version 1.31  --query 'addons[].{MarketplaceProductUrl: marketplaceInformation.productUrl, Name: addonName, Owner: owner Publisher: publisher, Type: type}' --output text | wc -l
aws eks describe-addon-versions --kubernetes-version 1.30  --query 'addons[].{MarketplaceProductUrl: marketplaceInformation.productUrl, Name: addonName, Owner: owner Publisher: publisher, Type: type}' --output text | wc -l
aws eks describe-addon-versions --kubernetes-version 1.29  --query 'addons[].{MarketplaceProductUrl: marketplaceInformation.productUrl, Name: addonName, Owner: owner Publisher: publisher, Type: type}' --output text | wc -l

# EKS Add-on 별 전체 버전 정보 확인
ADDON=<add-on 이름>
ADDON=vpc-cni

# 아래는 vpc-cni 전체 버전 정보와 기본 설치 버전(True) 정보 확인
aws eks describe-addon-versions \
    --addon-name $ADDON \
    --kubernetes-version 1.31 \
    --query "addons[].addonVersions[].[addonVersion, compatibilities[].defaultVersion]" \
    --output text

# EKS 애드온의 버전별로 호환되는 EKS 버전을 확인하는 스크립트 https://malwareanalysis.tistory.com/760
ADDON_NAME=aws-ebs-csi-driver
aws eks describe-addon-versions --addon-name $ADDON_NAME | jq -r '
  .addons[] |
  .addonVersions[] |
  select(.architecture[] | index("amd64")) |
  [.addonVersion, (.compatibilities[] | .clusterVersion), (.compatibilities[] | .defaultVersion)] |
  @tsv'
2.2. EKS Cluster 배포 with EKSCTL
eksctl을 통해서 eks cluster를 배포하면 CloudFormation을 이용해서 eks cluster가 생성이된다.
Control Plane
# 변수 확인***
echo $AWS_DEFAULT_REGION
echo $CLUSTER_NAME
echo $VPCID
echo $PubSubnet1,$PubSubnet2

# 옵션 [터미널1] EC2 생성 모니터링
while true; do aws ec2 describe-instances --query "Reservations[*].Instances[*].{PublicIPAdd:PublicIpAddress,PrivateIPAdd:PrivateIpAddress,InstanceName:Tags[?Key=='Name']|[0].Value,Status:State.Name}" --filters Name=instance-state-name,Values=running --output text ; echo "------------------------------" ; sleep 1; done
aws ec2 describe-instances --query "Reservations[*].Instances[*].{PublicIPAdd:PublicIpAddress,PrivateIPAdd:PrivateIpAddress,InstanceName:Tags[?Key=='Name']|[0].Value,Status:State.Name}" --filters Name=instance-state-name,Values=running --output table

# eks 클러스터 & 관리형노드그룹 배포 전 정보 확인
# --dry-run param을 사용하면 실제로 배포하지는 않고 test로 어떻게 배포될지에 대한 yaml file 출력해볼 수 있다.
eksctl create cluster --name $CLUSTER_NAME --region=$AWS_DEFAULT_REGION --nodegroup-name=$CLUSTER_NAME-nodegroup --node-type=t3.medium \
--node-volume-size=30 --vpc-public-subnets "$PubSubnet1,$PubSubnet2" --version 1.31 --ssh-access --external-dns-access --dry-run | yh
...
vpc:
  autoAllocateIPv6: false
  cidr: 192.168.0.0/16
  clusterEndpoints:
    privateAccess: false
    publicAccess: true
  id: vpc-0505d154771a3dfdf
  manageSharedNodeSecurityGroupRules: true
  nat:
    gateway: Disable
  subnets:
    public:
      ap-northeast-2a:
        az: ap-northeast-2a
        cidr: 192.168.1.0/24
        id: subnet-0d98bee5a7c0dfcc6
      ap-northeast-2c:
        az: ap-northeast-2c
        cidr: 192.168.2.0/24
        id: subnet-09dc49de8d899aeb7

# eks 클러스터 & 관리형노드그룹 배포: 총 15분 소요
eksctl create cluster --name $CLUSTER_NAME --region=$AWS_DEFAULT_REGION --nodegroup-name=$CLUSTER_NAME-nodegroup --node-type=t3.medium \
--node-volume-size=30 --vpc-public-subnets "$PubSubnet1,$PubSubnet2" --version 1.31 --ssh-access --external-dns-access --verbose 4
2025-02-05 11:15:18 [▶]  Setting credentials expiry window to 30 minutes
2025-02-05 11:15:18 [▶]  role ARN for the current session is "arn:aws:iam::[ACCOUNT_ID]:user/[ACCOUNT_NAME]"
2025-02-05 11:15:18 [ℹ]  eksctl version 0.203.0
2025-02-05 11:15:18 [ℹ]  using region ap-northeast-2

## dig 조회 : 해당 IP 소유 리소스는 어떤것일까요? : 자신의 PC에서도 해당 도메인 질의 조회 해보자
APIDNS=$(aws eks describe-cluster --name $CLUSTER_NAME | jq -r .cluster.endpoint | cut -d '/' -f 3)
dig +short $APIDNS

# eks API 접속 시도 : 도메인 or 출력되는 ip 주소로 https://<IP>/version 외부에서도 접속 가능!
curl -k -s $(aws eks describe-cluster --name $CLUSTER_NAME | jq -r .cluster.endpoint)
curl -k -s $(aws eks describe-cluster --name $CLUSTER_NAME | jq -r .cluster.endpoint)/version | jq
Data Plane
aws ec2 describe-instances --query "Reservations[*].Instances[*].{PublicIPAdd:PublicIpAddress,PrivateIPAdd:PrivateIpAddress,InstanceName:Tags[?Key=='Name']|[0].Value,Status:State.Name}" --filters Name=instance-state-name,Values=running --output table
kubectl get node --label-columns=topology.kubernetes.io/zone
kubectl get node --label-columns=topology.kubernetes.io/zone --selector=topology.kubernetes.io/zone=ap-northeast-2a
kubectl get node --label-columns=topology.kubernetes.io/zone --selector=topology.kubernetes.io/zone=ap-northeast-2c
N1=$(kubectl get node --label-columns=topology.kubernetes.io/zone --selector=topology.kubernetes.io/zone=ap-northeast-2a -o jsonpath={.items[0].status.addresses[0].address})
N2=$(kubectl get node --label-columns=topology.kubernetes.io/zone --selector=topology.kubernetes.io/zone=ap-northeast-2c -o jsonpath={.items[0].status.addresses[0].address})
echo $N1, $N2
echo "export N1=$N1" >> /etc/profile
echo "export N2=$N2" >> /etc/profile

# eksctl-host 에서 노드의IP나 coredns 파드IP로 ping 테스트
ping <IP>
ping -c 1 $N1
ping -c 1 $N2
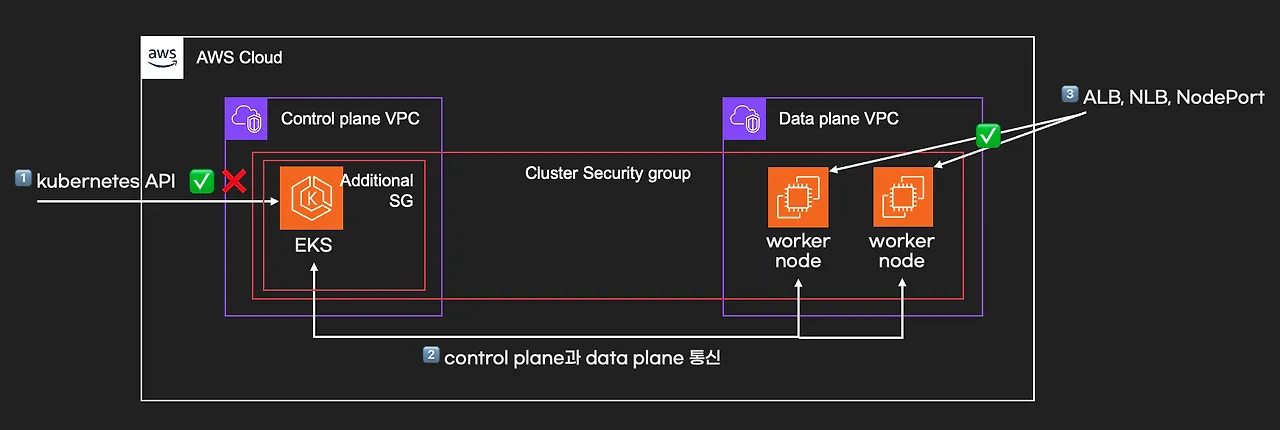
위에서 ping test가 실패한다 왜일까? → 현재 bastion host에서 Data Plane으로의 sg이 막혀있기 때문이다. sg 설정을 해주고 다시 확인해보자.
# 노드 보안그룹 ID 확인
aws ec2 describe-security-groups --filters Name=group-name,Values=*nodegroup* --query "SecurityGroups[*].[GroupId]" --output text
NGSGID=$(aws ec2 describe-security-groups --filters Name=group-name,Values=*nodegroup* --query "SecurityGroups[*].[GroupId]" --output text)
echo $NGSGID
echo "export NGSGID=$NGSGID" >> /etc/profile

# 노드 보안그룹에 eksctl-host 에서 노드(파드)에 접속 가능하게 룰(Rule) 추가 설정
aws ec2 authorize-security-group-ingress --group-id $NGSGID --protocol '-1' --cidr 192.168.1.100/32

# eksctl-host 에서 노드의IP나 coredns 파드IP로 ping 테스트
ping -c 2 $N1
ping -c 2 $N2

[root@myeks-host ~]# ping -c 2 $N1
PING 192.168.1.186 (192.168.1.186) 56(84) bytes of data.
64 bytes from 192.168.1.186: icmp_seq=1 ttl=255 time=0.258 ms
64 bytes from 192.168.1.186: icmp_seq=2 ttl=255 time=0.161 ms

--- 192.168.1.186 ping statistics ---
2 packets transmitted, 2 received, 0% packet loss, time 1026ms
rtt min/avg/max/mdev = 0.161/0.209/0.258/0.050 ms
[root@myeks-host ~]# ping -c 2 $N2
PING 192.168.2.226 (192.168.2.226) 56(84) bytes of data.
64 bytes from 192.168.2.226: icmp_seq=1 ttl=255 time=0.948 ms
64 bytes from 192.168.2.226: icmp_seq=2 ttl=255 time=0.954 ms

--- 192.168.2.226 ping statistics ---
2 packets transmitted, 2 received, 0% packet loss, time 1001ms
rtt min/avg/max/mdev = 0.948/0.951/0.954/0.003 ms
노드 네트워크 정보 확인
# AWS VPC CNI 사용 확인
kubectl -n kube-system get ds aws-node
kubectl describe daemonset aws-node --namespace kube-system | grep Image | cut -d "/" -f 2
kubecolor describe pod -n kube-system -l k8s-app=aws-node

# 파드 IP 확인
kubectl get pod -n kube-system -o wide
kubectl get pod -n kube-system -l k8s-app=kube-dns -owide

# 노드 정보 확인
for i in $N1 $N2; do echo ">> node $i <<"; ssh ec2-user@$i hostname; echo; done
for i in $N1 $N2; do echo ">> node $i <<"; ssh ec2-user@$i sudo ip -c addr; echo; done
for i in $N1 $N2; do echo ">> node $i <<"; ssh ec2-user@$i sudo ip -c route; echo; done
for i in $N1 $N2; do echo ">> node $i <<"; ssh ec2-user@$i sudo iptables -t nat -S; echo; done
Node cgroup version : v1(tmpfs), v2(cgroup2fs) - Link
for i in $N1 $N2; do echo ">> node $i <<"; ssh ec2-user@$i stat -fc %T /sys/fs/cgroup/; echo; done
노드 프로세스 정보 확인
Control Plane API server endpoint access 변경기존 API server endpoint access의 public 설정을 public & private으로 변경
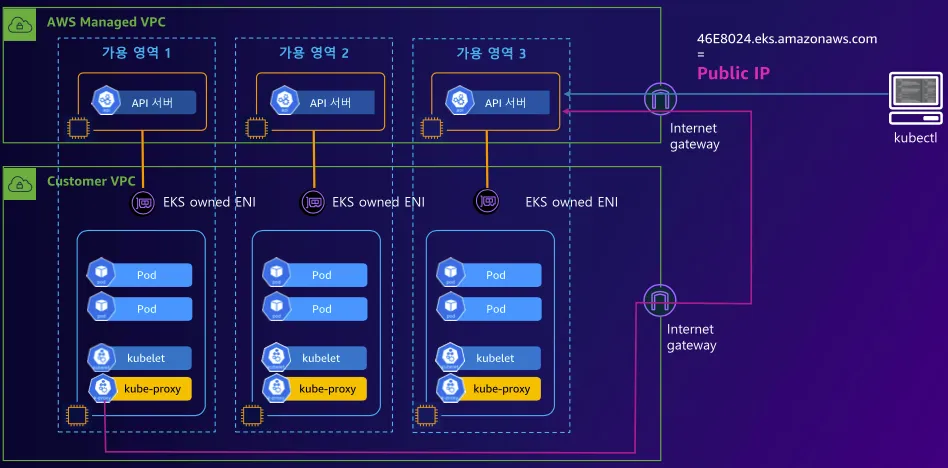
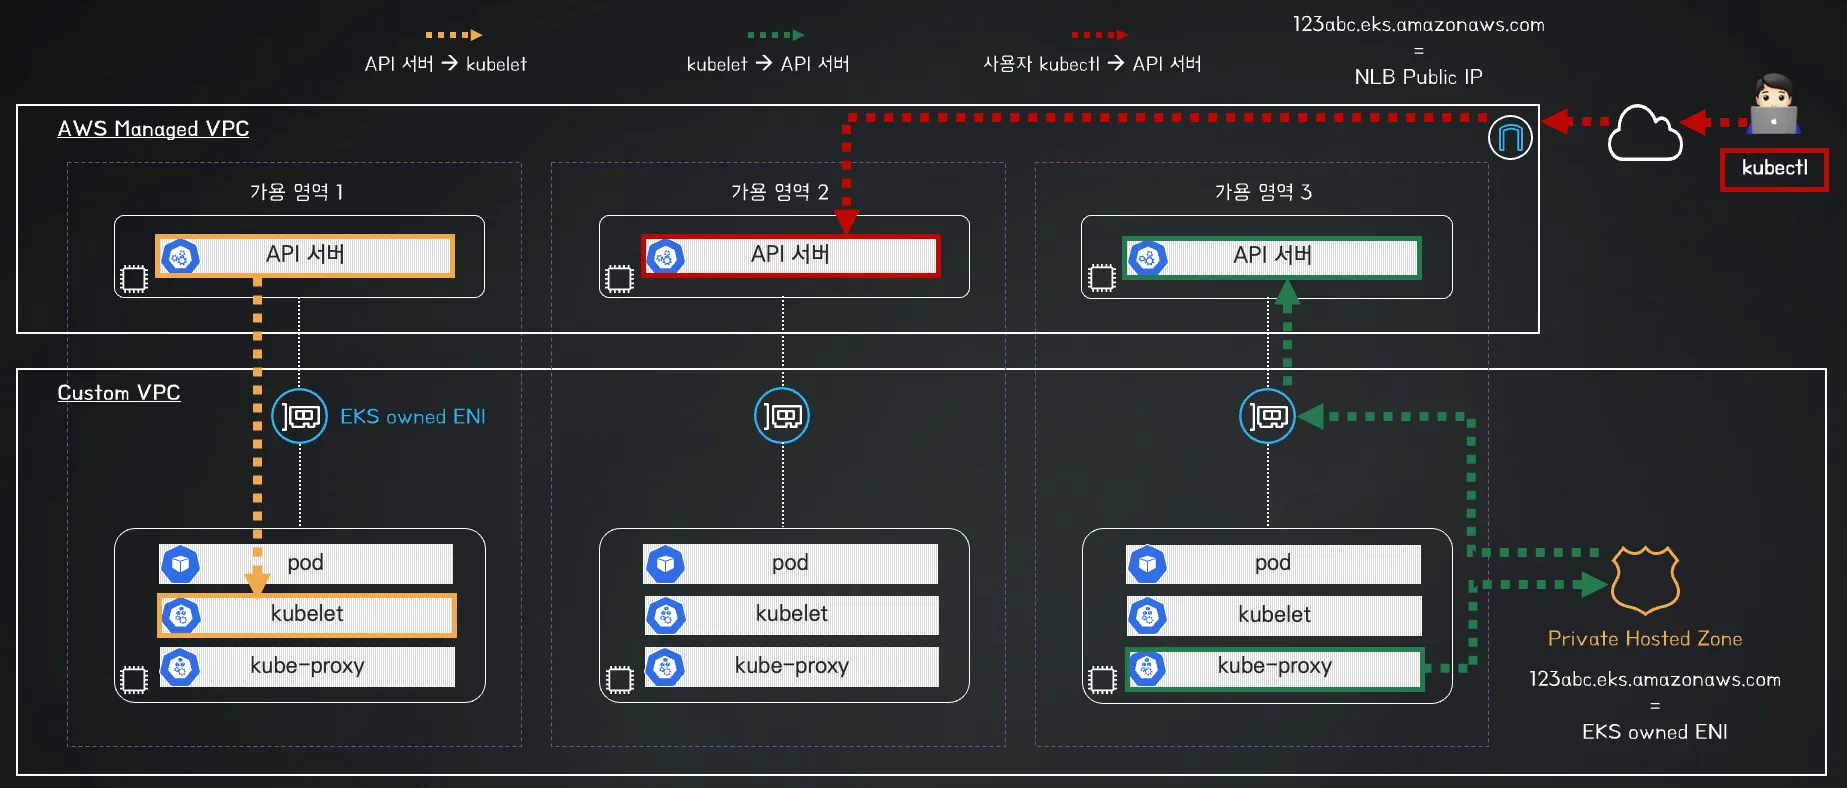
public & private로 변경한 N1,N2를 확인해보면 아래와 같이 kubelet과 kube-proxy가 private하게 통신하는것을 볼 수 있음 두개의 N1,N2 노드를 모두 확인해보려면 아래와 같이 정상적으로 private 통신을 하는것을 볼 수 있다. 다만, 여기서 192.168.1.0/24 대역에 있는 N1의 kubelet이 N2 subnet의 EKS Owned ENI와 통신하는것을 볼 수 있다.
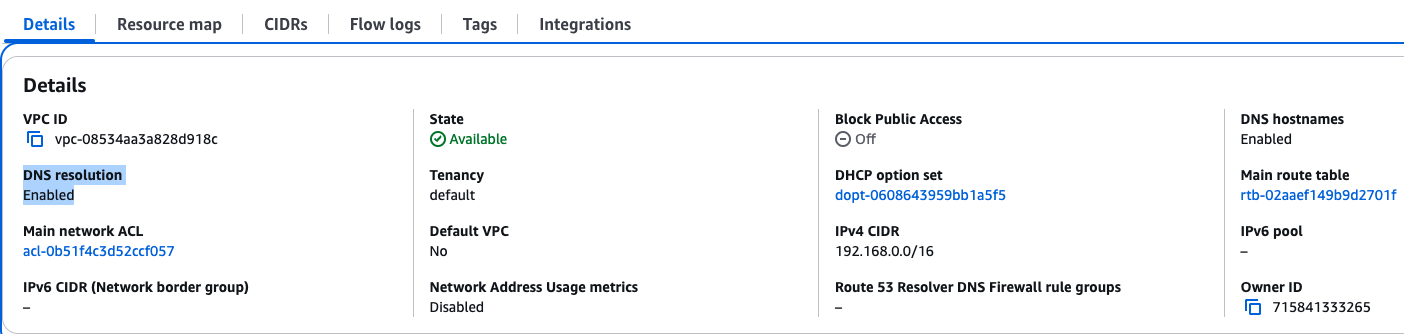
즉, EKS API Server로의 질의를 같은 network에서 수행 할 경우 VPC의 DNS resolution 기능에 의해서 EKS Owned IP가 resolve 되는것이다.
[root@myeks-host ~]# for i in $N1 $N2; do echo ">> node $i <<"; ssh ec2-user@$i sudo dig +short CE8FD72BF1E52C4B81776BB89CE7EBB2.yl4.ap-northeast-2.eks.amazonaws.com; echo; done;
>> node 192.168.1.186 <<
192.168.1.193
192.168.2.15

>> node 192.168.2.226 <<
192.168.2.15
192.168.1.193
# public
# kubelet과 kube-proxy가 control plane의 api-server와 통신할때 아래와 같이 public 통신을 하게됨
------------------------------
Wed Feb  5 16:24:48 KST 2025
ESTAB 0      0               192.168.1.218:58190          15.164.199.89:443   users:(("kube-proxy",pid=3111,fd=9))
ESTAB 0      0               192.168.1.218:58156          15.164.199.89:443   users:(("kubelet",pid=2891,fd=27))
ESTAB 0      0      [::ffff:192.168.1.218]:10250 [::ffff:192.168.1.113]:60950 users:(("kubelet",pid=2891,fd=12))
ESTAB 0      0      [::ffff:192.168.1.218]:10250  [::ffff:192.168.1.75]:57504 users:(("kubelet",pid=2891,fd=15))

ESTAB 0      0               192.168.2.64:60018          15.164.199.89:443   users:(("kube-proxy",pid=3115,fd=9))
ESTAB 0      0               192.168.2.64:49336         13.209.123.172:443   users:(("kubelet",pid=2893,fd=11))
ESTAB 0      0                  127.0.0.1:38906              127.0.0.1:34743 users:(("kubelet",pid=2893,fd=26))
ESTAB 0      0      [::ffff:192.168.2.64]:10250  [::ffff:192.168.2.15]:34300 users:(("kubelet",pid=2893,fd=25))
ESTAB 0      0      [::ffff:192.168.2.64]:10250  [::ffff:192.168.1.75]:42150 users:(("kubelet",pid=2893,fd=20))
ESTAB 0      0      [::ffff:192.168.2.64]:10250 [::ffff:192.168.1.113]:48368 users:(("kubelet",pid=2893,fd=14))

## kube-proxy와 kubelet을 재실행 해줘야함!!
# kube-proxy rollout : ss에 kube-proxy peer IP 변경 확인
kubectl rollout restart ds/kube-proxy -n kube-system

# kubelet 은 노드에서 systemctl restart kubelet으로 적용해보자 : ss에 kubelet peer IP 변경 확인
for i in $N1 $N2; do echo ">> node $i <<"; ssh ec2-user@$i sudo systemctl restart kubelet; echo; done

# public & private
# kubelet과 kube-proxy가 control plane의 api-server와 통신할때 아래와 같이 private 통신을 하게됨
------------------------------
Wed Feb  5 16:25:42 KST 2025
ESTAB 0      0               192.168.1.218:58588          192.168.1.193:443   users:(("kube-proxy",pid=114084,fd=9))
ESTAB 0      0               192.168.1.218:58156          15.164.199.89:443   users:(("kubelet",pid=2891,fd=27))
ESTAB 0      0      [::ffff:192.168.1.218]:10250 [::ffff:192.168.1.113]:60950 users:(("kubelet",pid=2891,fd=12))
ESTAB 0      0      [::ffff:192.168.1.218]:10250  [::ffff:192.168.1.75]:57504 users:(("kubelet",pid=2891,fd=15))

ESTAB 0      0               192.168.2.64:56674           192.168.2.15:443   users:(("kube-proxy",pid=114530,fd=9))
ESTAB 0      0               192.168.2.64:35360           192.168.2.15:443   users:(("kubelet",pid=115831,fd=27))
ESTAB 0      0      [::ffff:192.168.2.64]:10250 [::ffff:192.168.1.113]:46978 users:(("kubelet",pid=115831,fd=18))
ESTAB 0      0      [::ffff:192.168.2.64]:10250  [::ffff:192.168.1.75]:33636 users:(("kubelet",pid=115831,fd=20))
또한 각 Data Plane node에서 Control Plane의 API Server의 주소를 dns query 해보면 아래와 같이 kubelet과 kube-proxy가 peer 맺은 ip가 찍히는것을 확인 할 수 있다. 즉, EKS API Server로의 질의를 같은 network에서 수행 할 경우 VPC의 DNS resolution 기능에 의해서 EKS Owned IP가 resolve 되는것이다.
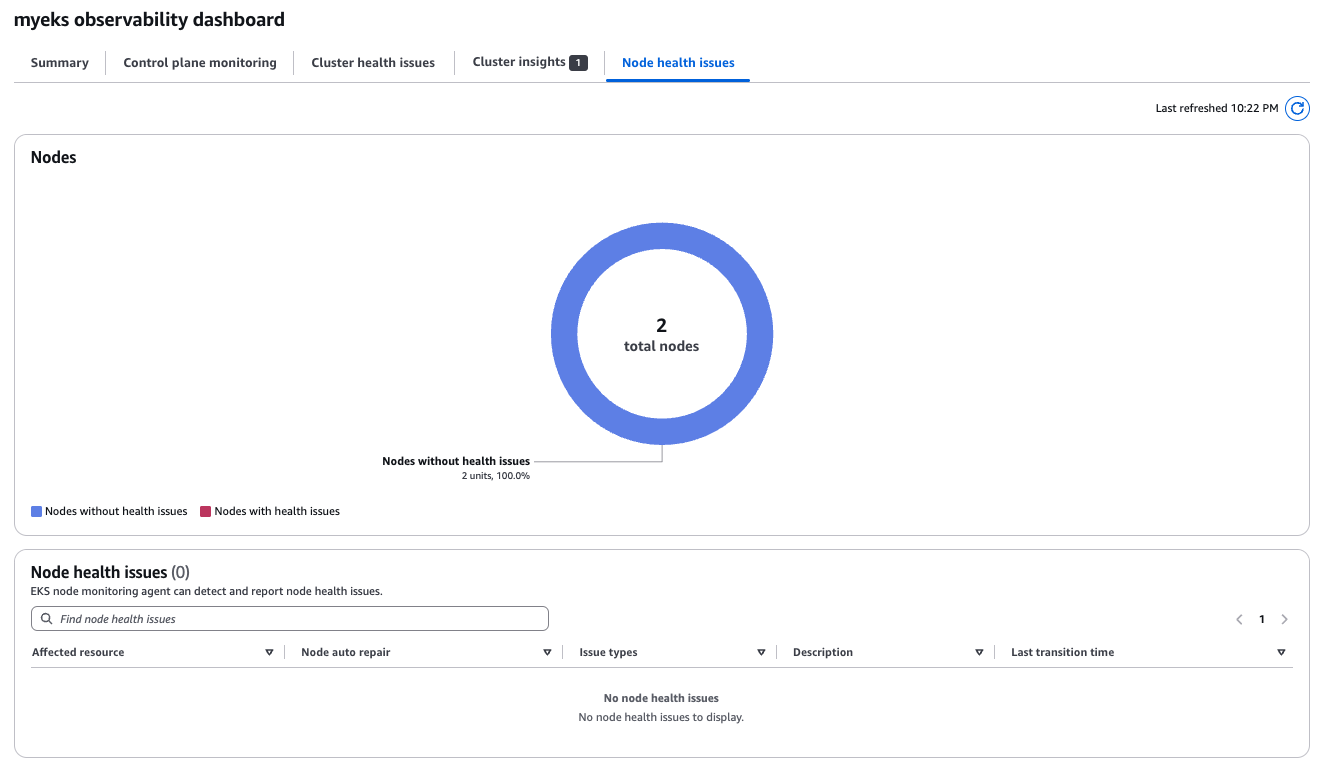
위와 같이 Addons는 DaemonSet 형태로 각 Data Plane에 배포가 된다. 이제 eks-node-monitoring-agent를 통해서 확인 할 수 있는 추가적인 node monitoring metrics를 확인해보자
[root@myeks-host ~]# kubectl get nodes -o 'custom-columns=NAME:.metadata.name,CONDITIONS:.status.conditions[*].type,STATUS:.status.conditions[*].status'

NAME                                               CONDITIONS                                                                                                     STATUS
ip-192-168-1-186.ap-northeast-2.compute.internal   MemoryPressure,DiskPressure,PIDPressure,Ready,NetworkingReady,KernelReady,ContainerRuntimeReady,StorageReady   False,False,False,True,True,True,True,True
ip-192-168-2-226.ap-northeast-2.compute.internal   MemoryPressure,DiskPressure,PIDPressure,Ready,KernelReady,ContainerRuntimeReady,StorageReady,NetworkingReady   False,False,False,True,True,True,True,True

[root@myeks-host ~]# kubecolor describe node

Name:               ip-192-168-1-186.ap-northeast-2.compute.internal
Roles:              <none>
Labels:             alpha.eksctl.io/cluster-name=myeks
                    alpha.eksctl.io/nodegroup-name=myeks-nodegroup
                    beta.kubernetes.io/arch=amd64
                    beta.kubernetes.io/instance-type=t3.medium
                    beta.kubernetes.io/os=linux
                    eks.amazonaws.com/capacityType=ON_DEMAND
                    eks.amazonaws.com/nodegroup=myeks-nodegroup
                    eks.amazonaws.com/nodegroup-image=ami-09dfa8dbb0051bd89
                    eks.amazonaws.com/sourceLaunchTemplateId=lt-0275ac4811078ea51
                    eks.amazonaws.com/sourceLaunchTemplateVersion=1
                    failure-domain.beta.kubernetes.io/region=ap-northeast-2
                    failure-domain.beta.kubernetes.io/zone=ap-northeast-2a
                    k8s.io/cloud-provider-aws=5553ae84a0d29114870f67bbabd07d44
                    kubernetes.io/arch=amd64
                    kubernetes.io/hostname=ip-192-168-1-186.ap-northeast-2.compute.internal
                    kubernetes.io/os=linux
                    node.kubernetes.io/instance-type=t3.medium
                    topology.k8s.aws/zone-id=apne2-az1
                    topology.kubernetes.io/region=ap-northeast-2
                    topology.kubernetes.io/zone=ap-northeast-2a
Annotations:        alpha.kubernetes.io/provided-node-ip: 192.168.1.186
                    node.alpha.kubernetes.io/ttl: 0
                    volumes.kubernetes.io/controller-managed-attach-detach: true
CreationTimestamp:  Sat, 08 Feb 2025 16:53:36 +0900
Taints:             <none>
Unschedulable:      false
Lease:
  HolderIdentity:  ip-192-168-1-186.ap-northeast-2.compute.internal
  AcquireTime:     <unset>
  RenewTime:       Sat, 08 Feb 2025 22:07:01 +0900
Conditions:
  Type                    Status  LastHeartbeatTime                 LastTransitionTime                Reason                       Message
  ----                    ------  -----------------                 ------------------                ------                       -------
  MemoryPressure          False   Sat, 08 Feb 2025 22:02:47 +0900   Sat, 08 Feb 2025 16:53:36 +0900   KubeletHasSufficientMemory   kubelet has sufficient memory available
  DiskPressure            False   Sat, 08 Feb 2025 22:02:47 +0900   Sat, 08 Feb 2025 16:53:36 +0900   KubeletHasNoDiskPressure     kubelet has no disk pressure
  PIDPressure             False   Sat, 08 Feb 2025 22:02:47 +0900   Sat, 08 Feb 2025 16:53:36 +0900   KubeletHasSufficientPID      kubelet has sufficient PID available
  Ready                   True    Sat, 08 Feb 2025 22:02:47 +0900   Sat, 08 Feb 2025 16:53:48 +0900   KubeletReady                 kubelet is posting ready status
  NetworkingReady         True    Sat, 08 Feb 2025 22:02:36 +0900   Sat, 08 Feb 2025 22:02:36 +0900   NetworkingIsReady            Monitoring for the Networking system is active
  KernelReady             True    Sat, 08 Feb 2025 22:02:36 +0900   Sat, 08 Feb 2025 22:02:36 +0900   KernelIsReady                Monitoring for the Kernel system is active
  ContainerRuntimeReady   True    Sat, 08 Feb 2025 22:02:36 +0900   Sat, 08 Feb 2025 22:02:36 +0900   ContainerRuntimeIsReady      Monitoring for the ContainerRuntime system is active
  StorageReady            True    Sat, 08 Feb 2025 22:02:36 +0900   Sat, 08 Feb 2025 22:02:36 +0900   DiskIsReady                  Monitoring for the Disk system is active
추가적인 여러가지 Node 관련 Metrics를 확인 할 수 있는것을 볼 수 있다.
# 특정 노드 세부 정보
kubectl describe node <node-name>
kubecolor describe node <node-name>

# 노드 이벤트 정보
kubectl get events --field-selector involvedObject.kind=Node
kubectl get events -w --field-selector involvedObject.kind=Node

# node의 이벤트 정보 확인
[root@myeks-host ~]# kubectl get events -w --field-selector involvedObject.kind=Node
LAST SEEN   TYPE     REASON         OBJECT                                                  MESSAGE
0s          Normal   NodeNotReady   node/ip-192-168-2-226.ap-northeast-2.compute.internal   Node ip-192-168-2-226.ap-northeast-2.compute.internal status is now: NodeNotReady
0s          Normal   NodeNotReady   node/ip-192-168-1-186.ap-northeast-2.compute.internal   Node ip-192-168-1-186.ap-northeast-2.compute.internal status is now: NodeNotReady
0s          Normal   Starting       node/ip-192-168-1-186.ap-northeast-2.compute.internal   Starting kubelet.
0s          Warning   CgroupV1       node/ip-192-168-1-186.ap-northeast-2.compute.internal   Cgroup v1 support is in maintenance mode, please migrate to Cgroup v2.
0s          Warning   InvalidDiskCapacity   node/ip-192-168-1-186.ap-northeast-2.compute.internal   invalid capacity 0 on image filesystem
0s          Normal    NodeHasSufficientMemory   node/ip-192-168-1-186.ap-northeast-2.compute.internal   Node ip-192-168-1-186.ap-northeast-2.compute.internal status is now: NodeHasSufficientMemory
0s          Normal    NodeHasNoDiskPressure     node/ip-192-168-1-186.ap-northeast-2.compute.internal   Node ip-192-168-1-186.ap-northeast-2.compute.internal status is now: NodeHasNoDiskPressure
0s          Normal    NodeHasSufficientPID      node/ip-192-168-1-186.ap-northeast-2.compute.internal   Node ip-192-168-1-186.ap-northeast-2.compute.internal status is now: NodeHasSufficientPID
0s          Normal    NodeAllocatableEnforced   node/ip-192-168-1-186.ap-northeast-2.compute.internal   Updated Node Allocatable limit across pods
0s          Normal    NodeHasSufficientMemory   node/ip-192-168-1-186.ap-northeast-2.compute.internal   Node ip-192-168-1-186.ap-northeast-2.compute.internal status is now: NodeHasSufficientMemory
0s          Normal    NodeHasNoDiskPressure     node/ip-192-168-1-186.ap-northeast-2.compute.internal   Node ip-192-168-1-186.ap-northeast-2.compute.internal status is now: NodeHasNoDiskPressure
0s          Normal    NodeHasSufficientPID      node/ip-192-168-1-186.ap-northeast-2.compute.internal   Node ip-192-168-1-186.ap-northeast-2.compute.internal status is now: NodeHasSufficientPID
0s          Warning   Rebooted                  node/ip-192-168-1-186.ap-northeast-2.compute.internal   Node ip-192-168-1-186.ap-northeast-2.compute.internal has been rebooted, boot id: b06e1edf-bf26-4553-97a5-224f47f608de
0s          Normal    NodeHasSufficientMemory   node/ip-192-168-1-186.ap-northeast-2.compute.internal   Node ip-192-168-1-186.ap-northeast-2.compute.internal status is now: NodeHasSufficientMemory
0s          Normal    NodeHasNoDiskPressure     node/ip-192-168-1-186.ap-northeast-2.compute.internal   Node ip-192-168-1-186.ap-northeast-2.compute.internal status is now: NodeHasNoDiskPressure
0s          Normal    NodeHasSufficientPID      node/ip-192-168-1-186.ap-northeast-2.compute.internal   Node ip-192-168-1-186.ap-northeast-2.compute.internal status is now: NodeHasSufficientPID
0s          Normal    NodeReady                 node/ip-192-168-1-186.ap-northeast-2.compute.internal   Node ip-192-168-1-186.ap-northeast-2.compute.internal status is now: NodeReady
0s          Normal    Starting                  node/ip-192-168-1-186.ap-northeast-2.compute.internal
1s          Normal    Starting                  node/ip-192-168-2-226.ap-northeast-2.compute.internal   Starting kubelet.

# 파드 로그 확인
kubectl krew install stern
kubectl stern -l app.kubernetes.io/instance=eks-node-monitoring-agent -n kube-system # EC2 재부팅 해두고 로그 확인

# 이벤트 확인 https://docs.aws.amazon.com/ko_kr/eks/latest/userguide/node-health.html#node-health-issues
kubectl get events --field-selector=reportingComponent=eks-node-monitoring-agent # EC2 재부팅 해두고 로그 확인
By itself, node auto repair can react to the Ready condition of the kubelet and any node objects that are manually deleted. When paired with the node monitoring agent, node auto repair can react to more conditions that wouldn’t be detected otherwise. These additional conditions include KernelReady, NetworkingReady, and StorageReady.
Node auto repair cannot handle certain problems that are reported such as DiskPressure, MemoryPressure, and PIDPressure.
Amazon EKS waits 10 minutes before acting on the AcceleratedHardwareReadyNodeConditions, and 30 minutes for all other conditions.
설정
AWS CLI, add the --node-repair-config enabled=true
eksctlClusterConfig
# An example ClusterConfig that uses a managed node group with auto repair.

apiVersion: eksctl.io/v1alpha5
kind: ClusterConfig

metadata:
  name: cluster-44
  region: us-west-2

managedNodeGroups:
- name: ng-1
  nodeRepairConfig:
    enabled: true
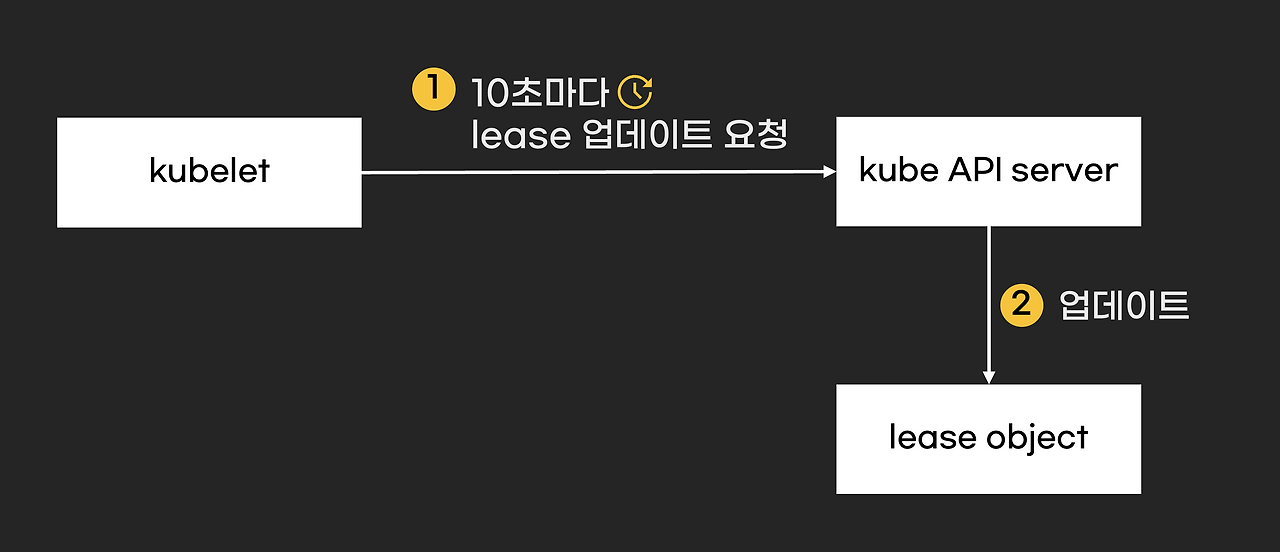
노드 체크(하트비트) 방식 2가지 : (1) .state 노드 업데이트 , (2) lease
The kubelet updates the node's .status either when there is change in status or if there has been no update for a configured interval. The default interval for .statusupdates to Nodes is 5 minutes, which is much longer than the 40 second default timeout for unreachable nodes.
The kubelet creates and then updates its Lease object every 10 seconds (the default update interval). Lease updates occur independently from updates to the Node's .status. If the Lease update fails, the kubelet retries, using exponential backoff that starts at 200 milliseconds and capped at 7 seconds.
헬스체크 알고리즘 lease : 자원 대여 → 자원 반납 or 대여 주기적인 업데이트 (노드 헬스체크 사용) - K8S_Docs , Lease(리스)
Lease 객체는 kube-node-lease 네임스페이스에 저장되며, 각 노드당 하나의 Lease 객체
# lease 자원 확인
kubectl get leases -n kube-node-lease
NAME                                               HOLDER                                             AGE
ip-192-168-1-164.ap-northeast-2.compute.internal   ip-192-168-1-164.ap-northeast-2.compute.internal   38m
ip-192-168-2-20.ap-northeast-2.compute.internal    ip-192-168-2-20.ap-northeast-2.compute.internal    140m

# 상세 정보 확인
kubecolor describe  leases -n kube-node-lease
Spec:
  Holder Identity:         ip-192-168-2-20.ap-northeast-2.compute.internal
  Lease Duration Seconds:  40 # 컨트롤러가 노드를 NotReady로 간주하기 전에 기다리는 시간 (기본 40초)
⇒ pod-eviction-timeout : 노드가 NotReady 상태일 때, Pod를 강제 퇴출(evict)하는 시간 - EKS 기본값 5분(300초)
The pod-eviction-timeout parameter inside the Kubernetes Controller Manager is set by default at 5 minutes and could be updated through the Kubernetes control plane.
However, because Amazon EKS is a managed Kubernetes service, pod-eviction-timeout is not available to be modified.
쿠버네티스 클러스터의 확장성은 노드 하트비트의 효과적인 처리에 달려 있습니다. 일반적인 프로덕션 환경에서 kubelet은 10초마다 하트비트를 보고합니다. 각 하트비트 요청과 연결된 콘텐츠는 노드의 수십 개의 이미지와 일정량의 볼륨 정보를 포함하여 15KB에 이릅니다. 그러나 이 모든 것에는 두 가지 문제가 있습니다.
하트비트 요청은 etcd에서 노드 객체의 업데이트를 트리거하는데, 이는 10,000개의 노드가 있는 쿠버네티스 클러스터에서 분당 약 1GB의 트랜잭션 로그를 생성할 수 있습니다. 변경 내역은 etcd에 기록됩니다.
API 서버의 CPU 사용량이 높고 직렬화 및 역직렬화의 오버헤드가 큰 노드로 구성된 Kubernetes 클러스터에서 하트비트 요청을 처리하는 CPU 오버헤드는 API 서버의 CPU 시간 사용량의 80%를 초과합니다.
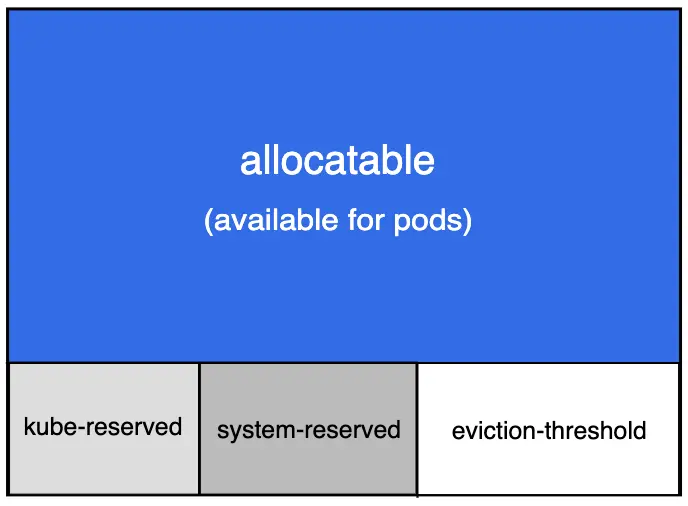
가장 아래의 allocated resources 부분은 모든 pod에 설정된 request와 limit 값들의 합이라는 것을 직관적으로 알 수 있다. 그런데, 아무리 pod를 배포하고 제거해봐도 capacity와 allocatable 값들은 변하지 않는다.
참고: https://littlemobs.com/blog/kuberentes-oom-kill-and-eviction/실제로 남은 공간을 의미하는 것은 available 값이다. Kubernetes 공식 문서에 의하면, memory에 대한 available 값은 다음과 같이 구한다.
한 가지 주의할 점은, available 값의 의미가 "할당 후 남은 공간"이 아니라, "사용되고 있지 않은 공간"이라는 점이다. Allocation 관점이 아니라 usage 관점이다. Pod가 배포될 때 request한 양과 상관없다. Pod에 설정된 request는 초기 할당받을 resource이지 사용중인 resource가 아니기 때문이다. 실제로 사용하고 있는 pod의 resource를 확인하려면 metrics-server or prometheus 등을 통해 monitoring이 필요하다. Pod들의 memory 사용량 총합이 증가하면 memory.available 값은 낮아진다.
Pod를 새로 배포할 때: kubectl describe nodes [NODE]를 통해 확인 할 수 있는 allocated resources 부분의 requests 값 참고
노드 자원이 부족해서 pod를 퇴출시킬 때: memory.available 값 참고
노드의 requests 값이 100%가 되지 않도록 pod 배포를 제한하는 로직은 간단명료해서 따로 살펴볼 필요가 없다.
정리하자면, kubernetes가 상황별로 참고하는 값은 다음과 같다.
위 그림을 통해 알 수 있듯이, allocatable 값은 시스템에 의해 예약된 값들을 제외한 것을 의미한다. 그림 하단의 kube-reserved, system-reserved, 그리고 eviction-threshold 부분이 kubernetes에 의해 미리 예약된 자원을 뜻한다. 따라서, allocatable은 pod를 위해 사용할 수 있는 최대 공간을 의미하는 것이지, 아직 자원이 할당되지 않은 남은 공간을 의미하는 것은 아니다. 참고로 위 그림에서 가장 바깥 테두리는 capacity를 의미한다. Capacity에서 시스템에 의해 예약된 값(kube-reserved, system-reserved, eviction-threshold)을 뺀 것이 바로 allocatable 값이다.
Capacity는 node 자체의 물리적인 한계를 의미한다. 아래 그림에서 모든 값을 더한것이 Capacity 이다. 따라서, 변하지 않는 것이 당연하다. 그렇다면, allocatable은 왜 변하지 않을까? Allocated resources가 증가하면, 개념적으로는 allocatable 값들이 감소해야 하는 것 아닐까?
kubectl describe node <NODE 이름> 명령어를 실행해보면, 다음과 같이 노드의 자원에 대한 capacity, allocatable, 그리고 allocated resources 값들을 확인할 수 있다.
Node-pressure Eviction 소개
노드-압박 축출은 kubelet이 노드의 자원을 회수하기 위해 파드를 능동적으로 중단시키는 절차이다.
Node-pressure eviction is the process by which the kubelet proactively terminatespods to reclaim resources on nodes.
kubelet은 클러스터 노드의 메모리, 디스크 공간, 파일시스템 inode와 같은 자원을 모니터링한다. 이러한 자원 중 하나 이상이 특정 소모 수준에 도달하면, kubelet은 하나 이상의 파드를 능동적으로 중단시켜 자원을 회수하고 고갈 상황을 방지할 수 있다.
The kubelet monitors resources like memory, disk space, and filesystem inodes on your cluster's nodes. When one or more of these resources reach specific consumption levels, the kubelet can proactively fail one or more pods on the node to reclaim resources and prevent starvation.
kubelet은 이전에 설정된 PodDisruptionBudget 값이나 파드의 terminationGracePeriodSeconds 값을 따르지 않는다. 소프트 축출 임계값을 사용하는 경우, kubelet은 이전에 설정된 eviction-max-pod-grace-period 값을 따른다. 하드 축출 임계값을 사용하는 경우, 파드 종료 시 0s 만큼 기다린 후 종료한다(즉, 기다리지 않고 바로 종료한다).
The kubelet does not respect your configured PodDisruptionBudget or the pod's terminationGracePeriodSeconds. If you use soft eviction thresholds, the kubelet respects your configured eviction-max-pod-grace-period. If you use hard eviction thresholds, the kubelet uses a 0s grace period (immediate shutdown) for termination.
Self healing behavior
kubelet은 최종 사용자 파드를 종료하기 전에 먼저 노드 수준 자원을 회수하려고 시도한다. 예를 들어, 디스크 자원이 부족하면 사용하지 않는 컨테이너 이미지를 먼저 제거한다.
The kubelet attempts to reclaim node-level resources before it terminates end-user pods. For example, it removes unused container images when disk resources are starved.
If the pods are managed by a workload management object (such as StatefulSet or Deployment) that replaces failed pods, the control plane (kube-controller-manager) creates new pods in place of the evicted pods.
Soft eviction 방식은 eviction이 발동하기 까지의 grace period를 주는 것이다. 반대로, hard eviction 방식은 grace period를 주지 않는 것이다. Soft eviction에서 grace period도 두 가지 종류가 있다.
eviction-soft-grace-period: eviction을 시작하기 까지의 grace period → 즉, 위에서 처럼 peak 발생시 특정 기간동안은 유예를 해주는것
eviction-max-pod-grace-period: pod가 완전히 종료될 때까지 기다려주는 grace period → eviction이 이미 발생되었고 pod가 gracefully shutdown 될 수 있도록 설정 할 수 있음
eviction-max-pod-grace-period 는 pod를 실제 종료시킬 때 적용되는 것이다. Pod 중에는 강제 종료되면 데이터 유실 등의 위험이 발생하는 것들이 있다. 이런 pod들은 작업하던 데이터를 DB에 저장하거나, 앱의 상태를 로그 파일에 남겨두는 등 종료 준비 작업이 필요하다. 무사히 종료 준비 작업을 마칠 수 있도록 해주어야 한다. 이를 위해 pod에 종료 신호를 보낸 뒤, 완전히 종료될 때까지 기다려주는 시간이 두 번째 grace period이다. Soft eviction 방식은 두 종류의 grace period를 둘 다 설정할 수 있다. 반대로, hard eviction 방식은 두 종류의 grace period를 아예 사용하지 않고 곧바로 pod들을 종료시켜버린다.Soft eviction 방식을 사용할 경우 이 쿨타임이 필요하다. 왜일까? 메모리 부족으로 eviction threshold를 만나게 되면 노드가 MemoryPressure 상태로 변경된다. 이 상태 변경은 soft eviction 방식과 무관하게 진행된다. 다시 말해서, soft eviction 방식은 eviction을 수행해야 할 시점이 오더라도 grace period 동안 기다려주는데, 그동안 노드의 상태가 계속 변할 수 있다는 뜻이다. 노드의 상태가 짧은 시간 안에 자주 변경되면 비효율적인 pod scheduling, 잘못된 eviction 등 다양한 문제를 발생시킨다. 따라서, 노드 상태 변경 주기를 늦추기 위해 eviction-pressure-transition-period가 필요하다.
추가적으로 알아두어야 할 grace period가 하나 더 있다. eviction-pressure-transition-period이라고 부르는 녀석이다. 이는 노드의 상태를 한 번 변화시켰을 때, 다음 상태 변경까지 기다려야 하는 쿨타임같은 개념이다. Default 값은 5분이다.
kubernetes는 클러스터 운영자에게 다음과 같이 두 가지 선택권을 준다.
Eviction이 시작되면 kubelet은 우선순위를 고려하여 선정된 pod들을 Failed 상태로 만든 뒤 종료시킨다. 어떤 pod가 우선적으로 선정되는지를 이해하려면 QoS와 PriorityClass에 대해 살펴봐야 한다. 글의 분량 조절을 위해 이 개념들은 다른 글에서 자세히 살펴보기로 하고, 우선은 eviction 발동 과정 자체에 초점을 맞춰보자.
Eviction signals and thresholds : kubelet은 축출 결정을 내리기 위해 다음과 같은 다양한 파라미터를 사용한다.
Eviction signals(축출 신호)
Eviction thresholds(축출 임계값)
Monitoring intervals(모니터링 간격)
축출 신호 Eviction signals
축출 신호는 특정 시점에서 특정 자원의 현재 상태이다. kubelet은 노드에서 사용할 수 있는 리소스의 최소량인 축출 임계값과 축출 신호를 비교하여 축출 결정을 내린다. kubelet은 다음과 같은 축출 신호를 사용한다.
Eviction signals are the current state of a particular resource at a specific point in time. Kubelet uses eviction signals to make eviction decisions by comparing the signals to eviction thresholds, which are the minimum amount of the resource that should be available on the node. On Linux, the kubelet uses the following eviction signals:
이 표에서, 설명 열은 kubelet이 축출 신호 값을 계산하는 방법을 나타낸다. 각 축출 신호는 백분율 또는 숫자값을 지원한다. kubelet은 총 용량 대비 축출 신호의 백분율 값을 계산한다.
In this table, the Description column shows how kubelet gets the value of the signal. Each signal supports either a percentage or a literal value. Kubelet calculates the percentage value relative to the total capacity associated with the signal.
memory.available 값은 free -m과 같은 도구가 아니라 cgroupfs로부터 도출된다. 이는 free -m이 컨테이너 안에서는 동작하지 않고, 또한 사용자가 node allocatable 기능을 사용하는 경우 자원 부족에 대한 결정은 루트 노드뿐만 아니라 cgroup 계층 구조의 최종 사용자 파드 부분에서도 지역적으로 이루어지기 때문에 중요하다. 이 스크립트는 kubelet이 memory.available을 계산하기 위해 수행하는 동일한 단계들을 재현한다. kubelet은 메모리 압박 상황에서 메모리가 회수 가능하다고 가정하므로, inactive_file(즉, 비활성 LRU 목록의 파일 기반 메모리 바이트 수)을 계산에서 제외한다.
The value for memory.available is derived from the cgroupfs instead of tools like free -m. This is important because free -m does not work in a container, and if users use the node allocatable feature, out of resource decisions are made local to the end user Pod part of the cgroup hierarchy as well as the root node. This script or cgroupv2 script reproduces the same set of steps that the kubelet performs to calculate memory.available. The kubelet excludes inactive_file (the number of bytes of file-backed memory on the inactive LRU list) from its calculation, as it assumes that memory is reclaimable under pressure.
(참고) cgroup 메모리 계산 script
#!/bin/bash
#!/usr/bin/env bash

# This script reproduces what the kubelet does
# to calculate memory.available relative to root cgroup.

# current memory usage
memory_capacity_in_kb=$(cat /proc/meminfo | grep MemTotal | awk '{print $2}')
memory_capacity_in_bytes=$((memory_capacity_in_kb * 1024))
memory_usage_in_bytes=$(cat /sys/fs/cgroup/memory/memory.usage_in_bytes)
memory_total_inactive_file=$(cat /sys/fs/cgroup/memory/memory.stat | grep total_inactive_file | awk '{print $2}')

memory_working_set=${memory_usage_in_bytes}
if [ "$memory_working_set" -lt "$memory_total_inactive_file" ];
then
    memory_working_set=0
else
    memory_working_set=$((memory_usage_in_bytes - memory_total_inactive_file))
fi

memory_available_in_bytes=$((memory_capacity_in_bytes - memory_working_set))
memory_available_in_kb=$((memory_available_in_bytes / 1024))
memory_available_in_mb=$((memory_available_in_kb / 1024))

echo "memory.capacity_in_bytes $memory_capacity_in_bytes"
echo "memory.usage_in_bytes $memory_usage_in_bytes"
echo "memory.total_inactive_file $memory_total_inactive_file"
echo "memory.working_set $memory_working_set"
echo "memory.available_in_bytes $memory_available_in_bytes"
echo "memory.available_in_kb $memory_available_in_kb"
echo "memory.available_in_mb $memory_available_in_mb"
kubelet은 다음과 같은 2개의 파일시스템 파티션을 지원한다.
nodefs: 노드의 메인 파일시스템이며, 로컬 디스크 볼륨, emptyDir, 로그 스토리지 등에 사용된다. 예를 들어 nodefs는 /var/lib/kubelet/을 포함한다.
The node's main filesystem, used for local disk volumes, emptyDir volumes not backed by memory, log storage, and more. For example, nodefs contains /var/lib/kubelet/.
imagefs: 컨테이너 런타임이 컨테이너 이미지 및 컨테이너 쓰기 가능 레이어를 저장하는 데 사용하는 선택적 파일시스템이다.
An optional filesystem that container runtimes use to store container images and container writable layers.
kubelet은 이러한 파일시스템을 자동으로 검색하고 다른 파일시스템은 무시한다. kubelet은 다른 구성은 지원하지 않는다. 아래의 kubelet 가비지 수집 기능은 더 이상 사용되지 않으며 축출로 대체되었다.
Kubelet auto-discovers these filesystems and ignores other node local filesystems. Kubelet does not support other configurations. Some kubelet garbage collection features are deprecated in favor of eviction:
Existing Flag
Rationale
--maximum-dead-containers
deprecated once old logs are stored outside of container's context
--maximum-dead-containers-per-container
deprecated once old logs are stored outside of container's context
--minimum-container-ttl-duration
deprecated once old logs are stored outside of container's context
축출 임계값 Eviction thresholds
kubelet이 축출 결정을 내릴 때 사용하는 Soft/Hard 축출 임계값을 사용자가 임의로 설정할 수 있다. 축출 임계값은 [eviction-signal][operator][quantity] 형태를 갖는다.
You can specify custom eviction thresholds for the kubelet to use when it makes eviction decisions. You can configure soft and hard eviction thresholds. Eviction thresholds have the form [eviction-signal][operator][quantity],
eviction-signal에는 사용할 축출 신호를 적는다. eviction-signal is the eviction signal to use.
operator에는 관계연산자를 적는다(예: < - 미만). operator is the relational operator you want, such as < (less than).
quantity에는 1Gi와 같이 축출 임계값 수치를 적는다. quantity에 들어가는 값은 쿠버네티스가 사용하는 수치 표현 방식과 맞아야 한다. 숫자값 또는 백분율(%)을 사용할 수 있다.
quantity is the eviction threshold amount, such as 1Gi. The value of quantity must match the quantity representation used by Kubernetes. You can use either literal values or percentages (%).
예를 들어, 노드에 총 10Gi의 메모리가 있고 1Gi 아래로 내려갔을 때 축출이 시작되도록 만들고 싶으면, 축출 임계값을 memory.available<10% 또는 memory.available<1Gi 형태로 정할 수 있다. 둘을 동시에 사용할 수는 없다.
For example, if a node has 10GiB of total memory and you want trigger eviction if the available memory falls below 1GiB, you can define the eviction threshold as either memory.available<10% or memory.available<1Gi (you cannot use both).
소프트 축출 임계값은 관리자가 설정하는 유예 시간(필수)과 함께 정의된다. kubelet은 유예 시간이 초과될 때까지 파드를 제거하지 않는다. 유예 시간이 지정되지 않으면 kubelet 시작 시 오류가 반환된다.
A soft eviction thresholdpairs an eviction threshold with a required administrator-specified graceperiod. The kubelet does not evict pods until the grace period is exceeded. The kubelet returns an error on startup if you do not specify a grace period.
kubelet이 축출 과정에서 사용할 수 있도록, '소프트 축출 임계값'과 '최대 허용 파드 종료 유예 시간' 둘 다를 설정할 수 있다. '최대 허용 파드 종료 유예 시간'이 설정되어 있는 상태에서 '소프트 축출 임계값'에 도달하면, kubelet은 두 유예 시간 중 작은 쪽을 적용한다. '최대 허용 파드 종료 유예 시간'을 설정하지 않으면, kubelet은 축출된 파드를 유예 시간 없이 즉시 종료한다.
You can specify both a soft eviction threshold grace period and a maximum allowed pod termination grace period for kubelet to use during evictions. If you specify a maximum allowed grace period and the soft eviction threshold is met, the kubelet uses the lesser of the two grace periods. If you do not specify a maximum allowed grace period, the kubelet kills evicted pods immediately without graceful termination.
소프트 축출 임계값을 설정할 때 다음과 같은 플래그를 사용할 수 있다. soft eviction thresholds
eviction-soft: 축출 임계값(예: memory.available<1.5Gi)의 집합이며, 지정된 유예 시간동안 이 축출 임계값 조건이 충족되면 파드 축출이 트리거된다.
eviction-soft: A set of eviction thresholds like memory.available<1.5Gi that can trigger pod eviction if held over the specified grace period.
eviction-soft-grace-period: 축출 유예 시간의 집합이며, 소프트 축출 임계값 조건이 이 유예 시간동안 충족되면 파드 축출이 트리거된다.
eviction-soft-grace-period: A set of eviction grace periods like memory.available=1m30s that define how long a soft eviction threshold must hold before triggering a Pod eviction.
eviction-max-pod-grace-period: '최대 허용 파드 종료 유예 시간(단위: 초)'이며, 소프트 축출 임계값 조건이 충족되어 파드를 종료할 때 사용한다.
eviction-max-pod-grace-period: The maximum allowed grace period (in seconds) to use when terminating pods in response to a soft eviction threshold being met.
Hard eviction thresholds
하드 축출 임계값에는 유예 시간이 없다. 하드 축출 임계값 조건이 충족되면, kubelet은 고갈된 자원을 회수하기 위해 파드를 유예 시간 없이 즉시 종료한다.
A hard eviction threshold has no grace period. When a hard eviction threshold is met, the kubelet kills pods immediately without graceful termination to reclaim the starved resource.
eviction-hard 플래그를 사용하여 하드 축출 임계값(예: memory.available<1Gi)을 설정할 수 있다.
You can use the eviction-hard flag to configure a set of hard eviction thresholds like memory.available<1Gi.
kubelet은 다음과 같은 하드 축출 임계값을 기본적으로 설정하고 있다. default hard eviction thresholds:
memory.available<100Mi
nodefs.available<10%
imagefs.available<15%
nodefs.inodesFree<5% (리눅스 노드)
이러한 하드 축출 임계값의 기본값은 매개변수가 변경되지 않은 경우에만 설정된다. 어떤 매개변수의 값을 변경한 경우, 다른 매개변수의 값은 기본값으로 상속되지 않고 0으로 설정된다. 사용자 지정 값을 제공하려면, 모든 임계값을 각각 제공해야 한다.
These default values of hard eviction thresholds will only be set if none of the parameters is changed. If you change the value of any parameter, then the values of other parameters will not be inherited as the default values and will be set to zero. In order to provide custom values, you should provide all the thresholds respectively.
모니터링 간격 Eviction Monitoring intervals
kubelet은 housekeeping-interval에 설정된 시간 간격(기본값: 10s)마다 축출 임계값(=Eviction Thresholds)을 확인한다.
즉, housekeeping-interval 마다 Eviction Signal을 확인한다.
노드 컨디션 Node conditions
kubelet은 하드/소프트 축출 임계값 조건이 충족되어 노드 압박이 발생했다는 것을 알리기 위해, 설정된 유예 시간과는 관계없이 노드 컨디션을 보고한다. kubelet은 다음과 같이 노드 컨디션과 축출 신호를 매핑한다.
The kubelet reports node conditions to reflect that the node is under pressure because hard or soft eviction threshold is met, independent of configured grace periods. The kubelet maps eviction signals to node conditions as follows:
Node Condition
Eviction Signal
Description
MemoryPressure
memory.available
Available memory on the node has satisfied an eviction threshold
DiskPressure
nodefs.available, nodefs.inodesFree, imagefs.available, or imagefs.inodesFree
Available disk space and inodes on either the node's root filesystem or image filesystem has satisfied an eviction threshold
PIDPressure
pid.available
Available processes identifiers on the (Linux) node has fallen below an eviction threshold
kubelet은 --node-status-update-frequency에 설정된 시간 간격(기본값: 10s)마다 노드 컨디션을 업데이트한다.
The kubelet updates the node conditions based on the configured --node-status-update-frequency, which defaults to 10s.
컨트롤 플레인은 이러한 노드 조건을 테인트에 매핑하기도 합니다
The control plane also maps these node conditions to taints.
노드 컨디션 진동 oscillation
경우에 따라, 노드의 축출 신호값이 사전에 설정된 유예 시간 동안 유지되지 않고 소프트 축출 임계값을 중심으로 진동할 수 있다. 이로 인해 노드 컨디션이 계속 true와 false로 바뀌며, 잘못된 축출 결정을 야기할 수 있다.
In some cases, nodes oscillate above and below soft eviction thresholds without holding for the defined grace periods. This causes the reported node condition to constantly switch between true and false, leading to bad eviction decisions.
이러한 진동을 방지하기 위해, eviction-pressure-transition-period 플래그를 사용하여 kubelet이 노드 컨디션을 다른 상태로 바꾸기 위해 기다려야 하는 시간을 설정할 수 있다. 기본값은 5m이다.
To protect against oscillation, you can use the eviction-pressure-transition-period flag, which controls how long the kubelet must wait before transitioning a node condition to a different state. The transition period has a default value of 5m.
노드-수준 자원 회수하기 Reclaiming node level resources
kubelet은 최종 사용자 파드를 축출하기 전에 노드-수준 자원 회수를 시도한다. DiskPressure 노드 컨디션이 보고되면, kubelet은 노드의 파일시스템을 기반으로 노드-수준 자원을 회수한다.
The kubelet tries to reclaim node-level resources before it evicts end-user pods.
When a DiskPressure node condition is reported, the kubelet reclaims node-level resources based on the filesystems on the node.
메모리(자원) 압박 시, toleratesmemory pressure taint 경우에는 허용
// Admit rejects a pod if its not safe to admit for node stability.
func (m *managerImpl) Admit(attrs *lifecycle.PodAdmitAttributes) lifecycle.PodAdmitResult {
	m.RLock()
	defer m.RUnlock()
	if len(m.nodeConditions) == 0 {
		return lifecycle.PodAdmitResult{Admit: true}
	}
	// Admit Critical pods even under resource pressure since they are required for system stability.
	// https://github.com/kubernetes/kubernetes/issues/40573 has more details.
	if kubelettypes.IsCriticalPod(attrs.Pod) {
		return lifecycle.PodAdmitResult{Admit: true}
	}

	// Conditions other than memory pressure reject all pods
	nodeOnlyHasMemoryPressureCondition := hasNodeCondition(m.nodeConditions, v1.NodeMemoryPressure) && len(m.nodeConditions) == 1
	if nodeOnlyHasMemoryPressureCondition {
		notBestEffort := v1.PodQOSBestEffort != v1qos.GetPodQOS(attrs.Pod)
		if notBestEffort {
			return lifecycle.PodAdmitResult{Admit: true}
		}

		// When node has memory pressure, check BestEffort Pod's toleration:
		// admit it if tolerates memory pressure taint, fail for other tolerations, e.g. DiskPressure.
		if corev1helpers.TolerationsTolerateTaint(attrs.Pod.Spec.Tolerations, &v1.Taint{
			Key:    v1.TaintNodeMemoryPressure,
			Effect: v1.TaintEffectNoSchedule,
		}) {
			return lifecycle.PodAdmitResult{Admit: true}
		}
	}

	return lifecycle.PodAdmitResult{
		Admit:   false,
		Reason:  Reason,
		Message: fmt.Sprintf(nodeConditionMessageFmt, m.nodeConditions),
	}
}
exceedMemoryRequests(stats): 파드의 메모리 사용량이 요청(requests)을 초과하는지 여부로 정렬합니다. 메모리 사용량이 요청량을 초과하는 파드를 우선적으로 정리합니다.⇒ Guaranteed 클래스의 파드는 request보다 더 많이 메모리를 쓰는 것이 불가능하기 때문에 (1) 에서 제외
priority: 파드의 우선순위(priority)로 정렬합니다. 우선순위가 낮은 파드를 먼저 퇴거합니다.⇒ 시스템 컴포넌트는 기본적으로 system-*-critical 라는 이름의 Priority Class를 가짐으로써 Priority가 매우 높게 설정되기 때문에 [2] 에서 제외
memory(stats): 파드의 메모리 사용량이 요청량을 얼마나 초과하는지에 따라 정렬합니다. 초과량이 큰 파드를 더 먼저 퇴거합니다.⇒ 대부분의 포드는 [3] 에 의해 우선순위가 결정
// rankMemoryPressure orders the input pods for eviction in response to memory pressure.
// It ranks by whether or not the pod's usage exceeds its requests, then by priority, and
// finally by memory usage above requests.
func rankMemoryPressure(pods []*v1.Pod, stats statsFunc) {
	orderedBy(exceedMemoryRequests(stats), priority, memory(stats)).Sort(pods)
}
kubelet 축출을 위한 파드 선택 Pod selection for kubelet eviction*
kubelet이 노드-수준 자원을 회수했음에도 축출 신호가 임계값 아래로 내려가지 않으면, kubelet은 최종 사용자 파드 축출을 시작한다. kubelet은 파드 축출 순서를 결정하기 위해 다음의 파라미터를 활용한다. If the kubelet's attempts to reclaim node-level resources don't bring the eviction signal below the threshold, the kubelet begins to evict end-user pods.
파드의 자원 사용량이 요청량을 초과했는지 여부 Whether the pod's resource usage exceeds requests
파드의 자원 요청량 대비 자원 사용량 The pod's resource usage relative to requests
결과적으로, kubelet은 다음과 같은 순서로 파드의 축출 순서를 정하고 축출을 수행한다. As a result, kubelet ranks and evicts pods in the following order:
BestEffort 또는 Burstable 파드 중 자원 사용량이 요청량을 초과한 파드. 이 파드들은 파드들의 우선순위, 그리고 자원 사용량이 요청량을 얼마나 초과했는지에 따라 축출된다.
BestEffort or Burstable pods where the usageexceedsrequests. These pods are evicted based on their Priority and then by how much their usage level exceeds the request.
Guaranteed, Burstable 파드 중 자원 사용량이 요청량보다 낮은 파드는 우선순위에 따라 후순위로 축출된다.
Guaranteed pods and Burstable pods where the usage is less than requests are evicted last, based on their Priority.
👉🏻
kubelet이 파드 축출 순서를 결정할 때 파드의 QoS 클래스는 이용하지 않는다. 메모리 등의 자원을 회수할 때, QoS 클래스를 이용하여 가장 가능성이 높은 파드 축출 순서를 예측할 수는 있다. QoS는 EphemeralStorage 요청에 적용되지 않으므로, 노드가 예를 들어 DiskPressure 아래에 있는 경우 위의 시나리오가 적용되지 않는다. The kubelet does not use the pod's QoS classto determine the eviction order. You can use the QoS class to estimate the most likely pod eviction order when reclaiming resources like memory. QoS classification does not apply to EphemeralStorage requests, so the above scenario will not apply if the node is, for example, under DiskPressure.
Guaranteed 파드는 모든 컨테이너에 대해 자원 요청량과 제한이 명시되고 그 둘이 동일할 때에만 보장(guaranteed)된다. 다른 파드의 자원 사용으로 인해 Guaranteed 파드가 축출되는 일은 발생하지 않는다. 만약 시스템 데몬(예: kubelet, journald)이 system-reserved 또는 kube-reserved 할당을 통해 예약된 것보다 더 많은 자원을 소비하고, 노드에는 요청량보다 적은 양의 자원을 사용하고 있는 Guaranteed / Burstable 파드만 존재한다면, kubelet은 노드 안정성을 유지하고 자원 고갈이 다른 파드에 미칠 영향을 통제하기 위해 이러한 파드 중 하나를 골라 축출해야 한다. 이 경우, 가장 낮은 Priority를 갖는 파드가 선택된다.
Guaranteed pods are guaranteed only when requests and limits are specified for all the containers and they are equal. These pods will never be evicted because of another pod's resource consumption. If a system daemon (such as kubelet and journald) is consuming more resources than were reserved via system-reserved or kube-reserved allocations, and the node only has Guaranteed or Burstable pods using less resources than requests left on it, then the kubelet must choose to evict one of these pods to preserve node stability and to limit the impact of resource starvation on other pods. In this case, it will choose to evict pods of lowest Priority first.
정적 파드를 실행 중이고 리소스 압박으로 인해 퇴출되는 것을 방지하려면 해당 파드의 우선순위 필드를 직접 설정한다. 정적 파드는 priorityClassName 필드를 지원하지 않는다.
If you are running a static pod and want to avoid having it evicted under resource pressure, set the priority field for that Pod directly. Static pods do not support the priorityClassName field.
inodes와 PIDs에 대한 요청량은 정의하고 있지 않기 때문에, kubelet이 inode 또는 PID 고갈 때문에 파드를 축출할 때에는 파드의 Priority를 이용하여 축출 순위를 정한다.
When the kubelet evicts pods in response to inode or process ID starvation, it uses the Pods' relative priority to determine the eviction order, because inodes and PIDs have no requests.
노드에 전용 imagefs 파일시스템이 있는지 여부에 따라 kubelet이 파드 축출 순서를 정하는 방식에 차이가 있다.
The kubelet sorts pods differently based on whether the node has a dedicated imagefs filesystem:
최소 축출 회수량 Minimum eviction reclaim
경우에 따라, 파드를 축출했음에도 적은 양의 자원만이 회수될 수 있다. 이로 인해 kubelet이 반복적으로 축출 임계값 도달을 감지하고 여러 번의 축출을 수행할 수 있다.
In some cases, pod eviction only reclaims a small amount of the starved resource. This can lead to the kubelet repeatedly hitting the configured eviction thresholds and triggering multiple evictions.
-eviction-minimum-reclaim 플래그 또는 kubelet 설정 파일을 이용하여 각 자원에 대한 최소 회수량을 설정할 수 있다. kubelet이 자원 부족 상황을 감지하면, 앞서 설정한 최소 회수량에 도달할때까지 회수를 계속 진행한다.
You can use the --eviction-minimum-reclaim flag or a kubelet config file to configure a minimum reclaim amount for each resource. When the kubelet notices that a resource is starved, it continues to reclaim that resource until it reclaims the quantity you specify.
예를 들어, 다음 YAML은 최소 회수량을 정의하고 있다. Configuration sets minimum reclaim amounts
이 예제에서, 만약 nodefs.available 축출 신호가 축출 임계값 조건에 도달하면, kubelet은 축출 신호가 임계값인 1Gi에 도달할 때까지 자원을 회수하며, 이어서 축출 신호가 1.5Gi에 도달할 때까지 최소 500Mi 이상의 자원을 회수한다.
In this example, if the nodefs.available signal meets the eviction threshold, the kubelet reclaims the resource until the signal reaches the threshold of 1GiB, and then continues to reclaim the minimum amount of 500MiB, until the available nodefs storage value reaches 1.5GiB. ← Hard 1G + Minimum 500Mi
유사한 방식으로, kubelet은 imagefs.available 축출 신호가 102Gi에(100+2) 도달할 때까지 imagefs 자원을 회수한다. kubelet이 회수할 수 있는 스토리지의 양이 2GiB 미만인 경우, kubelet은 아무것도 회수하지 않습니다.
Similarly, the kubelet tries to reclaim the imagefs resource until the imagefs.available value reaches 102Gi, representing 102 GiB of available container image storage. If the amount of storage that the kubelet could reclaim is less than 2GiB, the kubelet doesn't reclaim anything.
모든 자원에 대해 eviction-minimum-reclaim의 기본값은 0이다. The default eviction-minimum-reclaim is 0 for all resources.
노드 메모리 부족 시의 동작 Node out of memory behavior
kubelet의 메모리 회수가 가능하기 이전에 노드에 메모리 부족(out of memory, 이하 OOM) 이벤트가 발생하면, 노드는 oom_killer에 의존한다. kubelet은 각 파드에 설정된 QoS를 기반으로 각 컨테이너에 oom_score_adj 값을 설정한다.
If the node experiences an out of memory (OOM) event prior to the kubelet being able to reclaim memory, the node depends on the oom_killer to respond. The kubelet sets an oom_score_adj value for each container based on the QoS for the pod.
kubelet은 system-node-critical파드 우선 순위(Priority)를 갖는 파드의 컨테이너에 oom_score_adj 값을 -997로 설정한다.
The kubelet also sets an oom_score_adj value of -997 for any containers in Pods that have system-node-criticalPriority.
노드가 OOM을 겪기 전에 kubelet이 메모리를 회수하지 못하면, oom_killer가 노드의 메모리 사용률 백분율을 이용하여 oom_score를 계산하고, 각 컨테이너의 실질 oom_score를 구하기 위해 oom_score_adj를 더한다. 그 뒤 oom_score가 가장 높은 컨테이너부터 종료시킨다.
If the kubelet can't reclaim memory before a node experiences OOM, the oom_killer calculates an oom_score based on the percentage of memory it's using on the node, and then adds the oom_score_adj to get an effective oom_score for each container. It then kills the container with the highest score.
이는 곧, 스케줄링 요청에 비해 많은 양의 메모리를 사용하면서 QoS가 낮은 파드에 속한 컨테이너가 먼저 종료됨을 의미한다.
This means that containers in low QoS pods that consume a large amount of memory relative to their scheduling requests are killed first.
파드 축출과 달리, 컨테이너가 OOM으로 인해 종료되면, kubelet이 컨테이너의 RestartPolicy를 기반으로 컨테이너를 다시 실행할 수 있다.
Unlike pod eviction, if a container is OOM killed, the kubelet can restart it based on its restartPolicy.
Good practices
스케줄 가능한 자원과 축출 정책 Schedulable resources and eviction policies
kubelet에 축출 정책을 설정할 때, 만약 어떤 파드 배치가 즉시 메모리 압박을 야기하기 때문에 축출을 유발한다면 스케줄러가 그 파드 배치를 수행하지 않도록 설정해야 한다. When you configure the kubelet with an eviction policy, you should make sure that the scheduler will not schedule pods if they will trigger eviction because they immediately induce memory pressure.
다음 시나리오를 가정한다. Consider the following scenario:
노드 메모리 용량: 10Gi Node memory capacity: 10GiB
운영자는 시스템 데몬(커널, kubelet 등)을 위해 메모리 용량의 10%를 확보해 놓고 싶어 한다. Operator wants to reserve 10% of memory capacity for system daemons (kernel, kubelet, etc.)
운영자는 시스템 OOM 발생을 줄이기 위해 메모리 사용률이 95%인 상황에서 파드를 축출하고 싶어한다. Operator wants to evict Pods at 95% memory utilization to reduce incidence of system OOM.
이것이 실현되도록, kubelet이 다음과 같이 실행된다. For this to work, the kubelet is launched as follows:
이 환경 설정에서, --system-reserved 플래그는 시스템 용으로 1.5Gi 메모리를 확보하는데, 이는 총 메모리의 10% + 축출 임계값에 해당된다. In this configuration, the --system-reserved flag reserves 1.5GiB of memory for the system, which is 10% of the total memory + the eviction threshold amount.
파드가 요청량보다 많은 메모리를 사용하거나 시스템이 1Gi 이상의 메모리를 사용하여, memory.available 축출 신호가 500Mi 아래로 내려가면 노드가 축출 임계값에 도달할 수 있다. The node can reach the eviction threshold if a pod is using more than its request, or if the system is using more than 1GiB of memory, which makes the memory.available signal fall below 500MiB and triggers the threshold.
데몬셋(DaemonSet) DaemonSets and node-pressure eviction
파드 우선 순위(Priority)는 파드 축출 결정을 내릴 때의 주요 요소이다. kubelet이 DaemonSet에 속하는 파드를 축출하지 않도록 하려면 해당 파드의 파드 스펙에 충분히 높은 priorityClass를 지정한다. 또는 낮은 priorityClass나 기본값을 사용하여 리소스가 충분할 때만 DaemonSet 파드가 실행되도록 허용할 수도 있다.
Pod priority is a major factor in making eviction decisions. If you do not want the kubelet to evict pods that belong to a DaemonSet, give those pods a high enough priority by specifying a suitable priorityClassName in the pod spec. You can also use a lower priority, or the default, to only allow pods from that DaemonSet to run when there are enough resources.
Known issues 리소스 부족 처리와 관련된 알려진 이슈
kubelet이 메모리 압박을 즉시 감지하지 못할 수 있음 kubelet may not observe memory pressure right away
기본적으로 kubelet은 cAdvisor를 폴링하여 일정한 간격으로 메모리 사용량 통계를 수집한다. 해당 타임 윈도우 내에서 메모리 사용량이 빠르게 증가하면 kubelet이 MemoryPressure를 충분히 빠르게 감지하지 못해 OOMKiller가 계속 호출될 수 있다.
By default, the kubelet polls cAdvisor to collect memory usage stats at a regular interval. If memory usage increases within that window rapidly, the kubelet may not observe MemoryPressure fast enough, and the OOM killer will still be invoked.
-kernel-memcg-notification 플래그를 사용하여 kubelet의 memcg 알림 API가 임계값을 초과할 때 즉시 알림을 받도록 할 수 있다.
You can use the --kernel-memcg-notification flag to enable the memcg notification API on the kubelet to get notified immediately when a threshold is crossed.
사용률(utilization)을 극단적으로 높이려는 것이 아니라 오버커밋(overcommit)에 대한 합리적인 조치만 원하는 경우, 이 문제에 대한 현실적인 해결 방법은 --kube-reserved 및 --system-reserved 플래그를 사용하여 시스템에 메모리를 할당하는 것이다.
If you are not trying to achieve extreme utilization, but a sensible measure of overcommit, a viable workaround for this issue is to use the --kube-reserved and --system-reserved flags to allocate memory for the system.
active_file 메모리가 사용 가능한 메모리로 간주되지 않음 active_file memory is not considered as available memory
리눅스에서, 커널은 활성 LRU 목록의 파일 지원 메모리 바이트 수를 active_file 통계로 추적한다. kubelet은 active_file 메모리 영역을 회수할 수 없는 것으로 취급한다. 임시 로컬 스토리지를 포함하여 블록 지원 로컬 스토리지를 집중적으로 사용하는 워크로드의 경우 파일 및 블록 데이터의 커널 수준 캐시는 최근에 액세스한 많은 캐시 페이지가 active_file로 계산될 가능성이 있음을 의미한다. 활성 LRU 목록에 이러한 커널 블록 버퍼가 충분히 많으면, kubelet은 이를 높은 자원 사용 상태로 간주하고 노드가 메모리 압박을 겪고 있다고 테인트를 표시할 수 있으며, 이는 파드 축출을 유발한다. 자세한 사항은 https://github.com/kubernetes/kubernetes/issues/43916를 참고한다.
On Linux, the kernel tracks the number of bytes of file-backed memory on active least recently used (LRU) list as the active_file statistic. The kubelet treats active_file memory areas as not reclaimable. For workloads that make intensive use of block-backed local storage, including ephemeral local storage, kernel-level caches of file and block data means that many recently accessed cache pages are likely to be counted as active_file. If enough of these kernel block buffers are on the active LRU list, the kubelet is liable to observe this as high resource use and taint the node as experiencing memory pressure - triggering pod eviction.
집중적인 I/O 작업을 수행할 가능성이 있는 컨테이너에 대해 메모리 제한량 및 메모리 요청량을 동일하게 설정하여 이 문제를 해결할 수 있다. 해당 컨테이너에 대한 최적의 메모리 제한량을 추정하거나 측정해야 한다.
You can work around that behavior by setting the memory limit and memory request the same for containers likely to perform intensive I/O activity. You will need to estimate or measure an optimal memory limit value for that container.
5. QoS for Pod
5.1. Pod의 QoS class 종류
Pod의 QoS class 는 Guaranteed, Burstable, BestEffort 총 3가지가 존재한다.
QoS class of Guaranteed → CPU/Memroy request, limit이 모두 같게 설정되어있는 PodFor a Pod to be given a QoS class of Guaranteed:
Every Container in the Pod must have a memory limit and a memory request.
For every Container in the Pod, the memory limit must equal the memory request.
Every Container in the Pod must have a CPU limit and a CPU request.
For every Container in the Pod, the CPU limit must equal the CPU request.
QoS class of BestEffort → CPU/Memory request, limit 아무것도 설정하지 않음For a Pod to be given a QoS class of BestEffort, the Containers in the Pod must not have any memory or CPU limits or requests.
# monitor the metric etcd_db_total_size_in_bytes to track the etcd database size
kubectl get --raw /metrics | grep "apiserver_storage_size_bytes"
# HELP apiserver_storage_size_bytes [ALPHA] Size of the storage database file physically allocated in bytes.
# TYPE apiserver_storage_size_bytes gauge
apiserver_storage_size_bytes{cluster="etcd-0"} 2.957312e+06


# How do I identify what is consuming etcd database space?
kubectl get --raw=/metrics | grep apiserver_storage_objects |awk '$2>10' |sort -g -k 2
# HELP apiserver_storage_objects [STABLE] Number of stored objects at the time of last check split by kind.
# TYPE apiserver_storage_objects gauge
apiserver_storage_objects{resource="flowschemas.flowcontrol.apiserver.k8s.io"} 13
apiserver_storage_objects{resource="roles.rbac.authorization.k8s.io"} 15
apiserver_storage_objects{resource="rolebindings.rbac.authorization.k8s.io"} 16
apiserver_storage_objects{resource="apiservices.apiregistration.k8s.io"} 31
apiserver_storage_objects{resource="serviceaccounts"} 40
apiserver_storage_objects{resource="clusterrolebindings.rbac.authorization.k8s.io"} 67
apiserver_storage_objects{resource="events"} 67
apiserver_storage_objects{resource="clusterroles.rbac.authorization.k8s.io"} 81

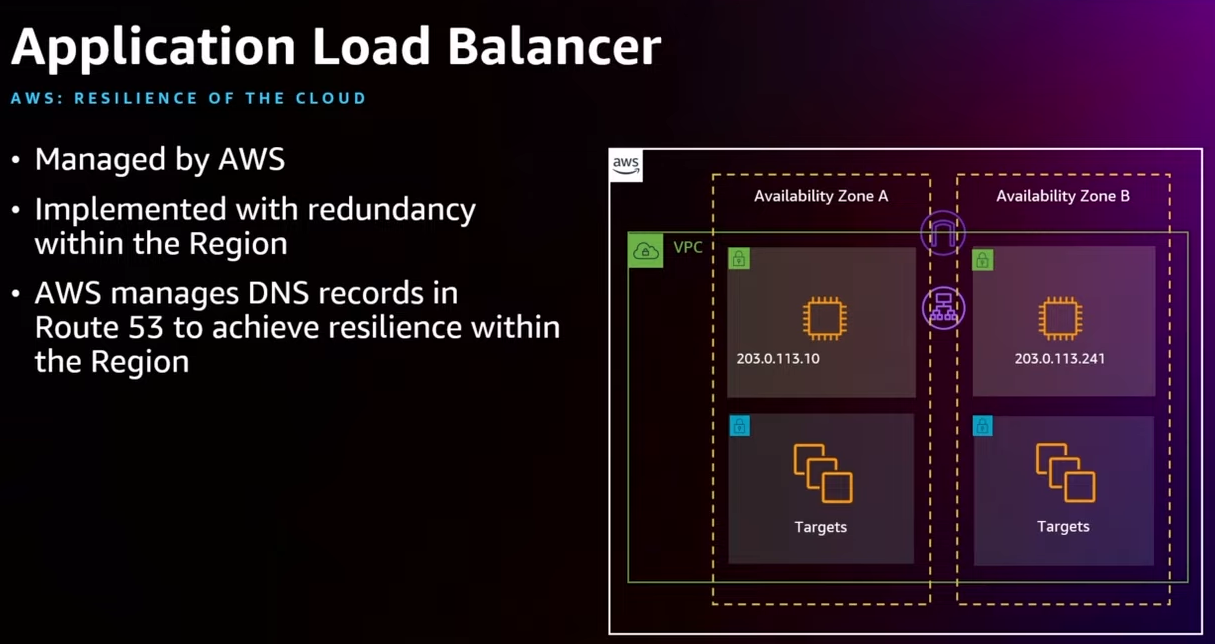
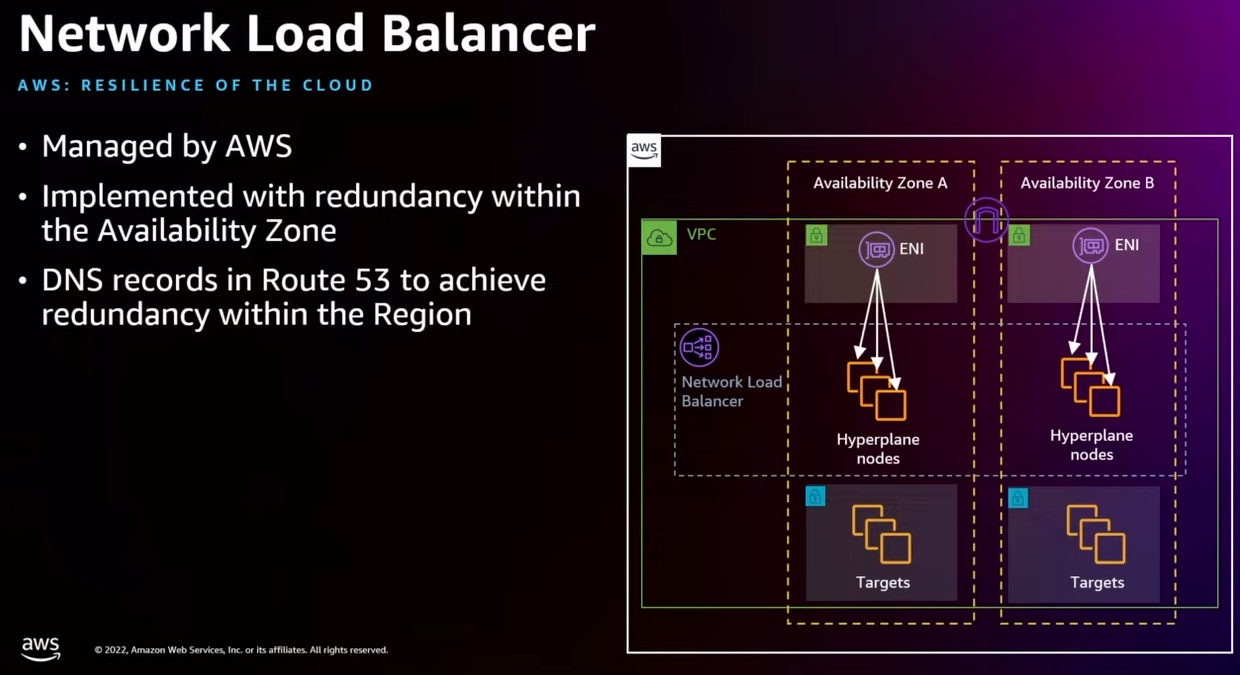





https://docs.aws.amazon.com/prescriptive-guidance/latest/ha-resiliency-amazon-eks-apps/pod-eviction-time.html

 https://www.alibabacloud.com/blog/how-does-alibaba-ensure-the-performance-of-system-components-in-a-10000-node-kubernetes-cluster_595469