-
[AEWS 3기] 7주차 - EKS Mode/NodesAWS 2025. 3. 23. 02:06
1. K8S scheduler
1.3. Pod Scheduling Readiness : schedulingGates - Docs , Readme
Copy# k8s 배포 kind create cluster --name myk8s --image kindest/node:v1.32.2 --config - <<EOF kind: Cluster apiVersion: kind.x-k8s.io/v1alpha4 nodes: - role: control-plane EOF # 파드 생성 cat <<EOF | kubectl apply -f - apiVersion: v1 kind: Pod metadata: name: test-pod spec: schedulingGates: - name: example.com/foo - name: example.com/bar containers: - name: pause image: registry.k8s.io/pause:3.6 terminationGracePeriodSeconds: 0 EOF # kubectl get pod NAME READY STATUS RESTARTS AGE test-pod 0/1 SchedulingGated 0 13s kubectl get pod test-pod -o jsonpath='{.spec.schedulingGates}' [{"name":"example.com/foo"},{"name":"example.com/bar"}] # 스케줄링 되기전으로 아직 node가 선택되지 않아서 nodename 없음! kubectl get pod -o yaml | grep -i nodename # To inform scheduler this Pod is ready for scheduling, you can remove its schedulingGates entirely by reapplying a modified manifest: cat <<EOF | kubectl apply -f - apiVersion: v1 kind: Pod metadata: name: test-pod spec: containers: - name: pause image: registry.k8s.io/pause:3.6 terminationGracePeriodSeconds: 0 EOF # You can check if the schedulingGates is cleared by running: kubectl get pod test-pod -o jsonpath='{.spec.schedulingGates}' kubectl get pod NAME READY STATUS RESTARTS AGE test-pod 1/1 Running 0 102s # 노드 스케줄링되어서 아래 nodename 출력! kubectl get pod -o yaml | grep -i nodename nodeName: myk8s-control-plane # 파드 삭제 kubectl delete pod test-pod # k8s 삭제 kind delete cluster --name myk8s- Fargate
2.2. Firecracker* - Github ,Install , Blog1 , Blog2 , Blog3 , AWS_Blog*
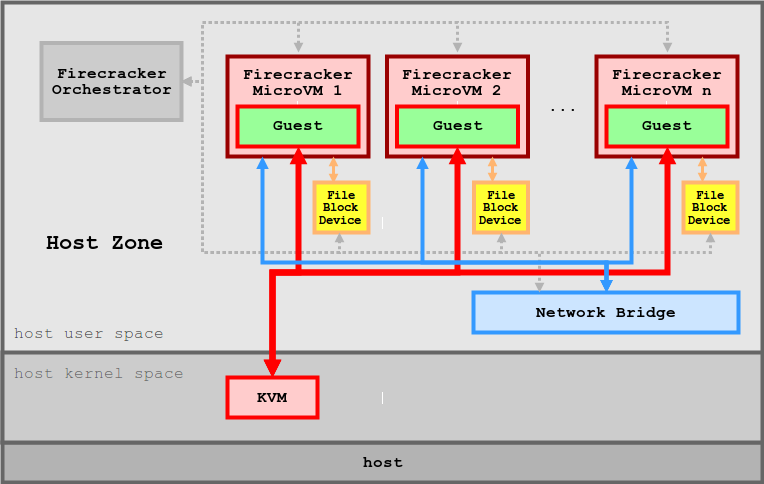
- KVM을 사용하는 새로운 가상화 기술인 Firecracker를 여러분에게 소개하고자 합니다. Firecracker를 통해 여러분은 가상화되지 않은 환경에서 1초도 되지 않는 시간 안에 경량 microVM(마이크로 가상 머신)을 시작할 수 있고, 컨테이너를 통해 제공하는 리소스 효율성과 기존 VM에서 제공하는 워크로드 격리 및 보안의 혜택을 그대로 활용할 수 있습니다.
- 보안 – 항상 가장 중요한 우선순위입니다! Firecracker는 여러 수준의 격리와 보호를 사용하며, 공격 노출 영역을 최소화합니다.
- 고성능 – 현 시점 기준으로 125밀리초 안에 microVM을 시작할 수 있으며(2019년에는 더 빨라질 예정), 단기간 또는 일시적인 워크로드를 비롯한 여러 유형의 워크로드에 적합합니다.
- 검증된 실적 – Firecracker는 실전에서 검증되어 있습니다. 이미 AWS Lambda 및 AWS Fargate를 비롯한 사용량이 많은 여러 AWS 서비스가 Firecracker를 사용하고 있습니다.
- 낮은 오버헤드 – Firecracker는 microVM당 약 5MiB의 메모리를 사용합니다. 그리고 동일한 인스턴스에서 다양한 vCPU 및 메모리 구성 사양을 갖춘 안전한 수천 개의 VM을 실행할 수 있습니다.
- 오픈 소스 – Firecracker는 현재 진행 중인 오픈 소스 프로젝트입니다. 이미 검토와 PR(Pull Request)을 수락할 준비가 되었으며, 전 세계 기고자들과 협업할 수 있기를 기대하고 있습니다.
- Firecracker는 미니멀리즘에 기반하여 제작되었습니다. crosvm에서 시작하여 오버헤드를 줄이고 안전한 멀티 테넌시를 활용하도록 최소 디바이스 모델을 설정했습니다. Firecracker는 스레드 보안을 보장하고 보안 취약성을 야기할 수 있는 여러 유형의 버퍼 오버런 오류를 방지하는 최신 프로그래밍 언어인 Rust로 작성되었습니다.
- 단순한 게스트 모델 – Firecracker 게스트는 공격 영역을 최소화하기 위해 가상화된 단순한 디바이스 모델로 제시됩니다(예: 네트워크 디바이스, 블록 I/O 디바이스, PIT(Programmable Interval Timer), KVM 클럭, 직렬 콘솔, 부분 키보드(VM을 재설정할 수 있을 정도의 기능)).
- 잠금(Jail) 처리 – Firecracker 프로세스는 cgroups 및 seccomp BPF를 사용하여 잠기며(Jail), 매우 제한된 소량의 시스템 호출 목록에 액세스합니다.
- 정적 연결 – firecracker 프로세스는 정적으로 연결되며, 잠금자(Jailer)에서 시작하여 가능한 안전하고 클린한 상태의 호스트 환경을 보장합니다.

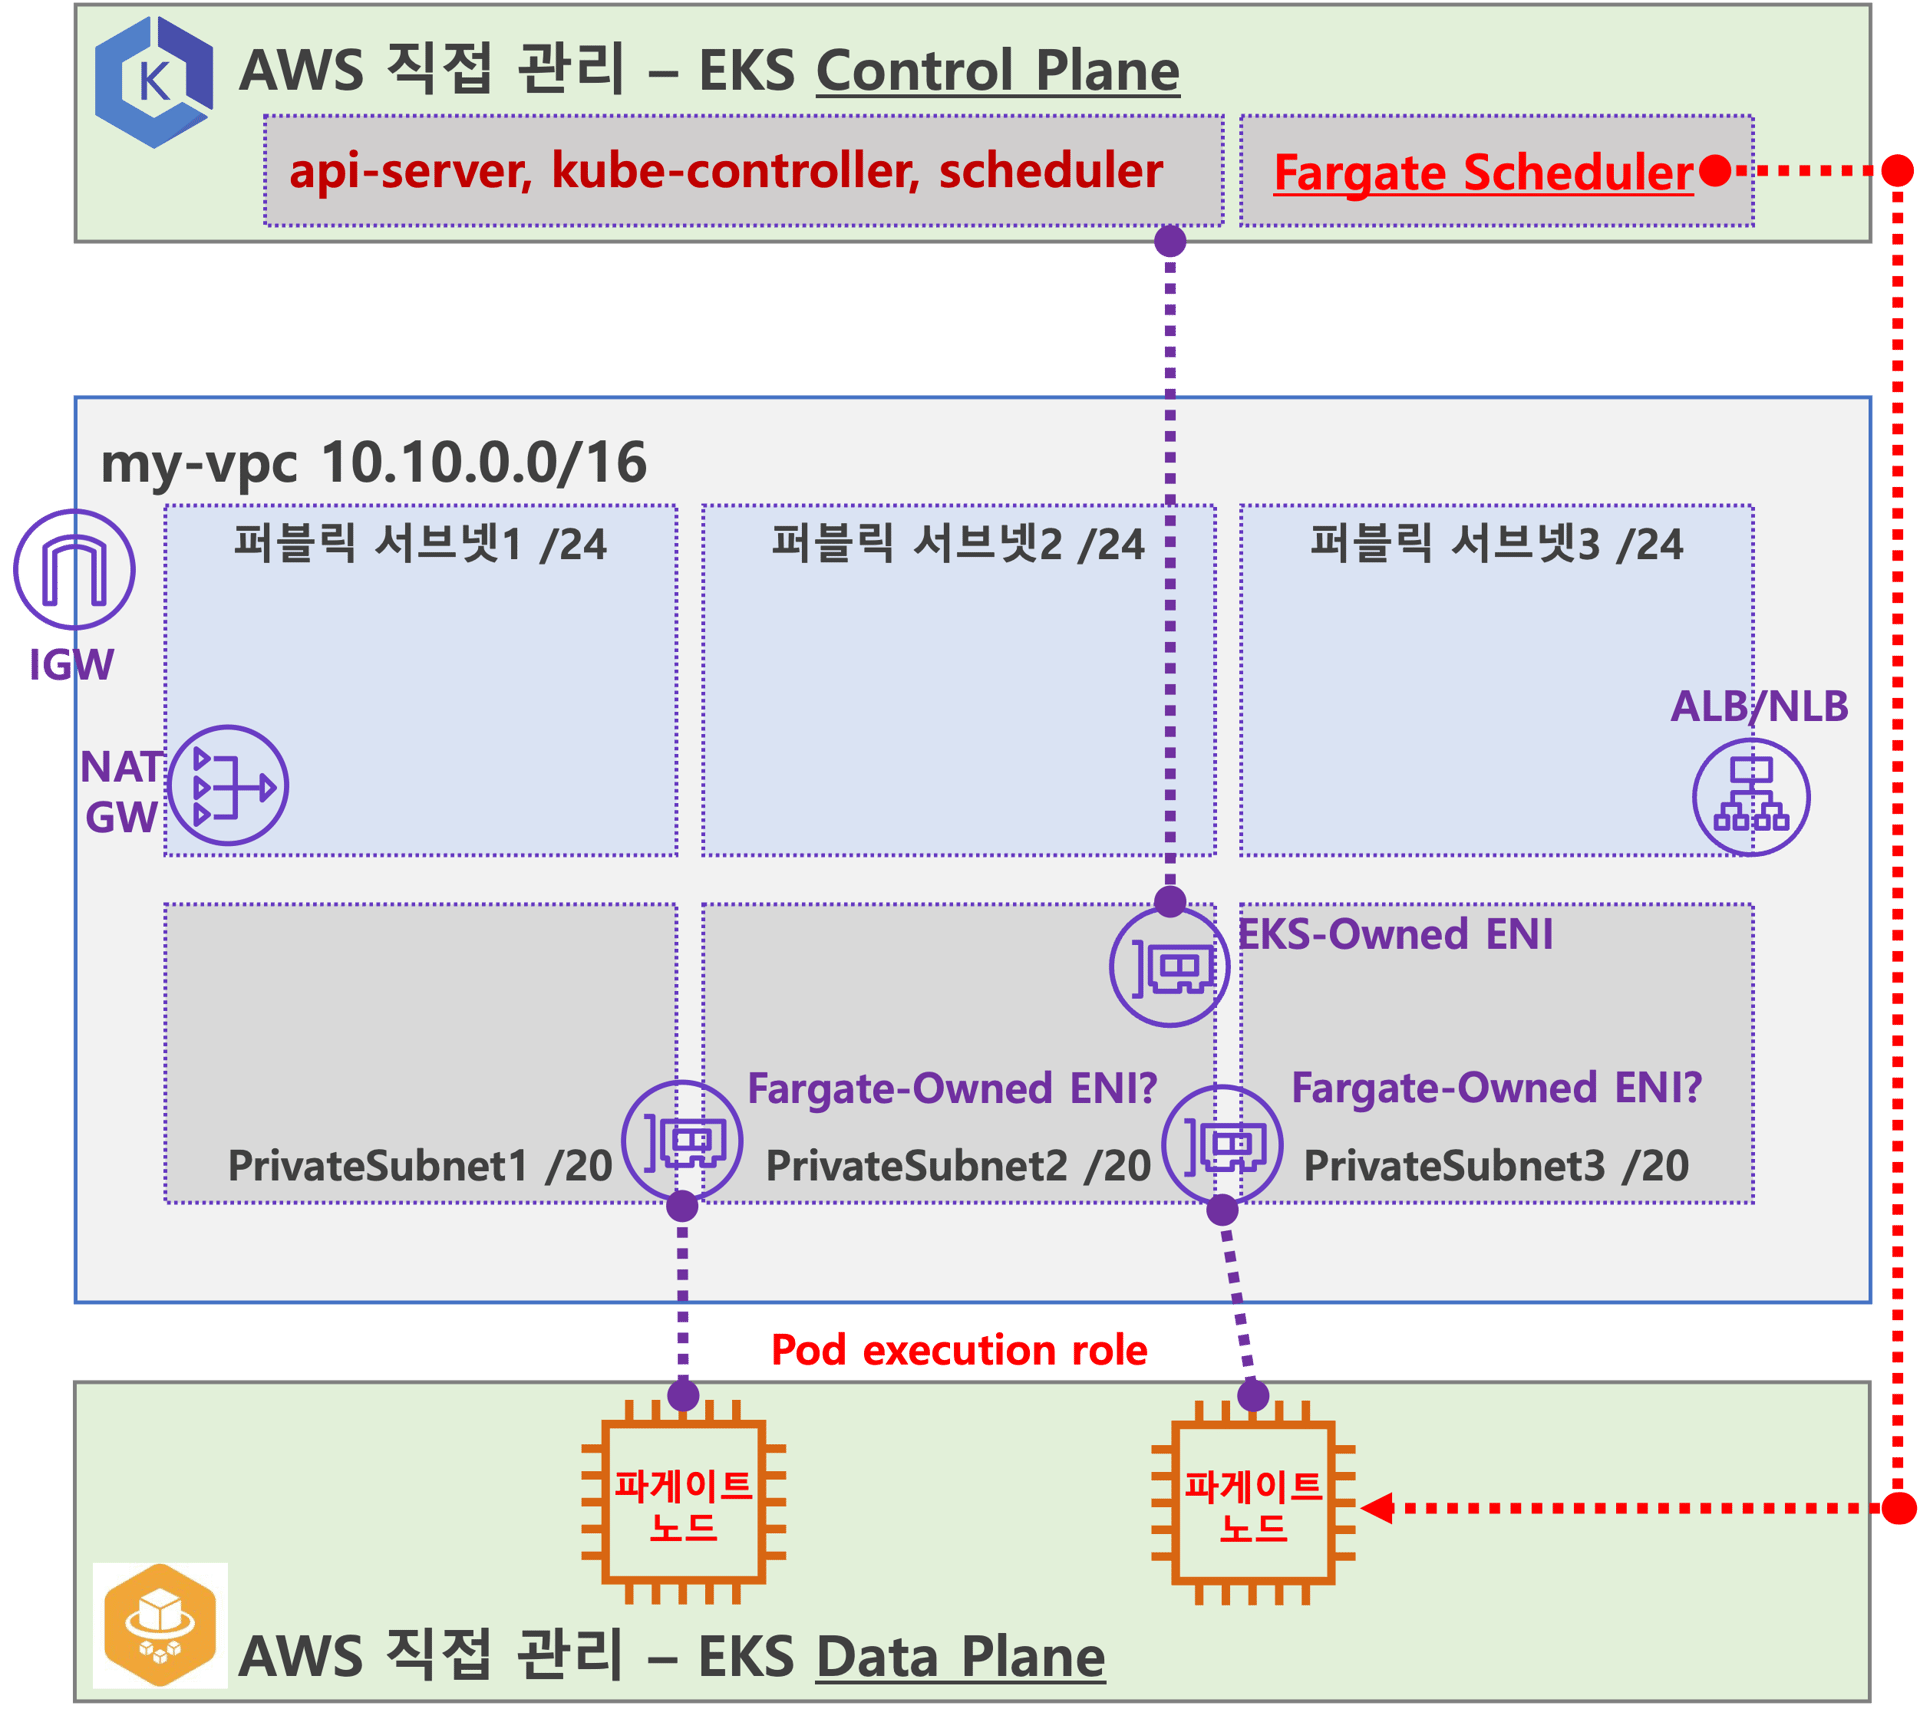
2.3. AWS EKS Fargate 아키텍처 (추정 포함)
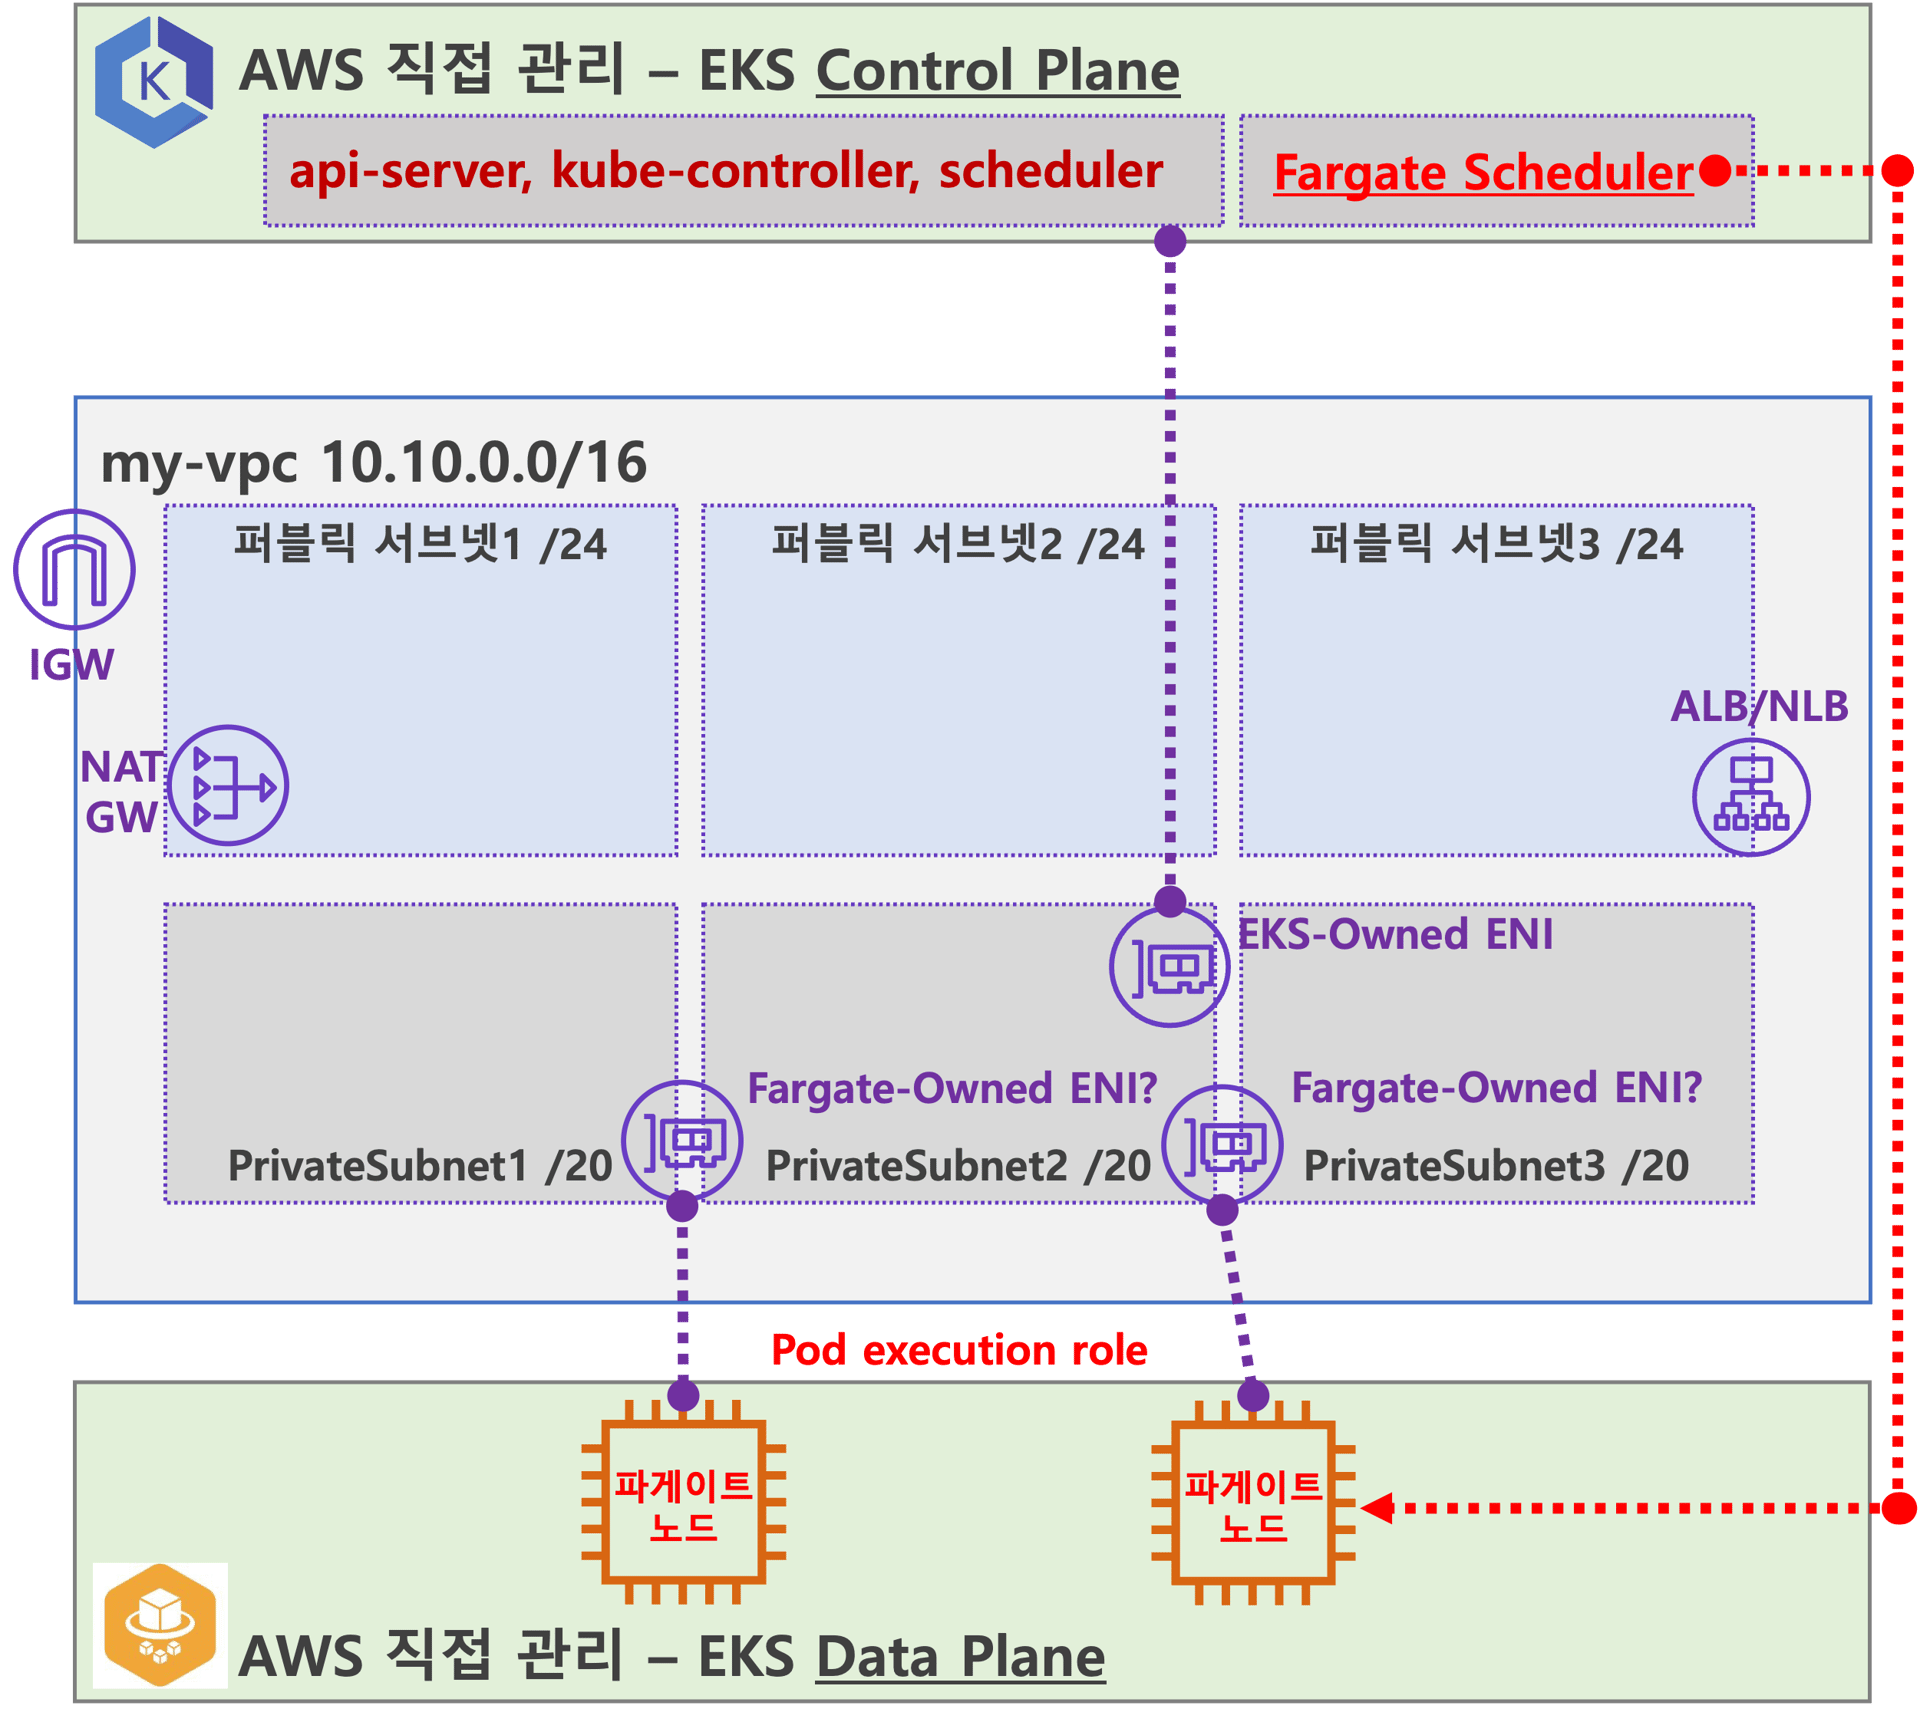
- 사용자에게 보이지 않지만, Fargate Scheduler(Controller 추정)가 EKS Control Plane 에서 동작.
- Fargate 에 의해서 배포된 파드(노드 당 1개 파드)에 ENI는 사용자의 VPC 영역 내에 속하여, Fargate-Owned ENI 로 추정.
- 파드가 외부 통신 시에는 → NATGW(공인 IP로 SNAT) ⇒ IGW(외부 인터넷)
- 외부에서 파드 내부로 인입 요청 시에는 → ALB/NLB ⇒ Fargate-Owned ENI 에 연결된 Fargate 파드(노드)로 전달

- firecracker-containerd 를 통하여 MicroVM(Application 컨테이너)를 배포.
- VMM을 통해서 MicroVM을 배포하고, FC Snapshotter 를 통해서 Application Container 의 이미지를 구현.
- MicroVM 마다 ‘Kubelet, Kube-proxy, Containerd’ 가 동작하여, 256 RAM 반드시 필요.
- 사용자에의 VPC에 보이는 ENI는 Application Containter 와 직접 매핑되어 있는 것으로 추정.
상세 정보 참고‣[AWS 공식 문서] Fargate* - AWS_Docs‣2.4. 제약사항 및 고려사항
- 데몬셋은 Fargate에서 지원되지 않습니다. 애플리케이션에 데몬이 필요한 경우 해당 데몬을 포드에서 사이드카 컨테이너로 실행하도록 재구성합니다.
- Fargate에서는 특권 컨테이너(Privileged containers)가 지원되지 않습니다.
- Fargate에서 실행되는 포드는 포드 매니페스트에서 HostPort 또는 HostNetwork를 지정할 수 없습니다.
- 현재 Fargate에서는 GPU를 사용할 수 없습니다.
- Can run workloads that require Arm processors 미지원.
- Can SSH into node 미지원
- Fargate에서 실행되는 포드는 AWS 서비스에 대한 NAT 게이트웨이 액세스 권한이 있는 private 서브넷에서만 지원됨
- 포드에는 Amazon EC2 인스턴스 메타데이터 서비스(IMDS)를 사용할 수 없습니다
- 대체 CNI 플러그인을 사용할 수 없습니다.
- EFS 동적 영구 볼륨 프로비저닝을 사용할 수 없음.
- Fargate Spot을 지원하지 않음
- EBS 볼륨을 Fargate 포드에 마운트할 수 없음
- Fargate does not currently support Kubernetes topologySpreadConstraints.
- Can run containers on Amazon EC2 dedicated hosts 미지원
- Can run AWS Bottlerocket 미지원
- Fargate Pods run with guaranteed priority, so the requested CPU and memory must be equal to the limit for all of the containers.
- Fargate는 필요한 Kubernetes 구성 요소(kubelet, kube-proxy, and containerd에 대해 각 Pod의 메모리 예약에 256MB를 추가합니다.
- 프로비저닝되면 Fargate에서 실행되는 각 Pod는 기본적으로 20 GiB의 임시 저장소를 받게 됩니다. 임시 저장소의 총 양을 최대 175 GiB까지 늘릴 수 있습니다.
- Fargate의 Amazon EKS는 Fluent Bit 기반의 내장 로그 라우터를 제공합니다. 즉, Fluent Bit 컨테이너를 사이드카로 명시적으로 실행하지 않고 Amazon에서 실행합니다
2.5. 테라폼으로 실습 환경 배포 : EKS, fargate profile
2.5.1. Terraform Backend 설정
- How to Enable S3 Locking
- Before: Using DynamoDB for Locking
- After: Switching to S3 Native Locking
- How It Works
- Terraform 1.10의 S3 native locking의 기술
- S3 native locking 적용시 고려사항
- 참고
2.5.2. Terraform으로 Fargate환경 배포
코드 가져오기
Copy# git clone https://github.com/aws-ia/terraform-aws-eks-blueprints tree terraform-aws-eks-blueprints/patterns cd terraform-aws-eks-blueprints/patterns/fargate-serverlessmain.tf 수정 : 리전 등 일부 실습 편리를 위해 수정, Sample App 배포 부분 삭제‣테라폼 초기화
Copy# init 초기화 terraform init tree .terraform cat .terraform/modules/modules.json | jq tree .terraform/providers/registry.terraform.io/hashicorp -L 2 # plan terraform planCopy# VPC 정보 확인 aws ec2 describe-vpcs --filter 'Name=isDefault,Values=false' --output yaml # vpc 배포 '9:6 ~ ' : 3분 소요 terraform apply -target="module.vpc" -auto-approve # 배포 확인 terraform state list data.aws_availability_zones.available module.vpc.aws_default_network_acl.this[0] module.vpc.aws_default_route_table.default[0] module.vpc.aws_default_security_group.this[0] module.vpc.aws_eip.nat[0] module.vpc.aws_internet_gateway.this[0] module.vpc.aws_nat_gateway.this[0] module.vpc.aws_route.private_nat_gateway[0] module.vpc.aws_route.public_internet_gateway[0] module.vpc.aws_route_table.private[0] module.vpc.aws_route_table.public[0] module.vpc.aws_route_table_association.private[0] module.vpc.aws_route_table_association.private[1] module.vpc.aws_route_table_association.private[2] module.vpc.aws_route_table_association.public[0] module.vpc.aws_route_table_association.public[1] module.vpc.aws_route_table_association.public[2] module.vpc.aws_subnet.private[0] module.vpc.aws_subnet.private[1] module.vpc.aws_subnet.private[2] module.vpc.aws_subnet.public[0] module.vpc.aws_subnet.public[1] module.vpc.aws_subnet.public[2] module.vpc.aws_vpc.this[0] terraform show ... # VPC 정보 확인 aws ec2 describe-vpcs --filter 'Name=isDefault,Values=false' --output yaml # 상세 정보 확인 echo "data.aws_availability_zones.available" | terraform console { "all_availability_zones" = tobool(null) "exclude_names" = toset(null) /* of string */ "exclude_zone_ids" = toset(null) /* of string */ "filter" = toset(null) /* of object */ "group_names" = toset([ "ap-northeast-2", ]) "id" = "ap-northeast-2" "names" = tolist([ "ap-northeast-2a", "ap-northeast-2b", "ap-northeast-2c", "ap-northeast-2d", ]) "state" = tostring(null) "timeouts" = null /* object */ "zone_ids" = tolist([ "apne2-az1", "apne2-az2", "apne2-az3", "apne2-az4", ]) } terraform state show 'module.vpc.aws_vpc.this[0]' VPCID=<각자 자신의 VPC ID> aws ec2 describe-subnets --filters "Name=vpc-id,Values=$VPCID" | jq aws ec2 describe-subnets --filters "Name=vpc-id,Values=$VPCID" --output text # public 서브넷과 private 서브넷 CIDR 확인 ## private_subnets = [for k, v in local.azs : cidrsubnet(local.vpc_cidr, 4, k)] ## public_subnets = [for k, v in local.azs : cidrsubnet(local.vpc_cidr, 8, k + 48)] terraform state show 'module.vpc.aws_subnet.public[0]' terraform state show 'module.vpc.aws_subnet.private[0]'(참고) slide Function - Docs‣(참고) cidrsubnet Function - Docs‣- EKS 배포 : 13분 소요
2.5.3. 기본 정보 확인
- 기본 정보 확인
- coredns 파드 상세 정보 확인 : schedulerName: fargate-scheduler
AWS 관리 콘솔 확인
- EKS - Compute(Nodes, Fargate profile - Pod execution role 확인), Add-ons, Access(IAM access entry), Control plane logs
- EC2 : EC2 읍다!, EBS, ENI(eks owned, fargate owned 확인)
- VPC : NATGW, Routing Table, Public Subnet(/24), Private Subnet(/20)
2.5.4. fargate 에 kube-ops-view
Copy# helm 배포 helm repo add geek-cookbook https://geek-cookbook.github.io/charts/ helm install kube-ops-view geek-cookbook/kube-ops-view --version 1.2.2 --set env.TZ="Asia/Seoul" --namespace kube-system # 포트 포워딩 kubectl port-forward deployment/kube-ops-view -n kube-system 8080:8080 & # 접속 주소 확인 : 각각 1배, 1.5배, 3배 크기 echo -e "KUBE-OPS-VIEW URL = http://localhost:8080" echo -e "KUBE-OPS-VIEW URL = http://localhost:8080/#scale=1.5" echo -e "KUBE-OPS-VIEW URL = http://localhost:8080/#scale=3" open "http://127.0.0.1:8080/#scale=1.5" # macOS- kube-ops-view 파드 정보 확인
Copy# node 확인 : 노드(Micro VM) kubectl get csr kubectl get node -owide kubectl describe node | grep eks.amazonaws.com/compute-type # kube-ops-view 디플로이먼트/파드 상세 정보 확인 kubectl get pod -n kube-system kubectl get pod -n kube-system -o jsonpath='{.items[0].metadata.annotations.CapacityProvisioned}' kubectl get pod -n kube-system -l app.kubernetes.io/instance=kube-ops-view -o jsonpath='{.items[0].metadata.annotations.CapacityProvisioned}' 0.25vCPU 0.5GB # 디플로이먼트 상세 정보 kubectl get deploy -n kube-system kube-ops-view -o yaml ... template: ... spec: automountServiceAccountToken: true containers: - env: - name: TZ value: Asia/Seoul image: hjacobs/kube-ops-view:20.4.0 imagePullPolicy: IfNotPresent livenessProbe: failureThreshold: 3 periodSeconds: 10 successThreshold: 1 tcpSocket: port: 8080 timeoutSeconds: 1 name: kube-ops-view ports: - containerPort: 8080 name: http protocol: TCP readinessProbe: failureThreshold: 3 periodSeconds: 10 successThreshold: 1 tcpSocket: port: 8080 timeoutSeconds: 1 resources: {} securityContext: readOnlyRootFilesystem: true runAsNonRoot: true runAsUser: 1000 startupProbe: failureThreshold: 30 periodSeconds: 5 successThreshold: 1 tcpSocket: port: 8080 timeoutSeconds: 1 terminationMessagePath: /dev/termination-log terminationMessagePolicy: File dnsPolicy: ClusterFirst enableServiceLinks: true restartPolicy: Always schedulerName: default-scheduler securityContext: {} serviceAccount: kube-ops-view serviceAccountName: kube-ops-view terminationGracePeriodSeconds: 30 ... # 파드 상세 정보 : admission control 이 동작했음을 알 수 있음 kubectl get pod -n kube-system -l app.kubernetes.io/instance=kube-ops-view -o yaml ... metadata: annotations: CapacityProvisioned: 0.25vCPU 0.5GB Logging: LoggingEnabled ... resources: {} ... dnsPolicy: ClusterFirst enableServiceLinks: true nodeName: fargate-ip-10-10-37-27.ap-northeast-2.compute.internal preemptionPolicy: PreemptLowerPriority priority: 2000001000 priorityClassName: system-node-critical restartPolicy: Always schedulerName: fargate-scheduler securityContext: {} serviceAccount: kube-ops-view serviceAccountName: kube-ops-view terminationGracePeriodSeconds: 30 tolerations: - effect: NoExecute key: node.kubernetes.io/not-ready operator: Exists tolerationSeconds: 300 - effect: NoExecute key: node.kubernetes.io/unreachable operator: Exists tolerationSeconds: 300 ... qosClass: BestEffort # kubectl describe pod -n kube-system -l app.kubernetes.io/instance=kube-ops-view | grep Events: -A10 Events: Type Reason Age From Message ---- ------ ---- ---- ------- Normal LoggingEnabled 2m10s fargate-scheduler Successfully enabled logging for pod Normal Scheduled 94s fargate-scheduler Successfully assigned kube-system/kube-ops-view-796947d6dc-tt2dm to fargate-ip-10-10-37-27.ap-northeast-2.compute.internal Normal Pulling 93s kubelet Pulling image "hjacobs/kube-ops-view:20.4.0" Normal Pulled 84s kubelet Successfully pulled image "hjacobs/kube-ops-view:20.4.0" in 9.488s (9.488s including waiting). Image size: 81086356 bytes. Normal Created 84s kubelet Created container kube-ops-view Normal Started 84s kubelet Started container kube-ops-view2.5.5. fargate 에 netshoot 디플로이먼트(파드)
vCPU valueMemory value.25 vCPU0.5 GB, 1 GB, 2 GB.5 vCPU1 GB, 2 GB, 3 GB, 4 GB1 vCPU2 GB, 3 GB, 4 GB, 5 GB, 6 GB, 7 GB, 8 GB2 vCPUBetween 4 GB and 16 GB in 1-GB increments4 vCPUBetween 8 GB and 30 GB in 1-GB increments8 vCPUBetween 16 GB and 60 GB in 4-GB increments16 vCPUBetween 32 GB and 120 GB in 8-GB incrementsCopy# 네임스페이스 생성 kubectl create ns study-aews # 테스트용 파드 netshoot 디플로이먼트 생성 : 0.5vCPU 1GB 할당되어, 아래 Limit 값은 의미가 없음. 배포 시 대략 시간 측정해보자! cat <<EOF | kubectl apply -f - apiVersion: apps/v1 kind: Deployment metadata: name: netshoot namespace: study-aews spec: replicas: 1 selector: matchLabels: app: netshoot template: metadata: labels: app: netshoot spec: containers: - name: netshoot image: nicolaka/netshoot command: ["tail"] args: ["-f", "/dev/null"] resources: requests: cpu: 500m memory: 500Mi limits: cpu: 2 memory: 2Gi terminationGracePeriodSeconds: 0 EOF kubectl get events -w --sort-by '.lastTimestamp' argate-ip-10-10-37-27.ap-northeast-2.compute.internal in Controller 51s Normal NodeHasSufficientMemory node/fargate-ip-10-10-4-162.ap-northeast-2.compute.internal Node fargate-ip-10-10-4-162.ap-northeast-2.compute.internal status is now: NodeHasSufficientMemory 51s Normal Starting node/fargate-ip-10-10-4-162.ap-northeast-2.compute.internal Starting kubelet. 51s Warning InvalidDiskCapacity node/fargate-ip-10-10-4-162.ap-northeast-2.compute.internal invalid capacity 0 on image filesystem 51s Normal NodeReady node/fargate-ip-10-10-4-162.ap-northeast-2.compute.internal Node fargate-ip-10-10-4-162.ap-northeast-2.compute.internal status is now: NodeReady 51s Normal Synced node/fargate-ip-10-10-4-162.ap-northeast-2.compute.internal Node synced successfully 51s Normal NodeAllocatableEnforced node/fargate-ip-10-10-4-162.ap-northeast-2.compute.internal Updated Node Allocatable limit across pods 51s Normal NodeHasSufficientPID node/fargate-ip-10-10-4-162.ap-northeast-2.compute.internal Node fargate-ip-10-10-4-162.ap-northeast-2.compute.internal status is now: NodeHasSufficientPID 51s Normal NodeHasNoDiskPressure node/fargate-ip-10-10-4-162.ap-northeast-2.compute.internal Node fargate-ip-10-10-4-162.ap-northeast-2.compute.internal status is now: NodeHasNoDiskPressure 50s Normal RegisteredNode node/fargate-ip-10-10-4-162.ap-northeast-2.compute.internal Node fargate-ip-10-10-4-162.ap-northeast-2.compute.internal event: Registered Node fargate-ip-10-10-4-162.ap-northeast-2.compute.internal in Controller # 확인 : 메모리 할당 측정은 어떻게 되었는지? kubectl get po -n study-aews -o wide NAME READY STATUS RESTARTS AGE IP NODE NOMINATED NODE READINESS GATES netshoot-84558cd8d9-zgv69 1/1 Running 0 70s 10.10.4.162 fargate-ip-10-10-4-162.ap-northeast-2.compute.internal <none> <none> kubectl get pod -n study-aews -o jsonpath='{.items[0].metadata.annotations.CapacityProvisioned}' 0.5vCPU 1GB # 디플로이먼트 상세 정보 kubectl get deploy -n study-aews netshoot -o yaml ... template: ... spec: ... schedulerName: default-scheduler securityContext: {} terminationGracePeriodSeconds: 0 ... # 파드 상세 정보 : admission control 이 동작했음을 알 수 있음 kubectl get pod -n study-aews -l app=netshoot -o yaml ... metadata: annotations: CapacityProvisioned: 0.5vCPU 1GB Logging: LoggingEnabled ... preemptionPolicy: PreemptLowerPriority priority: 2000001000 priorityClassName: system-node-critical restartPolicy: Always schedulerName: fargate-scheduler ... qosClass: Burstable # kubectl describe pod -n study-aews -l app=netshoot | grep Events: -A10 Events: Type Reason Age From Message ---- ------ ---- ---- ------- Normal LoggingEnabled 4m8s fargate-scheduler Successfully enabled logging for pod Normal Scheduled 3m21s fargate-scheduler Successfully assigned study-aews/netshoot-84558cd8d9-zgv69 to fargate-ip-10-10-4-162.ap-northeast-2.compute.internal Normal Pulling 3m21s kubelet Pulling image "nicolaka/netshoot" Normal Pulled 3m4s kubelet Successfully pulled image "nicolaka/netshoot" in 16.825s (16.825s including waiting). Image size: 183950747 bytes. Normal Created 3m4s kubelet Created container netshoot Normal Started 3m4s kubelet Started container netshoot # kubectl get mutatingwebhookconfigurations.admissionregistration.k8s.io kubectl describe mutatingwebhookconfigurations 0500-amazon-eks-fargate-mutation.amazonaws.com kubectl get validatingwebhookconfigurations.admissionregistration.k8s.io # 파드 내부에 zsh 접속 후 확인 kubectl exec -it deploy/netshoot -n study-aews -- zsh ----------------------------------------------------- ip -c a cat /etc/resolv.conf # 출력되는 IP는 어떤것? , 어떤 경로를 통해서 인터넷이 되는 걸까? # NAT Gateway의 ip를 통해서 통신된다. curl ipinfo.io/ip ping -c 1 <다른 파드 IP ex. coredns pod ip> lsblk df -hT / cat /etc/fstab exit -----------------------------------------------------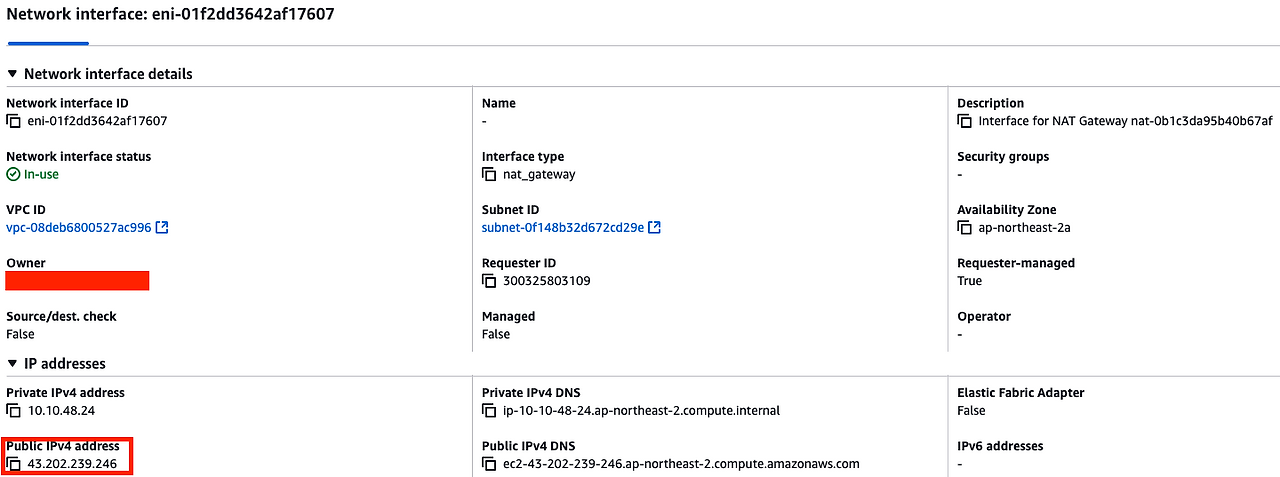
위에서 본 fargate pod —> 외부 네트워크 통신시 출력된 NAT Gateway의 IP
2.5.6. 파드 권한과 호스트 네임스페이스 공유로 호스트 탈취 시도 - Blog
Copykubectl apply -f - <<EOF apiVersion: v1 kind: Pod metadata: name: root-shell namespace: study-aews spec: containers: - command: - /bin/cat image: alpine:3 name: root-shell securityContext: privileged: true tty: true stdin: true volumeMounts: - mountPath: /host name: hostroot hostNetwork: true hostPID: true hostIPC: true tolerations: - effect: NoSchedule operator: Exists - effect: NoExecute operator: Exists volumes: - hostPath: path: / name: hostroot EOF # kubectl get pod -n study-aews root-shell kubectl describe pod -n study-aews root-shell | grep Events: -A 10 Events: Type Reason Age From Message ---- ------ ---- ---- ------- Warning FailedScheduling 48s fargate-scheduler Pod not supported on Fargate: fields not supported: HostNetwork, HostPID, HostIPC, volumes not supported: hostroot is of an unsupported volume Type, invalid SecurityContext fields: Privileged # 출력 메시지 # Pod not supported on Fargate: fields not supported: # HostNetwork, HostPID, HostIPC, volumes not supported: # hostroot is of an unsupported volume Type, invalid SecurityContext fields: Privileged # 즉, fargate에서는 SecurityContext를 통해서 root를 통해서 hostnetwork등에 접근 할 수 없다. # 삭제 kubectl delete pod -n study-aews root-shell # (참고) fargate가 아닌 권한이 충분한 곳에서 실행 시 : 아래 처럼 호스트 네임스페이스로 진입 가능! kubectl -n kube-system exec -it root-shell -- chroot /host /bin/bash root@myk8s-control-plane:/# id uid=0(root) gid=0(root) groups=0(root),1(daemon),2(bin),3(sys),4(adm),6(disk),10(uucp),11,20(dialout),26(tape),27(sudo)2.5.7. AWS ALB(Ingress)
 Copy
Copy# 게임 디플로이먼트와 Service, Ingress 배포 cat <<EOF | kubectl apply -f - apiVersion: apps/v1 kind: Deployment metadata: namespace: study-aews name: deployment-2048 spec: selector: matchLabels: app.kubernetes.io/name: app-2048 replicas: 2 template: metadata: labels: app.kubernetes.io/name: app-2048 spec: containers: - image: public.ecr.aws/l6m2t8p7/docker-2048:latest imagePullPolicy: Always name: app-2048 ports: - containerPort: 80 --- apiVersion: v1 kind: Service metadata: namespace: study-aews name: service-2048 spec: ports: - port: 80 targetPort: 80 protocol: TCP type: ClusterIP selector: app.kubernetes.io/name: app-2048 --- apiVersion: networking.k8s.io/v1 kind: Ingress metadata: namespace: study-aews name: ingress-2048 annotations: alb.ingress.kubernetes.io/scheme: internet-facing alb.ingress.kubernetes.io/target-type: ip spec: ingressClassName: alb rules: - http: paths: - path: / pathType: Prefix backend: service: name: service-2048 port: number: 80 EOF # 모니터링 watch -d kubectl get pod,ingress,svc,ep,endpointslices -n study-aews # 생성 확인 kubectl get-all -n study-aews kubectl get ingress,svc,ep,pod -n study-aews kubectl get targetgroupbindings -n study-aews # Ingress 확인 kubectl describe ingress -n study-aews ingress-2048 Name: ingress-2048 Labels: <none> Namespace: study-aews Address: k8s-studyaew-ingress2-08c53ee834-1614384940.ap-northeast-2.elb.amazonaws.com Ingress Class: alb Default backend: <default> Rules: Host Path Backends ---- ---- -------- * / service-2048:80 (10.10.20.86:80,10.10.37.55:80) Annotations: alb.ingress.kubernetes.io/scheme: internet-facing alb.ingress.kubernetes.io/target-type: ip Events: Type Reason Age From Message ---- ------ ---- ---- ------- Normal SuccessfullyReconciled 48s ingress Successfully reconciled kubectl get ingress -n study-aews ingress-2048 -o jsonpath="{.status.loadBalancer.ingress[*].hostname}{'\n'}" # 게임 접속 : ALB 주소로 웹 접속 kubectl get ingress -n study-aews ingress-2048 -o jsonpath='{.status.loadBalancer.ingress[0].hostname}' | awk '{ print "Game URL = http://"$1 }' # 파드 IP 확인 kubectl get pod -n study-aews -owide # 파드 증가 kubectl scale deployment -n study-aews deployment-2048 --replicas 4 # 게임 실습 리소스 삭제 kubectl delete ingress ingress-2048 -n study-aews kubectl delete svc service-2048 -n study-aews && kubectl delete deploy deployment-2048 -n study-aews2.5.8. fargate job
Copy# cat <<EOF | kubectl apply -f - apiVersion: batch/v1 kind: Job metadata: name: busybox1 namespace: study-aews spec: template: spec: containers: - name: busybox image: busybox command: ["/bin/sh", "-c", "sleep 10"] restartPolicy: Never ttlSecondsAfterFinished: 60 # <-- TTL controller --- apiVersion: batch/v1 kind: Job metadata: name: busybox2 namespace: study-aews spec: template: spec: containers: - name: busybox image: busybox command: ["/bin/sh", "-c", "sleep 10"] restartPolicy: Never EOF # kubectl get job,pod -n study-aews kubectl get job -n study-aews -w NAME STATUS COMPLETIONS DURATION AGE busybox1 Running 0/1 40s 40s busybox2 Running 0/1 40s 40s busybox1 Running 0/1 49s 49s busybox1 Running 0/1 59s 59s busybox2 Running 0/1 59s 59s busybox1 Running 0/1 60s 60s busybox1 Complete 1/1 60s 60s busybox2 Running 0/1 69s 69s busybox2 Running 0/1 70s 70s busybox2 Complete 1/1 70s 70s busybox1 Complete 1/1 60s 2m busybox1 Complete 1/1 60s 2m # ttl이 걸려있는 busybox1은 60초가 지난후 자동적으로 terminate되지만, busybox2는 그대로 Completed상태의 pod로 남아있다. kubectl get pod -n study-aews -w NAME READY STATUS RESTARTS AGE busybox1-jcplj 0/1 ContainerCreating 0 45s busybox2-rddn4 0/1 Pending 0 45s netshoot-84558cd8d9-zgv69 1/1 Running 0 15m busybox1-jcplj 1/1 Running 0 48s busybox2-rddn4 0/1 Pending 0 52s busybox2-rddn4 0/1 ContainerCreating 0 53s busybox1-jcplj 0/1 Completed 0 58s busybox2-rddn4 1/1 Running 0 58s busybox1-jcplj 0/1 Completed 0 59s busybox1-jcplj 0/1 Completed 0 60s busybox2-rddn4 0/1 Completed 0 68s busybox2-rddn4 0/1 Completed 0 69s busybox2-rddn4 0/1 Completed 0 70s busybox1-jcplj 0/1 Terminating 0 2m busybox1-jcplj 0/1 Terminating 0 2m kubectl get job,pod -n study-aews # 삭제 kubectl delete job -n study-aews --all2.5.9. fargate logging
- 들어가며 → 내장 로그 라우터는 어디에서 구동될까요???
- 로그 발생 nginx 배포
- 로그 설정 정보 확인
- 수집된 파드 로그 확인 : CW Log streams 에서 nginx 로 검색 필터링(fluent-bit 포함 체크) → First event time 중 가장 최근것 클릭
- 삭제 : kubectl delete deploy,svc -n study-aews sample-app
- 삭제 : 순서대로 삭제 할 것!!! FAQ (삭제 잘 안 되거나 오래 걸릴 때) 10분 소요 - Link
- 실습 배포 리소스들 먼저 삭제
- 테라폼 삭제
- EKS Auto Mode
- 참고사항
3.1. EKS Auto Mode 소개
- 한줄 요약 : 기존 EKS가 제어부(ControlPlane)에 대한 관리를 해주었고, Auto Mode를 통해서 데이터부(DataPlane, 쉽게 ‘노드’)에 대한 관리
(절반)를 해줌. - 기존 EKS 환경 : 관리형 노드 그룹을 사용하고, 필수적인 EKS Add-Ons 는 고객이 직접 관리함
[Containers from the Couch] Hands on with Amazon EKS Auto Mode - Youtube‣3.2. EKS Auto Mode Architecture
- EKS Auto Mode 아키텍처 (추정 포함)
- EKS Auto Mode Node(인스턴스) 내부 구성 요소 (추정 포함)
3.3. 제약사항 및 고려사항
- 6가지 구성요소가 파드로 구성되는게 아니고, 해당 노드에 systemd 데몬(agent)로 실행됨. - 아래 프로세스 확인
- 노드에 대해 불변으로 취급되는 AMI를 사용합니다. 이러한 AMI는 잠금 소프트웨어를 강제하고 SELinux 필수 액세스 제어를 활성화하며 읽기 전용 루트 파일 시스템을 제공합니다. 또한 EKS Auto Mode에서 실행하는 노드의 최대 수명은 21일. SELinux 강제 모드와 읽기 전용 루트 파일 시스템을 사용하여 AMI의 파일에 대한 액세스를 차단합니다.
- SSH 또는 SSM 액세스를 허용하지 않음으로써 노드에 대한 직접 액세스를 방지합니다.
- 자동 업그레이드: EKS 자동 모드는 최신 패치를 통해 Kubernetes 클러스터, 노드 및 관련 구성 요소를 최신 상태로 유지하면서 구성된 Pod Disruption Budgets(PDB) 및 NodePool Disruption Budgets(NDB)를 준수합니다. 최대 21일의 수명까지 PDB 또는 기타 구성을 차단하여 업데이트를 방해하는 경우 개입이 필요할 수 있습니다.
- 관리되는 구성 요소: EKS Auto 모드에는 추가 기능으로 관리해야 하는 핵심 구성 요소로 Kubernetes와 AWS 클라우드 기능이 포함되어 있습니다. 여기에는 Pod IP 주소 할당, Pod 네트워크 정책, 로컬 DNS 서비스, GPU 플러그인, 헬스 체커 및 EBS CSI 스토리지에 대한 내장 지원이 포함됩니다.
- Create node class : ephemeralStorage(80GiB), 노드 당 최대 파드 110개 제한.
- Create node pool : 기본 노드풀은 활성화/비활성화 가능, budgets 로 disruption 중지 가능.
- Create ingress class : IngressClassParams 리소스 및 API 일부 변경, 미지원 기능 확인
- Create StorageClss : provisioner: ebs.csi.eks.amazonaws.com , EBS 성능 프로메테우스 메트릭 접근 불가.
- Update Kubernetes version : 업그레이드 시 자체 관리 Add-on 등은 고객 담당.
- Review build-in node pools : 공통(온디멘드) - system(amd, arm64), general-purpose(amd64).
- Run critical add-ons : system 노드풀로 전용인스턴스(dedicated instances)에 파드 배포 - Docs , 전용인스턴스
- Control deployment : mixed mode 시 Auto-mode node 사용/미사용 방법 잘 확인 할 것
- Managed Instances : AWS 소유 관리 인스턴스(OS, CRI, Kubelet 등 관리/책임) - Docs
- EKS Auto Mode에서 생성된 EC2 인스턴스는 다른 EC2 인스턴스와 다르며 관리되는 인스턴스입니다. 이러한 관리되는 인스턴스는 EKS가 소유하고 있으며 더 제한적입니다. EKS Auto Mode에서 관리하는 인스턴스에는 직접 액세스하거나 소프트웨어를 설치할 수 없습니다.
- EKS 자동 모드는 다음 인스턴스 유형을 지원합니다 : vCPU 1개 이상, 불가(nano, micro, small)
- EKS 자동 모드는 지원되는 인스턴스 유형에 대해 NVMe 로컬 스토리지를 자동으로 포맷하고 구성합니다. 여러 개의 NVMe 드라이브를 가진 노드의 경우, EKS는 RAID 0 어레이를 설정합니다. 이 자동화를 통해 EKS 클러스터에서 로컬 NVMe 스토리지를 수동으로 포맷하고 RAID를 구성할 필요가 없습니다.
- EKS 자동 모드 노드에 Neuron Device Plugin을 설치할 필요가 없습니다.
- Identity and access : Cluster IAM role, Node IAM role, Service-linked role - Docs
- Networking : VPC CNI 관련 미지원 기능 확인 - Docs
- Troubleshoot* : NodeDiagnostic, get-console-output, 디버깅 컨테이너 - Docs
3.4. EKS Auto Mode Cluster 배포
3.4.1. 배포 : This repository provides a production-ready template for deploying various workloads on EKS Auto Mode - Github
3.4.2. 테라폼 배포 - 참고 https://malwareanalysis.tistory.com/787
variables.tf 수정 : ap-northeast-2 , 10.20.0.0/16
Copyvariable "name" { description = "Name of the VPC and EKS Cluster" default = "automode-cluster" type = string } variable "region" { description = "region" default = "ap-northeast-2" type = string } variable "eks_cluster_version" { description = "EKS Cluster version" default = "1.31" type = string } # VPC with 65536 IPs (10.0.0.0/16) for 3 AZs variable "vpc_cidr" { description = "VPC CIDR. This should be a valid private (RFC 1918) CIDR range" default = "10.20.0.0/16" type = string }Copy# Get the code : 배포 코드에 addon 내용이 읍다! git clone https://github.com/aws-samples/sample-aws-eks-auto-mode.git cd sample-aws-eks-auto-mode/terraform # eks.tf : "system" 은 '전용인스턴스'로 추가하지 않는다 ... cluster_compute_config = { enabled = true node_pools = ["general-purpose"] } ... # Initialize and apply Terraform terraform init terraform plan terraform apply -auto-approve ... null_resource.create_nodepools_dir: Creating... null_resource.create_nodepools_dir: Provisioning with 'local-exec'... null_resource.create_nodepools_dir (local-exec): Executing: ["/bin/sh" "-c" "mkdir -p ./../nodepools"] ... # Configure kubectl cat setup.tf ls -l ../nodepools $(terraform output -raw configure_kubectl) # kubectl context 변경 kubectl ctx kubectl config rename-context "arn:aws:eks:ap-northeast-2:$(aws sts get-caller-identity --query 'Account' --output text):cluster/automode-cluster" "automode-lab" kubectl ns default # 아래 IP의 ENI 찾아보자 kubectl get svc,ep NAME TYPE CLUSTER-IP EXTERNAL-IP PORT(S) AGE service/kubernetes ClusterIP 172.20.0.1 443/TCP 27m NAME ENDPOINTS AGE endpoints/kubernetes 10.20.22.204:443,10.20.40.216:443 27m # terraform state list terraform show terraform state show 'module.eks.aws_eks_cluster.this[0]' ... compute_config { enabled = true node_pools = [ "general-purpose", ] node_role_arn = "arn:aws:iam::911283464785:role/automode-cluster-eks-auto-20250316042752605600000003" } ...3.4.3. 관리 콘솔 확인
- VPC - ENI 확인 : EKS Owned-ENI

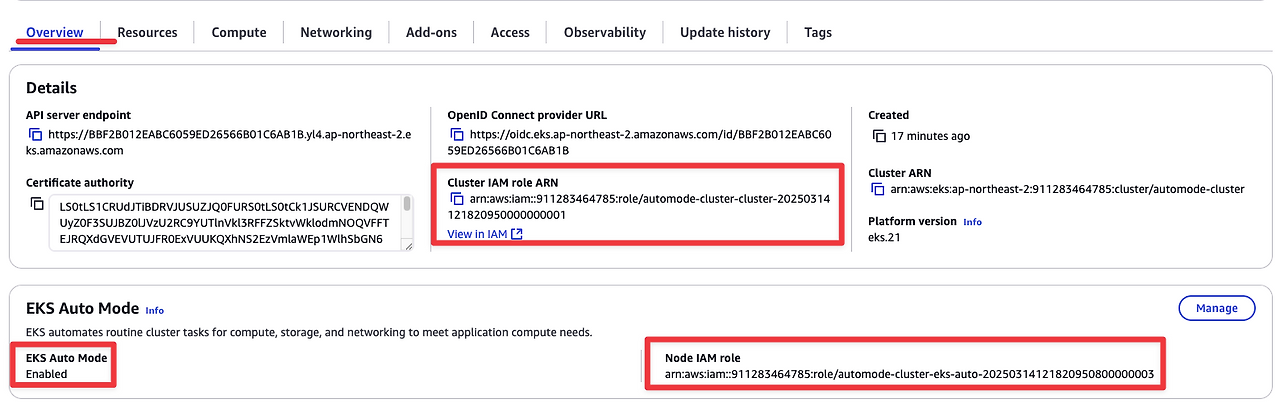
- EKS : Cluster IAM Role, Node IAM Role, Auto Mode
- Compute : Built-in node pools

- Add-ons 없음!

- Access : IAM access entries

3.4.4. kubectl 확인
Copy# kubectl get crd NAME CREATED AT cninodes.eks.amazonaws.com 2025-03-14T12:27:23Z cninodes.vpcresources.k8s.aws 2025-03-14T12:23:31Z ingressclassparams.eks.amazonaws.com 2025-03-14T12:27:23Z nodeclaims.karpenter.sh 2025-03-14T12:27:23Z nodeclasses.eks.amazonaws.com 2025-03-14T12:27:23Z nodediagnostics.eks.amazonaws.com 2025-03-14T12:27:23Z nodepools.karpenter.sh 2025-03-14T12:27:23Z policyendpoints.networking.k8s.aws 2025-03-14T12:23:31Z securitygrouppolicies.vpcresources.k8s.aws 2025-03-14T12:23:31Z targetgroupbindings.eks.amazonaws.com 2025-03-14T12:27:23Z kubectl api-resources | grep -i node nodes no v1 false Node cninodes cni,cnis eks.amazonaws.com/v1alpha1 false CNINode nodeclasses eks.amazonaws.com/v1 false NodeClass nodediagnostics eks.amazonaws.com/v1alpha1 false NodeDiagnostic nodeclaims karpenter.sh/v1 false NodeClaim nodepools karpenter.sh/v1 false NodePool runtimeclasses node.k8s.io/v1 false RuntimeClass csinodes storage.k8s.io/v1 false CSINode cninodes cnd vpcresources.k8s.aws/v1alpha1 false CNINode # 노드에 Access가 불가능하니, 분석 지원(CRD)제공 kubectl explain nodediagnostics GROUP: eks.amazonaws.com KIND: NodeDiagnostic VERSION: v1alpha1 DESCRIPTION: The name of the NodeDiagnostic resource is meant to match the name of the node which should perform the diagnostic tasks # EKS Auto Mode에서는 EC2Nodeclass가 아닌 nodeclasses를 사용한다. -> 일반 mode에서 karpenter 사용할때와는 다른 api사용 kubectl get nodeclasses.eks.amazonaws.com NAME ROLE READY AGE default automode-cluster-eks-auto-20250322084706178800000001 True 29m kubectl get nodeclasses.eks.amazonaws.com -o yaml ... spec: ephemeralStorage: iops: 3000 size: 80Gi throughput: 125 networkPolicy: DefaultAllow networkPolicyEventLogs: Disabled role: automode-cluster-eks-auto-20250322084706178800000001 securityGroupSelectorTerms: - id: sg-076923bf470bcbcba snatPolicy: Random # ??? subnetSelectorTerms: - id: subnet-0e80ce6edc11a4b0c - id: subnet-0f121949ee898f2ca - id: subnet-030ded78335fd9bc9 status: ... instanceProfile: eks-ap-northeast-2-automode-cluster-4187318176791650909 securityGroups: - id: sg-076923bf470bcbcba name: eks-cluster-sg-automode-cluster-2065126657 subnets: - id: subnet-0e80ce6edc11a4b0c zone: ap-northeast-2a zoneID: apne2-az1 - id: subnet-030ded78335fd9bc9 zone: ap-northeast-2b zoneID: apne2-az2 - id: subnet-0f121949ee898f2ca zone: ap-northeast-2c zoneID: apne2-az3 # kubectl get nodepools NAME NODECLASS NODES READY AGE general-purpose default 0 True 33m kubectl get nodepools -o yaml ... spec: disruption: budgets: - nodes: 10% consolidateAfter: 30s consolidationPolicy: WhenEmptyOrUnderutilized template: metadata: {} spec: expireAfter: 336h # 14일 nodeClassRef: group: eks.amazonaws.com kind: NodeClass name: default requirements: - key: karpenter.sh/capacity-type operator: In values: - on-demand - key: eks.amazonaws.com/instance-category operator: In values: - c - m - r - key: eks.amazonaws.com/instance-generation operator: Gt values: - "4" - key: kubernetes.io/arch operator: In values: - amd64 - key: kubernetes.io/os operator: In values: - linux terminationGracePeriod: 24h0m0s ... # kubectl get mutatingwebhookconfiguration kubectl get validatingwebhookconfiguration3.5. Custom NodePool with disruption budgets
3.5.1. NodePool Disruption Budgets
Karpenter의 disruption을 rate limit할 수 있습니다. 이를 위해 NodePool의 spec.disruption.budgets를 사용합니다. 만약 이 설정이 정의되지 않으면, Karpenter는 기본적으로 하나의 budget을 사용하며, 이 budget은 nodes: 10%로 설정됩니다. 이 budget은 현재 어떤 이유로든 삭제 중인 노드를 고려하며, Karpenter가 voluntary하게 drift, emptiness, consolidation을 통해 노드를 disruption하는 것을 차단합니다. NodePool Disruption Budgets는 expired nodes를 종료하는 것을 차단하지 않는 점에 유의해야 합니다.
- Reasons
- Nodes
- 예시
- Schedule
- Duration
💡Duration과 Schedule은 함께 정의되어야 합니다. 둘 중 하나가 생략되면, budget은 항상 활성화된 상태로 간주됩니다. 정의된 경우, Schedule은 budget이 적용되기 시작하는 시작점을 결정하며, Duration은 그 시작점으로부터 budget이 적용되는 시간을 결정합니다.
3.5.2. custom nodepools 에 disruption.budgets 에 평일 오전 9시~17시에는 disruption 동작하지 않게 설정 및 검증 해보기
CopyapiVersion: karpenter.sh/v1 kind: NodePool metadata: name: none-disruption-weekday-from-09-to-17 spec: disruption: consolidationPolicy: WhenEmptyOrUnderutilized budgets: - nodes: "0" schedule: "0 0-8 * * 1-5" reasons: - "Underutilized" - "Empty" - "Drifted" template: ...3.6. kube-ops-view 설치
Copy# 모니터링 eks-node-viewer --node-sort=eks-node-viewer/node-cpu-usage=dsc --extra-labels eks-node-viewer/node-age watch -d kubectl get node,pod -A # helm 배포 helm repo add geek-cookbook https://geek-cookbook.github.io/charts/ helm install kube-ops-view geek-cookbook/kube-ops-view --version 1.2.2 --set env.TZ="Asia/Seoul" --namespace kube-system kubectl get events -w --sort-by '.lastTimestamp' # 출력 이벤트 로그 분석해보자 # 확인 kubectl get nodeclaims NAME TYPE CAPACITY ZONE NODE READY AGE general-purpose-528mt c5a.large on-demand ap-northeast-2c i-09cf206aee76f0bee True 54s # OS, KERNEL, CRI 확인 kubectl get node -owide NAME STATUS ROLES AGE VERSION INTERNAL-IP EXTERNAL-IP OS-IMAGE KERNEL-VERSION CONTAINER-RUNTIME i-09cf206aee76f0bee Ready 2m14s v1.31.4-eks-0f56d01 10.20.44.40 Bottlerocket (EKS Auto) 2025.3.9 (aws-k8s-1.31) 6.1.129 containerd://1.7.25+bottlerocket # CNI 노드 확인 kubectl get cninodes.eks.amazonaws.com NAME AGE i-09cf206aee76f0bee 3m24s #[신규 터미널] 포트 포워딩 kubectl port-forward deployment/kube-ops-view -n kube-system 8080:8080 & # 접속 주소 확인 : 각각 1배, 1.5배, 3배 크기 echo -e "KUBE-OPS-VIEW URL = http://localhost:8080" echo -e "KUBE-OPS-VIEW URL = http://localhost:8080/#scale=1.5" echo -e "KUBE-OPS-VIEW URL = http://localhost:8080/#scale=3" open "http://127.0.0.1:8080/#scale=1.5" # macOS- AWS 관리콘솔 : EC2 확인
3.7. karpenter 동작 확인
- 실습을 위해 deployment 배포
- 스케일링 설정 후 확인 : kube-ops-view 파드 evict 되면, port-forward 명령 다시 입력 할것! → pod 안전성 설정이 없을 경우에 대한 간접 경험
3.8. [네트워킹] Graviton Workloads (2048 game) 배포 with ingress(ALB) : custom nodeclass/pool 사용
3.8.1. custom nodeclass/pool, ment 배포
Copy# custom node pool 생성 : 고객 NodePool : Karpenter 와 키가 다르니 주의! ## 기존(karpenter.k8s.aws/instance-family) → 변경(eks.amazonaws.com/instance-family) - Link ls ../nodepools cat ../nodepools/graviton-nodepool.yaml kubectl apply -f ../nodepools/graviton-nodepool.yaml --- apiVersion: eks.amazonaws.com/v1 kind: NodeClass metadata: name: graviton-nodeclass spec: role: automode-cluster-eks-auto-20250314121820950800000003 subnetSelectorTerms: - tags: karpenter.sh/discovery: "automode-demo" securityGroupSelectorTerms: - tags: kubernetes.io/cluster/automode-cluster: owned tags: karpenter.sh/discovery: "automode-demo" --- apiVersion: karpenter.sh/v1 kind: NodePool metadata: name: graviton-nodepool spec: template: spec: nodeClassRef: group: eks.amazonaws.com kind: NodeClass name: graviton-nodeclass requirements: - key: "eks.amazonaws.com/instance-category" operator: In values: ["c", "m", "r"] - key: "eks.amazonaws.com/instance-cpu" operator: In values: ["4", "8", "16", "32"] - key: "kubernetes.io/arch" operator: In values: ["arm64"] taints: - key: "arm64" value: "true" effect: "NoSchedule" # Prevents non-ARM64 pods from scheduling limits: cpu: 1000 disruption: consolidationPolicy: WhenEmpty consolidateAfter: 30s # kubectl get NodeClass NAME ROLE READY AGE default automode-cluster-eks-auto-20250322084706178800000001 True 41m graviton-nodeclass automode-cluster-eks-auto-20250322084706178800000001 True 27s kubectl get NodePool NAME NODECLASS NODES READY AGE general-purpose default 1 True 41m graviton-nodepool graviton-nodeclass 0 True 35s # ls ../examples/graviton cat ../examples/graviton/game-2048.yaml ... resources: requests: cpu: "100m" memory: "128Mi" limits: cpu: "200m" memory: "256Mi" automountServiceAccountToken: false tolerations: - key: "arm64" value: "true" effect: "NoSchedule" nodeSelector: kubernetes.io/arch: arm64 ... kubectl apply -f ../examples/graviton/game-2048.yaml # c6g.xlarge : vCPU 4, 8 GiB RAM > 스팟 선택됨! kubectl get nodeclaims NAME TYPE CAPACITY ZONE NODE READY AGE general-purpose-zpmkm c5a.large on-demand ap-northeast-2b i-0e928e1b661630630 True 12m graviton-nodepool-dr8kh c7g.xlarge spot ap-northeast-2b Unknown 14s kubectl get nodeclaims -o yaml ... spec: expireAfter: 336h ... kubectl get cninodes.eks.amazonaws.com kubectl get cninodes.eks.amazonaws.com -o yaml eks-node-viewer --resources cpu,memory kubectl get node -owide kubectl describe node ... Taints: arm64=true:NoSchedule ... Conditions: Type Status LastHeartbeatTime LastTransitionTime Reason Message ---- ------ ----------------- ------------------ ------ ------- MemoryPressure False Sat, 22 Mar 2025 18:37:48 +0900 Sat, 22 Mar 2025 18:37:48 +0900 KubeletHasSufficientMemory kubelet has sufficient memory available DiskPressure False Sat, 22 Mar 2025 18:37:48 +0900 Sat, 22 Mar 2025 18:37:48 +0900 KubeletHasNoDiskPressure kubelet has no disk pressure PIDPressure False Sat, 22 Mar 2025 18:37:48 +0900 Sat, 22 Mar 2025 18:37:48 +0900 KubeletHasSufficientPID kubelet has sufficient PID available Ready True Sat, 22 Mar 2025 18:37:48 +0900 Sat, 22 Mar 2025 18:37:48 +0900 KubeletReady kubelet is posting ready status StorageReady True Sat, 22 Mar 2025 18:37:53 +0900 Sat, 22 Mar 2025 18:37:53 +0900 DiskIsReady Monitoring for the Disk system is active NetworkingReady True Sat, 22 Mar 2025 18:37:53 +0900 Sat, 22 Mar 2025 18:37:53 +0900 NetworkingIsReady Monitoring for the Networking system is active KernelReady True Sat, 22 Mar 2025 18:37:53 +0900 Sat, 22 Mar 2025 18:37:53 +0900 KernelIsReady Monitoring for the Kernel system is active ContainerRuntimeReady True Sat, 22 Mar 2025 18:37:53 +0900 Sat, 22 Mar 2025 18:37:53 +0900 ContainerRuntimeIsReady Monitoring for the ContainerRuntime system is active... ... System Info: Machine ID: ec22be7b1b1e797527ecc1e6ce823d6f System UUID: ec22be7b-1b1e-7975-27ec-c1e6ce823d6f Boot ID: 65c8af7e-d38f-41d1-84e6-b115b0ae4097 Kernel Version: 6.1.129 OS Image: Bottlerocket (EKS Auto) 2025.3.14 (aws-k8s-1.31) Operating System: linux Architecture: arm64 Container Runtime Version: containerd://1.7.25+bottlerocket Kubelet Version: v1.31.4-eks-0f56d01 Kube-Proxy Version: v1.31.4-eks-0f56d01 ProviderID: aws:///ap-northeast-2b/i-0ff3fbfbdc697a34b # kubectl get deploy,pod -n game-2048 -owide3.8.2. 관리 콘솔 확인
- EKS - Compute : 내장 node pool 이 아닌 별도 node pool 생성 확인.
- EC2 - 1대 생성 확인!, 참고로 접근 안됨. ⇒ Reboot 해보자 ⇒ Terminated 해보자!
- 해당 EC2에서 Monitoring → Instance audit 확인 ⇒ 맨 하단에 RunInstances(CloudTrail) 클릭 , 재부팅/삭제 실패도 클릭
- CloudTrail 확인 : 실행 주체 확인
- EC2 - 보안 그룹 확인
- EC2 - ENI 추가됨 → ENI의 소유자 및 intance 소유자가 나이긴 하나… 어떤 작업(ex> reboot, stop, terminate 등…)도 할 수 없다.
3.8.3. ALB(Ingress) 설정
Copy# cat ../examples/graviton/2048-ingress.yaml ... apiVersion: eks.amazonaws.com/v1 kind: IngressClassParams metadata: namespace: game-2048 name: params spec: scheme: internet-facing --- apiVersion: networking.k8s.io/v1 kind: IngressClass metadata: namespace: game-2048 labels: app.kubernetes.io/name: LoadBalancerController name: alb spec: controller: eks.amazonaws.com/alb parameters: apiGroup: eks.amazonaws.com kind: IngressClassParams name: params --- apiVersion: networking.k8s.io/v1 kind: Ingress metadata: namespace: game-2048 name: ingress-2048 spec: ingressClassName: alb rules: - http: paths: - path: / pathType: Prefix backend: service: name: service-2048 port: number: 80 kubectl apply -f ../examples/graviton/2048-ingress.yaml # kubectl get ingressclass,ingressclassparams,ingress,svc,ep -n game-2048 NAME CONTROLLER PARAMETERS AGE ingressclass.networking.k8s.io/alb eks.amazonaws.com/alb IngressClassParams.eks.amazonaws.com/params 6s NAME GROUP-NAME SCHEME IP-ADDRESS-TYPE AGE ingressclassparams.eks.amazonaws.com/params internet-facing 6s NAME CLASS HOSTS ADDRESS PORTS AGE ingress.networking.k8s.io/ingress-2048 alb * k8s-game2048-ingress2-db993ba6ac-1755790116.ap-northeast-2.elb.amazonaws.com 80 6s NAME TYPE CLUSTER-IP EXTERNAL-IP PORT(S) AGE service/service-2048 NodePort 172.20.59.108 <none> 80:32053/TCP 6s NAME ENDPOINTS AGE endpoints/service-2048 10.20.28.144:80 6s- Configure Security Groups : Configure security group rules to allow communication between the ALB and EKS cluster
- 보안 그룹 소스에 ALB SG ID가 이미 들어가 있는 상태라서 아래 규칙 추가 없이 접속이 되어야 하지만, 혹시 잘 안될 경우 아래 추가 할 것
Copy# Get security group IDs ALB_SG=$(aws elbv2 describe-load-balancers \ --query 'LoadBalancers[?contains(DNSName, `game2048`)].SecurityGroups[0]' \ --output text) EKS_SG=$(aws eks describe-cluster \ --name automode-cluster \ --query 'cluster.resourcesVpcConfig.clusterSecurityGroupId' \ --output text) echo $ALB_SG $EKS_SG # 해당 보안그룹을 관리콘솔에서 정책 설정 먼저 확인해보자 # Allow ALB to communicate with EKS cluster : 실습 환경 삭제 때, 미리 $EKS_SG에 추가된 규칙만 제거해둘것. aws ec2 authorize-security-group-ingress \ --group-id $EKS_SG \ --source-group $ALB_SG \ --protocol tcp \ --port 80 # 아래 웹 주소로 http 접속! kubectl get ingress ingress-2048 \ -o jsonpath='{.status.loadBalancer.ingress[0].hostname}' \ -n game-2048 k8s-game2048-ingress2-db993ba6ac-782663732.ap-northeast-2.elb.amazonaws.com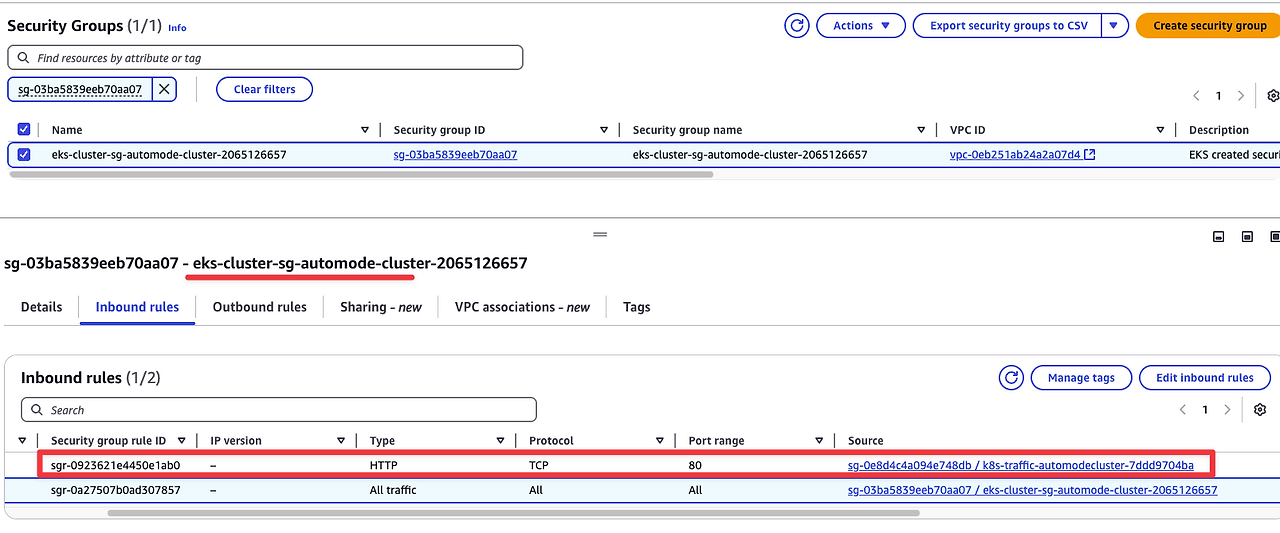
3.8.4.삭제
Copy# Remove application components kubectl delete ingress -n game-2048 ingress-2048 # 먼저 $EKS_SG에 추가된 규칙만 제거할것!!! kubectl delete svc -n game-2048 service-2048 kubectl delete deploy -n game-2048 deployment-2048 # 생성된 노드가 삭제 후에 노드 풀 제거 할 것 : Remove Graviton node pool kubectl delete -f ../nodepools/graviton-nodepool.yaml3.9. [스토리지] stateful workload with PV(EBS) 배포 : EBS Controller 동작 확인
- EKS Auto Mode does not create a StorageClass for you.
- 배포
- 관리 콘솔 : EBS
- 동작 확인 후 삭제
3.10. [운영] 노드 콘솔 출력 정보 확인 : get-console-output - Docs
- Get console output from an EC2 managed instance by using the AWS EC2 CLI
- 이 절차는 부팅 시간 또는 커널 수준 문제를 해결하는 데 도움이 됩니다.
- 먼저 워크로드와 관련된 인스턴스의 EC2 인스턴스 ID를 확인해야 합니다. 둘째, AWS CLI를 사용하여 콘솔 출력을 가져옵니다.
Copy# 노드 인스턴스 ID 확인 kubectl get node NAME STATUS ROLES AGE VERSION i-0e928e1b661630630 Ready <none> 33m v1.31.4-eks-0f56d01 i-0ff3fbfbdc697a34b Ready <none> 21m v1.31.4-eks-0f56d01 NODEID=i-0e928e1b661630630 aws ec2 get-console-output --instance-id $NODEID --latest --output text i-0e928e1b661630630 edRunningTime="2025-03-22 09:25:51.925032425 +0000 UTC m=+33.055578186" Mar 22 09:28:16 ip-10-20-16-188.ap-northeast-2.compute.internal kubelet[1230]: I0322 09:28:16.159710 1230 reconciler_common.go:245] "operationExecutor.VerifyControllerAttachedVolume started for volume \"hostroot\" (UniqueName: \"kubernetes.io/host-path/15e9c0e5-3391-49d9-832b-6ba64db86ee8-hostroot\") pod \"root-shell\" (UID: \"15e9c0e5-3391-49d9-832b-6ba64db86ee8\") " pod="default/root-shell" Mar 22 09:28:16 ip-10-20-16-188.ap-northeast-2.compute.internal kubelet[1230]: I0322 09:28:16.159771 1230 reconciler_common.go:245] "operationExecutor.VerifyControllerAttachedVolume started for volume \"kube-api-access-hn8pp\" (UniqueName: \"kubernetes.io/projected/15e9c0e5-3391-49d9-832b-6ba64db86ee8-kube-api-access-hn8pp\") pod \"root-shell\" (UID: \"15e9c0e5-3391-49d9-832b-6ba64db86ee8\") " pod="default/root-shell" Mar 22 09:28:20 ip-10-20-16-188.ap-northeast-2.compute.internal kubelet[1230]: I0322 09:28:20.965485 1230 pod_startup_latency_tracker.go:104] "Observed pod startup duration" pod="default/root-shell" podStartSLOduration=2.026283578 podStartE2EDuration="5.965468064s" podCreationTimestamp="2025-03-22 09:28:15 +0000 UTC" firstStartedPulling="2025-03-22 09:28:16.444505551 +0000 UTC m=+177.575051322" lastFinishedPulling="2025-03-22 09:28:20.383690037 +0000 UTC m=+181.514235808" observedRunningTime="2025-03-22 09:28:20.960898116 +0000 UTC m=+182.091443877" watchObservedRunningTime="2025-03-22 09:28:20.965468064 +0000 UTC m=+182.096013835" NMA::LOG|2025-03-22T09:50:24Z|containerd Mar 22 09:25:48 ip-10-20-16-188.ap-northeast-2.compute.internal containerd[1147]: time="2025-03-22T09:25:48.499414470Z" level=info msg="ImageCreate event name:\"docker.io/hjacobs/kube-ops-view:20.4.0\" labels:{key:\"io.cri-containerd.image\" value:\"managed\"}" Mar 22 09:25:48 ip-10-20-16-188.ap-northeast-2.compute.internal containerd[1147]: time="2025-03-22T09:25:48.500329237Z" level=info msg="stop pulling image docker.io/hjacobs/kube-ops-view:20.4.0: active requests=0, bytes read=81097213" Mar 22 09:25:48 ip-10-20-16-188.ap-northeast-2.compute.internal containerd[1147]: time="2025-03-22T09:25:48.501262645Z" level=info msg="ImageCreate event name:\"sha256:a645de6a07a3d0860452a751fc5d449efeb3984c739c0279640023ff10a991b9\" labels:{key:\"io.cri-containerd.image\" value:\"managed\"}" Mar 22 09:25:48 ip-10-20-16-188.ap-northeast-2.compute.internal containerd[1147]: time="2025-03-22T09:25:48.503711590Z" level=info msg="ImageCreate event name:\"docker.io/hjacobs/kube-ops-view@sha256:58221b57d4d23efe7558355c58ad7c66c8458db20b1f55ddd9f89cc9275bbc90\" labels:{key:\"io.cri-containerd.image\" value:\"managed\"}" Mar 22 09:25:48 ip-10-20-16-188.ap-northeast-2.compute.internal containerd[1147]: time="2025-03-22T09:25:48.504424491Z" level=info msg="Pulled image \"hjacobs/kube-ops-view:20.4.0\" with image id \"sha256:a645de6a07a3d0860452a751fc5d449efeb3984c739c0279640023ff10a991b9\", repo tag \"docker.io/hjacobs/kube-ops-view:20.4.0\", repo digest \"docker.io/hjacobs/kube-ops-view@sha256:58221b57d4d23efe7558355c58ad7c66c8458db20b1f55ddd9f89cc9275bbc90\", size \"81086356\" in 7.284332848s" Mar 22 09:25:48 ip-10-20-16-188.ap-northeast-2.compute.internal containerd[1147]: time="2025-03-22T09:25:48.504529554Z" level=info msg="PullImage \"hjacobs/kube-ops-view:20.4.0\" returns image reference \"sha256:a645de6a07a3d0860452a751fc5d449efeb3984c739c0279640023ff10a991b9\"" Mar 22 09:25:48 ip-10-20-16-188.ap-northeast-2.compute.internal containerd[1147]: time="2025-03-22T09:25:48.507198995Z" level=info msg="CreateContainer within sandbox \"2e1cf0654f5c8793390c20494138dd4dbf0117ddcce212ba888eff1d962c29b5\" for container &ContainerMetadata{Name:kube-ops-view,Attempt:0,}" Mar 22 09:25:48 ip-10-20-16-188.ap-northeast-2.compute.internal containerd[1147]: time="2025-03-22T09:25:48.530065186Z" level=info msg="CreateContainer within sandbox \"2e1cf0654f5c8793390c20494138dd4dbf0117ddcce212ba888eff1d962c29b5\" for &ContainerMetadata{Name:kube-ops-view,Attempt:0,} returns container id \"4a1b853b04980a1a5dcddf573843a3f91e405600f9c62c34b145fa8b734f0218\"" Mar 22 09:25:48 ip-10-20-16-188.ap-northeast-2.compute.internal containerd[1147]: time="2025-03-22T09:25:48.530867390Z" level=info msg="StartContainer for \"4a1b853b04980a1a5dcddf573843a3f91e405600f9c62c34b145fa8b734f0218\"" Mar 22 09:25:48 ip-10-20-16-188.ap-northeast-2.compute.internal containerd[1147]: time="2025-03-22T09:25:48.626885533Z" level=info msg="StartContainer for \"4a1b853b04980a1a5dcddf573843a3f91e405600f9c62c34b145fa8b734f0218\" returns successfully" Mar 22 09:26:11 ip-10-20-16-188.ap-northeast-2.compute.internal containerd[1147]: time="2025-03-22T09:26:11.598844032Z" level=info msg="Portforward for \"2e1cf0654f5c8793390c20494138dd4dbf0117ddcce212ba888eff1d962c29b5\" port []"3.11. [운영] 노드 특정 프로세스 로그 실시간 확인 : debug container - Docs
- Get node logs by using debug containers and the kubectl CLI
- EKS Auto Mode 노드에서 로그를 검색하는 권장 방법은 NodeDiagnostic 리소스를 사용하는 것입니다. 이러한 단계는 kubectl 및 S3를 사용하여 관리 노드에 대한 노드 로그 검색을 참조하십시오.
- 그러나 kubectl debug node 명령을 사용하여 인스턴스에서 로그를 실시간으로 스트리밍할 수 있습니다. 이 명령어는 디버그하려는 노드에서 새로운 Pod를 실행하여 대화형으로 사용할 수 있습니다.
Copy# 노드 인스턴스 ID 확인 kubectl get node NODEID=<각자 자신의 노드ID> NODEID=i-0e928e1b661630630 # 디버그 컨테이너를 실행합니다. 다음 명령어는 노드의 인스턴스 ID에 i-01234567890123456을 사용하며, # 대화형 사용을 위해 tty와 stdin을 할당하고 kubeconfig 파일의 sysadmin 프로필을 사용합니다. ## Create an interactive debugging session on a node and immediately attach to it. ## The container will run in the host namespaces and the host's filesystem will be mounted at /host ## --profile='legacy': Options are "legacy", "general", "baseline", "netadmin", "restricted" or "sysadmin" kubectl debug -h kubectl debug node/$NODEID -it --profile=sysadmin --image=public.ecr.aws/amazonlinux/amazonlinux:2023 ------------------------------------------------- bash-5.2# whoami # 셸에서 이제 nsenter 명령을 제공하는 util-linux-core를 설치할 수 있습니다. # nsenter를 사용하여 호스트에서 PID 1의 마운트 네임스페이스(init)를 입력하고 journalctl 명령을 실행하여 큐블릿에서 로그를 스트리밍합니다: yum install -y util-linux-core htop # host의 network namespace에 진입해 kubelet의 journal log 확인 nsenter -t 1 -m journalctl -f -u kubelet htop # 해당 노드(인스턴스) CPU,Memory 크기 확인 # 정보 확인 # host의 network namespace에 들어가서 host의 각종 정보들을 확인 할 수 있다!! nsenter -t 1 -m ip addr nsenter -t 1 -m ps -ef nsenter -t 1 -m ls -l /proc nsenter -t 1 -m df -hT nsenter -t 1 -m ctr nsenter -t 1 -m ctr ns ls nsenter -t 1 -m ctr -n k8s.io containers ls CONTAINER IMAGE RUNTIME 055a382a0ea2ea9eaf2def4af275b1482d37a68fe5844a59305e27205393d0e6 localhost/kubernetes/pause:0.1.0 io.containerd.runc.v2 2e1cf0654f5c8793390c20494138dd4dbf0117ddcce212ba888eff1d962c29b5 localhost/kubernetes/pause:0.1.0 io.containerd.runc.v2 36b6e54ceacddc78065b55a667f2e3c6a75029ba028c0514eaadf9c98782aede docker.io/library/alpine:3 io.containerd.runc.v2 4a1b853b04980a1a5dcddf573843a3f91e405600f9c62c34b145fa8b734f0218 docker.io/hjacobs/kube-ops-view:20.4.0 io.containerd.runc.v2 5abca705a1bc3a4220cb1ed0abf4abf6894f63609f06e5693680fafab2cda349 public.ecr.aws/amazonlinux/amazonlinux:2023 io.containerd.runc.v2 8b5774eac8e81174671fbd367deb9b4cac497c048d27cd9bc5adad6c3db51f70 localhost/kubernetes/pause:0.1.0 io.containerd.runc.v2 ... # (참고) 보안을 위해 Amazon Linux 컨테이너 이미지는 기본적으로 많은 바이너리를 설치하지 않습니다. # yum whatproved 명령을 사용하여 특정 바이너리를 제공하기 위해 설치해야 하는 패키지를 식별할 수 있습니다. yum whatprovides ps -------------------------------------------------- 디버그 파드 삭제 kubectl delete pod <node-debugger-#>
3.12. [보안] 호스트 네임스페이스를 공유하는 파드
탈옥(?)를 통해 호스트 정보 획득 시도 - Blog- 호스트 네임스페이스를 공유하는 파드 실행
- 파드 내 shell 진입 후 확인
- 삭제 : kubectl delete pod root-shell
3.13. [운영] 노드 로그 수집 by S3 : Node monitoring agent NodeDiagnostic - Docs , Link ← 실패
- EKS 자동 모드에는 Amazon EKS 노드 모니터링 에이전트가 포함되어 있습니다.
- 이 에이전트를 사용하여 노드에 대한 문제 해결 및 디버깅 정보를 볼 수 있습니다.
- 노드 모니터링 에이전트는 Kubernetes 이벤트와 노드 상태를 게시합니다.
- 자세한 내용은 노드 자동 복구 활성화 및 노드 상태 조사를 참조하십시오 - Docs
- NodeDiagnostic리소스를 사용하여 노드 모니터링 에이전트를 사용하여 노드 로그를 검색합니다.
- S3 버킷 생성
- AWS CloudShell 에서 아래 실행 : S3 pre-sign url 생성 : You must use the AWS API or a SDK to create the pre-signed S3 upload URL for EKS to upload the log file. You cannot create a pre-signed S3 upload URL using the AWS CLI.
- NodeDiagnostic 생성
3.14. [네트워킹] Service(LoadBalancer) AWS NLB 사용해보기 - sample-app , Workshop
- 샘플 앱 배포
- 접속 안됨 → Auto mode yaml 규칙 확인
- 삭제 kubectl delete -f https://github.com/aws-containers/retail-store-sample-app/releases/latest/download/kubernetes.yaml
3.15. 실습 환경 삭제
- helm uninstall -n kube-system kube-ops-view → 노드(인스턴스)까지 삭제 확인 후 아래 테라폼 삭제 할 것
- terraform destroy --auto-approve
- rm -rf ~/.kube/config
4. Hybrid Node
-
- Amazon EKS HyBrid Nodes 출시: EKS 클러스터 온프레미스 인프라 사용 가능 - Link
- A deep dive into Amazon EKS Hybrid Nodes - Link
- Use your on-premises infrastructure in Amazon EKS clusters with Amazon EKS Hybrid Nodes - Link
- Connect your on-premises Kubernetes cluster to AWS APIs using IAM Roles Anywhere - LinkAWS Blog EKS 정보
-
- [Youtube] AWS re:Invent 2024 중 EKS 업데이트 및 Hybrid Node PoC 사례 소개 - Link
- Amazon EKS for edge and hybrid use cases (KUB310) - Link
- Bring the power of Amazon EKS to your on-premises applications (KUB205-NEW) - Link
- Amazon EKS Hybrid Nodes | Run Kubernetes On-Premises and at the Edge - LinkAWS Youtube EKS 정보
- Blog 및 실습 환경 구성 관련
- [codingnyan] Amazon EKS Hybrid Nodes: EKS 하이브리드 노드를 리뷰 - Blog
- EKS Hybrid Nodes를 VPC Peering에 Calico로 구성 https://www.beex-inc.com/blog/eks-hybrid-nodes-calico
- Amazon EKS - Hybrid Nodes : 온프레미스의 인프라를 Amazon EKS에서 활용 - Link
- EKS Auto Mode에서 Hybrid Nodes로 Raspberry Pi 노드 등록 사용 - 개요 , 배포
- https://registry.terraform.io/modules/terraform-aws-modules/eks/aws/latest/examples/eks-hybrid-nodes
- 실습 환경 Blog 참고
-
- VPC Peering 으로 한쪽 VPC(dns option 별도 사용)를 온프레미스 환경으로 가정
-
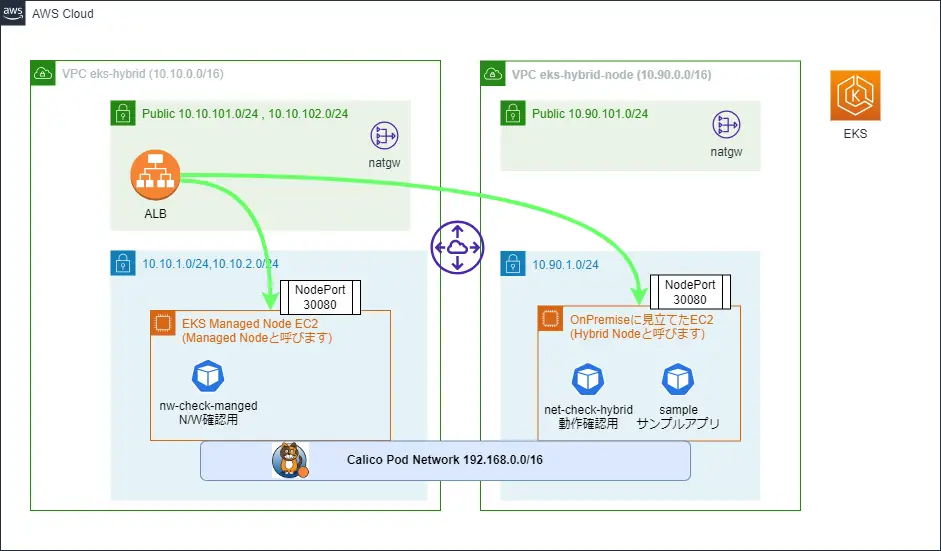
- 연결 정보는 생략되었지만, 나머지 환경 구성 절차가 잘 설명되어 있음. 온프렘은 Cilium CNI 사용

- Raspbery Pi에 SW VPN(libresawan) 을 통해 AWS와 S2S VPN 구성 후, Pi를 하이브리드 노드로 활용 - 개요 , 배포
- EKS Auto mode에서 Pi 노드에 웹 서비스 파드를 기동 후, Ingress(ALB)를 통하여 외부 요청을 집에 있는 Pi에 기동되는 파드가 처리.
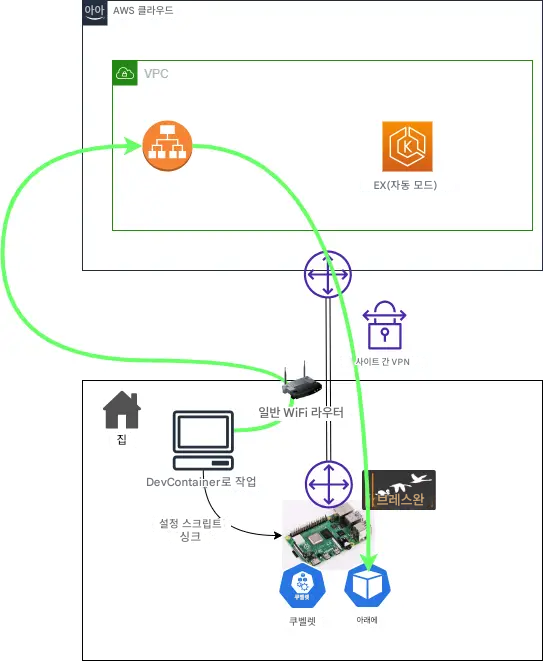
- [AWS EKS Workshop] Hybrid Nodes Lab - Link
- EKS Hybrid Node Networking

- AWS Site-to-Site VPN, AWS Direct Connect 또는 다른 가상 프라이빗 네트워크(VPN) 솔루션을 사용하여 온 프레미스 환경에서 AWS와 주고받는 하이브리드 네트워크 연결
- 가상 프라이빗 게이트웨이(VGW) 또는 전송 게이트웨이(TGW)를 대상으로 하는 온프레미스 노드 및 선택적으로 포드 네트워크용 라우팅 테이블에 경로가 있는 가상 프라이빗 클라우드(VPC)
- 물리적 또는 가상 시스템 형태의 인프라
- 하이브리드 노드와 호환되는 운영 체제 : Amazon Linux 2023, Ubuntu 20.04, Ubuntu 22.04, Ubuntu 24.04 또는 Red Hat Enterprise Linux(RHEL) 8 및 9를 하이브리드 노드의 노드 운영 체제
- AWS IAM Roles Anywhere 또는AWS Systems Manager가 컨트롤 플레인을 통해 하이브리드 노드를 인증(SSM Hybrid Activation)하도록 설정되어 있습니다.
- EKS 클러스터 IAM 역할 및 EKS 하이브리드 노드 IAM 역할
'AWS' 카테고리의 다른 글
[AEWS 3기] 9주차 - EKS Upgrade (0) 2025.04.02 [AEWS 3기] 8주차 - K8S CI/CD (0) 2025.03.30 [AEWS 3기] 6주차 - EKS Security (0) 2025.03.15 [AEWS 3기] 5주차 - EKS Autoscaling (0) 2025.03.08 [AEWS 3기] 4주차 - EKS Observability (0) 2025.03.01