ABOUT ME

-

Today
-
Yesterday
-
Total
-
  • [AEWS 3기] 8주차 - K8S CI/CD
    AWS 2025. 3. 30. 00:10
    1. 실습 환경 구성

    0.2. Jenkins : The open source automation server, support building deploying and automating any project - DockerHub , Github , Docs

    CI(지속적 제공)/CD(지속적 배포) 워크플로 예제 : Continuous Integration Server + Continuous Development, Build, Test, Deploy - Link

    1. 최신 코드 가져오기 : 개발을 위해 중앙 코드 리포지터리에서 로컬 시스템으로 애플리케이션의 최신 코드를 가져옴
    2. 단위 테스트 구현과 실행 : 코드 작성 전 단위 테스트 케이스를 먼저 작성
    3. 코드 개발 : 실패한 테스트 케이스를 성공으로 바꾸면서 코드 개발
    4. 단위 테스트 케이스 재실행 : 단위 테스트 케이스 실행 시 통과(성공!)
    5. 코드 푸시와 병합 : 개발 소스 코드를 중앙 리포지터리로 푸시하고, 코드 병합
    6. 코드 병합 후 컴파일 : 변경 함수 코드가 병함되면 전체 애플리케이션이 컴파일된다
    7. 병합된 코드에서 테스트 실행 : 개별 테스트뿐만 아니라 전체 통합 테스트를 실행하여 문제 없는지 확인
    8. 아티팩트 배포 : 애플리케이션을 빌드하고, 애플리케이션 서버의 프로덕션 환경에 배포
    9. 배포 애플리케이션의 E-E 테스트 실행 : 셀레늄 Selenium과 같은 User Interface 자동화 도구를 통해 애플리케이션의 전체 워크플로가 정상 동작하는지 확인하는 종단간 End-to-End 테스트를 실행.
    • 소프트웨어 개발 프로세스의 다양한 단계자동화하는 도구로서 중앙 소스 코드 리포지터리에서 최신 코드 가져오기, 소스 코드 컴파일, 단위 테스트 실행, 산출물을 다양한 유형으로 패키징, 산출물을 여러 종류의 환경으로 배포하기 등의 기능을 제공.
    • 젠킨스는 아파치 톰캣처럼 서블릿 컨테이너 내부에서 실행되는 서버 시스템이다. 자바로 작성됐고, 소프트웨어 개발과 관련된 다양한 도구를 지원.
    • 젠킨스는 DSL Domain Specific Language (jenkins file)로 E-E 빌드 수명 주기 단계를 구축한다.
    • 젠킨스는 파이프라인이라고 부르는 스크립트를 작성할 수 있는데, 이를 사용해서 각 빌드 단계마다 젠킨스가 수행할 태스트 및 하위 태스크의 순서를 정의.
    • 다양한 Plugins 연동

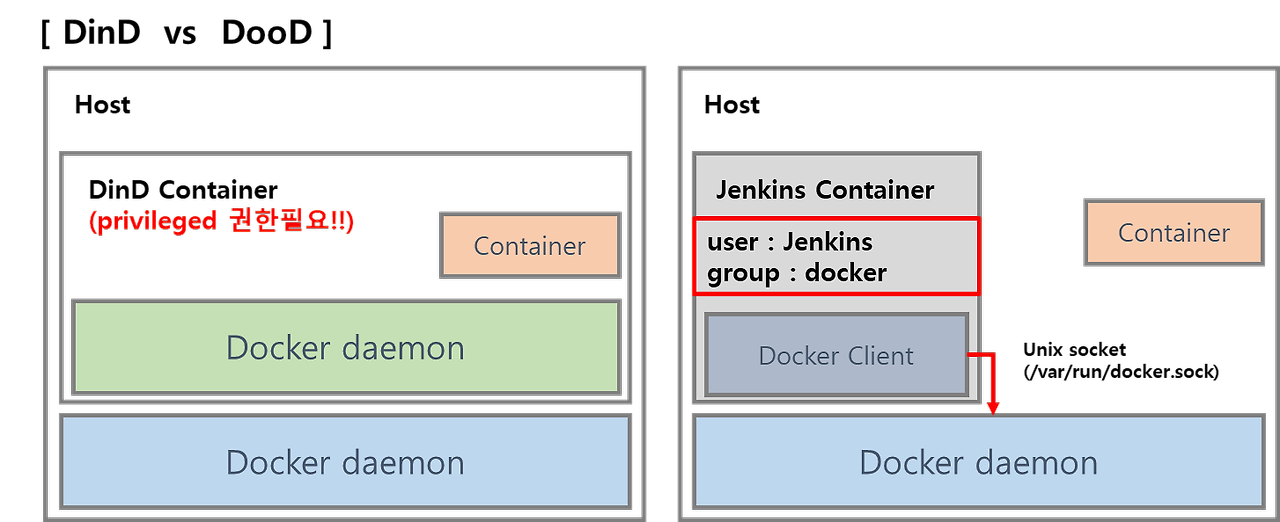
    0.3. Jenkins 컨테이너에서 호스트에 도커 데몬 사용 설정 (Docker-out-of-Docker) : macOS 사용자

    Copy
    # Jenkins 컨테이너 내부에 도커 실행 파일 설치
    docker compose exec --privileged -u root jenkins bash
    -----------------------------------------------------
    id
    
    curl -fsSL https://download.docker.com/linux/debian/gpg -o /etc/apt/keyrings/docker.asc
    chmod a+r /etc/apt/keyrings/docker.asc
    echo \
      "deb [arch=$(dpkg --print-architecture) signed-by=/etc/apt/keyrings/docker.asc] https://download.docker.com/linux/debian \
      $(. /etc/os-release && echo "$VERSION_CODENAME") stable" | \
      tee /etc/apt/sources.list.d/docker.list > /dev/null
    apt-get update && apt install docker-ce-cli curl tree jq yq -y
    
    docker info
    docker ps
    which docker
    
    # Jenkins 컨테이너 내부에서 root가 아닌 jenkins 유저도 docker를 실행할 수 있도록 권한을 부여
    groupadd -g 2000 -f docker  # macOS(Container)
    
    chgrp docker /var/run/docker.sock
    ls -l /var/run/docker.sock
    usermod -aG docker jenkins
    cat /etc/group | grep docker
    
    exit
    --------------------------------------------
    
    # jenkins item 실행 시 docker 명령 실행 권한 에러 발생 : Jenkins 컨테이너 재기동으로 위 설정 내용을 Jenkins app 에도 적용 필요
    docker compose restart jenkins
    
    # jenkins user로 docker 명령 실행 확인
    docker compose exec jenkins id
    docker compose exec jenkins docker info
    docker compose exec jenkins docker ps
    mac 재부팅 시에 jenkins 컨테이너에서 docker 실행 실패 시 : 소켓 파일에 docker 그룹을 다시 지정

    0.4. Gogs : Gogs is a painless self-hosted Git service

    • 초기 설정 웹 접속
    • 초기 설정

    Gogs 설치하기 클릭 ⇒ 관리자 계정으로 로그인 후 접속

     
    • [Token 생성] 로그인 후 → Your Settings → Applications : Generate New Token 클릭 - Token Name(devops) ⇒ Generate Token 클릭 : 메모해두기!
    • New Repository 1 : 개발팀용
    • New Repository 2 : 데브옵스팀용

    0.5. Gogs 실습을 위한 저장소 설정 : 호스트에서 직접 git 작업 , Windows 경우 WSL2 혹은 호스트에서 작업 둘 다 가능

    Copy
    # (옵션) GIT 인증 정보 초기화
    git credential-cache exit
    
    #
    git config --list --show-origin
    
    #
    TOKEN=<각자 Gogs Token>
    TOKEN=de6665398b85d560c06b790830bd9a2533cfd26a
    
    MyIP=<각자 자신의 PC IP> # Windows (WSL2) 사용자는 자신의 WSL2 Ubuntu eth0 IP 입력 할 것!
    MyIP=192.168.254.127
    
    git clone <각자 Gogs dev-app repo 주소>
    git clone http://devops:$TOKEN@$MyIP:3000/devops/dev-app.git
    Cloning into 'dev-app'...
    ...
    
    #
    cd dev-app
    
    #
    git --no-pager config --local --list
    git config --local user.name "devops"
    git config --local user.email "a@a.com"
    git config --local init.defaultBranch main
    git config --local credential.helper store
    git --no-pager config --local --list
    cat .git/config
    
    #
    git --no-pager branch
    git remote -v
    
    # server.py 파일 작성
    cat > server.py <<EOF
    from http.server import ThreadingHTTPServer, BaseHTTPRequestHandler
    from datetime import datetime
    import socket
    
    class RequestHandler(BaseHTTPRequestHandler):
        def do_GET(self):
            match self.path:
                case '/':
                    now = datetime.now()
                    hostname = socket.gethostname()
                    response_string = now.strftime("The time is %-I:%M:%S %p, VERSION 0.0.1\n")
                    response_string += f"Server hostname: {hostname}\n"                
                    self.respond_with(200, response_string)
                case '/healthz':
                    self.respond_with(200, "Healthy")
                case _:
                    self.respond_with(404, "Not Found")
    
        def respond_with(self, status_code: int, content: str) -> None:
            self.send_response(status_code)
            self.send_header('Content-type', 'text/plain')
            self.end_headers()
            self.wfile.write(bytes(content, "utf-8")) 
    
    def startServer():
        try:
            server = ThreadingHTTPServer(('', 80), RequestHandler)
            print("Listening on " + ":".join(map(str, server.server_address)))
            server.serve_forever()
        except KeyboardInterrupt:
            server.shutdown()
    
    if __name__== "__main__":
        startServer()
    EOF
    
    
    # (참고) python 실행 확인
    python3 server.py
    curl localhost
    curl localhost/healthz
    CTRL+C 실행 종료
    
    
    # Dockerfile 생성
    cat > Dockerfile <<EOF
    FROM python:3.12
    ENV PYTHONUNBUFFERED 1
    COPY . /app
    WORKDIR /app 
    CMD python3 server.py
    EOF
    
    
    # VERSION 파일 생성
    echo "0.0.1" > VERSION
    
    #
    tree
    git status
    git add .
    git commit -m "Add dev-app"
    git push -u origin main
    ...
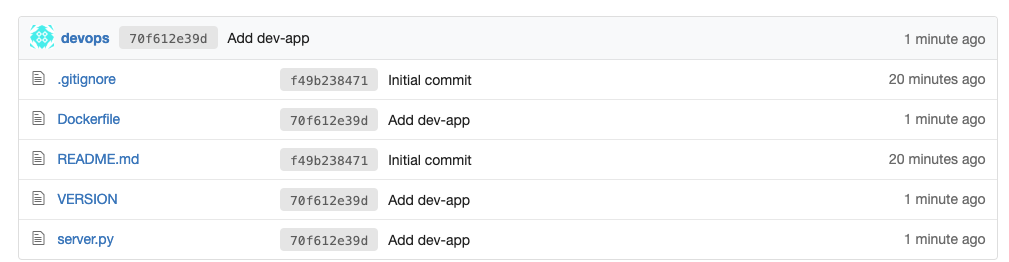
    • Gogs Repo 에서 확인
    • (예시) App Version - Blog

    0.6. 도커 허브 소개 - Docs

    도커 허브(Docker Hub)는 도커 이미지 원격 저장소입니다.

    사용자들은 도커 허브에 이미지업로드하고, 다른 곳에서 자유롭게 재사용(다운로드)할 수 있습니다.

    여러 사용자가 자신이 만든 도커 이미지를 서로 자유롭게 공유할 수 있는 장을 마련해 줍니다.

    • 단, 도커 허브는 누구나 이미지를 올릴 수 있기 때문에 공식(Official) 라벨이 없는 이미지는 사용법을 찾을 수 없거나 제대로 동작하지 않을 수 있습니다.
    • [정보] 도커 악성 이미지를 통한 취약점 공격 - 기사 모음
    • Docker Hub is also where you can go to carry out administrative tasks for organizations. If you have a Docker Team or Business subscription, you can also carry out administrative tasks in the Docker Admin Console.
    • Key features
    • Administrative task
    • Docker Hub Webhooks - Docs
    • Set up Automated Builds : 저장소를 구성하여 소스 공급자에게 새 코드를 푸시할 때마다 자동으로 이미지를 빌드 - Docs

    0.7. Docker Hub quickstart - Docs → 실습은 Skip

    • Step 1 : Sign up for a free Docker account
    • Step 2 : Create your first repository
    • Step 3 : Build and push a container image to Docker Hub from your computer
    • (참고) Name your local images using one of these methods:
    자신의 도커 허브 계정Token 발급
    1. Jenkins CI + K8S(Kind)

    1.2. kind 로 k8s 배포 : macOS 사용자

    • 기본 정보 확인
    • kube-ops-view
    • (참고) 클러스터 삭제

    1.3. 작업 소개 (프로젝트, Job, Item) : 3가지 유형의 지시 사항 포함

    1. 작업을 수행하는 시점 Trigger
    2. 작업을 구성하는 단계별 태스크 Built step
    3. 태스크가 완료 후 수행할 명령 Post-build action
    • (참고) 젠킨스의 빌드 : 젠킨스 작업의 특정 실행 버전

    1.4. Jenkins 설정 : Plugin 설치, 자격증명 설정

    • Jenkins Plugin 설치
    • 자격증명 설정 : Jenkins 관리 → Credentials → Globals → Add Credentials

    1.5. Jenkins Item 생성(Pipeline) : item name(pipeline-ci)

    • Pipeline script : 아래 빨간색 부분은 자신의 환경에 맞게 수정 할 것!
    • 지금 빌드 → 콘솔 Output 확인
    • 도커 허브 확인

    1.6. k8s Deploying an application with Jenkins(pipeline-ci)

    Deploying to Kubernetes

    • 원하는 상태 설정 시 k8s충족을 위해 노력함 : Kubernetes uses declarative configuration, where you declare the state you want (like “I want 3 copies of my container running in the cluster”) in a configuration file. Then, submit that config to the cluster, and Kubernetes will strive to meet the requirements you specified.
    Copy
    # 디플로이먼트 오브젝트 배포 : 리플리카(파드 2개), 컨테이너 이미지 >> 아래 도커 계정 부분만 변경해서 배포해보자
    DHUSER=<도커 허브 계정명>
    DHUSER=gylee815
    
    cat <<EOF | kubectl apply -f -
    apiVersion: apps/v1
    kind: Deployment
    metadata:
      name: timeserver
    spec:
      replicas: 2
      selector:
        matchLabels:
          pod: timeserver-pod
      template:
        metadata:
          labels:
            pod: timeserver-pod
        spec:
          containers:
          - name: timeserver-container
            image: docker.io/$DHUSER/dev-app:0.0.1
            livenessProbe:
              initialDelaySeconds: 30
              periodSeconds: 30
              httpGet:
                path: /healthz
                port: 80
                scheme: HTTP
              timeoutSeconds: 5
              failureThreshold: 3
              successThreshold: 1
    EOF
    
    watch -d kubectl get deploy,rs,pod -o wide
    
    # 배포 상태 확인 : kube-ops-view 웹 확인
    kubectl get events -w --sort-by '.lastTimestamp'
    kubectl get deploy,pod -o wide
    kubectl describe pod
    ...
    Events:
      Type     Reason     Age                From               Message
      ----     ------     ----               ----               -------
      Normal   Scheduled  52s                default-scheduler  Successfully assigned default/timeserver-7fb496bcd4-wxrrf to myk8s-worker2
      Normal   BackOff    23s (x2 over 49s)  kubelet            Back-off pulling image "docker.io/gylee815/dev-app:0.0.1"
      Warning  Failed     23s (x2 over 49s)  kubelet            Error: ImagePullBackOff
      Normal   Pulling    10s (x3 over 51s)  kubelet            Pulling image "docker.io/gylee815/dev-app:0.0.1"
      Warning  Failed     9s (x3 over 50s)   kubelet            Failed to pull image "docker.io/gylee815/dev-app:0.0.1": failed to pull and unpack image "docker.io/gylee815/dev-app:0.0.1": failed to resolve reference "docker.io/gylee815/dev-app:0.0.1": pull access denied, repository does not exist or may require authorization: server message: insufficient_scope: authorization failed
      Warning  Failed     9s (x3 over 50s)   kubelet            Error: ErrImagePull

    TROUBLESHOOTING : image pull error (ErrImagePull / ErrImagePullBackOff)

    • 보통 컨테이너 이미지 정보를 잘못 기입하는 경우에 발생
    • 혹은 이미지 저장소에 이미지가 없거나, 이미지 가져오는 자격 증명이 없는 경우에 발생
    • Check the spelling of your image and verify that the image is in your repository.
    Copy
    # k8s secret : 도커 자격증명 설정 
    kubectl get secret -A  # 생성 시 타입 지정
    
    DHUSER=<도커 허브 계정>
    DHPASS=<도커 허브 암호 혹은 토큰>
    echo $DHUSER $DHPASS
    
    DHUSER=gasida
    DHPASS=dckr_pat_KWx-0N27iEd1lk8aNvRz8pDrQlI
    echo $DHUSER $DHPASS
    
    kubectl create secret docker-registry dockerhub-secret \
      --docker-server=https://index.docker.io/v1/ \
      --docker-username=$DHUSER \
      --docker-password=$DHPASS
    
    # 확인
    kubectl get secret
    kubectl describe secret
    kubectl get secrets -o yaml | kubectl neat  # base64 인코딩 확인
    
    SECRET=eyJhdXRocyI6eyJodHRwczovL2luZGV4LmRvY2tlci5pby92MS8iOnsidXNlcm5hbWUiOiJnYXNpZGEiLCJwYXNzd29yZCI6ImRja3JfcGF0X0tXeC0wTjI3aUVkMWxrOGFOdlJ6OHBEclFsSSIsImF1dGgiOiJaMkZ6YVdSaE9tUmphM0pmY0dGMFgwdFhlQzB3VGpJM2FVVmtNV3hyT0dGT2RsSjZPSEJFY2xGc1NRPT0ifX19
    echo "$SECRET" | base64 -d ; echo
    {"auths":{"https://index.docker.io/v1/":{"username":"gylee815","password":"SOME_TOKEN","auth":"AUTH_INFO"}}}
    
    # 디플로이먼트 오브젝트 업데이트 : 시크릿 적용 >> 아래 도커 계정 부분만 변경해서 배포해보자
    cat <
    PODIP1=10.244.1.4
    
    kubectl exec -it curl-pod -- curl $PODIP1
    The time is 5:57:14 AM, VERSION 0.0.1
    Server hostname: timeserver-6777ff7cd-4s4fn
    
    kubectl exec -it curl-pod -- curl $PODIP1/healthz
    
    # 로그 확인
    kubectl logs deploy/timeserver
    kubectl logs deploy/timeserver -f
    kubectl stern deploy/timeserver
    kubectl stern -l pod=timeserver-pod
    • 파드 1개 삭제 후 동작 확인 → 접속 확인
    Copy
    #
    POD1NAME=<파드 1개 이름>
    POD1NAME=timeserver-7954b8f6df-l25wx
    
    kubectl get pod -owide
    kubectl delete pod $POD1NAME && kubectl get pod -w
    
    # 셀프 힐링 , 파드 IP 변경 -> 고정 진입점(고정 IP/도메인네임) 필요 => Service
    kubectl get deploy,rs,pod -owide

    Publishing your Service

    • Each Pod is given its own cluster-local (internal) IP address, which can be used for communication between Pods within the cluster.
    • It’s possible to expose Pods directly on the internet as well as on the node’s IP (with the field hostPort), but unless you’re writing a real-time game server, that’s rarely what you’ll do.
    • Typically, and especially when Deployment is used, you will aggregate your Pods into a Service, which provides a single access point with an internal (and optionally external) IP, and load balance requests across your pods.
    • 디플로이먼트에 파드 1개가 있다하더라도 서비스를 통해 안정적인 주소를 제공
    • In addition to load balancing, Services keep track of which Pods are running and capable of receiving traffic. For example, while you may have specified three replicas in your Deployment, that doesn’t mean that three replicas will be available at all times.
    • 노드 업그레이드 등 이벤트 발생 시 정상 동작 파드로만 라우팅 처리 : There might only be two if a node is being upgraded, or there could be more than three while you’re rolling out a new version of your Deployment. The Service will only route traffic to running Pods (in the next chapter, we’ll cover some key information you need to provide to make that works smoothly).
    • Services are used internally within the cluster to enable communication between multiple applications (a so-called microservice architecture) and offer convenient features, such as service discovery, for this purpose.
    • Each Pod and Service in Kubernetes has its own internal cluster IP, so you don’t need to worry about port conflicts between Pods.
    • Notice also that this Service has a section named selector, like our Deployment had.
    • The Service doesn’t reference the Deployment and actually has no knowledge of the Deployment.
    • Instead, it references the set of Pods that have the given label (which, in this case, will be the Pods created by our Deployment).
    • Unlike in the Deployment object, the selector section has no matchLabels subsection.
    • They are, however, equivalent. Deployment is just using a newer, more expressive syntax in Kubernetes.
    • The selectors in the Deployment and in the Service are achieving the same result: specifying the set of Pods that the object is referencing.

    Updating your application**

    • 샘플 앱 server.py 코드 변경젠킨스(지금 빌드 실행) : 0.0.2 버전 태그로 컨테이너 이미지 빌드 → 컨테이너 저장소 Push k8s deployment 업데이트 배포
    • 태그버전 정보 사용을 권장 : You can make this tag anything you like, but it’s a good convention to use version numbers.
    • The READY column shows how many Pods are serving traffic and how many we requested.
    • In this case, all three are ready. The UP-TO-DATE column, however, indicates that only one of these Pods is the current version.
    • This is because, rather than replacing all the Pods at once, causing some downtime to the application, by default, Pods are updated with a so-called rolling update strategy—that is, one or several at a time.

    1.7. Gogs Webhooks 설정 : Jenkins Job Trigger

    • gogs 에 /data/gogs/conf/app.ini 파일 수정 후 컨테이너 재기동 - issue
    • gogs 에 Webhooks 설정 : Jenkins job Trigger - Setting → Webhooks → Gogs 클릭
    • (TS) gogs 에 Webhooks 동작이 잘 되지 않을 경우 /data/gogs/conf/app.ini 파일 내에 아래 항목 확인 해볼것.

    1.8. Jenkins Item 생성(Pipeline) : item name(SCM-Pipeline)

    by ChatGPT
    • GitHub project : http://<mac IP>:3000/<Gogs 계정명>/dev-app ← .git 은 제거
    • Use Gogs secret : qwe123
    • Build Triggers : Build when a change is pushed to Gogs 체크
    • Pipeline script from SCM

    1.9. Jenkinsfile 작성 후 Git push

    • git 작업
    • IDE(VSCODE..) 로 Jenkinsfile 파일 작성
    • 작성된 파일 push
    • Gogs WebHook 기록 확인
    • 도커 저장소 확인
    • Jenkins 트리거 빌드 확인
    • k8s 에 신규 버전 적용
    1. Jenkins CI/CD + K8S(Kind)

    2.2. Jenkins Item 생성(Pipeline) : item name(k8s-cmd)

    Copy
    pipeline {
        agent any
        environment {
            KUBECONFIG = credentials('k8s-crd')
        }
        stages {
            stage('List Pods') {
                steps {
                    sh '''
                    # Fetch and display Pods
                    kubectl get pods -A --kubeconfig "$KUBECONFIG"
                    '''
                }
            }
        }
    }

    1.3. [K8S CD 실습] Jenkins 를 이용한 blue-green 배포 준비

    • 디플로이먼트 / 서비스 yaml 파일 작성 - http-echo 및 코드 push
    (참고) 직접 블루-그린 업데이트 실행

    1.4. Jenkins Item 생성(Pipeline) : item name(k8s-bluegreen) - Jenkins 통한 k8s 기본 배포

    • 이전 실습에 디플로이먼트, 서비스 삭제
    • 반복 접속 미리 실행
    • pipeline script : Windows (WSL2) 사용자는 자신의 WSL2 Ubuntu eth0 IP
    • 지금 배포 후 동작 확인
    • 실습 완료 후 삭제
    1. ArgoCD + K8S(Kind)

    3.2. Argo CD 설치 및 기본 설정 - helm_chart

    • Argo CD 설치
    • Argo CD 웹 접속 확인
    • 기본 정보 확인 (Settings) : Clusters, Projects, Accounts
    • ops-deploy Repo 등록 : Settings → Repositories → CONNECT REPO 클릭

    3.3. (기초) helm chart 를 통한 배포 실습

    Copy
    #
    cd cicd-labs
    mkdir nginx-chart
    cd nginx-chart
    
    mkdir templates
    
    cat > templates/configmap.yaml <<EOF
    apiVersion: v1
    kind: ConfigMap
    metadata:
      name: {{ .Release.Name }}
    data:
      index.html: |
    {{ .Values.indexHtml | indent 4 }}
    EOF
    
    cat > templates/deployment.yaml <<EOF
    apiVersion: apps/v1
    kind: Deployment
    metadata:
      name: {{ .Release.Name }}
    spec:
      replicas: {{ .Values.replicaCount }}
      selector:
        matchLabels:
          app: {{ .Release.Name }}
      template:
        metadata:
          labels:
            app: {{ .Release.Name }}
        spec:
          containers:
          - name: nginx
            image: {{ .Values.image.repository }}:{{ .Values.image.tag }}
            ports:
            - containerPort: 80
            volumeMounts:
            - name: index-html
              mountPath: /usr/share/nginx/html/index.html
              subPath: index.html
          volumes:
          - name: index-html
            configMap:
              name: {{ .Release.Name }}
    EOF
    
    cat > templates/service.yaml <<EOF
    apiVersion: v1
    kind: Service
    metadata:
      name: {{ .Release.Name }}
    spec:
      selector:
        app: {{ .Release.Name }}
      ports:
      - protocol: TCP
        port: 80
        targetPort: 80
        nodePort: 30000
      type: NodePort
    EOF
    
    cat > values.yaml <<EOF
    indexHtml: |
      <!DOCTYPE html>
      <html>
      <head>
        <title>Welcome to Nginx!</title>
      </head>
      <body>
        <h1>Hello, Kubernetes!</h1>
        <p>Nginx version 1.26.1</p>
      </body>
      </html>
    
    image:
      repository: nginx
      tag: 1.26.1
    
    replicaCount: 1
    EOF
    
    cat > Chart.yaml <<EOF
    apiVersion: v2
    name: nginx-chart
    description: A Helm chart for deploying Nginx with custom index.html
    type: application
    version: 1.0.0
    appVersion: "1.26.1"
    EOF
    
    # 이전 timeserver/service(nodeport) 삭제
    kubectl delete deploy,svc --all
    
    # 직접 배포 해보기
    helm template dev-nginx . -f values.yaml
    helm install dev-nginx . -f values.yaml
    helm list
    kubectl get deploy,svc,ep,cm dev-nginx -owide
    
    #
    curl http://127.0.0.1:30000
    curl -s http://127.0.0.1:30000 | grep version
    open http://127.0.0.1:30000
    
    
    # value 값 변경 후 적용 해보기 : version/tag, replicaCount
    cat > values.yaml <<EOF
    indexHtml: |
      <!DOCTYPE html>
      <html>
      <head>
        <title>Welcome to Nginx!</title>
      </head>
      <body>
        <h1>Hello, Kubernetes!</h1>
        <p>Nginx version 1.26.2</p>
      </body>
      </html>
    
    image:
      repository: nginx
      tag: 1.26.2
    
    replicaCount: 2
    EOF
    
    sed -i '' "s|1.26.1|1.26.2|g" Chart.yaml
    
    
    # helm chart 업그레이드 적용
    helm template dev-nginx . -f values.yaml # 적용 전 렌더링 확인 Render chart templates locally and display the output.
    helm upgrade dev-nginx . -f values.yaml
    
    # 확인
    helm list
    kubectl get deploy,svc,ep,cm dev-nginx -owide
    curl http://127.0.0.1:30000
    curl -s http://127.0.0.1:30000 | grep version
    open http://127.0.0.1:30000
    
    # 확인 후 삭제
    helm uninstall dev-nginx

    3.4. Repo(ops-deploy) 에 nginx helm chart 를 Argo CD를 통한 배포 1

    • git 작업
    • Argo CD에 App 등록 : ApplicationNEW APP
    • SYNC 클릭 으로 K8S(Live) 반영 확인 : 생성될 리소스 확인
    GitOps 방식(?)을 무시하고 K8S(Live)를 수정 시도해보기!
    • 1.26.2 로 업데이트(코드 수정) 후 반영 확인
    • Argo CD 웹 확인 → REFRESH 클릭 - Interval
    • SYNC 클릭 → SYNCHRONIZE 클릭
    • Argo CD 웹에서 App 삭제

    3.5. prd-nginx 배포하기

    👉🏻

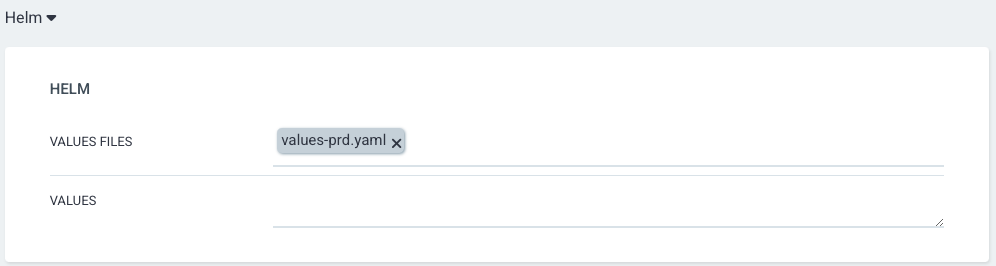
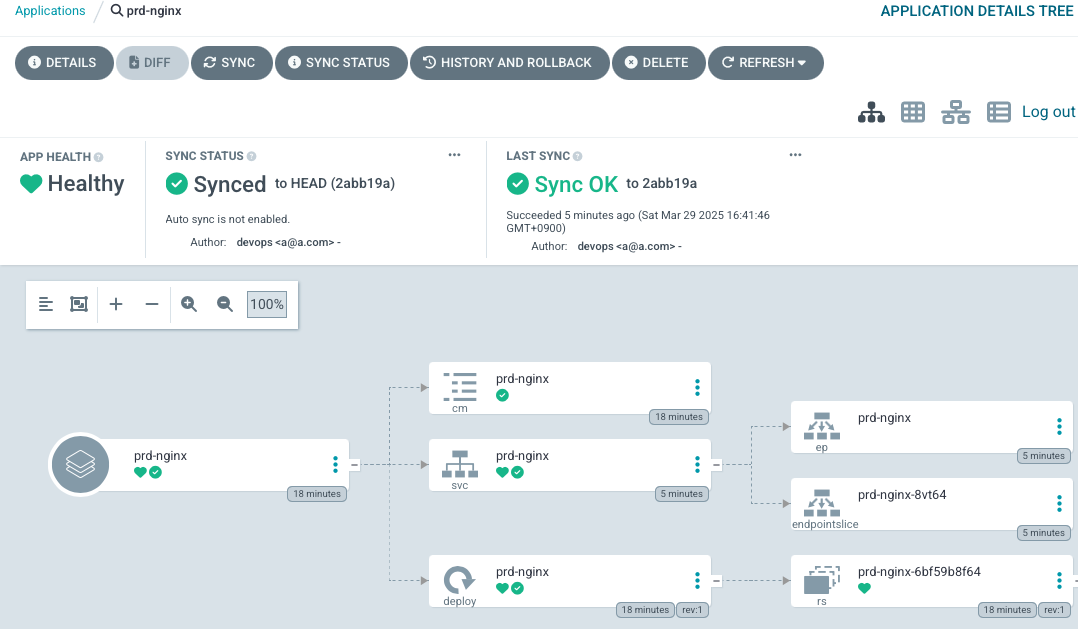
    위 ArgoCD App 을 신규 생성할 때 Helmprd-value 를 사용할 수 있게 설정 후 배포 실습 해보자!

    위에서 처럼 application을 생성할때 helm values files에 values-prd.yaml을 선택 하고, destination namespace를 prd-nginx로 배포하도록 한다.

    • helm chart 수정
    Copy
    # nginx-chart/template/service.yaml
    apiVersion: v1
    kind: Service
    metadata:
      name: {{ .Release.Name }}
    spec:
      selector:
        app: {{ .Release.Name }}
      ports:
      {{- range .Values.service.ports }}
      - protocol: TCP
        port: 80
        targetPort: 80
        nodePort: {{ .nodePort }}
      {{- end }}
      type: NodePort
    
    # nginx-chart/values-dev.yaml
    indexHtml: |
      <!DOCTYPE html>
      <html>
      <head>
        <title>Welcome to Nginx!</title>
      </head>
      <body>
        <h1>Hello, Kubernetes!</h1>
        <p>DEV : Nginx version 1.26.2</p>
      </body>
      </html>
    
    image:
      repository: nginx
      tag: 1.26.2
    
    replicaCount: 2
    
    service:
      ports:
      - nodePort: 30000 # 기존 port 유지
    
    # nginx-chart/values-prd.yaml
    indexHtml: |
      <!DOCTYPE html>
      <html>
      <head>
        <title>Welcome to Nginx!</title>
      </head>
      <body>
        <h1>Hello, Kubernetes!</h1>
        <p>PRD : Nginx version 1.26.2</p>
      </body>
      </html>
    
    image:
      repository: nginx
      tag: 1.26.2
    
    replicaCount: 2
    
    service:
      ports:
      - nodePort: 30004 # prd-nginx service를 위한 nodeport 새롭게 할당
    • git push
    Copy
    git add . && git commit -m "Update nginx version $(cat nginx-chart/VERSION) fix nodePort for prd-nginx" && git push -u origin main

    위의 과정을 수행하고 argocd에서 위에서 생성한 application에서 sync를 해준다.

    3.6. Repo(ops-deploy) 에 nginx helm chart 를 Argo CD를 통한 배포 2 : ArgoCD Declarative Setup

    • ArgoCD Declarative Setup - Project, applications(ArgoCD App 자체를 yaml로 생성), ArgoCD Settings - Docs
    • (참고) K8S FinalizersArgo Finalizers 동작 - Docs , Blog
    • dev-nginx App 생성 및 Auto SYNC
    • prd-nginx App 생성 및 Auto SYNC

    3.7. Repo(ops-deploy) 에 Webhook 를 통해 Argo CD 에 즉시 반영 trigger하여 k8s 배포 할 수 있게 설정 - Docs

    • Repo(ops-deploy) 에 webhooks 설정 : Gogs 선택
    • dev-nginx App 생성 및 Auto SYNC
    • Git(Gogs) 수정 후 ArgoCD 즉시 반영 확인
    • Argo CD App 삭제
    1. Jenkins CI + ArgoCD + K8S(Kind)

    4.2. Repo(ops-deploy) 를 바라보는 ArgoCD App 생성

    Copy
    #
    echo $MyIP
    
    cat <https://kubernetes.default.svc
    EOF
    
    #
    kubectl get applications -n argocd timeserver
    kubectl get applications -n argocd timeserver -o yaml | kubectl neat
    kubectl describe applications -n argocd timeserver
    kubectl get deploy,rs,pod
    kubectl get svc,ep timeserver
    
    #
    curl http://127.0.0.1:30000
    curl http://127.0.0.1:30000/healthz
    open http://127.0.0.1:30000

    4.3. Repo(dev-app) 코드 작업

    • dev-app Repo에 VERSION 업데이트 시 → ops-deploy Repo 에 dev-app 에 파일에 버전 정보 업데이트 작업 추가
    • 아래는 dev-app 에 위치한 Jenkinsfile 로 젠킨스에 SCM-Pipeline(SCM:git) 으로 사용되고 있는 파일을 수정해서 실습에 사용
    • 아래는 dev-app (Repo) 에서 git push 수행

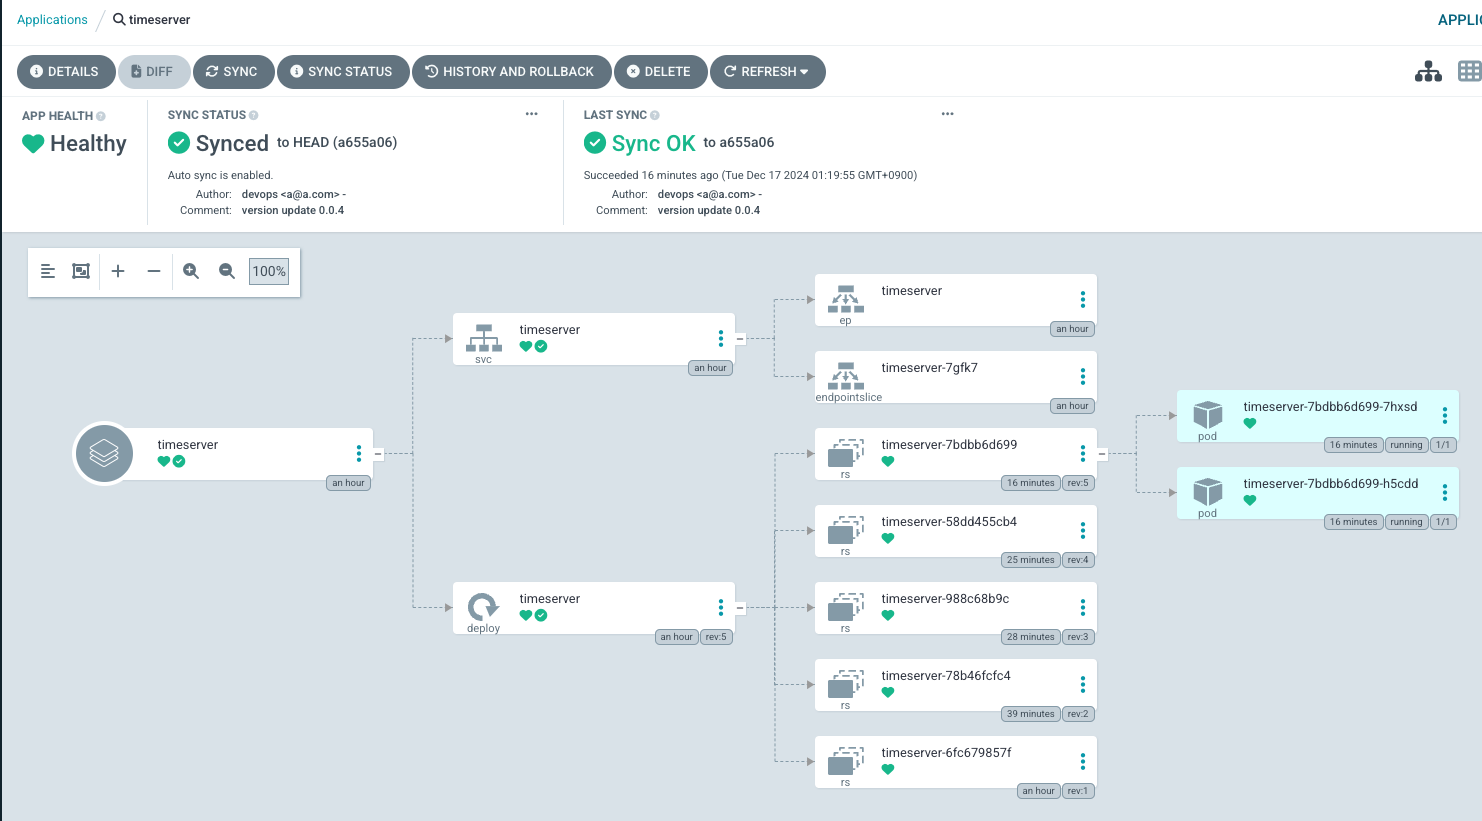
    4.4. Full CI/CD 동작 확인 : Argo CD app Trigger 후 AutoSync 로 신규 버전 업데이트 진행 확인

    • dev-app Repo 에서 한번 더 버전 업데이트 수행
    Copy
    # [터미널] 동작 확인 모니터링
    while true; do curl -s --connect-timeout 1 http://127.0.0.1:30000 ; echo ; kubectl get deploy timeserver -owide; echo "------------" ; sleep 1 ; done
    
    # VERSION 파일 수정 : 0.0.4
    # server.py 파일 수정 : 0.0.4
    
    # git push : VERSION, server.py, Jenkinsfile
    git add . && git commit -m "VERSION $(cat VERSION) Changed" && git push -u origin main
    Copy
    # VERSION 파일 수정 : 0.0.5
    # server.py 파일 수정 : 0.0.5
    
    # git push : VERSION, server.py, Jenkinsfile
    git add . && git commit -m "VERSION $(cat VERSION) Changed" && git push -u origin main
    👉🏻

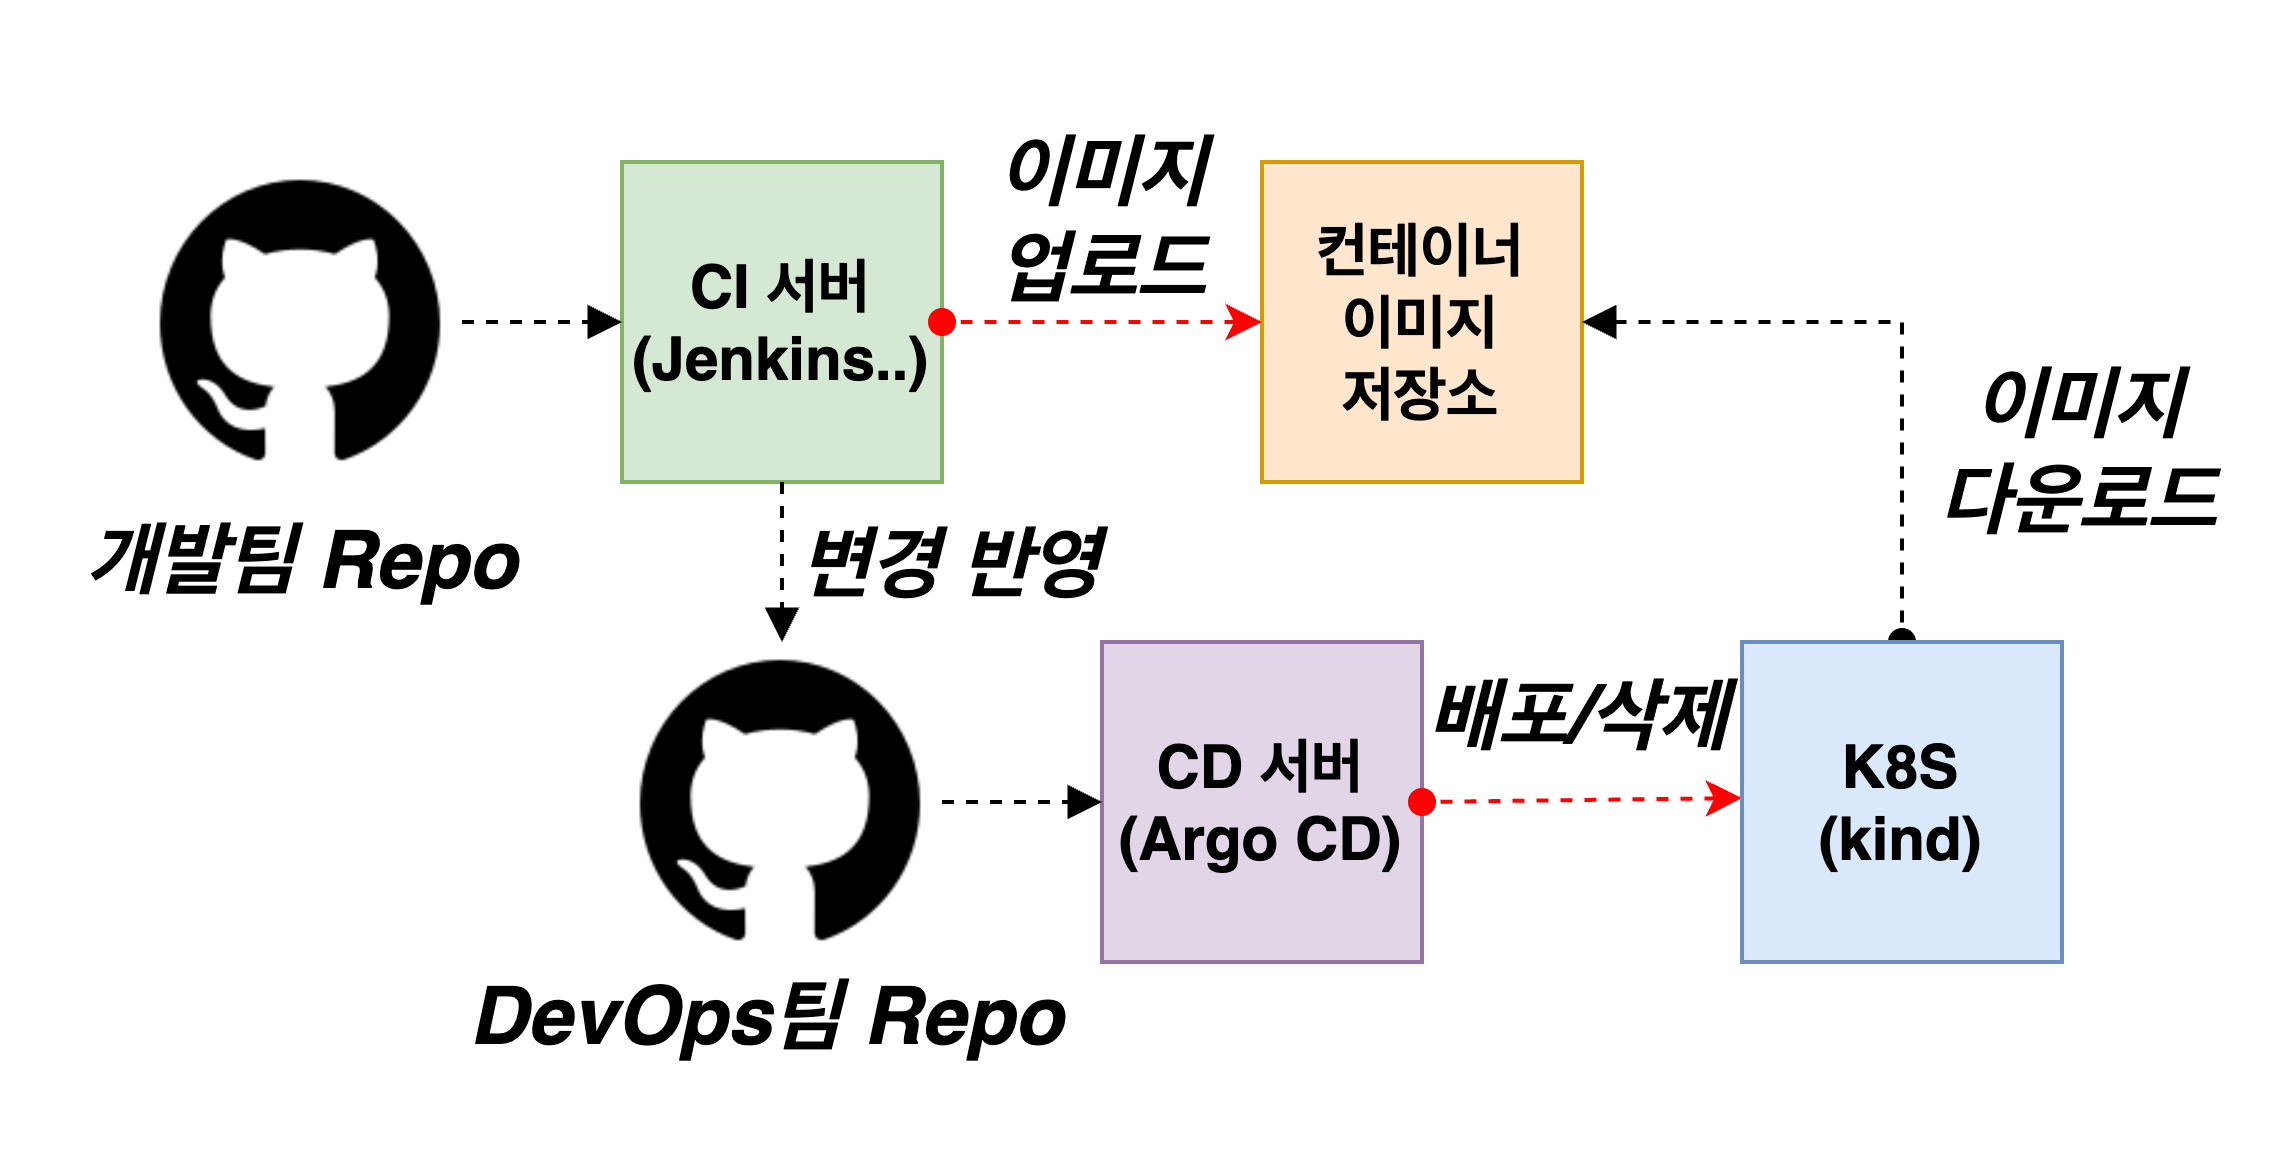
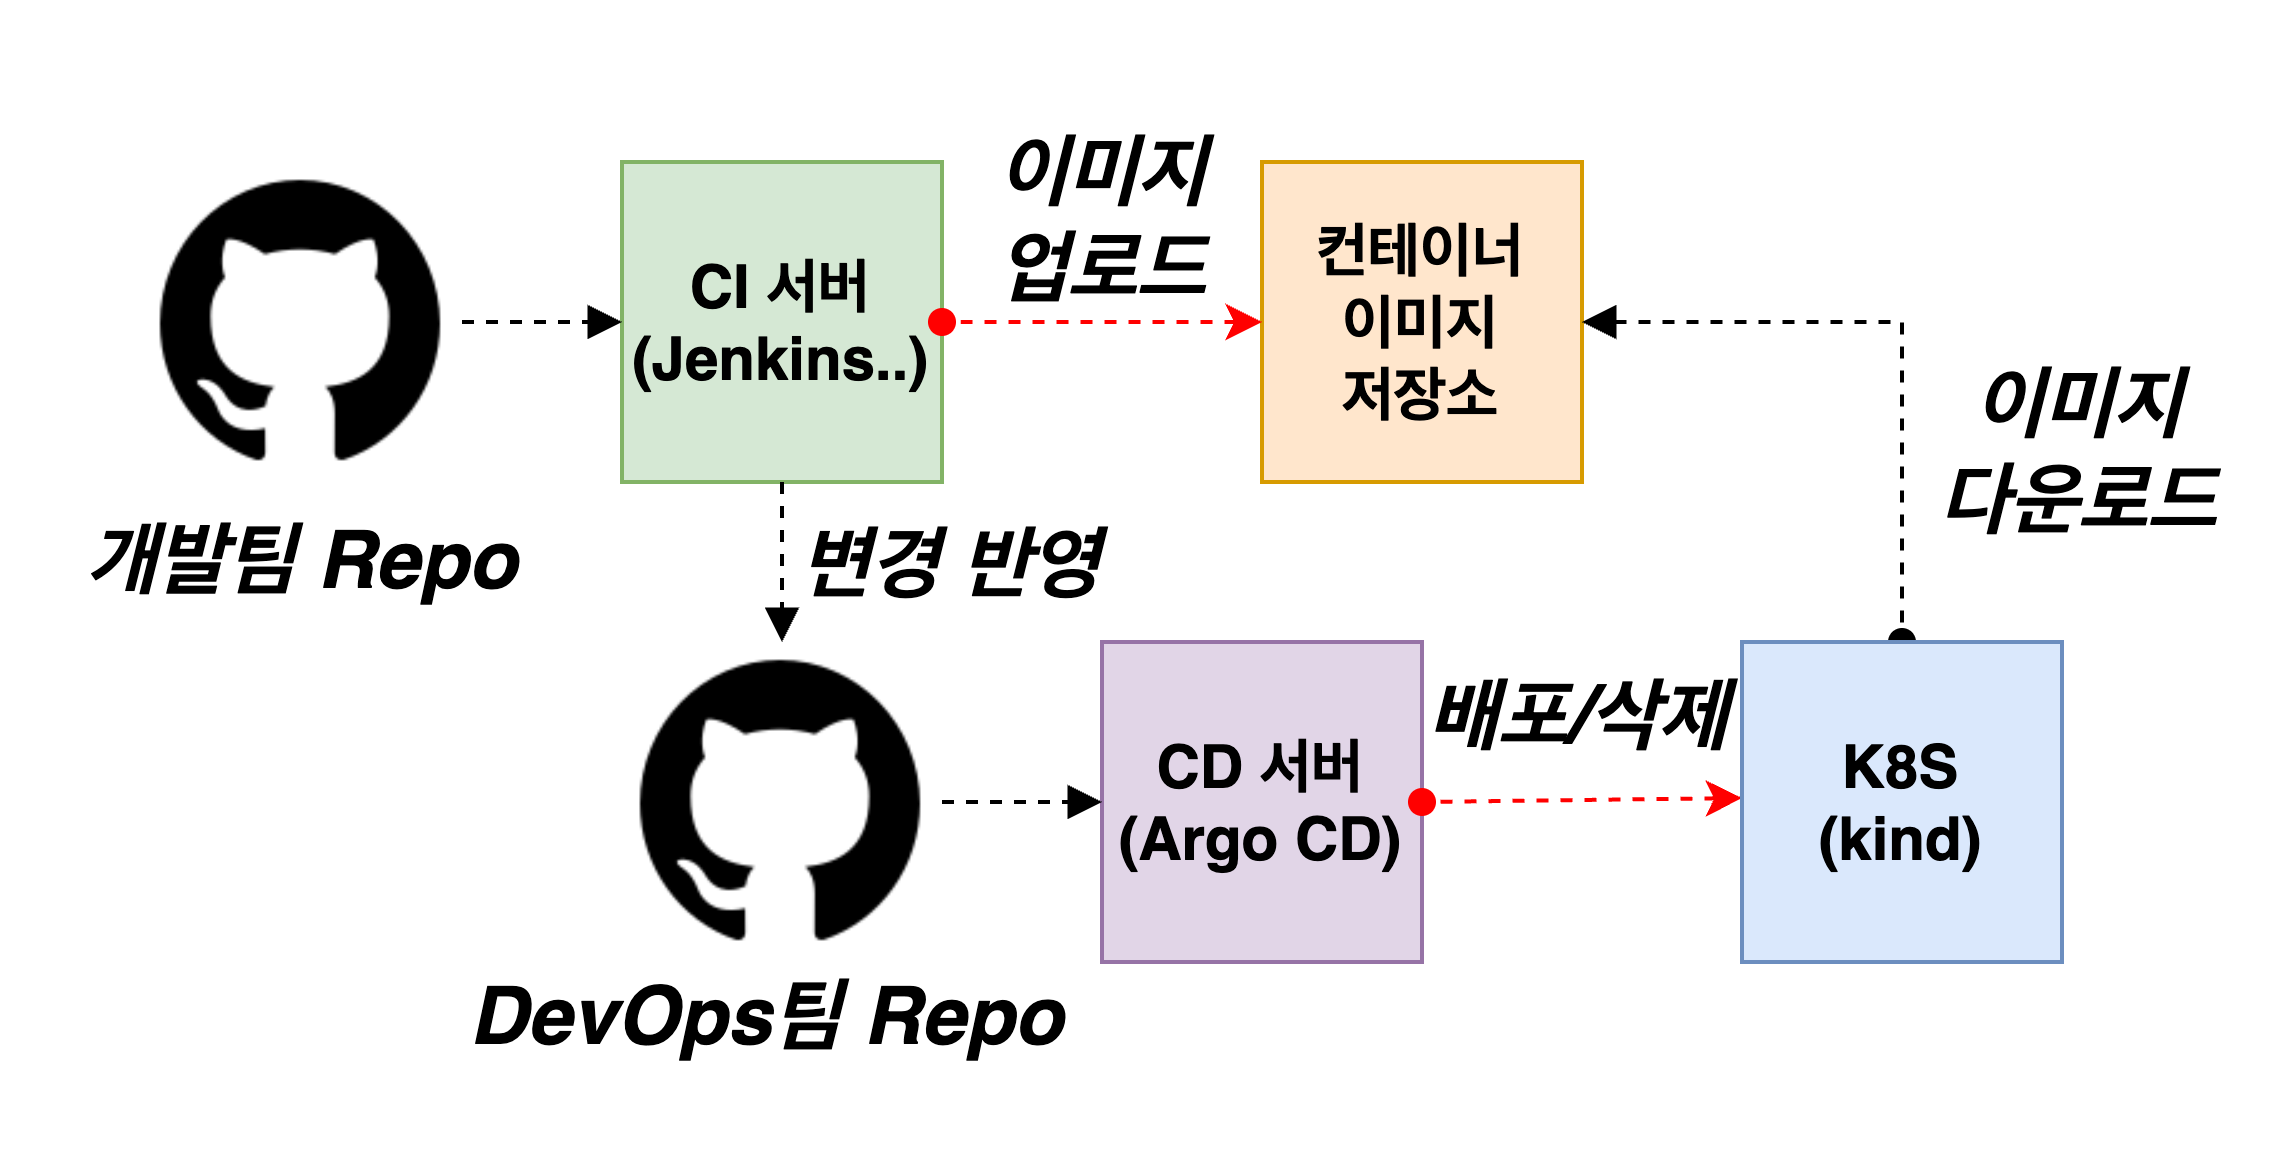
    즉, 개발팀 dev-app Repo 에서만 코드 업데이트 작업 시, jenkins pipeline 에서 ops-deploy Repo 에 버전 정보 업데이트를 하고, 이후 Argo CD가 자동으로 신규 버전 정보로 배포를 하게 된다.

    1. Argo Image Updater

    5.2. KrBlog

    • argo CD Image Updater* - Blog
    • ArgoCD 빠르게 레벨업 하기* - Blog
    • [CD] ArgoCD Image Updater를 활용한 Continuous Delivery w/AWS ECR - Blog
    • K8s Argocd Image Updater - Blog
    • 제목은 안정적인 AI 서빙 시스템으로 하겠습니다. 근데 이제 자동화를 곁들인… - Blog
    • [AWS] ArgoCD Image Updater로 이미지 자동 배포 with ECR - Blog
    1. ArgoCD App-of-Apps

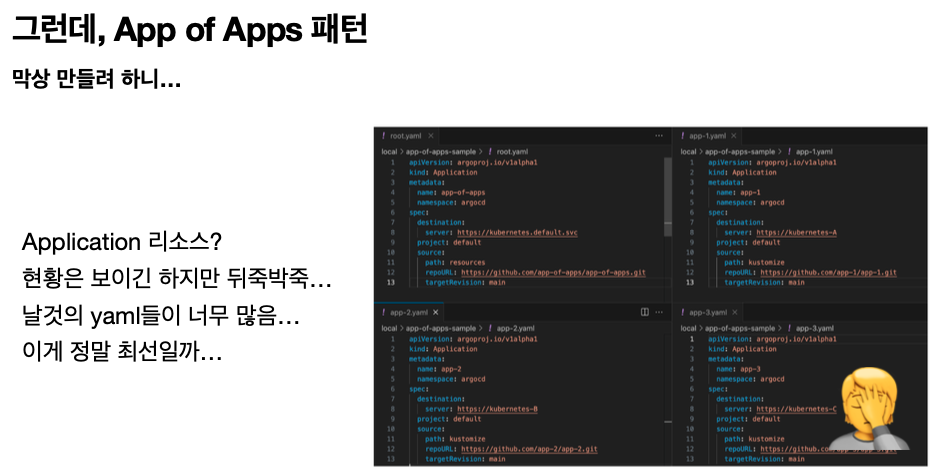
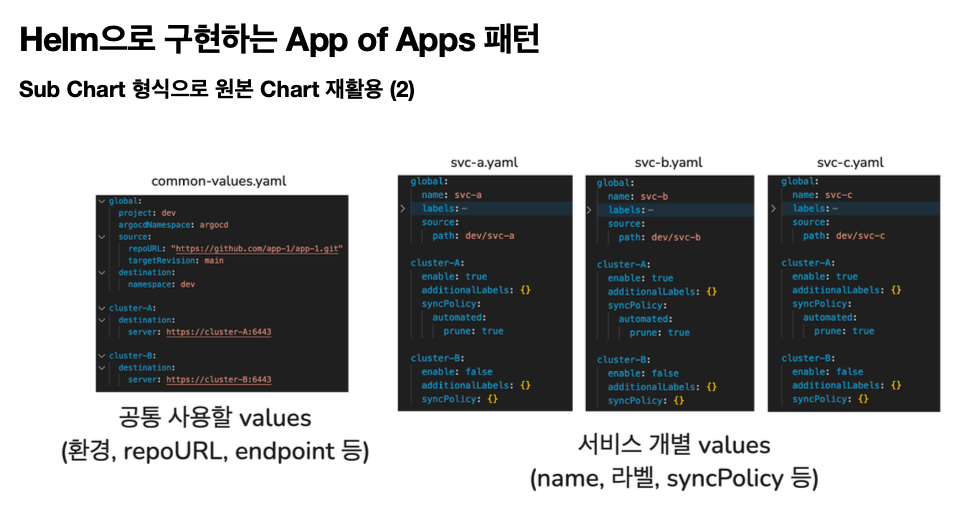
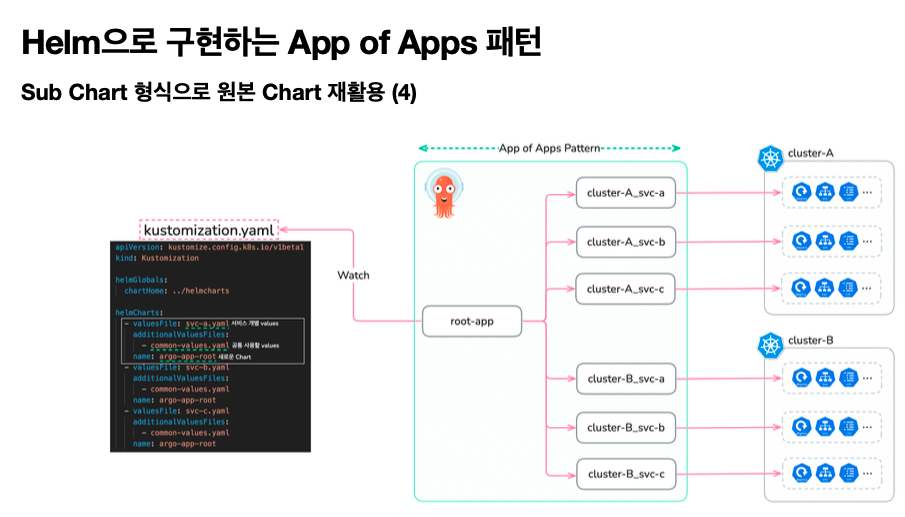
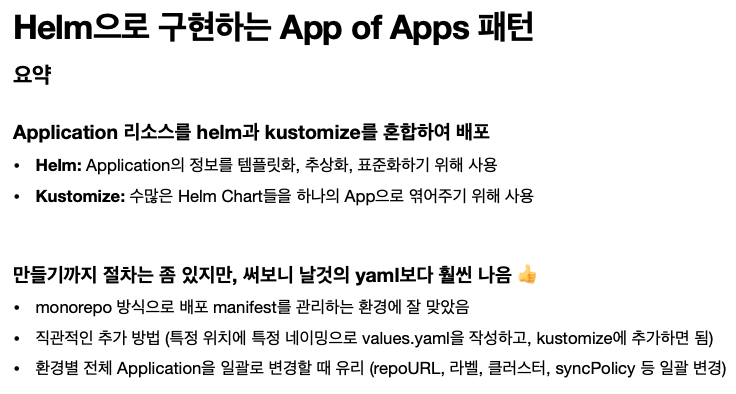
    6.2. [ArgoCD Docs] Cluster Boostrapping : app of apps pattern - Docs , Github

    • apps 생성
    • You can either sync via the UI, firstly filter by the correct label:
    • Then select the "out of sync" apps and sync:
    • 확인
    • 삭제 : Cascading deletion - app of app application과 모든 application이 삭제 kubectl delete applications -n argocd apps - Docs
    Non cascade를 선택하면 app of app application만 삭제되고 다른 application은 유지 Ignoring differences in child applications

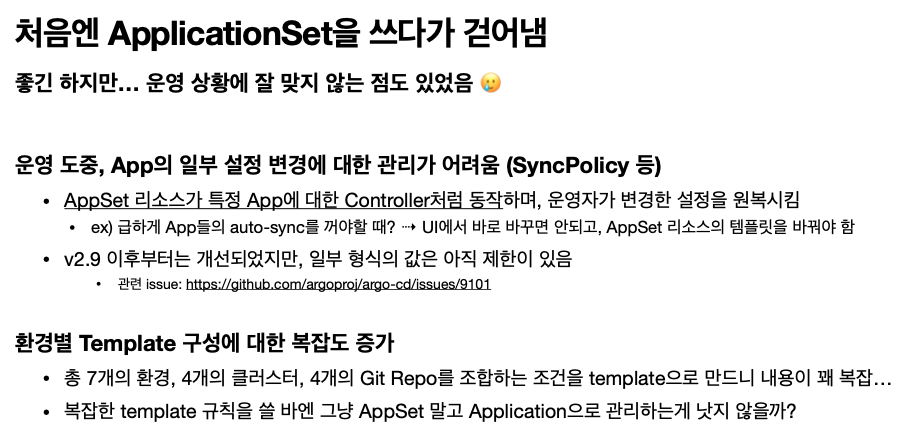
    6.3. ApplicationSets - 링크

    6.4. [CNKCD2024] 선언형으로 만드는 멀티 클러스터 - Cluster API 와 App of Apps 패턴 (문지현) , PDF

     
    1. Argo Rollout

    7.2. Argo Rollouts 설치 및 Sample 테스트 - Docs

    7.2.1. Blue/Green

    아래와 같이 blue/green 배포를 위한 rollout.yaml 을 정의한다.

    Copy
    apiVersion: argoproj.io/v1alpha1
    kind: Rollout
    metadata:
      name: rollout-bluegreen
    spec:
      replicas: 2
      revisionHistoryLimit: 2
      selector:
        matchLabels:
          app: rollout-bluegreen
      template:
        metadata:
          labels:
            app: rollout-bluegreen
        spec:
          containers:
          - name: rollouts-demo
            image: argoproj/rollouts-demo:blue
            # image: argoproj/rollouts-demo:green
            imagePullPolicy: Always
            ports:
            - containerPort: 8080
      strategy:
        blueGreen:
          activeService: rollout-bluegreen-active     # 최초 생성되는 argoproj/rollouts-demo:blue를 갖는 rs는 active, preview service가 모두 같이 바라보고 있다. 
          previewService: rollout-bluegreen-preview   # 이후 green으로 update시 active는 blue preview는 green image의 rs를 바라본다.
          autoPromotionEnabled: false
     
    ---
    kind: Service
    apiVersion: v1
    metadata:
      name: rollout-bluegreen-active
    spec:
      type: NodePort
      selector:
        app: rollout-bluegreen
      ports:
      - protocol: TCP
        port: 80
        targetPort: 8080
        nodePort: 30000
     
    ---
    kind: Service
    apiVersion: v1
    metadata:
      name: rollout-bluegreen-preview
    spec:
      type: NodePort
      selector:
        app: rollout-bluegreen
      ports:
      - protocol: TCP
        port: 80
        targetPort: 8080
        nodePort: 30001
    Copy
    kubectl apply -f rollout.yaml
    
    kubectl get po
    NAME                                 READY   STATUS    RESTARTS   AGE
    curl-pod                             1/1     Running   0          8h
    rollout-bluegreen-5ffd47b8d4-4gs8c   1/1     Running   0          14m
    rollout-bluegreen-5ffd47b8d4-qc57m   1/1     Running   0          14m
    
    kubectl get rs
    NAME                           DESIRED   CURRENT   READY   AGE
    rollout-bluegreen-5ffd47b8d4   2         2         2       14m
    
    kubectl get ep
    NAME                        ENDPOINTS                           AGE
    kubernetes                  172.19.0.3:6443                     7h5m
    rollout-bluegreen-active    10.244.1.41:8080,10.244.2.38:8080   14m
    rollout-bluegreen-preview   10.244.1.41:8080,10.244.2.38:8080   14m

    이제 blue/green 배포를 위한 준비가 완료되었으면, 아래와 같이 rollout-bluegreen rollout resource의 container.image를 green으로 변경한다.

    Copy
    # rollout.yaml
    apiVersion: argoproj.io/v1alpha1
    kind: Rollout
    metadata:
      name: rollout-bluegreen
    spec:
      replicas: 2
      revisionHistoryLimit: 2
      selector:
        matchLabels:
          app: rollout-bluegreen
      template:
        metadata:
          labels:
            app: rollout-bluegreen
        spec:
          containers:
          - name: rollouts-demo
            # image: argoproj/rollouts-demo:blue
            image: argoproj/rollouts-demo:green
            imagePullPolicy: Always
            ports:
            - containerPort: 8080
      strategy:
        blueGreen:
          activeService: rollout-bluegreen-active
          previewService: rollout-bluegreen-preview
          autoPromotionEnabled: false
          
    kubectl apply -f rollout.yaml
    
    kubectl get rs
    NAME                           DESIRED   CURRENT   READY   AGE
    rollout-bluegreen-5ffd47b8d4   2         2         2       14m
    rollout-bluegreen-75695867f    2         2         2       77s
    
    kubectl get svc -o wide
    NAME                        TYPE        CLUSTER-IP      EXTERNAL-IP   PORT(S)        AGE     SELECTOR
    kubernetes                  ClusterIP   10.96.0.1       <none>        443/TCP        7h18m   <none>
    rollout-bluegreen-active    NodePort    10.96.223.222   <none>        80:30000/TCP   27m     app=rollout-bluegreen,rollouts-pod-template-hash=5ffd47b8d4
    rollout-bluegreen-preview   NodePort    10.96.36.245    <none>        80:30001/TCP   27m     app=rollout-bluegreen,rollouts-pod-template-hash=75695867f
    
    kubectl get ep
    NAME                        ENDPOINTS                           AGE
    kubernetes                  172.19.0.3:6443                     7h5m
    rollout-bluegreen-active    10.244.1.41:8080,10.244.2.38:8080   14m
    rollout-bluegreen-preview   10.244.1.42:8080,10.244.2.39:8080   14m
    rollouts-demo               <none>                              42m
    
    kubectl get po -o wide
    NAME                                 READY   STATUS    RESTARTS   AGE   IP            NODE            NOMINATED NODE   READINESS GATES
    curl-pod                             1/1     Running   0          8h    10.244.1.5    myk8s-worker    <none>           <none>
    rollout-bluegreen-5ffd47b8d4-4gs8c   1/1     Running   0          15m   10.244.1.41   myk8s-worker    <none>           <none>
    rollout-bluegreen-5ffd47b8d4-qc57m   1/1     Running   0          15m   10.244.2.38   myk8s-worker2   <none>           <none>
    rollout-bluegreen-75695867f-4w6cs    1/1     Running   0          95s   10.244.2.39   myk8s-worker2   <none>           <none>
    rollout-bluegreen-75695867f-q52hj    1/1     Running   0          95s   10.244.1.42   myk8s-worker    <none>           <none>

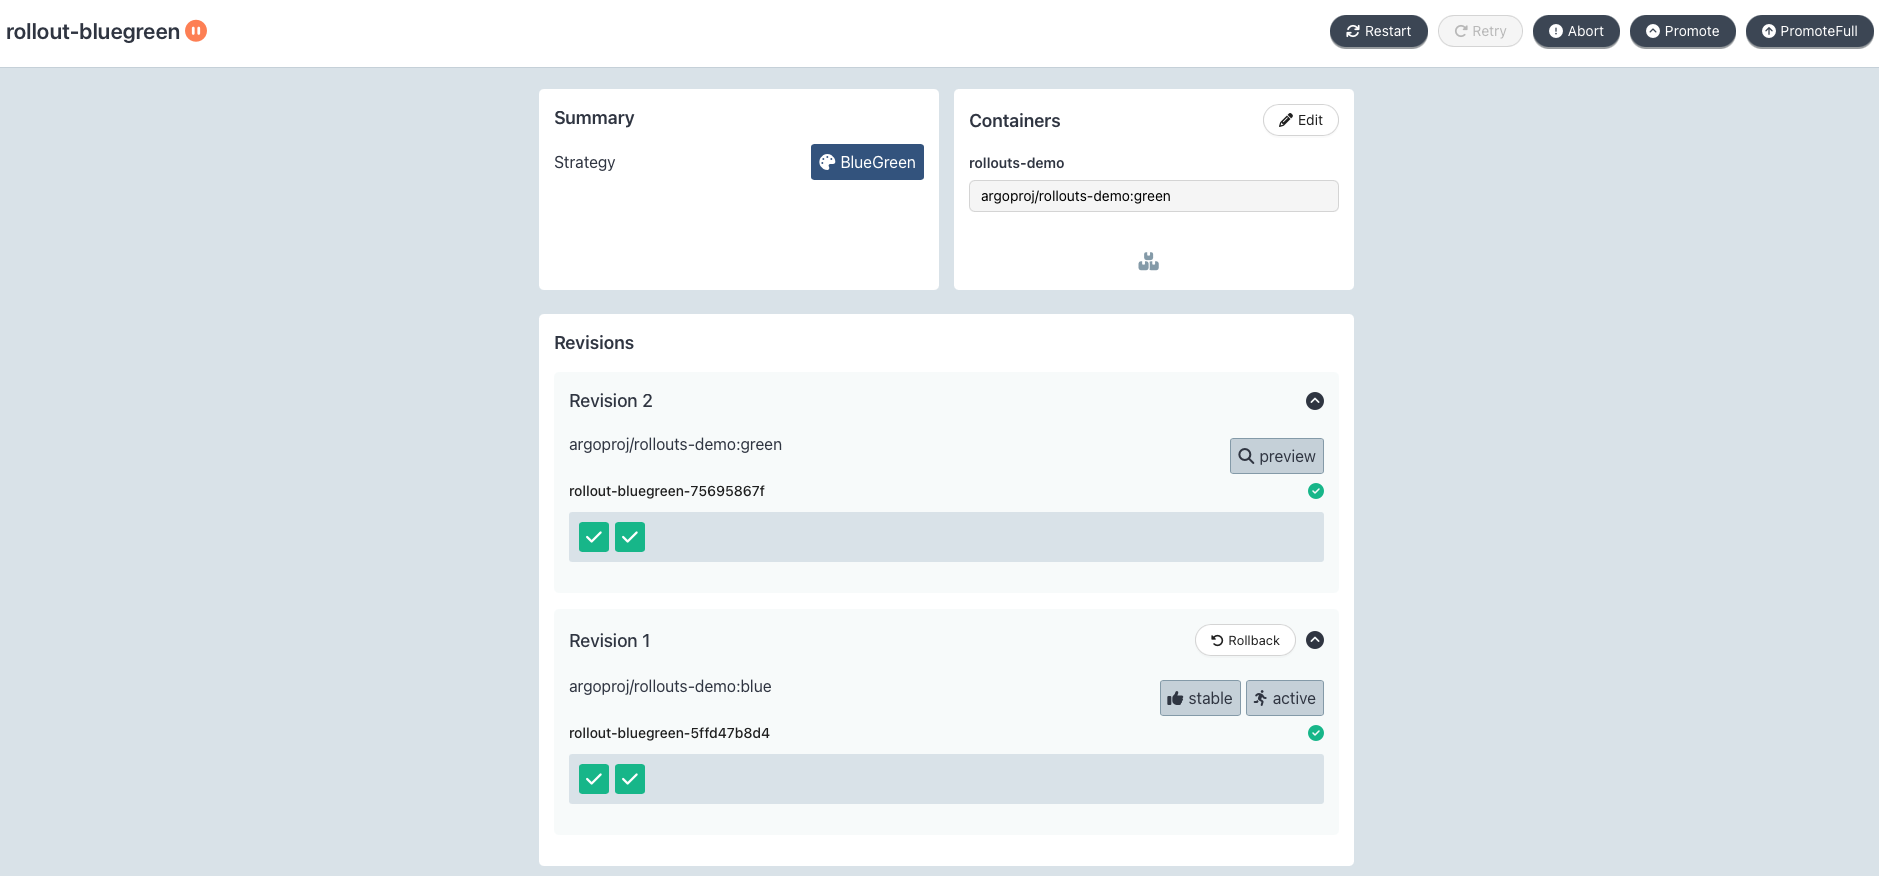
    새롭게 green version의 rs가 생성되었고, preview service가 green version의 rs를 바라보고게 되고 endpoints도 green version의 pod ip인것을 볼 수 있다.

    argo-rollout web을 확인해보면 아래와 같이 blue version은 아직 stable 상태로있고, 새롭게 생성된 green version이 preview로 추가된것을 볼 수 있다.

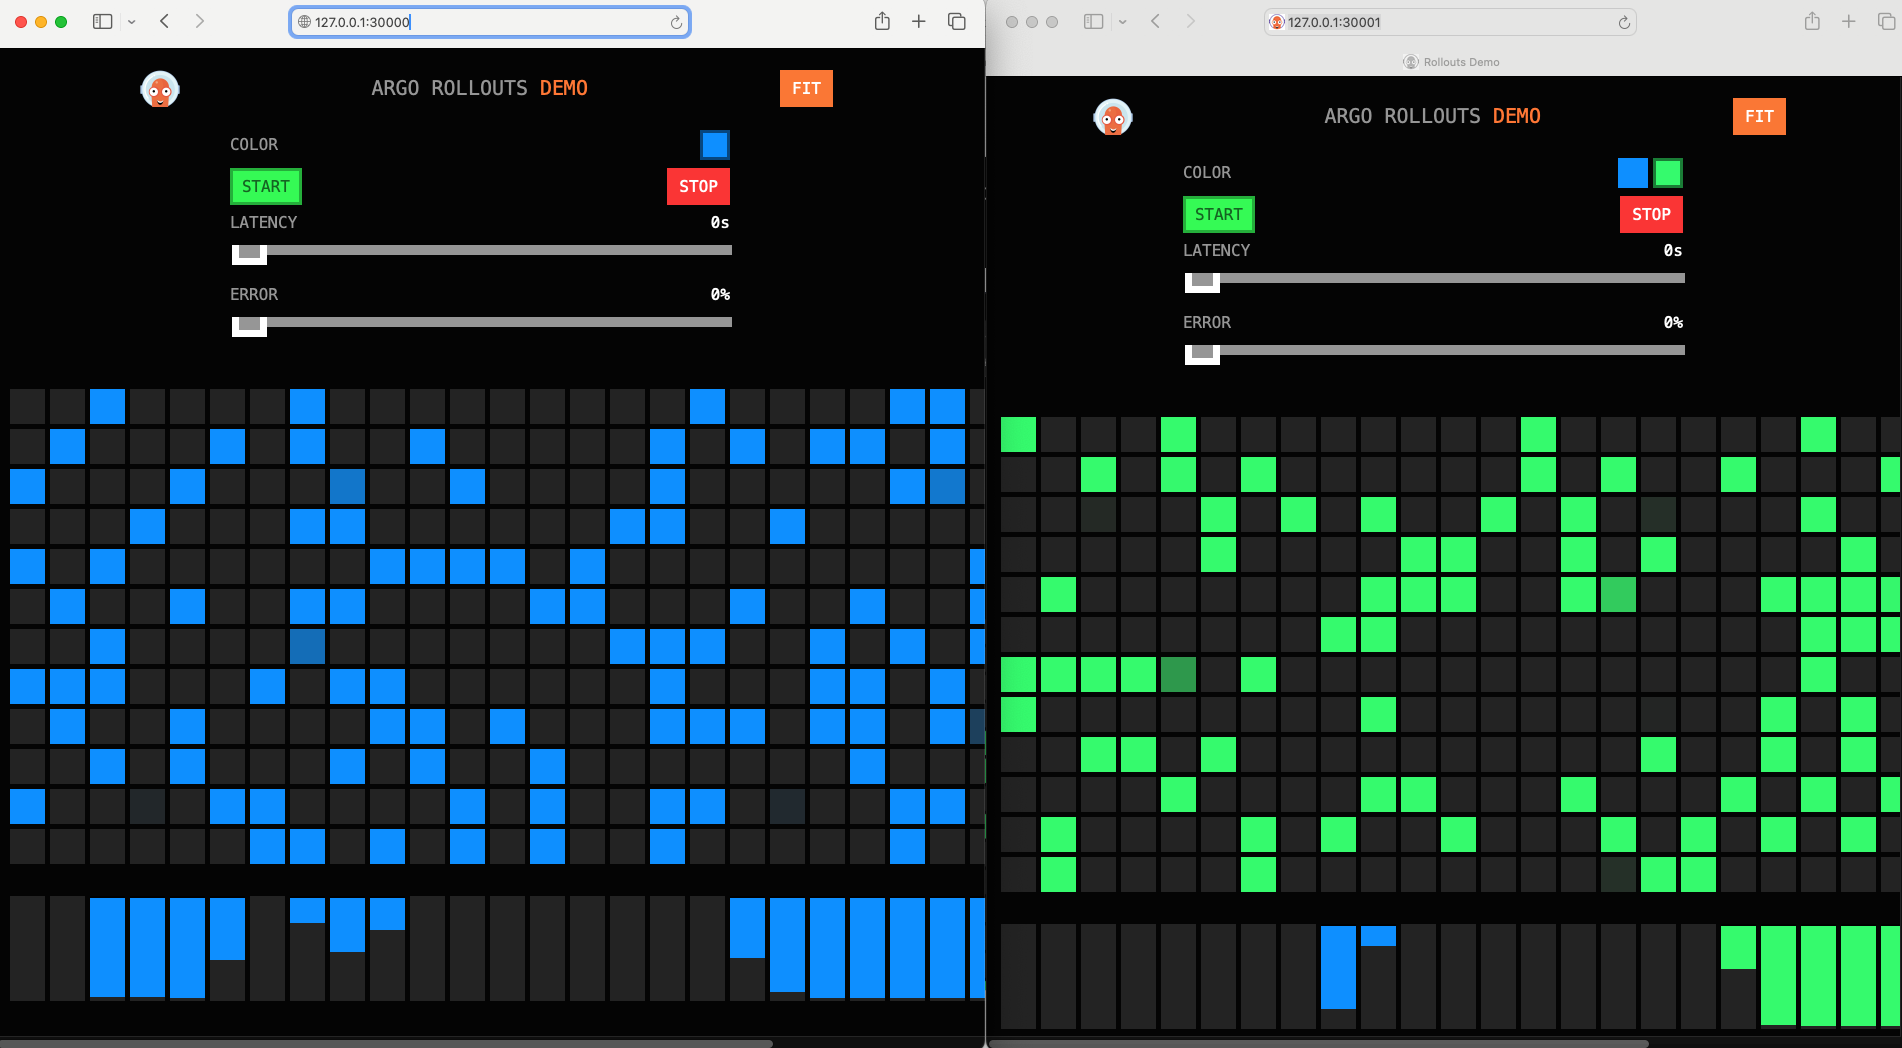
    아래에서 보는 것 처럼 active service에 접근하면 blue version의 web이 보이고, preview serivce에 접근하면 green version의 web이 보이고 있다.

    ingress와 연동한다면 사용자에게 노출할 ingress는 active service에 연결해두고, 내부에서 배포전에 확인 할 용도로 사용할 ingress에는 preview service를 연결해두어 내부적으로 검증을 하면 되겠다.

    이제 preview service의 green version app이 모두 검증이 끝났다고 가정을 하면, 사용자에게도 green version의 app이 노출되게 해야 한다.

    argo-rollout web상에서 promote를 통해서 active service도 green version을 바라보도록 할 수 있다.

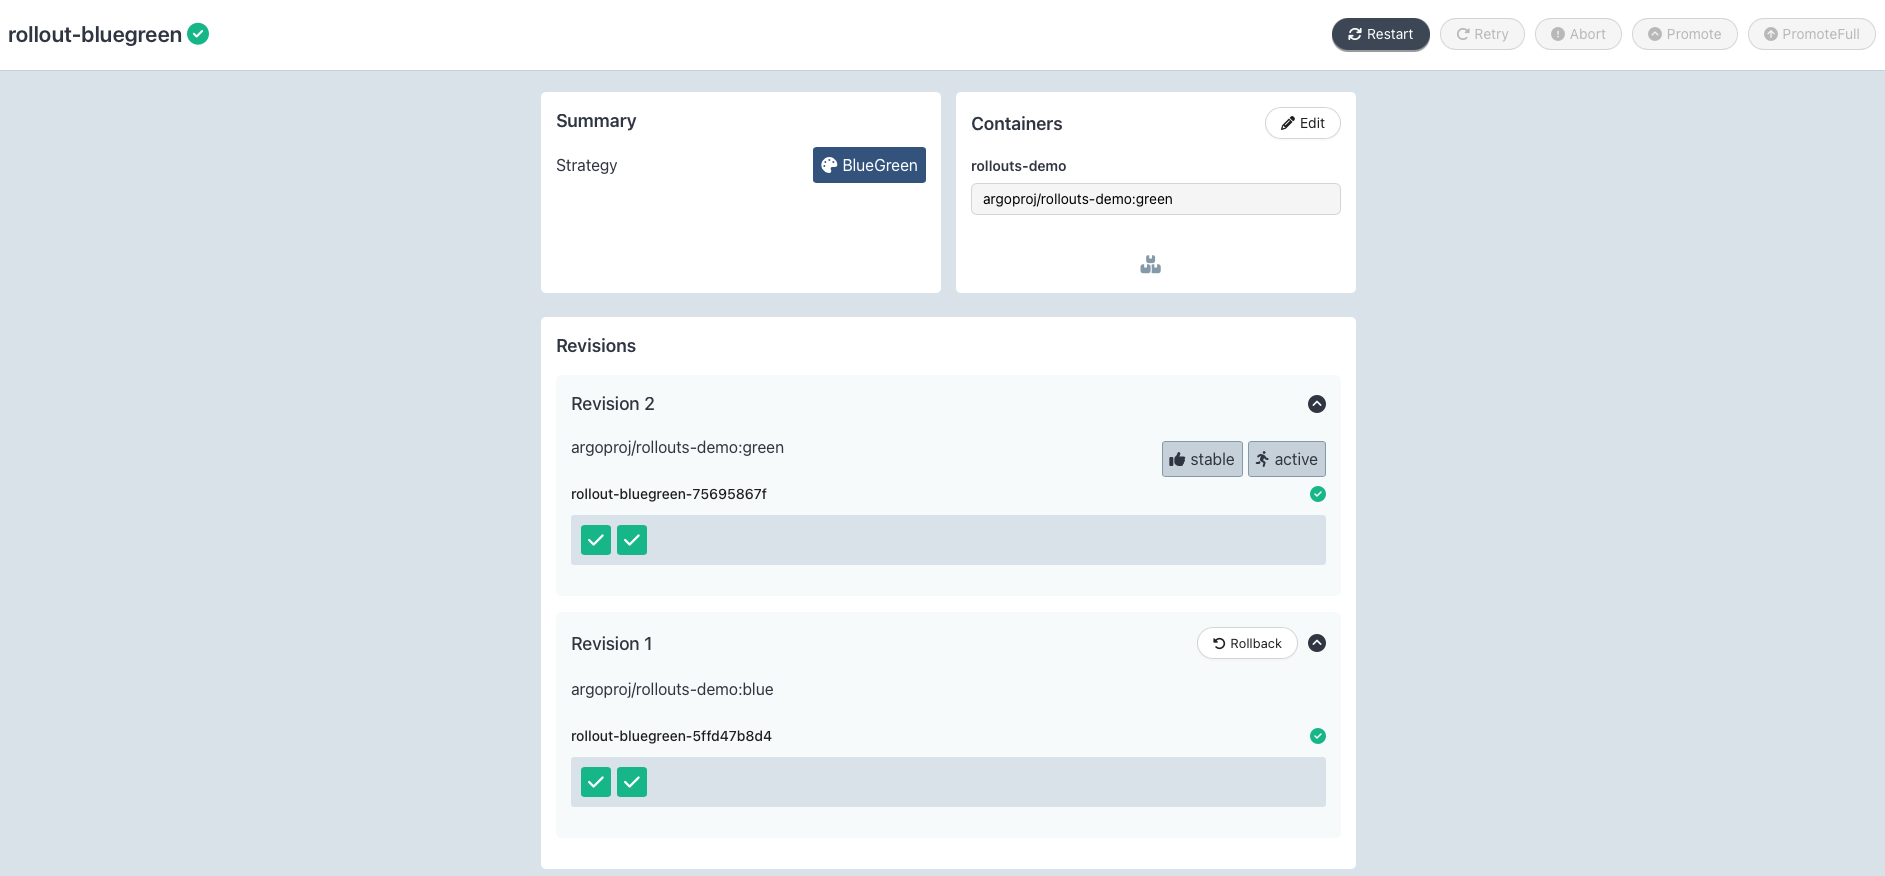
    이제 green version app의 rs가 stable/ active 상태인것을 볼 수 있다.

    아래에서 볼 수 있듯이 active와 preview service모두 같은 endpoint 를 갖고 있다. 즉, 두 service 모두 green version app의 rs를 바라보고있다.

    이렇게 하여 최종적으로 검증이 완료된 green verion의 app이 사용자에게 노출되게 된다.

    Copy
    kubectl get svc -o wide
    NAME                        TYPE        CLUSTER-IP      EXTERNAL-IP   PORT(S)        AGE     SELECTOR
    kubernetes                  ClusterIP   10.96.0.1       <none>        443/TCP        7h28m   <none>
    rollout-bluegreen-active    NodePort    10.96.223.222   <none>        80:30000/TCP   38m     app=rollout-bluegreen,rollouts-pod-template-hash=75695867f
    rollout-bluegreen-preview   NodePort    10.96.36.245    <none>        80:30001/TCP   38m     app=rollout-bluegreen,rollouts-pod-template-hash=75695867f
    
    kubectl get ep         
    NAME                        ENDPOINTS                           AGE
    kubernetes                  172.19.0.3:6443                     7h28m
    rollout-bluegreen-active    10.244.1.42:8080,10.244.2.39:8080   38m
    rollout-bluegreen-preview   10.244.1.42:8080,10.244.2.39:8080   38m
    
    kubectl get po -o wide 
    NAME                                 READY   STATUS    RESTARTS   AGE   IP            NODE            NOMINATED NODE   READINESS GATES
    curl-pod                             1/1     Running   0          8h    10.244.1.5    myk8s-worker    <none>           <none>
    rollout-bluegreen-5ffd47b8d4-4gs8c   1/1     Running   0          38m   10.244.1.41   myk8s-worker    <none>           <none>
    rollout-bluegreen-5ffd47b8d4-qc57m   1/1     Running   0          38m   10.244.2.38   myk8s-worker2   <none>           <none>
    rollout-bluegreen-75695867f-4w6cs    1/1     Running   0          24m   10.244.2.39   myk8s-worker2   <none>           <none>
    rollout-bluegreen-75695867f-q52hj    1/1     Running   0          24m   10.244.1.42   myk8s-worker    <none>           <none>
    
    kubectl get rs         
    NAME                           DESIRED   CURRENT   READY   AGE
    rollout-bluegreen-5ffd47b8d4   2         2         2       38m
    rollout-bluegreen-75695867f    2         2         2       24m


    7.2.2. Canary

    • Argo Rollouts 설치
    # 네임스페이스 생성 및 파라미터 파일 작성
    cd cicd-labs
    
    kubectl create ns argo-rollouts
    cat <<EOT > argorollouts-values.yaml
    dashboard:
      enabled: true
      service:
        type: NodePort
        nodePort: 30003
    EOT
    
    # 설치: 2.35.1
    helm install argo-rollouts argo/argo-rollouts --version 2.39.2 -f argorollouts-values.yaml --namespace argo-rollouts
    
    # 확인
    kubectl get all -n argo-rollouts
    kubectl get crds
    
    # Argo rollouts 대시보드 접속 주소 확인
    echo "http://127.0.0.1:30003"
    open "http://127.0.0.1:30003"


    • Deploying a Rollout
      • 먼저, 롤아웃 리소스와 해당 롤아웃을 타겟으로 하는 Kubernetes 서비스를 배포합니다.
      • 이 가이드의 예제 롤아웃은 카나리아 업데이트 전략을 사용하여 트래픽의 20%를 카나리아로 보내고, 이어서 수동 프로모션을 실시하며, 마지막으로 업그레이드의 나머지 기간 동안 점진적으로 자동 트래픽이 증가합니다.
      • 이 동작은 롤아웃 사양의 다음 부분에서 설명됩니다
    spec:
      replicas: 5
      strategy:
        canary:
          steps:
          - setWeight: 20
          - pause: {}
          - setWeight: 40
          - pause: {duration: 10}
          - setWeight: 60
          - pause: {duration: 10}
          - setWeight: 80
          - pause: {duration: 10}
    # 다음 명령을 실행하여 초기 롤아웃 및 서비스를 배포합니다:
    kubectl apply -f https://raw.githubusercontent.com/argoproj/argo-rollouts/master/docs/getting-started/basic/rollout.yaml
    kubectl apply -f https://raw.githubusercontent.com/argoproj/argo-rollouts/master/docs/getting-started/basic/service.yaml
    
    # 확인
    kubectl get rollout --watch
    kubectl get rollout
    kubectl describe rollout
    
    kubectl get pod -l app=rollouts-demo
    kubectl get svc,ep rollouts-demo
    kubectl get rollouts rollouts-demo -o json | grep rollouts-demo
    ...
       "image": "argoproj/rollouts-demo:blue"
    ...

    default 네임스페이스 선택 → rollout-demo 클릭


    • 모든 롤아웃의 초기 생성물은 업그레이드가 발생하지 않았기 때문에 즉시 복제본을 100%로 확장합니다(카나리 업그레이드 단계, 분석 등 생략).
    • Argo 롤아웃 쿠벡틀 플러그인을 사용하면 롤아웃 및 관련 리소스(ReplicaSets, Pods, AnalysisRuns)를 시각화할 수 있으며, 발생하는 실시간 상태 변경 사항을 표시할 수 있습니다. 롤아웃이 배포되는 동안 롤아웃을 확인하려면 플러그인에서 get rollout --watch 명령을 실행하세요:

    Updating a Rollout

    • 다음은 업데이트를 수행할 시간입니다. 배포와 마찬가지로 Pod 템플릿 필드(spec.template)를 변경하면 새로운 버전(즉, ReplicaSet)이 배포됩니다.
    • 롤아웃 업데이트에는 롤아웃 사양을 수정하고 일반적으로 컨테이너 이미지 필드를 새 버전으로 변경한 다음 새로운 매니페스트에 대해 kubectl 적용을 실행하는 작업이 포함됩니다.
    • 편의상 롤아웃 플러그인은 실시간 롤아웃 객체에 대해 다음 단계를 수행하는 설정 이미지 명령을 제공합니다. 다음 명령을 실행하여 롤아웃 데모 롤아웃을 컨테이너의 "yellow" 버전으로 업데이트합니다:
    # Run the following command to update the rollouts-demo Rollout with the "yellow" version of the container:
    KUBE_EDITOR="nano" kubectl edit rollouts rollouts-demo
    ..
         - image: argoproj/rollouts-demo:yellow
    ...
    
    #
    kubectl get rollout --watch
    
    # 파드 label 정보 확인
    watch -d kubectl get pod -l app=rollouts-demo -owide --show-labels

    • 롤아웃 업데이트 중에 컨트롤러는 롤아웃의 업데이트 전략에 정의된 단계를 진행합니다.
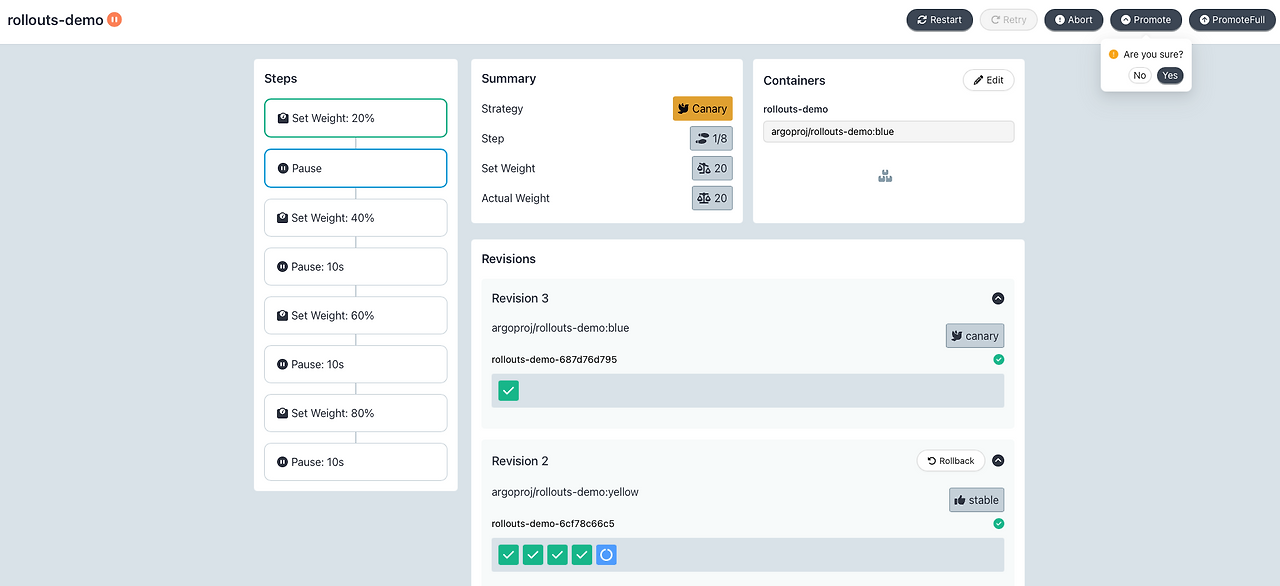
    • 예제 롤아웃은 카나리아의 트래픽 가중치를 20%로 설정하고, 롤아웃을 일시 중지/촉진하기 위한 사용자 조치가 취해질 때까지 롤아웃을 무기한 일시 중지합니다. 이미지를 업데이트한 후 일시 중지 상태에 도달할 때까지 롤아웃을 확인하세요.
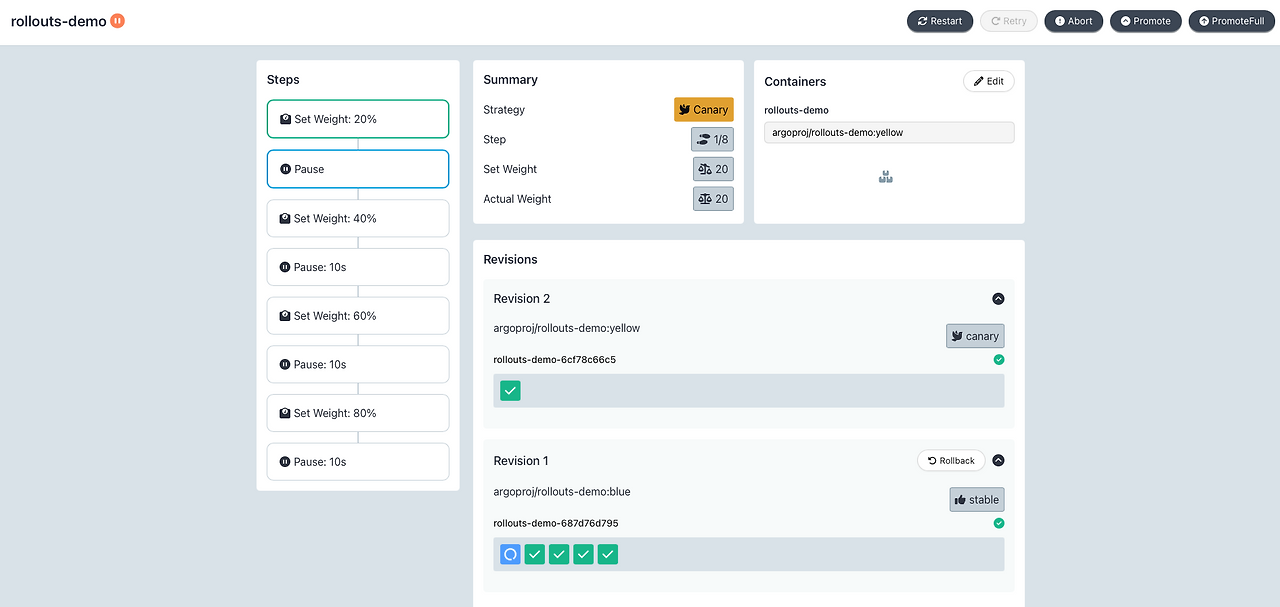
    • 데모 롤아웃이 두 번째 단계에 도달하면 플러그인을 통해 롤아웃이 일시 중지된 상태이며, 이제 5개의 복제본 중 1개가 포드 템플릿의 새 버전을 실행하고 있고, 5개의 복제본 중 4개가 이전 버전을 실행하고 있음을 알 수 있습니다. 이는 set Weight: 20로 정의된 20%에 해당합니다.

    Promoting a Rollout

    • 이제 롤아웃이 일시 중지된 상태입니다. 롤아웃이 지속 시간 없이 일시 중지 단계에 도달하면 재개/추진될 때까지 무기한 일시 중지된 상태로 유지됩니다. 롤아웃을 다음 단계로 수동으로 승격하려면 플러그인의 promote 명령을 실행합니다:

    # 아래 입력 혹은 UI에서 Promote Yes 클릭
    kubectl argo rollouts promote rollouts-demo
    
    # 정보 확인
    kubectl get rollouts rollouts-demo -o json | grep rollouts-demo
    watch -d kubectl get pod -l app=rollouts-demo -owide --show-labels
    • 프로모션 후 롤아웃은 나머지 단계를 실행합니다. 예제의 남은 롤아웃 단계는 완전히 자동화되어 있으므로 롤아웃은 새 버전으로 완전히 전환될 때까지 단계를 완료합니다. 모든 단계가 완료될 때까지 롤아웃을 확인하세요
    • 모든 단계가 성공적으로 완료되면 새로운 ReplicaSet은 "Healthy" ReplicaSet으로 표시됩니다. 업데이트 중에 실패한 카나리아 분석을 통해 자동으로 또는 사용자가 수동으로 롤아웃을 중단하면 롤아웃은 다시 "Healthy" 버전으로 돌아갑니다.

    Rollback

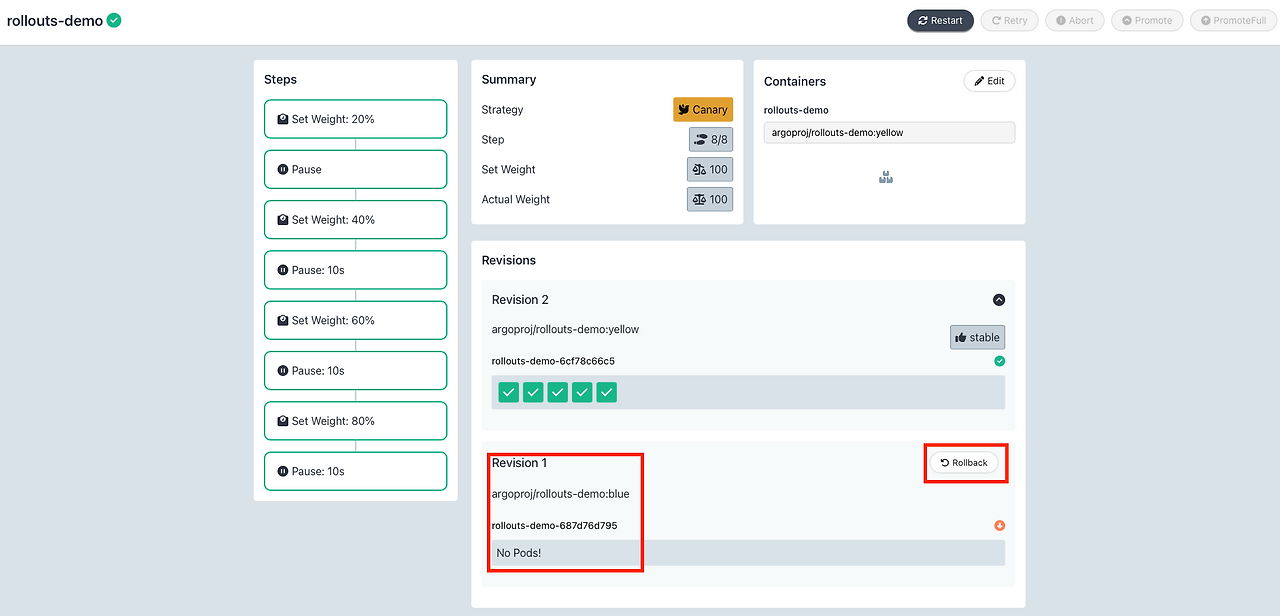
    1. 만약 Blue/Green 혹은 Canary 배포가 완료되고, 현재 new version의 application에 문제가 발생하였을때 rollback 기능을 통해서 기존 old version으로 원복 할 수 있다.
    2. Rollback 역시 기존과 마찬가지로(기존에 blue → yellow로 변경시 Canary update 진행) Canary방식으로 점진적 배포가 이루어진다.


    • 요약
      • 이 기본 예제의 롤아웃은 트래픽을 라우팅하기 위해 입력 컨트롤러나 서비스 메시 제공자를 사용하지 않았습니다. 대신, 일반적인 Kubernetes 서비스 네트워킹(즉, kube-proxy)을 사용하여 새로운 복제본 수와 이전 복제본 수의 가장 가까운 비율을 기준으로 대략적인 카나리아 가중치를 달성했습니다. 그 결과, 이 롤아웃은 새로운 버전을 실행하기 위해 5개의 포드 중 1개를 확장함으로써 최소 카나리아 가중치를 20%까지만 달성할 수 있다는 한계가 있었습니다. 훨씬 더 세밀한 카나리아를 달성하기 위해서는 입력 컨트롤러나 서비스 메시가 필요합니다.
      • 트래픽 라우팅 가이드 중 하나를 따라가면 Argo Rollouts가 네트워킹 제공업체를 어떻게 활용하여 보다 발전된 트래픽 형성을 달성할 수 있는지 확인할 수 있습니다.
     

    SMI - Argo Rollouts - Kubernetes Progressive Delivery Controller

    Getting Started - SMI (Service Mesh Interface) Important Available since v0.9 This guide covers how Argo Rollouts integrates with the Service Mesh Interface (SMI), using Linkerd and NGINX Ingress Controller for traffic shaping. Since the SMI TrafficSplit r

    argoproj.github.io


    8. GitOps Bridge

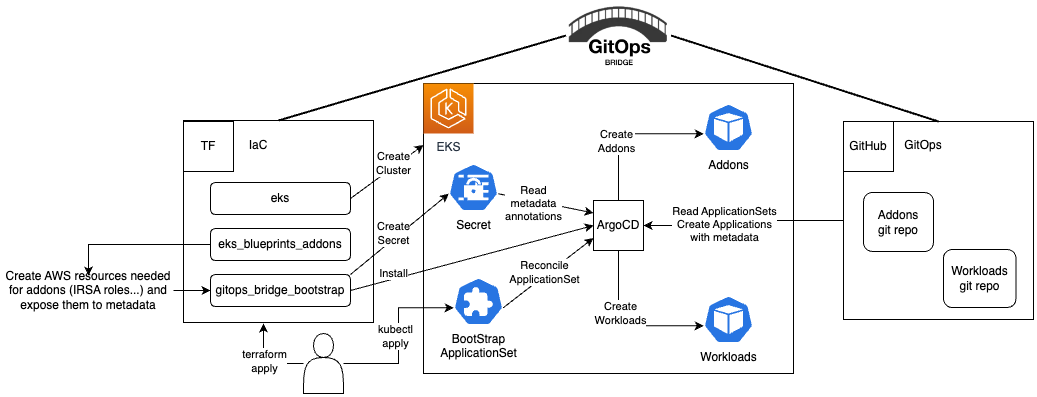
    8.1. GitOps Bridge : Kubernetes 클러스터를 만드는 과정부터 GitOps를 통해 모든 것을 관리 - Github

    Kubernetes 클러스터를 만드는 과정부터 GitOps를 통해 모든 것을 관리하는 과정까지 연결하는 모범 사례와 패턴을 선보이는 커뮤니티 프로젝트


    8.2. [GitOps Bridge] Argo CD on Amazon EKS 배포를 해보자 - Link , Workshop


    ArgoCD - Getting Started - Amazon EKS Blueprints for Terraform

    ArgoCD on Amazon EKS This tutorial guides you through deploying an Amazon EKS cluster with addons configured via ArgoCD, employing the GitOps Bridge Pattern. The GitOps Bridge Pattern enables Kubernetes administrators to utilize Infrastructure as Code (IaC

    aws-ia.github.io

    - GitOps Control Plane - Github

    'AWS' 카테고리의 다른 글

    [AEWS 3기] 10주차 - K8S 시크릿 관리  (1) 2025.04.12
    [AEWS 3기] 9주차 - EKS Upgrade  (0) 2025.04.02
    [AEWS 3기] 7주차 - EKS Mode/Nodes  (0) 2025.03.23
    [AEWS 3기] 6주차 - EKS Security  (0) 2025.03.15
    [AEWS 3기] 5주차 - EKS Autoscaling  (0) 2025.03.08
Designed by Tistory.