-
[IHOS 1기] 7주차 - 이스티오 스케일링, 데이터 플레인 확장Kubernetes 2025. 5. 25. 02:26
12. 이스티오 스케일링하기
This chapter coversScaling Istio in your organization- 여러 클러스터에서 서비스 메시 스케일링하기 Scaling the service mesh in multiple clusters
- 두 클러스터를 합치기 위한 전체 조건 해결하기 Resolving the prerequisites to join two clusters
- 여러 클러스터의 워크로드 간에 공통 신뢰 common trust 설정하기 Setting up common trust between workloads of different clusters
- 클러스터 간 워크로드 찾기 Discovering cross-cluster workloads
- east-west 트래픽을 위한 이스티오 인그레스 게이트웨이 설정하기 Configuring Istio’s ingress gateway for east-west traffic
들어가며 : 다중 클러스터 서비스 메시‣- 지금까지는 단일 클러스터의 메시 내에서 활성화하는 이스티오의 여러 기능을 살펴봤다.
- 그러나 서비스 메시는 단일 클러스터에 종속되지 않는다.
- 서비스 메시는 여러 클러스터에 걸쳐 있을 수 있으며, 클러스터 모두에 동일한 기능을 제공할 수 있다.
- 사실 메시의 가치는 워크로드가 많아질수록 증가한다.
- 그런데 우리는 언제 서비스 메시가 여러 클러스터에 걸쳐 있길 원하는가?
- 단일 클러스터와 비교할 때 다중 클러스터 서비스 메시는 어떤 이점을 갖는가?
- 이와 같은 질문에 답하기 위해 가상의 ACME사를 다시 살펴보자.
- 이 회사는 클라우드 플랫폼으로 이전했고, 마이크로서비스 아키텍처 때문에 늘어난 네트워크 복잡성을 모두 경험했다.
12.1. 다중 클러스터 서비스 메시의 이점
소개 : The benefits of a multi-cluster service mesh - Docs‣- 클라우드 마이그레이션 초기에 ACME는 클러스터의 규모를 어떻게 조정할지에 대한 딜레마에 직면했다.
- 이 회사는 단일 클러스터로 시작했지만 그 결정을 신속하게 바꿨다.
- ACME는 다음과 같은 이점 때문에 작은 클러스터 다수을 쓰기로 결정했다.
- 한 팀의 사고가 다른 팀에 영향을 미치지 않게 한다.
- 클러스터 전체에 영향을 미칠 수 있는 설정이나 운영에 경계선을 설정해 클러스터가 다운될 때 아키텍처의 다른 부분에 미치는 영향을 줄인다.
- 아키텍처의 다른 부분에서 민감 데이터로 접근하는 서비스를 제한한다.
- 가용성을 늘리기 위해 여러 리전에서 클러스터를 운영하고, 가장 가까운 클러스터로 트래픽을 라우팅해 지연 시간을 줄인다.
- 서로 다른 클라우드 프로바이더 또는 하이브리드 클라우드와 같이 다양한 환경에서 워크로드를 실행할 수 있게 한다.
- 격리성 강화 Improved isolation
- 장애 경계 Failure boundary
- 규정 준수 Regulatory and compliance
- 가용성 및 성능 향상 Increased availability and performance
- 다중 및 하이브리드 클라우드 Multi and hybrid clouds
- 초기 평가에서 ACME가 서비시 메시를 채택하는 데 주요 동기로 삼았던 것은 여러 클러스터 간에 서비스 메시를 확장할 수 있는 기능과, 클러스터 간에 트래픽 관리, 관찰 가능성, 보안을 지원하는 기능이었다.
- 다중 클러스터 작업을 지원하고자 회사는 두 가지 접근법을 고려했다 - Docs
- 다중 클러스터 서비스 메시 Multi-cluster service mesh
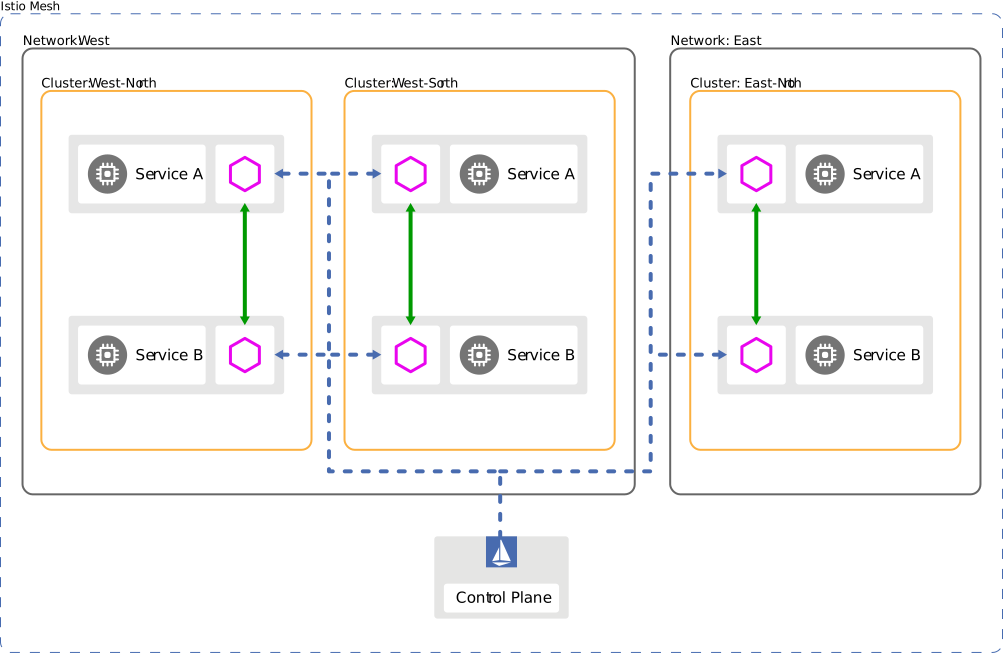
- 여러 클러스터에 걸쳐 있고 워크로드가 클러스터 간에 트래픽을 라우팅하도록 설정하는 메시. A mesh that spans multiple clusters and configures workloads to route cross-cluster traffic.
- 이 모든 것은 VirtualService, DestinationRule, Sidecar 등이 적용된 Istio 구성을 따른다. All of this is in accordance with the applied Istio configuration
- 메시 연합 (다중 메시) Mesh federation, also known as multi-mesh
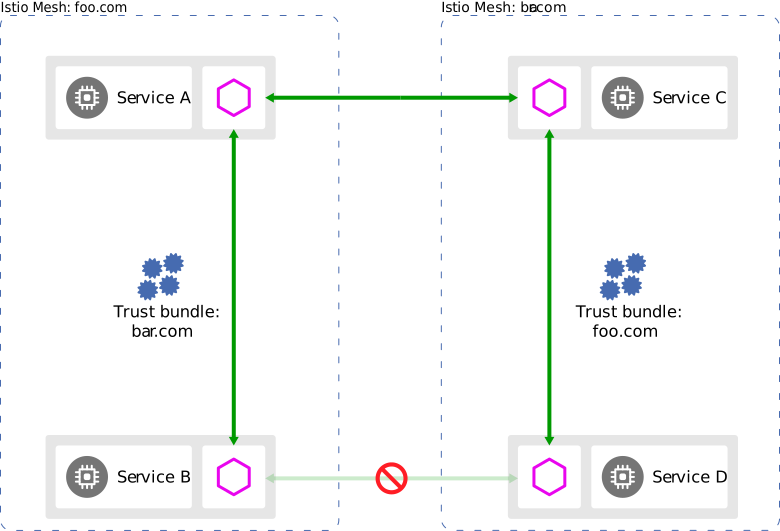
- 개별 서비스 메시 2개의 워크로드 간 통신을 노출하고 활성화한다. Exposes and enables the communication of workloads of two separate service meshes.
- 이 선택지는 덜 자동화돼 있어서 서비스 간 트래픽을 설정하려면 두 메시 모두에게 수동 설정이 필요한다.
- 그러나 서로 다른 팀에서 두 메시를 운영하거나 보안 격리 요구 사항이 엄격한 경우 좋은 선택지다.
- 이 책에서 다루는 선택지는 다중 클러스터 서비스 메시다. 메시 연합 같은 경우에는 공식 문서를 참고하자 - Docs
12.2. 다중 클러스터 서비스 메시 개요 multi-cluster service mesh
소개 : 필요 사항‣- 다중 클러스터 서비스 메시는 앱에는 완전히 투명한 방식으로 클러스터 간에 서비스를 연결하면서, 클러스터 간 통신을 위한 서비스 메시의 기능(세밀한 트래픽 제오, 복원력, 관찰 가능성, 보안 등)은 모두 유지한다.
- 이스티오가 다중 클러스터 서비스 메시를 구현하는 방법은 모든 클러스터의 서비스를 퀴리한 다음 이 정보로 서비스 프록시에 클러스터 사이에서 서비스 간 트래픽을 라우팅하는 방법을 설정하는 것이다.
- 그림 12.1은 클러스터들을 하나의 메시로 결합하는 데 필요한 것을 보여준다.
- 클러스터 간 워크로드 디스커버리 Cross-cluster workload discovery
- Istio 컨트롤 플레인은 서비스 프록시를 설정하기 위해 동료 K8S 클러스터의 워크로드를 찾아야 한다. (K8S 클러스터 API 서버를 상대편 클러스터의 이스티오 컨트롤 플레인에서 접근할 수 있어야 한다. The control planes must discover the workloads in the peer clusters in order to configure the service proxies (the API server of the clusters must be accessible to Istio’s control plane in the opposite cluster).
- 클러스터 간 워크로드 연결성 Cross-cluster workload connectivity
- 워크로드는 서로 연결돼 있어야 한다. 워크로드 엔드포인트를 인지하고 있어도 커넥션을 시작할 수 없다면 쓸모가 없다.
- 클러스터 간 공통 신뢰 Common trust between clusters
- 이스티오의 보안 기능을 활성화하려면 클러스터 간 워크로드가 서로 인증해야 한다. Cross-cluster workloads must mutually authenticate to enable the security features of Istio.
- 이 기준들을 충족하면 클러스터가 다른 클러스터에서 실행 중인 워크로드를 인지할 수 있고, 워크로드가 서로 연결될 수 있으며, 워크로드가 이스티오 정책을 사용해 인증하고 인가할 수 있다.
- 이들 모두가 다중 클러스터 서비스 메시를 설정하기 위한 전체 조건이다.
12.2.1 이스티오 다중 클러스터 배포 모델 Istio multi-cluster deployment models - Blog‣- 다중 클러스터 서비스 메시에서는 istio 클러스터 유형을 두 가지로 구분한다.
- 기본 클러스터 primary cluster : 이스티오 컨트롤 플레인이 설치된 K8S 클러스터 → 아래 그림 중 왼쪽
- 원격 클러스터 remote cluster : 설치된 이스티오 컨트롤 플레인과 떨어져 있는 K8S 클러스터 → 아래 그림 중 오른쪽
기본-원격 배포 모델
- 달성하고자 하는 가용성 수준에 따라 배포 모델 3가지
- 기본-원격(컨트롤 플레인 공유) 배포 모델 primary-remote (shared control plane) → 위 그림 12.2
- 기본-기본(복제된 컨트롤 플레인) 배포 모델 primary-primary (replicated control plane) → 아래 그림 12.3
- 외부 컨트롤 플레인 배포 모델 external control plane → 아래 그림 12.4
- 기본-기본(복제된 컨트롤 플레인) 배포 모델 primary-primary (replicated control plane) 에는 컨트롤 플레인이 여럿이므로 가용성이 높지만, 트레이드오프로 리소스가 더 많이 필요하다.
- 이렇게 되면 가용성이 향상는데, 중단 범위가 중단이 발생한 클러스터로 국한되기 때문이다.
- 이 모델을 복제된 컨트롤 플레인 배포 모델이라고 부른다. We refer to this model as the replicated control plane deployment model.
기본-기본 배포 모델
- 외부 컨트롤 플레인 배포 모델 external control plane 은 모든 클러스터가 컨트롤 플레인과 떨어져 있는 배포 모델이다.
- 이 배포 모델로 클라우드 프로바이더가 이스티오를 관리형 서비스로 제공할 수 있다.
외부 컨트롤 플레인 배포 모델
12.2.2 다중 클러스터 배포에서 워크로드는 어떻게 찾는가? How workloads are discovered in multi-cluster deployments‣- 이스티오의 컨트롤 플레인은 쿠버네티스 API 서버와 통신해 서비스 뒤의 서비스와 엔드포인트 같은 서비스 프록시 설정 관련 정보를 수집해야 한다.
- 쿠버네티스 API 서버에 요청하는 것은 막강한 일종의 권한인데, 리소스 세부 정보를 조회하고, 민감 정보를 쿼리할 수 있으며, 클러스터를 불량하고 되돌이킬 수 없는 상태로 만들 수 있는 정도로 리소스를 업데이트하거나 지울 수 있기 때문이다.
- 쿠버네티스는 RBAC를 이용해 API 서버로의 접근을 보호한다. 쿠버네티스 RBAC은 광범위한 주제로, 이 책의 범위를 벗어난다.
- 그러나 클러스터 간 디스커버리를 용이하게 하는데 사용하는 개념 일부를 잠시 언급할 수는 있다.
- 서비스 어카운트는 기계나 서비스 등 사람이 아닌 클라이언트에 ID를 제공한다. Service accounts provide identity to non-human clients such as machines or services.
- 서비스 어카운트 토큰은 서비스 어카운트마다 자동으로 생성돼 해당 ID 클레임을 나타낸다. 토큰은 JWT 형식이며 쿠버네티스가 파드에 주입한다. 파드는 이 토큰을 사용해 API 서버에게 (자신의 신원) 인증할 수 있다. Service account tokens are automatically generated for every service account and represent its identity claim. Tokens are formatted as JSON Web Tokens and are injected by Kubernetes into Pods that can use the tokens to authenticate to the API server.
- 롤 role 과 클러스터롤 clusterrole 은 서비스 어카운트나 일반 사용자 같은 ID에 대한 권한 집합을 정의한다. Roles and cluster roles define the set of permissions for identity, such as a service account or a regular user.
- 그림 12.5는 istiod에 인증과 인가를 제공하는 쿠버네티스 리소스를 시각화한다.
istiod의 ID와 접근을 설정하는 리소스
- 클러스터 간 워크로드 디스커버리는 기술적으로 동일한다. Cross-cluster workload discovery is technically the same.
- 그러나 그림 12.6과 같이 istiod에 원격 클러스터의 서비스 어카운트 토큰을 제공해야 한다 (구체적인 예제에서 볼 수 있듯이 API 서버로 보안 통신을 시작할 수 있는 인증서와 함께). However, as shown in figure 12.6, we need to provide istiod with the service account token of the remote cluster (along with the certificates to initiate a secure connection to the API server, as we see when we get to the concrete examples).
- istiod는 토큰을 사용해 원격 클러스터에 인증하고, 클러스터에서 실행 중인 워크로드를 찾는다. istiod uses the token to authenticate to remote clusters and discover workloads running in them.
- 험난한 과정처럼 들릴지도 모르지만 걱정할 필요는 없다.
- 이 장 뒷부분에서 보겠지만 istioctl이 이 과정을 자동화해주기 때문이다.
12.2.3 클러스터 간 워크로드 연결 Cross-cluster workload connectivity - Docs : east-west gw or 라우팅 처리‣- 다른 전체 조건은 워크로드가 클러스터를 건너 연결할 수 있어야 한다는 것이다.
- 클러스터가 플랫 네트워크 flat network 에 있다면, 그러나까 단일 네트워크를 공유하거나(Amazon VPC 처럼) 네트워크가 네트워크 피어링 network peering 으로 연결된 경우 등에서는 워크로드가 IP 주소로 연결 할 수 있으므로 조건은 이미 충족됐다!
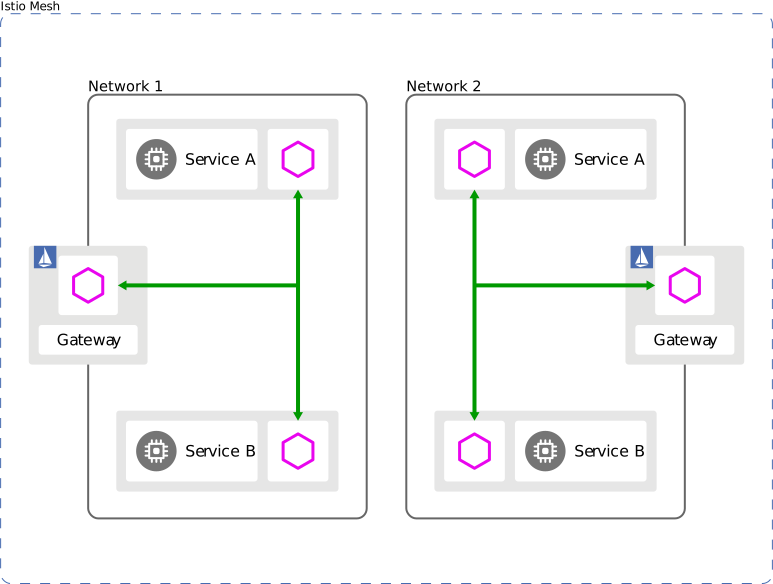
- 그러나 클러스터가 서로 다른 네트워크에 있다면 네트워크의 에지에 위치해 클러스터 간 트래픽을 프록시해주는 특수한 이스티오 인그레스 게이트웨이를 사용해야 한다. However, when clusters are in different networks, we have to use special Istio ingress gateways that are located at the edge of the network and proxy cross-cluster traffic.
- 다중 네트워크 메시에서 클러스터를 잇는 인그레스 게이트웨이를 east-west 게이트웨이라고 부른다 (그림 12.7 참조). Ingress gateways that bridge clusters in multi-network meshes are known as east-west gateways
- [공식 문서] Multiple networks 제공 기능 : 중복 IP 환경 시 해결 등 - Docs
- Overlapping IP or VIP ranges for service endpoints
- Crossing of administrative boundaries
- Fault tolerance
- Scaling of network addresses
- Compliance with standards that require network segmentation
- Multi-cluster 에 Multi-primary 환경에서 east-west gateway 없이도, 네트워크 장비에 L3 라우팅을 통해서 통신 가능!
12.2.4 클러스터 간 공통 신뢰 Common trust between clusters - Docs‣- 우리가 해결해야 하는 마지막 요소는 다중 클러스터 서비스 메시 내 클러스터들이 공통된 신뢰를 가져야 한다는 것이다. The last factor we need to resolve is that clusters in a multi-cluster service mesh must have common trust.
- 공통 신뢰를 가지면 반대편 클러스터의 워크로드들이 상호 인증할 수 있게 된다. Having common trust ensures that workloads of opposite clusters can mutually authenticate.
- 반대편 클러스터의 워크로드들 사이에 공통 신뢰를 달성하는 방법에는 두 가지가 있다.
- 첫 번째 방법은 플러그인 CA 인증서라고 부르는, 공통된 루트 CA가 발급한 사용자 정의 인증서를 사용한다. The first uses what we call plug-in CA certificates: userdefined certificates issued from a common root CA.
- 두 번째 방법은 두 클러스터가 인증서를 서명하는 데 사용하는 외부 CA를 통합한다. The second integrates an external CA that both clusters use to sign certificates.
플로그인 CA 인증서 PLUG-IN CA CERTIFICATES - Docs
같은 루트가 서명한 중간 CA 인증서 사용하기
- 플러그인 중간 CA 인증서를 사용하는 것은 쉽다! Using plug-in intermediate CA certificates is easy!
- 중간 CA를 이스티오가 만들게 하는 대신에 사용할 인증서를 지정하면 된다. 이 인증서는 이스티오가 설치한 네임스페이스에 시크릿으로 제공한다. Instead of letting Istio generate an intermediate CA, you specify the certificate to be used by providing it as a secret on the Istio installation namespace.
- 두 클러스터 모두에서 그렇게 함으로써 같은 루트 CA가 서명한 중간 CA를 사용한다. (그림 12.8) You do so for both clusters and use intermediate CAs that were both signed by the common root CA.
- 이 방법은 간단해서 좋다. 그러나 중간 CA가 노출될 경우 보안 위험이 있다. This method is favorable due to its simplicity; however, it poses a security risk if the intermediate CAs are exposed.
- 노출을 감지해 중간 CA의 인증서를 취소할 때까지 공격자들은 중간 CA로 신뢰받는 인증서를 서명할 수 있다. Attackers can use them to sign certificates that are trusted until the exposure is detected and the intermediate CA’s certificate is revoked.
- 이런 이유로 조직은 중간 CA를 넘겨주기를(사용하기를) 꺼린다. For this reason, organizations are reluctant to hand over intermediate CAs.
- 노출 위험은 중간 CA를 메모리에만 올리고 etcd(시크릿 같은 쿠버네티스 리소스를 저장하는 저장소)에 쿠버네티스 시크릿으로 유지하지 않음으로써 줄일 수 있다 ⇒ 아래 Secret 내용 참고 The exposure risk can be reduced by only loading the intermediate CAs into memory and not persisting them as Kubernetes secrets into etcd (the datastore where Kubernetes resources such as secrets are stored).
- 즉, kubernetes secret으로 intermediate CA를 저장하는것이 아니라 istiod 자체에 CA를 저장하여 etcd가 노출되어 intermediate CA가 노출되는 일이 없도록 한다.
- 더 안전한 대안은 인증서에 서명하는 외부 CA를 통합하는 것이다. An even safer alternative is to integrate an external CA that signs the certificates.
외부 인증 기관 통합 EXTERNAL CERTIFICATE AUTHORITY INTEGRATION
- 이 방법에서 istiod는 쿠버네티스 CSR 리소스로 저장된 인증서 서명 요청 CSRs 을 검증하고 승인하는 등록 기관 역할을 한다. istiod acts as a registration authority that validates and approves certificate signing requests (CSRs) stored as Kubernetes CSRs.
- 승인된 쿠버네티스 CSR 리소스는 다음 방법 중 하나로 외부 CA에 제출된다. The Kubernetes CSRs that are approved are submitted to the external CA in one of the following ways:
- cert-manager 가 우리의 외부 CA를 지원할 때만 가능하다. Using cert-manager - Only viable when our external CA is supported by certmanager.
- 지원하는 외부 발급자 확인 https://cert-manager.io/docs/configuration/issuers/
- 지원하는 경우, cert-manager 의 istio-csr로 쿠버네티스 CSR을 지켜보고 서명을 위해 외부 CA에 제출할 수 있다.
- 맞춤 개발 Custom development
- 승인된 쿠버네티스 CSR을 지켜보고 이를 서명을 위해 외부 CA에 제출하는 쿠버네티스 컨트롤러를 만든다. Create a Kubernetes controller that listens for approved Kubernetes CSRs and submits them to an external CA for signing.
- 그러나 로컬 키가 있는 자체 서명 인증서 대신 외부 CA를 사용하도록 솔루션을 조정해야 한다. however, the solution needs to be adapted to use an external CA instead of self-signing certificates with local keys.
- 외부 CA가 인증서를 서명한 후에는 쿠버네티스 CSR에 저장하는데, istiod가 SDS를 사용해 이를 워크로드에 전달한다. After the external CA signs the certificate, it is stored in the Kubernetes CSR, which istiod forwards to the workload using the Secret Discovery Service (SDS).
- 이 장에서는 플러그인 CA 인증서를 사용해 클러스터 사이에 공통 신뢰를 설정한다. 그러면 좀 더 간단하고 다중 클러스터 서비스 메시에 초점을 유지하기 때문이다. In this chapter, we set up common trust between clusters using plug-in CA certificates, because it’s simpler and maintains focus on multi-cluster service meshes.
- 이제 다중 클러스터 서비스 메시를 구축하는 데 필요한 조건 모두를 고수준으로 다뤘다. We have now covered at a high level all the required conditions to set up a multi-cluster service mesh.
Signature Algorithm: ecdsa-with-SHA256
        Issuer: O=cert-manager, O=cluster.local, CN=istio-ca
        Validity
            Not Before: Jan 13 16:51:59 2022 GMT
            Not After : Jan 13 17:51:59 2022 GMT
...
            X509v3 Subject Alternative Name:
                URI:spiffe://cluster.local/ns/default/sa/httpbin
12.3. 다중 클러스터, 다중 네트워크, 다중 컨트롤 플레인 서비스 메시 개요
12.3.0.인프라 구성 환경‣- 실세계 엔터프라이즈 서비스를 모방하는 인프라를 준비해보자.
- 이 서비스는 여러 클러스터에서 실행되고, 여러 리전에 걸쳐 배포되며, 서로 다른 네트워크에 위치한다.
west-cluster: 사설 네트워크가 us-west 리전에 있는 쿠버네티스 클러스터. 여기서 webapp 서비스를 실행.east-cluster: 사설 네트워크가 us-east 리전에 있는 쿠버네티스 클러스터. 여기서 catalog 서비스를 실행할 것이다.
다중 클러스터 서비스 메시 다이러그램
- 클러스터를 2개의 서로 다른 리전에 두면, 둘 중 하나에 재난이 일어난 경우의 서비스 중단으로부터 우리를 보호할 수 있다.
- webapp 과 catalog 워크로드가 별개의 클러스터에 있어야 하는 기술적인 이유는 없으며, 단지 시연하려는 것뿐이다.
- ‘수다스러운’ 워크로드는 지연 시간을 줄이기 위해 가능하면 가까이 있어야 한다.
12.3.1 다중 클러스터 배포 모델 선택하기 Choosing the multi-cluster deployment model‣- 다중 네트워크 인프라는 클러스터 사이를 연결할 수 있게 네트워크를 잇는 east-west 게이트웨이를 사용해야 하지만, 복제 컨트롤 플레인 배포 모델을 사용할지, 단일 컨트롤 플레인을 사용할지 여부는 정해져 있지 않다. 결정은 비즈니스 요구 사항에 달려 있다. The multi-network infrastructure dictates that we need to use an east-west gateway to bridge the networks to achieve cross-cluster connectivity but leaves open the decision whether to use the replicated control-plane deployment model or a single control plane. The decision is driven by the business requirements.
- ACME의 경우에는 온라인 상점이 아주 인기가 많으며, 서비스가 중단되는 1분마다 수백만 달러의 비용이 발생한다. 정말 그렇다! 따라서 고가용성이 최우선 과제이므로, 이스티오 컨트롤 플레인이 각 클러스터에 배포되는 기본-기본 배포 모델을 사용할 것이다. In ACME’s case, its online store is highly popular: every minute of it being down would cost the business millions, for real! Hence high availability is a top priority, and we’ll use the primary-primary deployment model, where the Istio control plane is deployed in each cluster.
- 이 모든 것을 종합하면, 우리는 네트워크를 잇는 east-west 게이트웨이를 사용해 다중 클러스터, 다중 네트워크, 다중 컨트롤 플레인 서비스 메시를 구축할 것이고, 기본-기본 배포 모델을 사용할 것이다. 그럼 시작해보자! Putting it all together, we’ll set up a multi-cluster, multi-network, multi-control-plane service mesh using an east-west gateway to bridge the networks and use the primary-primary deployment model. Let’s get started!
12.3.2 클라우드 인프라 준비하기 Setting up the cloud infrastructure (실습~)‣- (참고) 책은 Azure AKS 클러스터 2대를 배포함.
[실습 환경 구성] k8s(1.23.17) 배포 : west k8s 클러스터 배포 , east k8s 클러스터 배포 - (참고)Github & mypc 컨테이너‣- west k8s 클러스터 배포
git clone https://github.com/AcornPublishing/istio-in-action cd istio-in-action/book-source-code-master # kind create cluster --name west --image kindest/node:v1.23.17 --kubeconfig ./west-kubeconfig --config - <<EOF kind: Cluster apiVersion: kind.x-k8s.io/v1alpha4 nodes: - role: control-plane extraPortMappings: - containerPort: 30000 # istio-ingrssgateway HTTP hostPort: 30000 - containerPort: 30001 # Prometheus hostPort: 30001 - containerPort: 30002 # Grafana hostPort: 30002 - containerPort: 30003 # Kiali hostPort: 30003 - containerPort: 30004 # Tracing hostPort: 30004 - containerPort: 30005 # kube-ops-view hostPort: 30005 networking: podSubnet: 10.10.0.0/16 serviceSubnet: 10.100.0.0/24 EOF # 설치 확인 docker ps cat west-kubeconfig kubectl get node --kubeconfig=./west-kubeconfig kubectl get pod -A --kubeconfig=./west-kubeconfig # 노드에 기본 툴 설치 docker exec -it west-control-plane sh -c 'apt update && apt install tree psmisc lsof wget bridge-utils net-tools dnsutils tcpdump ngrep iputils-ping git vim -y' # (옵션) kube-ops-view helm install kube-ops-view geek-cookbook/kube-ops-view --version 1.2.2 --set service.main.type=NodePort,service.main.ports.http.nodePort=30005 --set env.TZ="Asia/Seoul" --namespace kube-system --kubeconfig=./west-kubeconfig kubectl get deploy,pod,svc,ep -n kube-system -l app.kubernetes.io/instance=kube-ops-view --kubeconfig=./west-kubeconfig ## kube-ops-view 접속 URL 확인 open "http://localhost:30005/#scale=1.5" open "http://localhost:30005/#scale=1.3"- east k8s 클러스터 배포
# kind create cluster --name east --image kindest/node:v1.23.17 --kubeconfig ./east-kubeconfig --config - <<EOF kind: Cluster apiVersion: kind.x-k8s.io/v1alpha4 nodes: - role: control-plane extraPortMappings: - containerPort: 31000 # istio-ingrssgateway HTTP hostPort: 31000 - containerPort: 31001 # Prometheus hostPort: 31001 - containerPort: 31002 # Grafana hostPort: 31002 - containerPort: 31003 # Kiali hostPort: 31003 - containerPort: 31004 # Tracing hostPort: 31004 - containerPort: 31005 # kube-ops-view hostPort: 31005 networking: podSubnet: 10.20.0.0/16 serviceSubnet: 10.200.0.0/24 EOF # 설치 확인 docker ps cat east-kubeconfig kubectl get node --kubeconfig=./east-kubeconfig kubectl get pod -A --kubeconfig=./east-kubeconfig # 노드에 기본 툴 설치 docker exec -it east-control-plane sh -c 'apt update && apt install tree psmisc lsof wget bridge-utils net-tools dnsutils tcpdump ngrep iputils-ping git vim -y' # (옵션) kube-ops-view helm install kube-ops-view geek-cookbook/kube-ops-view --version 1.2.2 --set service.main.type=NodePort,service.main.ports.http.nodePort=31005 --set env.TZ="Asia/Seoul" --namespace kube-system --kubeconfig=./east-kubeconfig kubectl get deploy,pod,svc,ep -n kube-system -l app.kubernetes.io/instance=kube-ops-view --kubeconfig=./east-kubeconfig ## kube-ops-view 접속 URL 확인 open "http://localhost:31005/#scale=1.5" open "http://localhost:31005/#scale=1.3"- kind docker network 에 테스트용 PC(실제로는 컨테이너) 배포
# kind 설치 시 kind 이름의 도커 브리지가 생성된다 : 172.18.0.0/16 대역 docker network ls docker inspect kind # mypc 컨테이너 기동 : kind 도커 브리지를 사용하고, 컨테이너 IP를 지정 없이 혹은 지정 해서 사용 docker run -d --rm --name mypc --network kind --ip 172.19.0.100 nicolaka/netshoot sleep infinity # IP 지정 실행 시 혹은 IP 지정 실행 시 에러 발생 시 아래 처럼 IP 지정 없이 실행 docker run -d --rm --name mypc --network kind nicolaka/netshoot sleep infinity # IP 지정 없이 실행 시 docker ps # kind network 중 컨테이너(노드) IP(대역) 확인 docker ps -q | xargs docker inspect --format '{{.Name}} {{.NetworkSettings.Networks.kind.IPAddress}}' /mypc 172.19.0.100 /east-control-plane 172.19.0.3 /west-control-plane 172.19.0.2 # 동일한 docker network(kind) 내부에서 컨테이너 이름 기반 도메인 통신 가능 확인! docker exec -it mypc ping -c 1 172.19.0.2 docker exec -it mypc ping -c 1 172.19.0.3 docker exec -it mypc ping -c 1 west-control-plane docker exec -it mypc ping -c 1 east-control-plane --- east-control-plane ping statistics --- 1 packets transmitted, 1 received, 0% packet loss, time 0ms rtt min/avg/max/mdev = 0.038/0.038/0.038/0.000 ms # docker exec -it west-control-plane ping -c 1 east-control-plane docker exec -it east-control-plane ping -c 1 west-control-plane --- west-control-plane ping statistics --- 1 packets transmitted, 1 received, 0% packet loss, time 0ms rtt min/avg/max/mdev = 0.102/0.102/0.102/0.000 ms docker exec -it west-control-plane ping -c 1 mypc docker exec -it east-control-plane ping -c 1 mypc --- mypc ping statistics --- 1 packets transmitted, 1 received, 0% packet loss, time 0ms rtt min/avg/max/mdev = 0.108/0.108/0.108/0.000 ms[실습 환경 구성] (편리성 설정) MetalLB 배포 - Github & Alias 설정(kwest, keast)‣- MetalLB 배포
# MetalLB 배포 kubectl apply -f https://raw.githubusercontent.com/metallb/metallb/v0.14.9/config/manifests/metallb-native.yaml \ --kubeconfig=./west-kubeconfig kubectl apply -f https://raw.githubusercontent.com/metallb/metallb/v0.14.9/config/manifests/metallb-native.yaml \ --kubeconfig=./east-kubeconfig # 확인 kubectl get crd --kubeconfig=./west-kubeconfig kubectl get crd --kubeconfig=./east-kubeconfig kubectl get pod -n metallb-system --kubeconfig=./west-kubeconfig kubectl get pod -n metallb-system --kubeconfig=./east-kubeconfig # IPAddressPool, L2Advertisement 설정 cat << EOF | kubectl apply --kubeconfig=./west-kubeconfig -f - apiVersion: metallb.io/v1beta1 kind: IPAddressPool metadata: name: default namespace: metallb-system spec: addresses: - 172.19.255.101-172.19.255.120 --- apiVersion: metallb.io/v1beta1 kind: L2Advertisement metadata: name: default namespace: metallb-system spec: ipAddressPools: - default EOF cat << EOF | kubectl apply --kubeconfig=./east-kubeconfig -f - apiVersion: metallb.io/v1beta1 kind: IPAddressPool metadata: name: default namespace: metallb-system spec: addresses: - 172.19.255.201-172.19.255.220 --- apiVersion: metallb.io/v1beta1 kind: L2Advertisement metadata: name: default namespace: metallb-system spec: ipAddressPools: - default EOF # 확인 kubectl get IPAddressPool,L2Advertisement -A --kubeconfig=./west-kubeconfig NAMESPACE NAME AUTO ASSIGN AVOID BUGGY IPS ADDRESSES metallb-system ipaddresspool.metallb.io/default true false ["172.19.255.101-172.19.255.120"] NAMESPACE NAME IPADDRESSPOOLS IPADDRESSPOOL SELECTORS INTERFACES metallb-system l2advertisement.metallb.io/default ["default"] gylee@GYLEEui-Macmini week7 % kubectl get IPAddressPool,L2Advertisement -A --kubeconfig=./east-kubeconfig kubectl get IPAddressPool,L2Advertisement -A --kubeconfig=./east-kubeconfig NAMESPACE NAME AUTO ASSIGN AVOID BUGGY IPS ADDRESSES metallb-system ipaddresspool.metallb.io/default true false ["172.19.255.201-172.19.255.220"] NAMESPACE NAME IPADDRESSPOOLS IPADDRESSPOOL SELECTORS INTERFACES metallb-system l2advertisement.metallb.io/default ["default"]- 샘플 애플리케이션 배포 후 확인
# cat << EOF | kubectl apply --kubeconfig=./west-kubeconfig -f - apiVersion: apps/v1 kind: Deployment metadata: name: nginx spec: selector: matchLabels: app: nginx template: metadata: labels: app: nginx spec: containers: - name: nginx image: nginx:latest ports: - containerPort: 80 --- apiVersion: v1 kind: Service metadata: name: nginx-service spec: selector: app: nginx ports: - port: 80 targetPort: 80 type: LoadBalancer EOF # cat << EOF | kubectl apply --kubeconfig=./east-kubeconfig -f - apiVersion: apps/v1 kind: Deployment metadata: name: nginx spec: selector: matchLabels: app: nginx template: metadata: labels: app: nginx spec: containers: - name: nginx image: nginx:latest ports: - containerPort: 80 --- apiVersion: v1 kind: Service metadata: name: nginx-service spec: selector: app: nginx ports: - port: 80 targetPort: 80 type: LoadBalancer EOF # 확인 kubectl get deploy,pod,svc,ep --kubeconfig=./west-kubeconfig kubectl get deploy,pod,svc,ep --kubeconfig=./east-kubeconfig kubectl get svc nginx-service --kubeconfig=./west-kubeconfig -o jsonpath='{.status.loadBalancer.ingress[0].ip}' kubectl get svc nginx-service --kubeconfig=./east-kubeconfig -o jsonpath='{.status.loadBalancer.ingress[0].ip}' WNIP=$(kubectl get svc nginx-service --kubeconfig=./west-kubeconfig -o jsonpath='{.status.loadBalancer.ingress[0].ip}') ENIP=$(kubectl get svc nginx-service --kubeconfig=./east-kubeconfig -o jsonpath='{.status.loadBalancer.ingress[0].ip}') # 외부(mypc)에서 각 클러스터의 Service(LB)로 접속(인입) 확인 : TCP 80 포트 사용으로 편리하다! docker exec -it mypc curl -s $WNIP <!DOCTYPE html> <html> <head> <title>Welcome to nginx!</title> ... docker exec -it mypc curl -s $WNIP -v -I docker exec -it mypc curl -s $ENIP <!DOCTYPE html> <html> <head> <title>Welcome to nginx!</title> ... docker exec -it mypc curl -s $ENIP -v -I # 확인 후 삭제 kubectl delete deploy,svc --all --kubeconfig=./west-kubeconfig kubectl delete deploy,svc --all --kubeconfig=./east-kubeconfig- alias 설정
# alias kwest='kubectl --kubeconfig=./west-kubeconfig' alias keast='kubectl --kubeconfig=./east-kubeconfig' # 확인 kwest get node keast get node- 자주 사용하는 Alias
alias kwest='kubectl --kubeconfig=./west-kubeconfig' alias keast='kubectl --kubeconfig=./east-kubeconfig' alias iwest='docker exec -it west-control-plane istioctl' alias ieast='docker exec -it east-control-plane istioctl'12.3.3 플러그인 CA 인증서 설정하기* Configuring plug-in CA certificates‣- 9장에서 워크로드 ID를 부트스트래핑(워크로드가 자신의 정체를 입증하는 서명된 인증서를 받는 방법)을 다룰 때는 설치할 때 인증서에 서명할 CA를 생성한다는 사실을 생략했다. In chapter 9, when we covered bootstrapping of workload identity—which is how workloads get a signed certificate that proves their identity—for simplicity we omitted the fact that Istio generates a CA to sign the certificates upon installation.
- 이렇게 만들어진 CA는 이스티오를 설치한 네임스페이스에 istio-ca-secret 이라는 시크릿으로 저장되고, istiod 복제본들에게 공유된다. This generated CA is stored as a secret named istio-ca-secret in the Istio installation namespace and is shared with istiod replicas.
- 이 기본 동작은 우리의 자체 CA를 사용하도록 변경할 수 있는데, 그러면 이스티오 CA가 CA를 새로 만드는 대신 이 CA 를 사용하게 된다. The default behavior can be overridden by plugging in our CA, which the Istio CA picks up instead of generating a new one.
- 그렇게 하려면 CA 인증서를 이스티오를 설치한 네임스페이스인 istio-system 에 cacerts 라는 시크릿으로 저장해야 하며, 다음과 같은 데이터를 포함해야 한다.
- ca.cert.pem : 중간 CA의 인증서 The intermediate CA’s certificate.
- ca-key.pem : 중간 CA의 개인 키 The intermediate CA’s private key.
- root-cert.pem : 중간 CA를 발급한 루트 CA의 인증서. 루트 CA는 중간 CA들의 인증서를 검증하며, 이것이 클러스터 간 상호 신뢰의 핵심이다. The root CA’s certificate that issued the intermediate CA. The root CA validates the certificates issued by any of its intermediate CAs, which is key for mutual trust across clusters.
- cert-chain.pem : 중간 CA의 인증서와 루트 인증서를 이어 붙인 신뢰 체인 The concatenation of the intermediate CA’s certificate and the root CA certificate that forms the trust chain.
- (참고) 인증서 구조
- 루트 CA: 모든 클러스터가 신뢰하는 최상위 인증서.
- 중간 CA: 각 클러스터별로 발급되어 워크로드 인증서 서명에 사용.
- 인증서 체인 : 신뢰 체인을 구성하여 클라이언트가 인증서를 검증할 수 있도록 함.
(참고) SSL과 인증서 구조 이해하기 : 인증서 계층 구조 설명 - Blog‣cacerts 시크릿은 루트 CA의 공개 키와 중간 CA의 공개 키 및 비밀 키로 구성된다. 루트 CA의 비밀 키는 클러스터 외부에 안전하게 저장된다.
- 저자가 제공하는
./ch12/scripts/generate-certificates.sh스크립트를 사용하면 중간 CA와 루트 CA는 ./ch12/certs디렉터리에 만들어진다. - 이 스크립트는 루트 CA를 만들고, 이 CA를 사용해 중간 CA 2개에 서명한다. 그 결과 신뢰가 같은 중간 CA가 만들어진다.
플러그인 CA 인증서 적용하기 APPLYING PLUG-IN CA CERTIFICATES
# cat ./ch12/scripts/generate-certificates.sh #!/bin/bash set -ex cert_dir=`dirname "$BASH_SOURCE"`/../certs echo "Clean up contents of dir './chapter12/certs'" rm -rf ${cert_dir} echo "Generating new certificates" mkdir -p ${cert_dir}/west-cluster mkdir -p ${cert_dir}/east-cluster # step CLI 설치 확인 : step CLI가 설치되어 있지 않으면 에러 출력 후 종료. ## macOS : brew install step if ! [ -x "$(command -v step)" ]; then echo 'Error: Install the smallstep cli (https://github.com/smallstep/cli)' exit 1 fi step certificate create root.istio.in.action ${cert_dir}/root-cert.pem ${cert_dir}/root-ca.key \ --profile root-ca --no-password --insecure --san root.istio.in.action \ --not-after 87600h --kty RSA step certificate create west.intermediate.istio.in.action ${cert_dir}/west-cluster/ca-cert.pem ${cert_dir}/west-cluster/ca-key.pem --ca ${cert_dir}/root-cert.pem --ca-key ${cert_dir}/root-ca.key --profile intermediate-ca --not-after 87600h --no-password --insecure --san west.intermediate.istio.in.action --kty RSA step certificate create east.intermediate.istio.in.action ${cert_dir}/east-cluster/ca-cert.pem ${cert_dir}/east-cluster/ca-key.pem --ca ${cert_dir}/root-cert.pem --ca-key ${cert_dir}/root-ca.key --profile intermediate-ca --not-after 87600h --no-password --insecure --san east.intermediate.istio.in.action --kty RSA cat ${cert_dir}/west-cluster/ca-cert.pem ${cert_dir}/root-cert.pem > ${cert_dir}/west-cluster/cert-chain.pem cat ${cert_dir}/east-cluster/ca-cert.pem ${cert_dir}/root-cert.pem > ${cert_dir}/east-cluster/cert-chain.pem기본 정보 확인‣# tree ch12/certs ch12/certs ├── east-cluster │ ├── ca-cert.pem # 중간 CA 인증서 │ ├── ca-key.pem # 중간 CA 개인zl │ └── cert-chain.pem # 인증서 체인 ├── root-ca.key # 루트 인증서 ├── root-cert.pem # 루트 개인키 └── west-cluster ├── ca-cert.pem ├── ca-key.pem └── cert-chain.pem # (참고) 인증서 체인 생성 ## 중간 CA 인증서(ca-cert.pem)와 루트 CA 인증서(root-cert.pem)를 결합 -> 결과는 {west/east}-cluster/cert-chain.pem 에 저장 cat ${cert_dir}/west-cluster/ca-cert.pem ${cert_dir}/root-cert.pem > ${cert_dir}/west-cluster/cert-chain.pem cat ${cert_dir}/east-cluster/ca-cert.pem ${cert_dir}/root-cert.pem > ${cert_dir}/east-cluster/cert-chain.pem # 인증서 계층 구조 root.istio.in.action (Root CA) │ └── east.intermediate.istio.in.action (Intermediate CA) # 루트 CA 인증서 확인 openssl x509 -in ch12/certs/root-cert.pem -noout -text ... Issuer: CN=root.istio.in.action Validity Not Before: Jun 28 14:11:35 2022 GMT Not After : Jun 25 14:11:35 2032 GMT Subject: CN=root.istio.in.action ... X509v3 extensions: X509v3 Key Usage: critical Certificate Sign, CRL Sign X509v3 Basic Constraints: critical CA:TRUE, pathlen:1 ... # openssl x509 -in ch12/certs/east-cluster/ca-cert.pem -noout -text ... Issuer: CN=root.istio.in.action Validity Not Before: Jun 28 14:11:35 2022 GMT Not After : Jun 25 14:11:35 2032 GMT Subject: CN=east.intermediate.istio.in.action ... X509v3 extensions: X509v3 Key Usage: critical Certificate Sign, CRL Sign X509v3 Basic Constraints: critical CA:TRUE, pathlen:0 # 이 중간 CA는 추가적인 하위 CA를 만들 수 없음 ... openssl x509 -in ch12/certs/east-cluster/cert-chain.pem -noout -text Issuer: CN=root.istio.in.action Validity Not Before: Jun 28 14:11:35 2022 GMT Not After : Jun 25 14:11:35 2032 GMT Subject: CN=east.intermediate.istio.in.action ... X509v3 extensions: X509v3 Key Usage: critical Certificate Sign, CRL Sign X509v3 Basic Constraints: critical CA:TRUE, pathlen:0 # openssl x509 -in ch12/certs/west-cluster/ca-cert.pem -noout -text openssl x509 -in ch12/certs/west-cluster/cert-chain.pem -noout -text(옵션) step 로 인증서 생성 시‣# step CLI 설치 # macOS : brew install step # 스크립트 실행 ./ch12/scripts/generate-certificates.sh ... # 생성 결과 확인 tree ch12/certs ...istio-system 네임스페이스를 만든 후 인증서를 cacerts 라는 시크릿으로 배포하여 각 클러스터에 중간 CA를 만들어두기‣# west-cluster 용 인증서 설정하기 kwest create namespace istio-system kwest create secret generic cacerts -n istio-system \ --from-file=ch12/certs/west-cluster/ca-cert.pem \ --from-file=ch12/certs/west-cluster/ca-key.pem \ --from-file=ch12/certs/root-cert.pem \ --from-file=ch12/certs/west-cluster/cert-chain.pem # east-cluster 용 인증서 설정하기 keast create namespace istio-system keast create secret generic cacerts -n istio-system \ --from-file=ch12/certs/east-cluster/ca-cert.pem \ --from-file=ch12/certs/east-cluster/ca-key.pem \ --from-file=ch12/certs/root-cert.pem \ --from-file=ch12/certs/east-cluster/cert-chain.pem # 확인 for i in west east; do echo ">> k8s cluster : $i <<"; kubectl get ns istio-system --kubeconfig=./$i-kubeconfig; echo; done >> k8s cluster : west << NAME STATUS AGE istio-system Active 3m56s >> k8s cluster : east << NAME STATUS AGE istio-system Active 21s for i in west east; do echo ">> k8s cluster : $i <<"; kubectl get secret cacerts -n istio-system --kubeconfig=./$i-kubeconfig; echo; done >> k8s cluster : west << NAME TYPE DATA AGE cacerts Opaque 4 71s >> k8s cluster : east << NAME TYPE DATA AGE cacerts Opaque 4 32s for i in west east; do echo ">> k8s cluster : $i <<"; kubectl view-secret cacerts -n istio-system --all --kubeconfig=./$i-kubeconfig; echo; done- 플러그인 인증서가 설정되면 이스티오 컨트롤 플레인을 설치할 수 있다. 컨트롤 플레인은 플러그인 CA 인증서(사용자가 정의한 중간 인증서)를 갖고 워크로드 인증서에 서명한다. With the plug-in certificates configured, we can install the Istio control plane, which picks up the plug-in CA certificates (the user-defined intermediate certificates) to sign workload certificates.
12.3.4 각 클러스터에 (Istiod) 컨트롤 플레인 설치하기* Installing the control planes in each cluster‣들어가며‣- 이스티오의 컨트롤 플레인을 설치하기에 앞서, 각 클러스터에 네트워크 메타데이터를 더하자. network metadata for each cluster
- 네트워크 메타데이터를 통해 이스티오는 토폴로지 정보를 사용할 수 있고, 그 정보에 기반해 워크로드를 설정할 수 있다. Network metadata enables Istio to utilize the topology information and configure workloads based on it.
- 따라서 워크로드는 지역 정보를 사용해 트래픽을 라우팅할 때 가까운 워크로드를 우선할 수 있다. Thus workloads can use locality information and prioritize routing traffic to workloads in close proximity.
- 이스티오가 네트워크 토폴로지를 이해할 때 얻는 또 다른 이점은 워크로드가 다른 네트워크에 있는 원격 클러스터의 워크로드로 트래픽을 라우팅할 때 east-west 게이트웨이를 사용하도록 설정한다는 것이다. Another benefit when Istio understands the network topology is that it configures workloads to use east-west gateways when routing traffic to workloads in remote clusters that are in different networks.
클러스터 간 연결을 위해 네트워크에 레이블 붙이기 LABELING NETWORKS FOR CROSS-CLUSTER CONNECTIVITY‣- 네트워크 토롤로지는 이스티오를 설치할 때 MeshNetwork 설정을 사용해 설정할 수 있다 - Docs
- 그러나 이것은 드문 고급 사용 사례에서나 유지하는 레거시 설정이며, 더 간단한 방법은 이스티오를 설치한 네임스페이스에 네트워크 토폴로지 정보를 레이블로 붙이는 것이다.
- 우리의 경우 이스티오를 설치한 네임스페이스는 istio-system 이고, west-cluster 의 네트워크는 west-network 이다.
- 그러므로 west-cluster 의 istio-system 에
topology.istio.io/network=west-network레이블을 붙인다. east 도 설정하자.
# kwest label namespace istio-system topology.istio.io/network=west-network keast label namespace istio-system topology.istio.io/network=east-network # 확인 for i in west east; do echo ">> k8s cluster : $i <<"; kubectl get ns istio-system --show-labels --kubeconfig=./$i-kubeconfig; echo; done >> k8s cluster : west << NAME STATUS AGE LABELS istio-system Active 13m kubernetes.io/metadata.name=istio-system,topology.istio.io/network=west-network >> k8s cluster : east << NAME STATUS AGE LABELS istio-system Active 9m37s kubernetes.io/metadata.name=istio-system,topology.istio.io/network=east-network- 이 레이블들을 사용해 이스티오는 네트워크 토폴로지를 이해하고, 그 이해를 바탕으로 워크로드 설정법을 결정한다.
- IstioOperator 리소스를 사용해 컨트롤 플레인 설치하기* INSTALLING THE CONTROL PLANES USING ISTIOOPERATOR RESOURCES & Alias 설정(iwest, ieast)
많이 수정해야 하므로, IstioOperator 리소스를 사용해 west-cluster 의 이스티오 설치를 정의하자.‣west-cluster 를 성공적으로 설치한 후, east-cluster 에 복제한 컨트롤 플레인을 설치할 수 있다.‣east-cluster 용 IstioOperator 정의는 west-cluster 용과 비교했을 때 클러스터 이름과 네트워크만 다르다.‣istioctl alias 설정 (iwest, ieast) 및 미리 만들어둔 인증서 적용 확인‣- 두 클러스터 모두에 컨트롤 플레인을 설치하면 개별 메시 2개를 갖게 되는데, 각자 로컬 서비스만 찾는 istiod 복제복 하나와 수신 트래픽용 게이트웨이 하나를 실행한다. (그림 12.11 참조)
메시의 현재 설정
- 메시에는 다음 절에서 설정할 클러스터 간 워크로드 디스커버리 및 연결이 없다. 그러나 더 진행하기 전에 각 클러스터에 일부 워크로드를 실행해보자.
- 이 워크로드는 클러스터 간 디스커버리와 연결성이 올바르게 준비됐는지 확인하는 데 유용할 것이다.
두 클러스터 모두에 워크로드 실행하기 Running workloads on both clusters‣- 컨트롤 플레인을 설치했으니 몇 가지 워크로드를 실행해보자.
- west-cluster 에서는 webapp 을 배포한다.
# kwest create ns istioinaction kwest label namespace istioinaction istio-injection=enabled kwest -n istioinaction apply -f ch12/webapp-deployment-svc.yaml kwest -n istioinaction apply -f ch12/webapp-gw-vs.yaml kwest -n istioinaction apply -f ch12/catalog-svc.yaml # Stub catalog service to which webapp makes request # Stub service는 west의 weapp에서 east에 있는 catalog에 request하기 위해 만들어지는 빈 service이다. # 해당 service에 연결된 ep는 존재하지 않는다. -> stub service 방식은 1.7 버전이하에서 사용하며, 이후 버전에서는 사용되지 않는 cat ch12/catalog-svc.yaml piVersion: v1 kind: Service metadata: labels: app: catalog name: catalog spec: ports: - name: http port: 80 protocol: TCP targetPort: 3000 selector: app: catalog # 확인 kwest get deploy,pod,svc,ep -n istioinaction kwest get svc,ep catalog -n istioinaction NAME TYPE CLUSTER-IP EXTERNAL-IP PORT(S) AGE service/catalog ClusterIP 10.100.0.87 <none> 80/TCP 2m36s NAME ENDPOINTS AGE endpoints/catalog <none> 2m36s kwest get gw,vs,dr -A NAMESPACE NAME AGE istioinaction gateway.networking.istio.io/coolstore-gateway 2m47s NAMESPACE NAME GATEWAYS HOSTS AGE istioinaction virtualservice.networking.istio.io/webapp-virtualservice ["coolstore-gateway"] ["webapp.istioinaction.io"] 2m47s # iwest proxy-status NAME CLUSTER CDS LDS EDS RDS ECDS ISTIOD VERSION istio-ingressgateway-5db74c978c-n5zbr.istio-system west-cluster SYNCED SYNCED SYNCED SYNCED NOT SENT istiod-5585445f4c-bs5hk 1.17.8 webapp-5c8b4fff64-2hbwf.istioinaction west-cluster SYNCED SYNCED SYNCED SYNCED NOT SENT istiod-5585445f4c-bs5hk 1.17.8 # endpoint 에 IP 는 10.10.0.0/16 대역들 다수 확인 for i in listener route cluster endpoint; do echo ">> k8s cluster : west - istio-config $i <<"; docker exec -it west-control-plane istioctl proxy-config $i deploy/istio-ingressgateway.istio-system; echo; done iwest proxy-config cluster deploy/istio-ingressgateway.istio-system | grep catalog catalog.istioinaction.svc.cluster.local 80 - outbound EDS # 현재 cluster간 discovery가 되지 않으므로 endpoint 정보가 출력되지 않는다. 이후 discovery를 활성화 하면 west cluster에서 endpoint 정보 확인 가능 iwest proxy-config endpoint deploy/istio-ingressgateway.istio-system | grep catalog- 그런데 east-cluster 에서만 실행하려고 하는 catalog 워크로드용 서비스(Stub Service)가 필요한 이유는 무엇일까?
- 이 서비스가 없으면 webapp 컨테이너가 FQDN을 IP 주소로 해석할 수 없고, 따라서 트래픽이 애플리케이션을 떠나 프록시로 리다이렉트되는 지점에 도달하기도 전에 요청이 실패하기 때문이다. The reason for adding this stub service is that in its absence, the webapp container cannot resolve the fully qualified domain name (FQDN) to any IP address, and thus the request would fail prior to reaching the point where traffic leaves the application and is redirected to the proxy.
- 스텁 catalog 서비스를 추가함으로써, FQDN은 서비스 클러스터 IP로 해석되고, 애플리케이션이 트래픽을 시작해 실제 엔보이 설정을 갖고 클러스터 사이의 라우팅을 처리하는 엔보이 프록시로 리다이렉트될 수 있다. By adding a stub catalog service, the FQDN is resolved to the service cluster IP and traffic is initiated by the application, which makes it possible for it to be redirected to the Envoy proxy where the actual Envoy configuration exists and handles the cross-cluster routing.
- 이는 이스티오 커뮤니티가 향후 버전에서 DNS 프록시를 개선할 때 해결할 예정인 에지 케이스로, 다음 장에서 살펴볼 주제다. This is an edge case that the Istio community plans to fix in upcoming versions when the DNS proxy is enhanced further, which is a topic we will examine in the next chapter.
- east-cluster 에 catalog 서비스를 배포하자.
# keast create ns istioinaction keast label namespace istioinaction istio-injection=enabled keast -n istioinaction apply -f ch12/catalog.yaml cat ch12/catalog.yaml # 확인 keast get deploy,pod,svc,ep -n istioinaction keast get svc,ep catalog -n istioinaction keast get gw,vs,dr -A # 없음, gw,vs,dr은 모두 west cluster에서 설정됨 # ieast proxy-status NAME CLUSTER CDS LDS EDS RDS ECDS ISTIOD VERSION catalog-6cf4b97d-68vr7.istioinaction east-cluster SYNCED SYNCED SYNCED SYNCED NOT SENT istiod-85976468f-gxcqn 1.17.8 istio-ingressgateway-7f6f8f8d99-c259g.istio-system east-cluster SYNCED SYNCED SYNCED NOT SENT NOT SENT istiod-85976468f-gxcqn 1.17.8 # endpoint 에 IP 는 10.20.0.0/16 대역들 다수 확인 for i in listener route cluster endpoint; do echo ">> k8s cluster : east - istio-config $i <<"; docker exec -it east-control-plane istioctl proxy-config $i deploy/istio-ingressgateway.istio-system; echo; done ieast proxy-config cluster deploy/istio-ingressgateway.istio-system | grep catalog catalog.istioinaction.svc.cluster.local 80 - outbound EDS # east cluster에 생성된 pod의 정도(endpoint 정보) ieast proxy-config endpoint deploy/istio-ingressgateway.istio-system | grep catalog 10.20.0.14:3000 HEALTHY OK outbound|80||catalog.istioinaction.svc.cluster.local- 클러스터 2개를 각자 연결해야 하는 워크로드가 있는 지금을 시작점이라고 해보자. 그러나 클러스터 간 워크로드 디스커버리 없이는 사이드카 프록시에 반대 클러스터의 워크로드가 설정되지 않는다. 그러므로 다음 단계는 클러스터 간 디스커버리를 활성화해보자.
12.3.5 클러스터 간 워크로드 디스커버리 활성화하기 Enabling cross-cluster workload discovery‣들어가며‣- 원격 클러스터 접근용 시크릿 만들기 CREATING THE SECRETS FOR REMOTE CLUSTER ACCESS
istioctl에는create-remote-secret명령어가 있는데, 기본istio-reader-service-account서비스 어카운트를 사용해 원격 클러스터 접근용으로 시크릿을 만드는 것이다.- 시크릿을 만들 때는 이스티오를 설치할 때
IstioOperator에서 사용한 클러스터 이름을 지정하는 것이 중요하다 (east-cluster 및 west-cluster 값은 앞서 ‘IstioOperator 리소스를 사용해 컨트롤 플레인 설치하기’ 절 참조).
원격 클러스터에 접근하기 위한 설정의 식별자로 클러스터 이름이 어떻게 사용되는지에는 주의를 기울이자*‣# for i in west east; do echo ">> k8s cluster : $i <<"; kubectl get sa -n istio-system --kubeconfig=./$i-kubeconfig; echo; done # east keast describe sa -n istio-system istio-reader-service-account ... Mountable secrets: istio-reader-service-account-token-jlqcc Tokens: istio-reader-service-account-token-jlqcc keast get sa -n istio-system istio-reader-service-account -o yaml ... name: istio-reader-service-account namespace: istio-system resourceVersion: "10391" uid: 37688420-7381-454b-96b3-8c2c72275ead secrets: - name: istio-reader-service-account-token-jlqc keast get sa -n istio-system istio-reader-service-account -o jsonpath='{.secrets[0].name}' eirsa=$(keast get sa -n istio-system istio-reader-service-account -o jsonpath='{.secrets[0].name}') keast get secret -n istio-system $eirsa keast get secret -n istio-system $eirsa -o json { "apiVersion": "v1", "data": { "ca.crt": "LS0t,,,==", "namespace": "aXN0aW8tc3lzdGVt", # istio-system "token": "ZXl...VN2Zw==" }, ... kubectl rolesum istio-reader-service-account -n istio-system --kubeconfig=./east-kubeconfig ... Policies: • [CRB] */istio-reader-clusterrole-istio-system ⟶ [CR] */istio-reader-clusterrole-istio-system Resource Name Exclude Verbs G L W C U P D DC *.[config.istio.io,security.istio.io,networking.istio.io,authentication.istio.io,rbac.istio.io] [*] [-] [-] ✔ ✔ ✔ ✖ ✖ ✖ ✖ ✖ customresourcedefinitions.apiextensions.k8s.io [*] [-] [-] ✔ ✔ ✔ ✖ ✖ ✖ ✖ ✖ endpoints [*] [-] [-] ✔ ✔ ✔ ✖ ✖ ✖ ✖ ✖ endpointslices.discovery.k8s.io [*] [-] [-] ✔ ✔ ✔ ✖ ✖ ✖ ✖ ✖ namespaces [*] [-] [-] ✔ ✔ ✔ ✖ ✖ ✖ ✖ ✖ nodes [*] [-] [-] ✔ ✔ ✔ ✖ ✖ ✖ ✖ ✖ pods [*] [-] [-] ✔ ✔ ✔ ✖ ✖ ✖ ✖ ✖ replicasets.apps [*] [-] [-] ✔ ✔ ✔ ✖ ✖ ✖ ✖ ✖ replicationcontrollers [*] [-] [-] ✔ ✔ ✔ ✖ ✖ ✖ ✖ ✖ secrets [*] [-] [-] ✔ ✔ ✔ ✖ ✖ ✖ ✖ ✖ serviceexports.multicluster.x-k8s.io [*] [-] [-] ✔ ✔ ✔ ✔ ✖ ✖ ✔ ✖ serviceimports.multicluster.x-k8s.io [*] [-] [-] ✔ ✔ ✔ ✖ ✖ ✖ ✖ ✖ services [*] [-] [-] ✔ ✔ ✔ ✖ ✖ ✖ ✖ ✖ subjectaccessreviews.authorization.k8s.io [*] [-] [-] ✖ ✖ ✖ ✔ ✖ ✖ ✖ ✖ tokenreviews.authentication.k8s.io [*] [-] [-] ✖ ✖ ✖ ✔ ✖ ✖ ✖ ✖ workloadentries.networking.istio.io [*] [-] [-] ✔ ✔ ✔ ✖ ✖ ✖ ✖ ✖ • [CRB] */istio-reader-istio-system ⟶ [CR] */istio-reader-istio-system Resource Name Exclude Verbs G L W C U P D DC *.[config.istio.io,security.istio.io,networking.istio.io,authentication.istio.io,rbac.istio.io] [*] [-] [-] ✔ ✔ ✔ ✖ ✖ ✖ ✖ ✖ ... keast auth can-i --list keast auth can-i --as=system:serviceaccount:istio-system:istio-reader-service-account --list Resources Non-Resource URLs Resource Names Verbs tokenreviews.authentication.k8s.io [] [] [create] selfsubjectaccessreviews.authorization.k8s.io [] [] [create] selfsubjectrulesreviews.authorization.k8s.io [] [] [create] subjectaccessreviews.authorization.k8s.io [] [] [create] serviceexports.multicluster.x-k8s.io [] [] [get list watch create delete] endpoints [] [] [get list watch] namespaces [] [] [get list watch] nodes [] [] [get list watch] pods [] [] [get list watch] replicationcontrollers [] [] [get list watch] secrets [] [] [get list watch] services [] [] [get list watch] ... # ieast x create-remote-secret --help Create a secret with credentials to allow Istio to access remote Kubernetes apiservers ieast x create-remote-secret --name="east-cluster" # This file is autogenerated, do not edit. apiVersion: v1 kind: Secret metadata: annotations: networking.istio.io/cluster: east-cluster creationTimestamp: null labels: istio/multiCluster: "true" # 이 레이블이 true로 설정된 시크릿은 이스티오의 컨트롤 플레인이 새 클러스터를 등록하기 위해 감시한다 name: istio-remote-secret-east-cluster namespace: istio-system stringData: east-cluster: | apiVersion: v1 clusters: - cluster: # 아래 'certificate-authority-data'는 이 클러스터에 보안 커넥션을 시작하는 데 사용하는 CA certificate-authority-data: LS0tLS1CR.... server: https://east-control-plane:6443 name: east-cluster contexts: - context: cluster: east-cluster user: east-cluster name: east-cluster current-context: east-cluster kind: Config preferences: {} users: - name: east-cluster user: # 아래 'token'은 서비스 어카운트의 ID를 나타내는 토큰 token: eyJhb... --- ## certificate-authority-data 정보 : k8s 루트 인증서 openssl x509 -in YYY -noout -text ... Issuer: CN=kubernetes Validity Not Before: May 23 03:15:44 2025 GMT Not After : May 21 03:15:44 2035 GMT Subject: CN=kubernetes ... X509v3 extensions: X509v3 Key Usage: critical Digital Signature, Key Encipherment, Certificate Sign X509v3 Basic Constraints: critical CA:TRUE ## user.token 정보 : jwt decode YYY Token header ------------ { "alg": "RS256", "kid": "ywYVbtznnn9iveoNWvLj-ECZ4-x4dl6RUftGnFRS8v0" } Token claims ------------ { "iss": "kubernetes/serviceaccount", "kubernetes.io/serviceaccount/namespace": "istio-system", "kubernetes.io/serviceaccount/secret.name": "istio-reader-service-account-token-jlqcc", "kubernetes.io/serviceaccount/service-account.name": "istio-reader-service-account", "kubernetes.io/serviceaccount/service-account.uid": "37688420-7381-454b-96b3-8c2c72275ead", "sub": "system:serviceaccount:istio-system:istio-reader-service-account" }시크릿 내용을 출력하는 대신, kubectl 명령어에 파이프해 west-cluster 에 적용하자‣# west 에 시크릿 생성 ieast x create-remote-secret --name="east-cluster" | kwest apply -f - secret/istio-remote-secret-east-cluster created # istiod 로그 확인 : 시크릿이 생성되면, 바로 istiod가 이 시크릿을 가지고 새로 추가된 원격 클러스터(east)에 워크로드를 쿼리한다. kwest logs deploy/istiod -n istio-system | grep 'Adding cluster' 2025-05-23T09:25:28.586415Z info Adding cluster cluster=east-cluster secret=istio-system/istio-remote-secret-east-cluster # west cluster에 east kubeapi server 접근용 secret이 생성된것을 확인!! for i in west east; do echo ">> k8s cluster : $i <<"; kubectl get secret -n istio-system --kubeconfig=./$i-kubeconfig; echo; done >> k8s cluster : west << NAME TYPE DATA AGE cacerts Opaque 4 121m default-token-f624t kubernetes.io/service-account-token 3 124m grafana-token-x2dwt kubernetes.io/service-account-token 3 108m istio-ingressgateway-service-account-token-2wsk4 kubernetes.io/service-account-token 3 108m istio-reader-service-account-token-qjrzd kubernetes.io/service-account-token 3 109m istio-remote-secret-east-cluster Opaque 1 11s istiod-service-account-token-c4sdr kubernetes.io/service-account-token 3 109m istiod-token-tvjnj kubernetes.io/service-account-token 3 109m kiali-token-rhrb8 kubernetes.io/service-account-token 3 108m prometheus-token-hpmrz kubernetes.io/service-account-token 3 108m >> k8s cluster : east << NAME TYPE DATA AGE cacerts Opaque 4 121m default-token-5x2q4 kubernetes.io/service-account-token 3 121m grafana-token-rtbzk kubernetes.io/service-account-token 3 90m istio-ingressgateway-service-account-token-nbnk5 kubernetes.io/service-account-token 3 90m istio-reader-service-account-token-jlqcc kubernetes.io/service-account-token 3 91m istiod-service-account-token-lf4mv kubernetes.io/service-account-token 3 91m istiod-token-mh2ws kubernetes.io/service-account-token 3 91m kiali-token-cds6p kubernetes.io/service-account-token 3 90m prometheus-token-kz6l2 kubernetes.io/service-account-token 3 90m kwest get secret -n istio-system istio-remote-secret-east-cluster kwest get secret -n istio-system istio-remote-secret-east-cluster -o yaml ... # west 확인 : east 의 모든 CDS/EDS 정보를 west 에서도 확인 가능! for i in listener route cluster endpoint; do echo ">> k8s cluster : west - istio-config $i <<"; docker exec -it west-control-plane istioctl proxy-config $i deploy/istio-ingressgateway.istio-system; echo; done iwest proxy-config cluster deploy/istio-ingressgateway.istio-system | grep catalog iwest proxy-config cluster deploy/istio-ingressgateway.istio-system --fqdn catalog.istioinaction.svc.cluster.local -o json # secret이 생성되면서 cluster간 discovery가 가능해져 west cluster에서 east cluster의 Endpoint 정보가 확인된다. iwest proxy-config endpoint deploy/istio-ingressgateway.istio-system | grep catalog 10.20.0.14:3000 HEALTHY OK outbound|80||catalog.istioinaction.svc.cluster.local # west 에서 10.20.0.14(10.20.0.0/16)로 라우팅이 가능한 상태인가? iwest proxy-config endpoint deploy/istio-ingressgateway.istio-system --cluster 'outbound|80||catalog.istioinaction.svc.cluster.local' -o json ... "address": { "socketAddress": { "address": "10.20.0.15", "portValue": 3000 ... # east 확인 : west 의 CDS/EDS 정보를 아직 모름! for i in listener route cluster endpoint; do echo ">> k8s cluster : east - istio-config $i <<"; docker exec -it east-control-plane istioctl proxy-config $i deploy/istio-ingressgateway.istio-system; echo; done ieast proxy-config cluster deploy/istio-ingressgateway.istio-system | grep catalog ieast proxy-config endpoint deploy/istio-ingressgateway.istio-system | grep catalog 10.20.0.14:3000 HEALTHY OK outbound|80||catalog.istioinaction.svc.cluster.local- 기본-기본 배포 primary-primary deployment 에서는 east 가 west 쿼리 할 수 있게 반대로도 설정하자.
# east 에 시크릿 생성 iwest x create-remote-secret --name="west-cluster" | keast apply -f - secret/istio-remote-secret-west-cluster created # istiod 로그 확인 : 시크릿이 생성되면, 바로 istiod가 이 시크릿을 가지고 새로 추가된 원격 클러스터(east)에 워크로드를 쿼리한다. keast logs deploy/istiod -n istio-system | grep 'Adding cluster' 2025-05-23T09:56:08.181415Z info Adding cluster cluster=west-cluster secret=istio-system/istio-remote-secret-west-cluster # for i in west east; do echo ">> k8s cluster : $i <<"; kubectl get secret -n istio-system --kubeconfig=./$i-kubeconfig; echo; done keast get secret -n istio-system istio-remote-secret-west-cluster keast get secret -n istio-system istio-remote-secret-west-cluster -o yaml ... # east 확인 : west 의 모든 CDS/EDS 정보를 east 에서도 확인 가능! for i in listener route cluster endpoint; do echo ">> k8s cluster : east - istio-config $i <<"; docker exec -it east-control-plane istioctl proxy-config $i deploy/istio-ingressgateway.istio-system; echo; done ieast proxy-config cluster deploy/istio-ingressgateway.istio-system | grep webapp # east 에서 10.10.0.14(10.10.0.0/16)로 라우팅이 가능한 상태인가? # 역시 secret이 생성되면서 cluster간 discovery가 가능해져 east cluster에서 west cluster의 webapp의 endpoint discovery가 가능해짐! ieast proxy-config endpoint deploy/istio-ingressgateway.istio-system | grep webapp 10.10.0.14:8080 HEALTHY OK outbound|80||webapp.istioinaction.svc.cluster.local이제 컨트롤 플레인이 상대 클러스터의 워크로드를 퀴리할 수 있다.‣# catalog stub service 정보 확인 : endpoints 는 아직도 none. kwest get svc,ep -n istioinaction NAME TYPE CLUSTER-IP EXTERNAL-IP PORT(S) AGE service/catalog ClusterIP 10.100.0.87 <none> 80/TCP 93m service/webapp ClusterIP 10.100.0.72 <none> 80/TCP 93m NAME ENDPOINTS AGE endpoints/catalog <none> 93m endpoints/webapp 10.10.0.14:8080 93m # webapp stub service 생성하지 않았으므로 별도 west 의 webapp service 정보가 없다!! # 앞서 설명했듯이 istio 1.7 이하의 버전에서는 stub service가 있어야 cross cluster의 service에 대한 ip resolve가 가능하다 keast get svc,ep -n istioinaction NAME TYPE CLUSTER-IP EXTERNAL-IP PORT(S) AGE service/catalog ClusterIP 10.200.0.238 <none> 80/TCP 88m NAME ENDPOINTS AGE endpoints/catalog 10.20.0.14:3000 88m- 다음으로는 클러스터 간 연결을 설정해보자.
12.3.6 클러스터 간 연결 설정하기 Setting up cross-cluster connectivity‣들어가며 : north-south 트래픽, east-west 트래픽‣- 4장에서는 이스티오의 인그레스 게이트웨이를 다루면서 엔보이 프록시 기반이라는 것을 살펴봤다.
- 인그레스 게이트웨이는 퍼블릭 네트워크에서 시작한 트래픽의 진입점으로, 트래픽을 조직의 내부 네트워크로 보낸다.
- 이런 유형의 트래픽을
north-south 트래픽이라고도 한다. - 한편 서로 다른 내부 네트워크(여기서는 클러스터의 네트워크) 간의 트래픽은
east-west 트래픽이라고 한다. (그림 12.12 참조)
north-south 와 east-west 트래픽
east-west 트래픽을 단순화하기 위해, 대부분의 클라우드 프로바이더들은 네트워크 주소 공간이 겹치지 않는다면 가상 네트워크의 피어링을 활성화한다.- 피어링된 가상 네트워크의 서비스들은 IPv4 및 IPv6 주소로 직접 커넥션을 시작한다. 그러나 네트워크 피어링은 클라우드 전용 기능이다.
- 네트워크 피어링이 불가능한, 다른 클라우드 프로바이더나 온프레미스에 있는 클러스터에 연결하고 싶을 때 이스티오가 제공하는 선택지가 east-west 게이트웨이다.
- 게이트웨이는 반대편 클러스터의 워크로드에 접근할 수 있는 로드 밸런서로 노출돼야 한다.
- 이 절에서는 클러스터 간 연결을 설정하고, 내부적으로 어떻게 동작하는지 보여준다.
이스티오의 east-west 게이트웨이 ISTIO’S EAST-WEST GATEWAY‣east-west 게이트웨이의 목적은 클러스터 간 east-west 트래픽의 진입점 역할을 하는 것 뿐 아니라, 이 과정을 서비스 운영 팀에게 투명하게 만드는 것이다.- 이 목표를 달성하려면 게이트웨이는 반드시 다음을 수행해야 한다.
- 클러스터 사이의 정밀한 트래픽 관리 Enable fine-grained traffic management across clusters
- 암호화된 트래픽 라우팅, 암호화된 상태로 라우팅해야 워크로드 간 상호 인증이 가능하다.
Route encrypted traffic to enable mutual authentication between workloads
- 그리고 서비스 메시 운영자는 어떤 추가 리소스도 구성할 필요가 없어야 한다! 즉, 어떤 이스티오 리소스도 추가 구성할 필요가 없어야 한다! And service mesh operators shouldn’t have to configure any additional resources! In other words, you shouldn’t have to configure any additional Istio resources!
- 이렇게 하면, 트래픽을 클러스터 내에서 라우팅할 때나 클러스터 간에 라우팅할 때 차이가 없다.
- 두 시나리오 모두에서 워크로드는 서비스를 세밀하게 겨냥할 수 있고 상호 인증된 커넥션을 시작할 수 있다 (미묘한 차이가 하나 있는데, 클러스터 경계를 넘을 때의 로드 밸런싱이 조금 다르다. 이 부분은 다음 절에서 살펴본다).
- 이것이 어떻게 구현되는지 이해하려면, 이스티오의 두 기능인 SNI 클러스터와 SNI 자동 통과를 소개하고 이들이 게이트웨이의 동작을 어떻게 바꾸는지 살펴봐야 한다. SNI clusters and SNI auto passthrough.
SNI 클러스터로 east-west 게이트웨이 설정하기 CONFIGURING EAST-WEST GATEWAYS WITH SNI CLUSTERS‣east-west 게이트웨이는 SNI 클러스터를 모든 서비스에 추가 설정한 인그레스 게이트웨이다. East-west gateways are ingress gateways with additional configuration for Server Name Indication (SNI) clusters for every service.- 그럼 SNI 클러스터란 무엇일까?
- SNI 클러스터는 단순히 보통의 엔보이 클러스터 Envoy clusters 같은 것으로(10장 10.3.2절의 ‘엔보이 클러스터 설정 쿼리하기’ 절 참조), 트래픽이 라우팅될 수 있는 유사 워크로드 집합을 묶는 속성인 방향, 부분집합, 포트, FQDN을 포함한다. SNI clusters are just like regular Envoy clusters (see chapter 10, section 10.3.2, Querying the Envoy Cluster Configuration subsection), consisting of the direction, subset, port, and FQDN that group a set of similar workloads where traffic can be routed.
- 그러나 SNI 클러스터에는 한 가지 주요 차이점이 있다. SNI 클러스터는 모든 엔보이 클러스터 정보를 SNI에 인코딩한다. However, SNI clusters have one key difference: they encode all Envoy cluster information in the SNI.
- 이 덕분에
east-west 게이트웨이는 클러스터가 SNI 안에 지정한 클러스터로 암호화된 트래픽을 라우팅할 수 있는 것이다. This enables the east-west gateway to proxy encrypted traffic to the cluster specified by the client within the SNI. - 구체적인 예를 들면, 클라이언트(webapp 같은)가 원격 클러스터의 워크로드(catalog 같은)로 커넥션을 시작할 때 그림 12.13 처럼 겨냥하는 클러스터를 SNI에 인코딩한다. To take a concrete example, when one client(such as the webapp) initiates a connection to a workload in a remote cluster(such as the catalog workload) it encodes the cluster that it targets into the SNI, as shown in figure 12.13.
- 클러스터 정보는 SNI에 인코딩된다.
- SNI에는 라우팅 결정을 지시하는 방향, 포트, 버전, 서비스 이름이 포함된다.
- 그러므로 클라이언트는 세밀한 라우팅 결정을 내릴 수 있으며, 게이트웨이는 SNI 헤더에서 클러스터 정보를 읽어 트래픽을 클라이언트가 의도한 워크로드로 프록시할 수 있다. Thus the client can make fine-grained routing decisions, and the gateway can read the cluster information from the SNI header and then proxy the traffic to the workload intended by the client.
- 이 모든 작업이 안전하고 상호 인증한 커넥션을 워크로드 사이에 유지하는 중에 일어난다. All this happens while maintaining a secure and mutually authenticated connection between the workloads.
SNI 클러스터가 있는 east-west 게이트웨이 설치하기 Installing the east-west gateway with SNI clusters‣- SNI 클러스터 설정은 옵트인 기능으로, 다음
IstioOpertor정의처럼 환경 변수ISTIO_META_ROUTER_MODE로 게이트웨이 라우터 모드를sni-dnat으로 설정해서 활성화할 수 있다. For a gateway, the configuration of SNI clusters is an opt-in feature that can be enabled by setting the gateway router mode to sni-dnat using the environment variable ISTIO_META_ROUTER_MODE, as shown in the following IstioOperator definition:
# cat ch12/gateways/cluster-east-eastwest-gateway.yaml apiVersion: install.istio.io/v1alpha1 kind: IstioOperator metadata: name: istio-eastwestgateway # IstioOperator 이름은 앞 선 이스티오 설정 이름과 겹치지 않아야 한다 namespace: istio-system spec: profile: empty # empty 프로필은 추가 이스티오 구성 요소를 설치하지 않는다 components: ingressGateways: - name: istio-eastwestgateway # 게이트웨이 이름 label: istio: eastwestgateway app: istio-eastwestgateway topology.istio.io/network: east-network enabled: true k8s: env: - name: ISTIO_META_ROUTER_MODE # sni-dnat 모드는 트래픽을 프록시하는 데 필요한 SNI 클러스터를 추가한다 value: "sni-dnat" # The network to which traffic is routed - name: ISTIO_META_REQUESTED_NETWORK_VIEW # 게이트웨이가 트래픽을 라우팅하는 네트워크(target cluster의 istiod설정 값) value: east-network service: ports: ... (생략) ... values: global: meshID: usmesh # 메시, 클러스터, 네트워크 식별 정보 multiCluster: clusterName: east-cluster network: east-network- IstioOperator 리소스 이름은 처음에 컨트롤 플레인 설치하는 데 사용한 리소스와 같아서는 안 된다. 같은 이름을 사용하면 앞 서 설치한 것을 덮어 쓸 것이다.
ISTIO_META_ROUTER_MODE를sni-dnat으로 설정하면 SNI 클러스터를 자동으로 구성한다. 지정하지 않으면standard모드로 돌아가며, 이는 SNI 클러스터를 설정하지 않는다.ISTIO_META_REQUESTED_NETWORK_VIEW는 네트워크 트래픽이 프록시되는 곳을 정의한다.
- IstioOperator 로 east 클러스터에 east-west 게이트웨이를 설치하자.
# 설치 전 확인 for i in west east; do echo ">> k8s cluster : $i <<"; kubectl get pod -n istio-system -l istio.io/rev=default --kubeconfig=./$i-kubeconfig; echo; done for i in west east; do echo ">> k8s cluster : $i <<"; kubectl get IstioOperator -n istio-system --kubeconfig=./$i-kubeconfig; echo; done kwest get IstioOperator -n istio-system installed-state-istio-controlplane -o yaml keast get IstioOperator -n istio-system installed-state-istio-controlplane -o yaml # 설치 전 확인 : west 에서 catalog endpoint 에 IP 확인 for i in listener route cluster endpoint; do echo ">> k8s cluster : west - istio-config $i <<"; docker exec -it west-control-plane istioctl proxy-config $i deploy/istio-ingressgateway.istio-system; echo; done # eastwest-gateway 설치 후 해당 endpoint가 eastwest-gateway의 lb ip로 변경되는것 확인해보자!! iwest proxy-config endpoint deploy/istio-ingressgateway.istio-system | grep catalog 10.20.0.14:3000 HEALTHY OK outbound|80||catalog.istioinaction.svc.cluster.local # IstioOperator 로 east 클러스터에 east-west 게이트웨이를 설치 cat ch12/gateways/cluster-east-eastwest-gateway.yaml docker cp ./ch12/gateways/cluster-east-eastwest-gateway.yaml east-control-plane:/cluster-east-eastwest-gateway.yaml ieast install -f /cluster-east-eastwest-gateway.yaml --set values.global.proxy.privileged=true -y # east 클러스터에 east-west 게이트웨이를 설치 확인 for i in west east; do echo ">> k8s cluster : $i <<"; kubectl get IstioOperator -n istio-system --kubeconfig=./$i-kubeconfig; echo; done >> k8s cluster : west << NAME REVISION STATUS AGE installed-state-istio-controlplane 7h28m >> k8s cluster : east << NAME REVISION STATUS AGE installed-state-istio-controlplane 7h10m installed-state-istio-eastwestgateway 5s for i in west east; do echo ">> k8s cluster : $i <<"; kubectl get pod -n istio-system -l istio.io/rev=default --kubeconfig=./$i-kubeconfig; echo; done >> k8s cluster : west << NAME READY STATUS RESTARTS AGE istio-ingressgateway-5db74c978c-n5zbr 1/1 Running 0 7h28m istiod-5585445f4c-bs5hk 1/1 Running 0 7h28m >> k8s cluster : east << NAME READY STATUS RESTARTS AGE istio-eastwestgateway-866794c798-ppblc 1/1 Running 0 23s istio-ingressgateway-7f6f8f8d99-c259g 1/1 Running 0 7h10m istiod-85976468f-gxcqn 1/1 Running 0 7h10m keast get IstioOperator -n istio-system installed-state-istio-eastwestgateway -o yaml ... ingressGateways: - enabled: true k8s: env: - name: ISTIO_META_ROUTER_MODE value: sni-dnat - name: ISTIO_META_REQUESTED_NETWORK_VIEW value: east-network service: ports: - name: status-port port: 15021 targetPort: 15021 - name: mtls port: 15443 targetPort: 15443 - name: tcp-istiod port: 15012 targetPort: 15012 - name: tcp-webhook port: 15017 targetPort: 15017 label: app: istio-eastwestgateway istio: eastwestgateway topology.istio.io/network: east-network name: istio-eastwestgateway ... # east 정보 확인 ieast proxy-status NAME CLUSTER CDS LDS EDS RDS ECDS ISTIOD VERSION catalog-6cf4b97d-68vr7.istioinaction east-cluster SYNCED SYNCED SYNCED SYNCED NOT SENT istiod-85976468f-gxcqn 1.17.8 istio-eastwestgateway-866794c798-ppblc.istio-system east-cluster SYNCED SYNCED SYNCED NOT SENT NOT SENT istiod-85976468f-gxcqn 1.17.8 istio-ingressgateway-7f6f8f8d99-c259g.istio-system east-cluster SYNCED SYNCED SYNCED NOT SENT NOT SENT istiod-85976468f-gxcqn 1.17.8 # east 에 istio-ingressgateway 에 istio-config 정보 확인 : west 의 CDS/EDS 모두 알고 있음! for i in listener route cluster endpoint; do echo ">> east k8s cluster : ingressgateway - istio-config $i <<"; docker exec -it east-control-plane istioctl proxy-config $i deploy/istio-ingressgateway.istio-system; echo; done # east 에 istio-eastwestgateway 에 istio-config 정보 확인 : webapp(CDS) OK, west 에 EDS 아직 모름! for i in listener route cluster endpoint; do echo ">> east k8s cluster : eastwestgateway - istio-config $i <<"; docker exec -it east-control-plane istioctl proxy-config $i deploy/istio-eastwestgateway.istio-system; echo; done ieast proxy-config cluster deploy/istio-eastwestgateway.istio-system | grep istioinaction catalog.istioinaction.svc.cluster.local 80 - outbound EDS webapp.istioinaction.svc.cluster.local 80 - outbound EDS ieast proxy-config cluster deploy/istio-eastwestgateway.istio-system --fqdn webapp.istioinaction.svc.cluster.local -o json ieast proxy-config cluster deploy/istio-eastwestgateway.istio-system --fqdn webapp.istioinaction.svc.cluster.local -o json | grep sni "sni": "outbound_.80_._.webapp.istioinaction.svc.cluster.local" ieast proxy-config endpoint deploy/istio-eastwestgateway.istio-system | grep istioinaction ieast proxy-config endpoint deploy/istio-eastwestgateway.istio-system --cluster 'outbound|80||catalog.istioinaction.svc.cluster.local' -o json # west 정보 확인 iwest proxy-status # west 에 istio-ingressgateway 에 istio-config 정보 확인 for i in listener route cluster endpoint; do echo ">> west k8s cluster : ingressgateway - istio-config $i <<"; docker exec -it west-control-plane istioctl proxy-config $i deploy/istio-ingressgateway.istio-system; echo; done iwest proxy-config cluster deploy/istio-ingressgateway.istio-system | grep istioinaction iwest proxy-config cluster deploy/istio-ingressgateway.istio-system --fqdn catalog.istioinaction.svc.cluster.local -o json iwest proxy-config cluster deploy/istio-ingressgateway.istio-system --fqdn catalog.istioinaction.svc.cluster.local -o json | grep sni "sni": "outbound_.80_._.catalog.istioinaction.svc.cluster.local" # west 에 istio-ingressgateway : east EDS 모든 정보에서 east의 eastwestgateway에 mtls 정보로 변경! iwest proxy-config endpoint deploy/istio-ingressgateway.istio-system | grep istioinaction 10.10.0.14:8080 HEALTHY OK outbound|80||webapp.istioinaction.svc.cluster.local 172.19.255.202:15443 HEALTHY OK outbound|80||catalog.istioinaction.svc.cluster.local # 출력되는 172.18.X.Y에 IP 확인 : east 에 eastwestgateway 의 Service(LoadBalancer)의 External-IP. keast get svc,ep -n istio-system istio-eastwestgateway NAME TYPE CLUSTER-IP EXTERNAL-IP PORT(S) AGE service/istio-eastwestgateway LoadBalancer 10.200.0.191 172.19.255.202 15021:31496/TCP,15443:32213/TCP,15012:31540/TCP,15017:31661/TCP 5m4s NAME ENDPOINTS AGE endpoints/istio-eastwestgateway 10.20.0.15:15021,10.20.0.15:15017,10.20.0.15:15012 + 1 more... 5m4s # west 에 webapp 에 istio-config 정보 확인 for i in listener route cluster endpoint; do echo ">> west k8s cluster : webapp - istio-config $i <<"; docker exec -it west-control-plane istioctl proxy-config $i deploy/webapp.istioinaction; echo; done iwest proxy-config endpoint deploy/webapp.istioinaction | grep istioinaction 10.10.0.14:8080 HEALTHY OK outbound|80||webapp.istioinaction.svc.cluster.local 172.19.255.202:15443 HEALTHY OK outbound|80||catalog.istioinaction.svc.cluster.local # west 에서 호출 시도 kwest get svc,ep -n istioinaction NAME TYPE CLUSTER-IP EXTERNAL-IP PORT(S) AGE service/catalog ClusterIP 10.100.0.87 <none> 80/TCP 6h50m service/webapp ClusterIP 10.100.0.72 <none> 80/TCP 6h50m NAME ENDPOINTS AGE endpoints/catalog <none> 6h50m endpoints/webapp 10.10.0.14:8080 6h50m kwest exec -it deploy/webapp -c istio-proxy -n istioinaction -- curl catalog.istioinaction.svc.cluster.local -v * Trying 10.100.0.170:80... * connect to 10.100.0.170 port 80 failed: Connection refused ...- east-west 게이트웨이를 설치하고 라우터 모드를 sni-dnat으로 설정했으면, 다음 단계는 SNI 자동 통과 모드 SNI auto passthrough mode 를 사용해 east-west 게이트웨이에서 다중 클러스터 상호 TLS 포트를 노출하는 것이다. With the east-west gateway installed and the router mode set to sni-dnat the next step is to expose the multi-cluster mTLS port through the east-west gateway using the SNI auto passthrough mode.
- 이스티오는 영리해서 딱 그때만 게이트웨이에 SNI 클러스터를 설정한다. Istio is clever and only then configures the gateway with the SNI clusters.
SNI 자동 통과로 클러스터 간 트래픽 라우팅하기 ROUTING CROSS-CLUSTER TRAFFIC USING SNI AUTO PASSTHROUGH‣- SNI 자동 통과 auto passthrough 를 이해하기 위해, 수동 SNI 통과가 SNI 헤더에 기반해 트래픽을 허용하도록 인그레스 게이트웨이를 설정한다는 것을 떠올려보자 (4장의 4.4.2절 참고). To understand SNI auto passthrough, let’s recall that the manual SNI passthrough configures the ingress gateway to admit traffic based on the SNI header.
- 이는 허용된 트래픽을 라우팅하려면 서비스 운영자가 수작업으로 VirtualService 리소스를 정의해야 함을 보여준다 (그림 12.14) This shows that to route admitted traffic, service operators have to manually define a VirtualService resource.
- SNI 자동 통과는 그 이름에서 짐작할 수 있듯이, 허용된 트래픽을 라우팅하자고 VirtualService 를 수작업으로 만들 필요가 없다. SNI auto passthrough, as the name suggests, doesn’t require manually creating a VirtualService to route admitted traffic.
- 라우팅은 SNI 클러스터를 사용해 수행할 수 있는데, SNI 클러스터는 라우터 모드가 sni-dnat 일때 east-west 게이트웨이에서 자동으로 설정된다. It is done using the SNI clusters, which are configured automatically in the east-west gateway when its router mode is set to sni-dnat.
- SNI 자동 통과는 이스티오 Gateway 리소스로 설정할 수 있다. 다음 정의에서는 SNI 헤더의 값이
*.local인 모든 트래픽에 대해 SNI 자동 통과를 사용한는데, 이는 모든 쿠버네티스 서비스에 해당한다. SNI auto passthrough mode is configured using the Istio Gateway resource. In the following definition, we use SNI auto passthrough for all traffic where the SNI header matches the expression *.local, which is the case for all Kubernetes services.
# cat ch12/gateways/expose-services.yaml apiVersion: networking.istio.io/v1alpha3 kind: Gateway metadata: name: cross-network-gateway namespace: istio-system spec: selector: istio: eastwestgateway # 셀렉터와 일치하는 게이트웨이에만 설정이 적용된다. servers: - port: number: 15443 # 이스티오에서 15443 포트는 멀티 클러스터 상호 TLS 트래픽 용도로 지정된 특수 포트다 name: tls protocol: TLS tls: mode: AUTO_PASSTHROUGH # SNI 헤더를 사용해 목적지를 해석하고 SNI 클러스터를 사용한다. hosts: - "*.local" # 정규식 *.local 과 일치하는 SNI에 대해서만 트래픽을 허용한다.- east 클러스터에 적용 시, east-cluster의 워크로드를 west-cluster 에 노출한다.
# east 클러스터에 적용하자. east-cluster의 워크로드를 west-cluster 에 노출한다. cat ch12/gateways/expose-services.yaml keast apply -n istio-system -f ch12/gateways/expose-services.yaml # 확인 keast get gw,vs,dr -A NAMESPACE NAME AGE istio-system gateway.networking.istio.io/cross-network-gateway 16s # west 에서 호출 시도 kwest get svc,ep -n istioinaction NAME TYPE CLUSTER-IP EXTERNAL-IP PORT(S) AGE service/catalog ClusterIP 10.100.0.87 <none> 80/TCP 6h59m service/webapp ClusterIP 10.100.0.72 <none> 80/TCP 6h59m NAME ENDPOINTS AGE endpoints/catalog <none> 6h59m endpoints/webapp 10.10.0.14:8080 6h59m kwest exec -it deploy/webapp -c istio-proxy -n istioinaction -- curl catalog.istioinaction.svc.cluster.local -v * Trying 10.100.0.170:80... * connect to 10.100.0.170 port 80 failed: Connection refused ... # east 에 istio-ingressgateway 에 istio-config 정보 확인 : 이전 내용과 동일하게 west 의 CDS/EDS 모두 알고 있음! for i in listener route cluster endpoint; do echo ">> east k8s cluster : ingressgateway - istio-config $i <<"; docker exec -it east-control-plane istioctl proxy-config $i deploy/istio-ingressgateway.istio-system; echo; done # east 에 istio-eastwestgateway 에 istio-config 정보 확인 : SNI 자동 통과를 위한 listener 추가 확인! for i in listener route cluster endpoint; do echo ">> east k8s cluster : eastwestgateway - istio-config $i <<"; docker exec -it east-control-plane istioctl proxy-config $i deploy/istio-eastwestgateway.istio-system; echo; done ieast proxy-config listener deploy/istio-eastwestgateway.istio-system ieast proxy-config listener deploy/istio-eastwestgateway.istio-system | grep istioinaction 0.0.0.0 15443 SNI: outbound_.80_._.webapp.istioinaction.svc.cluster.local; App: istio,istio-peer-exchange,istio-http/1.0,istio-http/1.1,istio-h2 Cluster: outbound_.80_._.webapp.istioinaction.svc.cluster.local 0.0.0.0 15443 SNI: outbound_.80_._.catalog.istioinaction.svc.cluster.local; App: istio,istio-peer-exchange,istio-http/1.0,istio-http/1.1,istio-h2 Cluster: outbound_.80_._.catalog.istioinaction.svc.cluster.local ieast proxy-config listener deploy/istio-eastwestgateway.istio-system --port 15443 -o json ... "filterChainMatch": { "serverNames": [ "outbound_.80_._.catalog.istioinaction.svc.cluster.local" ... }, "filters": [ ... { "name": "envoy.filters.network.tcp_proxy", "typedConfig": { "@type": "type.googleapis.com/envoy.extensions.filters.network.tcp_proxy.v3.TcpProxy", "statPrefix": "outbound_.80_._.catalog.istioinaction.svc.cluster.local", "cluster": "outbound_.80_._.catalog.istioinaction.svc.cluster.local", ... # west 정보 확인 iwest proxy-status # west 에 istio-ingressgateway 에 istio-config 정보 확인 for i in listener route cluster endpoint; do echo ">> west k8s cluster : ingressgateway - istio-config $i <<"; docker exec -it west-control-plane istioctl proxy-config $i deploy/istio-ingressgateway.istio-system; echo; done # west 에 webapp 에 istio-config 정보 확인 for i in listener route cluster endpoint; do echo ">> west k8s cluster : webapp - istio-config $i <<"; docker exec -it west-control-plane istioctl proxy-config $i deploy/webapp.istioinaction; echo; done- 반대편 클러스터에도 작업 수행. west-cluster 에 east-west 게이트웨이를 만들고, 그 서비스를 east-cluster 워크로드에 노출.
# IstioOperator 로 west 클러스터에 east-west 게이트웨이를 설치 cat ch12/gateways/cluster-west-eastwest-gateway.yaml docker cp ./ch12/gateways/cluster-west-eastwest-gateway.yaml west-control-plane:/cluster-west-eastwest-gateway.yaml iwest install -f /cluster-west-eastwest-gateway.yaml --set values.global.proxy.privileged=true -y # west 클러스터에 east-west 게이트웨이를 설치 확인 for i in west east; do echo ">> k8s cluster : $i <<"; kubectl get IstioOperator -n istio-system --kubeconfig=./$i-kubeconfig; echo; done for i in west east; do echo ">> k8s cluster : $i <<"; kubectl get pod -n istio-system -l istio.io/rev=default --kubeconfig=./$i-kubeconfig; echo; done kwest get IstioOperator -n istio-system installed-state-istio-eastwestgateway -o yaml iwest proxy-status NAME CLUSTER CDS LDS EDS RDS ECDS ISTIOD VERSION istio-eastwestgateway-6f7995db66-pbz4q.istio-system west-cluster SYNCED SYNCED SYNCED NOT SENT NOT SENT istiod-5585445f4c-bs5hk 1.17.8 istio-ingressgateway-5db74c978c-n5zbr.istio-system west-cluster SYNCED SYNCED SYNCED SYNCED NOT SENT istiod-5585445f4c-bs5hk 1.17.8 webapp-5c8b4fff64-2hbwf.istioinaction west-cluster SYNCED SYNCED SYNCED SYNCED NOT SENT istiod-5585445f4c-bs5hk 1.17.8 # west 클러스터에 적용하자. east-cluster의 워크로드를 west-cluster 에 노출한다. cat ch12/gateways/expose-services.yaml kwest apply -n istio-system -f ch12/gateways/expose-services.yaml # 확인 kwest get gw,vs,dr -A NAMESPACE NAME AGE istio-system gateway.networking.istio.io/cross-network-gateway 4s istioinaction gateway.networking.istio.io/coolstore-gateway 7h3m NAMESPACE NAME GATEWAYS HOSTS AGE istioinaction virtualservice.networking.istio.io/webapp-virtualservice ["coolstore-gateway"] ["webapp.istioinaction.io"] 7h3m kwest get svc,ep -n istioinaction NAME TYPE CLUSTER-IP EXTERNAL-IP PORT(S) AGE service/catalog ClusterIP 10.100.0.87 <none> 80/TCP 7h4m service/webapp ClusterIP 10.100.0.72 <none> 80/TCP 7h4m NAME ENDPOINTS AGE endpoints/catalog <none> 7h4m endpoints/webapp 10.10.0.14:8080 7h4m ieast pc clusters deploy/istio-eastwestgateway.istio-system | grep catalog catalog.istioinaction.svc.cluster.local 80 - outbound EDS outbound_.80_._.catalog.istioinaction.svc.cluster.local - - - EDS # sni 클러스터 확인 ieast pc clusters deploy/istio-eastwestgateway.istio-system | grep catalog | awk '{printf "CLUSTER: %s\n", $1}' CLUSTER: catalog.istioinaction.svc.cluster.local CLUSTER: outbound_.80_._.catalog.istioinaction.svc.cluster.local # catalog 서비스용 SNI 클러스터 # west 에 webapp 에 istio-config 정보 다시 확인 # east cluster의 eastwest-gateway lb의 external ip가 endpoint로 등록되어 catalog 서비스용 SNI Cluster로 route되도록 설정됨 for i in listener route cluster endpoint; do echo ">> west k8s cluster : webapp - istio-config $i <<"; docker exec -it west-control-plane istioctl proxy-config $i deploy/webapp.istioinaction; echo; done >> west k8s cluster : webapp - istio-config endpoint << ENDPOINT STATUS OUTLIER CHECK CLUSTER ... 172.19.255.202:15443 HEALTHY OK outbound|80||catalog.istioinaction.svc.cluster.local- 출력은 catalog 워크로드에 SNI 클러스터가 정의됐음을 보여준다! The output shows the SNI cluster is defined for the catalog workload!
- 그리고 SNI 자동 통과로 게이트웨이를 설정했으므로, 게이트웨이에 들어오는 트래픽은 SNI 클러스터를 사용해 의도한 워크로드로 라우팅한다. And as we configured the gateway with SNI auto passthrough, incoming traffic on the gateway uses the SNI clusters to route to the intended workloads.
- 이스티오 컨트롤 플레인은 이 리소스들의 생성을 지켜보고 있다가, 이제 클러스터 간 트래픽을 라우팅할 수 있는 경로가 존재함을 발견한다. Istio’s control plane listens for the creation of these resources and discovers that now a path exists to route crosscluster traffic.
- 따라서 컨트롤 플레인은 원격 클러스터에서 새로 발견한 엔드포인트로 모든 워크로드를 설정한다. Thus it updates all workloads with the newly discovered endpoints in the remote cluster.
클러스터 간 워크로드 디스커버리 검증하기* VALIDATING CROSS-CLUSTER WORKLOAD DISCOVERY‣- 이제 east-cluster 의 워크로드가 west-cluster 에 노출됐으므로, webapp 엔보이 클러스터가 catalog 워크로드로 향햐는 엔드포인트를 갖고 있으리라 기대된다.
- 이 엔드포인트는 네트워크의 catalog 에 대한 요청을 프록시하는 east-west 게이트웨이 주소를 가리켜야 한다.
- 이를 확인하기 위해 east-cluster 의 east-west 게이트웨이 주소(Service)를 알아보자.
# keast -n istio-system get svc istio-eastwestgateway -o jsonpath='{.status.loadBalancer.ingress[0].ip}' 172.19.255.202- 이제 이 값을 west-cluster 의 워크로드가 클러스터 간 트래픽을 라우팅할 때 사용하는 주소와 비교해보자.
# iwest pc endpoints deploy/webapp.istioinaction | grep catalog 172.19.255.202:15443 HEALTHY OK outbound|80||catalog.istioinaction.svc.cluster.local- catalog 리소스의 엔드포인트가 east-west 게이트웨이의 주소(=east cluster의 east-west gateway lb service의 ip)와 일치하면, 워크로드를 찾을 수 있고 클러스터 간 트래픽이 가능하다.
- 프록시 설정을 고려하면 모든 것이 올바르게 설정됐다.
- 직접 요청을 트리거해 마지막으로 확인해보자.
# west 에 istio-ingressgateway 인입을 위한 접속 정보 확인 kwest get svc -n istio-system istio-ingressgateway NAME TYPE CLUSTER-IP EXTERNAL-IP PORT(S) AGE istio-ingressgateway LoadBalancer 10.100.0.95 172.19.255.101 15021:32170/TCP,80:30000/TCP,443:32359/TCP,31400:31954/TCP,15443:32009/TCP 8h EXT_IP=$(kwest -n istio-system get svc istio-ingressgateway -o jsonpath='{.status.loadBalancer.ingress[0].ip}') echo $EXT_IP 172.19.255.101 # docker exec -it mypc curl -s -H "Host: webapp.istioinaction.io" http://$EXT_IP/api/catalog | jq [ { "id": 1, "color": "amber", ... # 신규 터미널 : 반복 접속 alias kwest='kubectl --kubeconfig=./west-kubeconfig' EXT_IP=$(kwest -n istio-system get svc istio-ingressgateway -o jsonpath='{.status.loadBalancer.ingress[0].ip}') while true; do docker exec -it mypc curl -s -H "Host: webapp.istioinaction.io" http://$EXT_IP/api/catalog ; date "+%Y-%m-%d %H:%M:%S" ; sleep 1; echo; done- kiali : west-cluster 확인
- kiali : east-cluster 확인 , mTLS 통신이며 TCP Traffic 와 HTTP(S) 2개 트래픽 흐름으로 확인됨.(초록색 = http / 남색 = tcp) Gateway에서 설정한 tls mode의 passthrough에 의해서 트래픽 흐름이 두개처럼 보이는 것이다.
- Gateway에 tls mode를 passthrough로 설정하면 cross cluster east-west 통신의 mTLS통신에서 west의 webapp이 east의 catalog로 traffic을 보낼때, west의 endpoint 정보에 따라 eastwest-gateway로 SNI정보를 담아 보내고 eastwest-gateway에서는 SNI 헤더를 살펴보고 트래픽을 특정 백엔드로 라우팅하고 TLS 커넥션 종료는 그 후 백엔드에서 처리한다.
- 게이트웨이가 하는 일은 SNI 헤더를 살펴보고 트래픽을 특정 백엔드로 라우팅하는 것 뿐이다. TLS 커넥션 종료는 그 후 백엔드에서 처리한다!!
- cross cluster통신 뿐만 아니라 single cluster에서도 Gateway에 tls mode를 passthrough로 설정하면 동일!!
(참고) Istio 의 TCP Traffic 라우팅과 Traffic routing with SNI passthrough 는 4.4.2 를 확인하자.‣apiVersion: networking.istio.io/v1alpha3 kind: Gateway metadata: name: sni-passthrough-gateway spec: selector: istio: ingressgateway servers: - port: number: 31400 #1 HTTP 포트가 아닌 특정 포트 열기 name: tcp-sni protocol: TLS hosts: - "simple-sni-1.istioinaction.io" #2 이 호스트를 포트와 연결 tls: mode: PASSTHROUGH #3 통과 트래픽으로 처리 --- apiVersion: networking.istio.io/v1alpha3 kind: VirtualService metadata: name: simple-sni-1-vs spec: hosts: - "simple-sni-1.istioinaction.io" gateways: - sni-passthrough-gateway tls: - match: #1 특정 포트와 호스트의 비교 부분 - port: 31400 sniHosts: - simple-sni-1.istioinaction.io route: - destination: #2 트래픽이 일치하는 경우 라우팅 목적지 host: simple-tls-service-1 port: number: 80 #3 서비스 포트로 라우팅실제 traffic은 webapp —(TCP)—> istio-eastwestgateway(check SNI) —(TCP)—> catalog(여기서 mtls인증서 확인 및 tls termination) —> backend catalog
- jaeger : west-cluster 확인
- jaeger : east-cluster 확인
- istio-proxy 로그 확인
# west 에 istio-ingressgateway 로그 kwest logs -n istio-system -l app=istio-ingressgateway -f [2025-05-23T16:03:56.013Z] "GET /api/catalog HTTP/1.1" 200 - via_upstream - "-" 0 357 4 4 "172.19.0.100" "curl/8.7.1" "b0cfca91-bcee-9e84-a7c4-03e71d51bd05" "webapp.istioinaction.io" "10.10.0.14:8080" outbound|80||webapp.istioinaction.svc.cluster.local 10.10.0.9:37008 10.10.0.9:8080 172.19.0.100:42278 - - # west 에 webapp 로그 kwest logs -n istioinaction -l app=webapp -c istio-proxy -f [2025-05-23T16:04:03.657Z] "GET /api/catalog HTTP/1.1" 200 - via_upstream - "-" 0 357 4 3 "172.19.0.100" "curl/8.7.1" "107fa10a-2963-987a-9305-0a9f0e3df1ca" "webapp.istioinaction.io" "10.10.0.14:8080" inbound|8080|| 127.0.0.6:39631 10.10.0.14:8080 172.19.0.100:0 outbound_.80_._.webapp.istioinaction.svc.cluster.local default [2025-05-23T16:04:04.751Z] "GET /items HTTP/1.1" 200 - via_upstream - "-" 0 502 1 1 "172.19.0.100" "beegoServer" "9b8f7ebc-aacd-9cdd-af4a-efe5098d6cd4" "catalog.istioinaction.svc.cluster.local:80" "172.19.255.202:15443" outbound|80||catalog.istioinaction.svc.cluster.local 10.10.0.14:42424 10.100.0.87:80 172.19.0.100:0 - default kwest logs -n istioinaction -l app=webapp -c webapp -f 2025/05/23 16:04:17.797 [M] [router.go:1014] 172.19.0.100 - - [23/May/2025 04:04:17] "GET /api/catalog HTTP/1.1 200 0" 0.002664 curl/8.7.1 # west 에 istio-eastwestgateway 로그 kwest exec -it -n istio-system deploy/istio-eastwestgateway -- curl -X POST http://localhost:15000/logging?level=debug kwest logs -n istio-system -l app=istio-eastwestgateway -f ... # east 에 istio-eastwestgateway 로그 keast exec -it -n istio-system deploy/istio-eastwestgateway -- curl -X POST http://localhost:15000/logging?level=debug keast logs -n istio-system -l app=istio-eastwestgateway -f ... # east 에 catalog 로그 keast logs -n istioinaction -l app=catalog -c istio-proxy -f [2025-05-23T16:04:29.882Z] "GET /items HTTP/1.1" 200 - via_upstream - "-" 0 502 1 0 "172.19.0.100" "beegoServer" "770551b0-d919-981e-9ceb-a4d39400e983" "catalog.istioinaction.svc.cluster.local:80" "10.20.0.14:3000" inbound|3000|| 127.0.0.6:46995 10.20.0.14:3000 172.19.0.100:0 outbound_.80_._.catalog.istioinaction.svc.cluster.local default keast logs -n istioinaction -l app=catalog -c catalog -f request path: /items blowups: {} number of blowups: 0 GET catalog.istioinaction.svc.cluster.local:80 /items 200 502 - 0.219 ms GET /items 200 0.219 ms - 502- west : webapp
# kwest exec -it -n istioinaction deploy/webapp -c istio-proxy -- sudo tcpdump -i any tcp -nn kwest exec -it -n istioinaction deploy/webapp -c istio-proxy -- sudo tcpdump -i lo tcp -nn kwest exec -it -n istioinaction deploy/webapp -c istio-proxy -- sudo tcpdump -i eth0 tcp -nn 16:04:53.990334 IP 10.10.0.14.42424 > 172.19.255.202.15443: Flags [P.], seq 3649254160:3649255538, ack 539546589, win 696, options [nop,nop,TS val 1407640032 ecr 1480757014], length 1378 16:04:53.991627 IP 172.19.255.202.15443 > 10.10.0.14.42424: Flags [P.], seq 1:1789, ack 1378, win 21266, options [nop,nop,TS val 1480759220 ecr 1407640032], length 1788 ... # src kwest get po -n istioinaction -o wide NAME READY STATUS RESTARTS AGE IP NODE NOMINATED NODE READINESS GATES webapp-5c8b4fff64-2hbwf 2/2 Running 0 7h41m 10.10.0.14 west-control-plane <none> <none> # dst keast get svc -n istio-system istio-eastwestgateway NAME TYPE CLUSTER-IP EXTERNAL-IP PORT(S) AGE istio-eastwestgateway LoadBalancer 10.200.0.191 172.19.255.202 15021:31496/TCP,15443:32213/TCP,15012:31540/TCP,15017:31661/TCP 60m- east : catalog
# istio-proxy 에 tcp port 3000 에서 패킷 덤프에 출력 결과를 파일로 저장 keast exec -it -n istioinaction deploy/catalog -c istio-proxy -- sudo tcpdump -i any tcp port 3000 -w /var/lib/istio/data/dump.pcap keast exec -it -n istioinaction deploy/catalog -c istio-proxy -- ls -l /var/lib/istio/data/ # 출력 결과 파일을 로컬로 다운로드 keast get pod -n istioinaction -l app=catalog -oname pod/catalog-6cf4b97d-68vr7 keast cp -n istioinaction -c istio-proxy catalog-6cf4b97d-68vr7:var/lib/istio/data/dump.pcap ./dump.pcap # 로컬로 다운 받은 파일을 wireshark 로 불러오기 : XFF 로 요청 Client IP 확인 wireshark dump.pcap- west의 인그레스 게이트웨이에 요청을 트리거하면 요청이 west-cluster 의 webapp 으로 라우팅됨을 알 수 있다.
- 그런 다음, 요청을 처리하는 east-cluster 의 catalog 워크로드로 해석된다.
- 이로써 다중 클러스터, 다중 네트워크, 다중 컨트롤 플레인 서비스 메시가 설정됐고 두 클러스터가 서로의 워크로드를 찾을 수 있음을 확인했다.
- 워크로드들은 east-west 게이트웨이를 통과 지점으로 사용해 상호 인증 커넥션을 시작한다.
다중 클러스터 서비스 메시를 설정하는데 필요한 것 요약‣- 클러스터 간 워크로드 디스커버리 Cross-cluster workload discovery
- 서비스 어카운트 토큰과 인증서가 포함된 kubeconfig 를 사용해 각 컨트롤 플레인에 동료 클러스터에 대한 접근 권한을 제공함으로써 구현한다.
- 이 과정은 istioctl 을 사용해 쉽게 진행했고, east-cluster 에만 적용했다.
- 클러스터 간 워크로드 연결 Cross-cluster workload connectivity
- 다른 클러스터의 워크로드(다른 네트워크에 위치) 간에 트래픽을 라우팅하도록 east-west 게이트웨이를 설정하고, 이스티오가 워크로드가 위치한 네트워크를 알 수 있도록 각 클러스터에 네트워크 정보 레이블을 지정해 구현한다.
- 클러스터 간 신뢰 설정 Configuring trust between clusters
- 상대 클러스터와 동일한 루트 신뢰로 중간 인증서를 발급함으로써 설정한다.
- 겨우 몇 단계 정도이며, 대부분 자동화돼 다중 클러스터 서비스 메시를 설정한다.
- 다음 절에서는 클러스터 간의 서비스 메시 동작을 몇 가지 확인해본다.
12.3.7 클러스터 간 로드 밸런싱 Load-balancing across clusters‣클러스터 간 로드 밸런싱‣- 6장에서는 클러스터 지역 인식 로드 밸런싱을 살펴보겠다고 약속했다. In chapter 6, we promised to explore cross-cluster, locality-aware load balancing.
- 그리고 이제 다중 클러스터 서비스 메시가 있으니 그럴 준비가 됐다. 이를 시연하기 위해 2개의 샘플 서비스를 배포할 것이다.
- 이 서비스들은 워크로드가 실행 중인 클러스터의 이름을 반환하도록 설정돼 있다. 그러므로 요청을 처리하는 워크로드의 위치를 쉽게 확인할 수 있다. To demonstrate this, we’ll deploy two sample services, each of which is configured to return the name of the cluster in which the workload is running.
- west-cluster 에 첫 번째 서비스를 배포해보자. Thus we can easily determine the locality of the workload that served the request.
# tree ch12/locality-aware/west ch12/locality-aware/west ├── simple-backend-deployment.yaml ├── simple-backend-dr.yaml ├── simple-backend-gw.yaml ├── simple-backend-svc.yaml └── simple-backend-vs.yaml # west-cluster 에 간단한 백엔드 디플로이먼트/서비스를 배포 cat ch12/locality-aware/west/simple-backend-deployment.yaml ... - name: "MESSAGE" value: "Hello from WEST" ... cat ch12/locality-aware/west/simple-backend-svc.yaml kwest apply -f ch12/locality-aware/west/simple-backend-deployment.yaml kwest apply -f ch12/locality-aware/west/simple-backend-svc.yaml kwest get deploy -n istioinaction simple-backend-west kwest get svc,ep -n istioinaction simple-backend # 트래픽을 허용하기 위해 Gateway, 게이트웨이에서 백엔드 워크로드로 트래픽을 라우팅하기 위해 VirtualService 적용 cat ch12/locality-aware/west/simple-backend-gw.yaml cat ch12/locality-aware/west/simple-backend-vs.yaml kwest apply -f ch12/locality-aware/west/simple-backend-gw.yaml kwest apply -f ch12/locality-aware/west/simple-backend-vs.yaml kwest get gw,vs,dr -n istioinaction NAME AGE gateway.networking.istio.io/coolstore-gateway 8h gateway.networking.istio.io/simple-backend-gateway 5s NAME GATEWAYS HOSTS AGE virtualservice.networking.istio.io/simple-backend-vs-for-gateway ["simple-backend-gateway"] ["simple-backend.istioinaction.io"] 5s virtualservice.networking.istio.io/webapp-virtualservice ["coolstore-gateway"] ["webapp.istioinaction.io"] 8h- west-cluster의 서비스로 요청하고 클러스터 이름을 반환하는지 확인하자.
# west-cluster의 서비스로 요청하고 클러스터 이름을 반환하는지 확인 EXT_IP=$(kwest -n istio-system get svc istio-ingressgateway -o jsonpath='{.status.loadBalancer.ingress[0].ip}') docker exec -it mypc curl -s -H "Host: simple-backend.istioinaction.io" http://$EXT_IP | jq ".body" docker exec -it mypc curl -s -H "Host: simple-backend.istioinaction.io" http://$EXT_IP { "name": "simple-backend-west", "uri": "/", "type": "HTTP", "ip_addresses": [ "10.10.0.16" ], "start_time": "2025-05-23T16:37:20.204575", "end_time": "2025-05-23T16:37:20.355776", "duration": "151.202ms", "body": "Hello from WEST", "code": 200 } # 신규 터미널 : 반복 접속 alias kwest='kubectl --kubeconfig=./west-kubeconfig' EXT_IP=$(kwest -n istio-system get svc istio-ingressgateway -o jsonpath='{.status.loadBalancer.ingress[0].ip}') while true; do docker exec -it mypc curl -s -H "Host: simple-backend.istioinaction.io" http://$EXT_IP | jq ".body" ; date "+%Y-%m-%d %H:%M:%S" ; sleep 1; echo; done- 이제 east-cluster 에 서비스를 배포하자.
# tree ch12/locality-aware/east ch12/locality-aware/east ├── simple-backend-deployment.yaml └── simple-backend-svc.yaml # east-cluster 에 서비스를 배포 cat ch12/locality-aware/east/simple-backend-deployment.yaml ... - name: "MESSAGE" value: "Hello from EAST" ... cat ch12/locality-aware/east/simple-backend-svc.yaml keast apply -f ch12/locality-aware/east/simple-backend-deployment.yaml keast apply -f ch12/locality-aware/east/simple-backend-svc.yaml keast get deploy -n istioinaction simple-backend-east keast get svc,ep -n istioinaction simple-backend NAME TYPE CLUSTER-IP EXTERNAL-IP PORT(S) AGE service/simple-backend ClusterIP 10.200.0.243 <none> 80/TCP 6s NAME ENDPOINTS AGE endpoints/simple-backend 6s- 양쪽 클러스터에서 서비스가 실행되면서 인그레스 게이트웨이에 엔드포인트가 설정돼 요청이 양쪽으로 분산된다 (그림 12.17 참조)
- kiali : west, east
west-cluster
east-cluster
- 기본적으로, 이스티오는 라운드 로빈 알고리듬으로 워크로드 간에 로드 밸런싱한다. 그러므로 트래픽은 고르게 분산된다.
# 10회 요청 후 확인 for i in {1..10}; do docker exec -it mypc curl -s -H "Host: simple-backend.istioinaction.io" http://$EXT_IP | jq ".body" ; echo ; done for i in {1..10}; do docker exec -it mypc curl -s -H "Host: simple-backend.istioinaction.io" http://$EXT_IP | jq ".body" ; echo ; done | sort | uniq -c 4 "Hello from EAST" 6 "Hello from WEST" # 정보 확인 kwest get svc,ep -n istioinaction simple-backend NAME TYPE CLUSTER-IP EXTERNAL-IP PORT(S) AGE service/simple-backend ClusterIP 10.100.0.162 <none> 80/TCP 4m43s NAME ENDPOINTS AGE endpoints/simple-backend 10.10.0.16:8080 4m43s # k8s service 에 endpoint 에는 west 에 파드 ip만 출력 # for i in listener route cluster endpoint; do echo ">> k8s cluster : west - istio-config $i <<"; docker exec -it west-control-plane istioctl proxy-config $i deploy/istio-ingressgateway.istio-system; echo; done >> k8s cluster : west - istio-config listener << ADDRESS PORT MATCH DESTINATION 0.0.0.0 8080 ALL Route: http.8080 ... >> k8s cluster : west - istio-config route << NAME DOMAINS MATCH VIRTUAL SERVICE http.8080 simple-backend.istioinaction.io /* simple-backend-vs-for-gateway.istioinaction ... >> k8s cluster : west - istio-config cluster << SERVICE FQDN PORT SUBSET DIRECTION TYPE DESTINATION RULE simple-backend.istioinaction.svc.cluster.local 80 - outbound EDS ... >> k8s cluster : west - istio-config endpoint << ENDPOINT STATUS OUTLIER CHECK CLUSTER 10.10.0.17:8080 HEALTHY OK outbound|80||simple-backend.istioinaction.svc.cluster.local 172.18.255.202:15443 HEALTHY OK outbound|80||simple-backend.istioinaction.svc.cluster.local ... # iwest proxy-config listener deploy/istio-ingressgateway.istio-system iwest proxy-config listener deploy/istio-ingressgateway.istio-system --port 8080 -o json iwest proxy-config route deploy/istio-ingressgateway.istio-system iwest proxy-config route deploy/istio-ingressgateway.istio-system --name http.8080 iwest proxy-config route deploy/istio-ingressgateway.istio-system --name http.8080 -o json iwest proxy-config cluster deploy/istio-ingressgateway.istio-system iwest proxy-config cluster deploy/istio-ingressgateway.istio-system --fqdn simple-backend.istioinaction.svc.cluster.local -o json iwest proxy-config endpoint deploy/istio-ingressgateway.istio-system # istio endpoint에서 simple-backend에 대한 2개의 endpoint가 확인되며, Cluster 정보로 모두 같은 SNI를 갖고있다. # 하나는 west cluster의 simple-backend pod의 ip이고, 나머지 하나는 east cluster의 eastwest-gateway의 metallb ip이다. iwest proxy-config endpoint deploy/istio-ingressgateway.istio-system | grep simple 10.10.0.16:8080 HEALTHY OK outbound|80||simple-backend.istioinaction.svc.cluster.local 172.19.255.202:15443 HEALTHY OK outbound|80||simple-backend.istioinaction.svc.cluster.local # 아래 정보를 보면 두개의 endpoint정보가 확인되며 별다른 설정이 없어서 현재 1:1 weight로 50:50으로 routing 된다. iwest proxy-config endpoint deploy/istio-ingressgateway.istio-system --cluster 'outbound|80||simple-backend.istioinaction.svc.cluster.local' -o json [ { "name": "outbound|80||simple-backend.istioinaction.svc.cluster.local", "addedViaApi": true, "hostStatuses": [ { "address": { "socketAddress": { "address": "10.10.0.16", "portValue": 8080 } "weight": 1, "locality": {} ... { "address": { "socketAddress": { "address": "172.19.255.202", "portValue": 15443 } "weight": 1, "locality": {} ...- 좋다! 그러나 워크로드가 트래픽을 라우팅할 때 자신의 지역 내 워크로드를 우선하도록 지역 인식 로드 밸런싱을 사용하면 성능을 더 개선할 수 있다. However, performance can be improved further using locality-aware load balancing so workloads prioritize routing traffic to workloads within their locality.
- 앞선 장들에서 클라우드 프로바이더가 지역성 정보를 노드에 레이블로 추가한다는 점을 언급한 바 있다. We mentioned in previous chapters that cloud providers add the locality information into nodes as labels.
- 이스티오는 레이블을 추출한 이 정보를 사용해 워크로드의 지역을 설정한다. Istio uses this information retrieved from the labels to configure the locality of workloads.
클러스터 간 지역 인식 라우팅 검증하기 VERIFYING LOCALITY-AWARE ROUTING ACROSS CLUSTERS‣- 실습을 위해 노드에 지역성 정보 레이블을 설정하자
# kwest label node west-control-plane 'topology.kubernetes.io/region=westus' kwest label node west-control-plane 'topology.kubernetes.io/zone=0' kwest get node -o yaml ... topology.kubernetes.io/region: westus topology.kubernetes.io/zone: "0" ... keast label node east-control-plane 'topology.kubernetes.io/region=eastus' keast label node east-control-plane 'topology.kubernetes.io/zone=0' keast get node -o yaml ... topology.kubernetes.io/region: eastus topology.kubernetes.io/zone: "0" ... # istio eds 에 정보 반영을 위해 파드 재기동하자 : isiotd 가 노드의 지역성 정보 레이블을 엔드포인트 설정할 때 워크로드로 전파. iwest proxy-config endpoint deploy/istio-ingressgateway.istio-system --cluster 'outbound|80||simple-backend.istioinaction.svc.cluster.local' -o json ... "weight": 1, "locality": {} ... kwest rollout restart -n istio-system deploy/istio-ingressgateway kwest rollout restart -n istio-system deploy/istio-eastwestgateway kwest rollout restart -n istioinaction deploy/simple-backend-west keast rollout restart -n istio-system deploy/istio-ingressgateway keast rollout restart -n istio-system deploy/istio-eastwestgateway keast rollout restart -n istioinaction deploy/simple-backend-east iwest proxy-config endpoint deploy/istio-ingressgateway.istio-system --cluster 'outbound|80||simple-backend.istioinaction.svc.cluster.local' -o json ... "weight": 1, "locality": { "region": "eastus", # east-cluster 에 있는 워크로드의 위치 정보 "zone": "0" } ... "weight": 1, "locality": { "region": "westus", # west-cluster 에 있는 워크로드의 위치 정보 "zone": "0" } ...- 지역성 정보를 사용하려면 수동적 passive 헬스 체크가 필수라고 했던 것을 기억하자.
- 엔드포인트 상태를 수동적으로 확인하도록, 이상값 감지를 사용하는
DestinationRole을 적용해보자.
# cat ch12/locality-aware/west/simple-backend-dr.yaml apiVersion: networking.istio.io/v1beta1 kind: DestinationRule metadata: name: simple-backend-dr namespace: istioinaction spec: host: simple-backend.istioinaction.svc.cluster.local trafficPolicy: connectionPool: http: http2MaxRequests: 10 maxRequestsPerConnection: 10 outlierDetection: consecutive5xxErrors: 1 interval: 20s baseEjectionTime: 30s kwest apply -f ch12/locality-aware/west/simple-backend-dr.yaml kwest get gw,vs,dr -n istioinaction # 확인 iwest proxy-config endpoint deploy/istio-ingressgateway.istio-system --cluster 'outbound|80||simple-backend.istioinaction.svc.cluster.local' -o json iwest proxy-config endpoint deploy/istio-ingressgateway.istio-system --cluster 'outbound|80||simple-backend.istioinaction.svc.cluster.local' ENDPOINT STATUS OUTLIER CHECK CLUSTER 10.10.0.18:8080 HEALTHY OK outbound|80||simple-backend.istioinaction.svc.cluster.local 172.19.255.202:15443 HEALTHY OK outbound|80||simple-backend.istioinaction.svc.cluster.local- 몇 초 정도 걸려 설정이 전파되면, 요청이 지역 정보를 사용해 동일 클러스터 안에서 라우팅 되는 것을 확인할 수 있다.
# EXT_IP=$(kwest -n istio-system get svc istio-ingressgateway -o jsonpath='{.status.loadBalancer.ingress[0].ip}') docker exec -it mypc curl -s -H "Host: simple-backend.istioinaction.io" http://$EXT_IP docker exec -it mypc curl -s -H "Host: simple-backend.istioinaction.io" http://$EXT_IP | jq ".body" # 동일 클러스터 안에서 라우팅 되는 것을 확인 for i in {1..20}; do docker exec -it mypc curl -s -H "Host: simple-backend.istioinaction.io" http://$EXT_IP | jq ".body" ; echo ; done | sort | uniq -c 20 "Hello from WEST"- 기대한 대로 모든 요청은 west-cluster 내에서 라우팅되는데, 트래픽을 라우팅하는 인그레스 게이트웨이에서 가장 가깝기 때문이다.
- 또한 모든 라우팅 결정을 엔보이 프록시가 내리므로, 컨트롤 플레인이 엔보이 프록시의 설정을 수정했으리라고 결론지을 수 있다.
# iwest proxy-config endpoint deploy/istio-ingressgateway.istio-system --cluster 'outbound|80||simple-backend.istioinaction.svc.cluster.local' -o json ... "weight": 1, "locality": { "region": "westus", # priority 가 없으면(생략 시), 0으로 우선 순위가 가장 높음 "zone": "0" } ... "weight": 1, "priority": 1, # priority 0 다음으로, 두 번쨰 우선순위 "locality": { "region": "eastus", "zone": "0" } ...- 우선순위가 가장 높은 호스트가 사용할 수 없는 상태가 되면, 트래픽은 우선순위가 낮은 호스트로 라우팅된다.
클러스터 간 장애 극복 확인하기 VERIFYING CROSS-CLUSTER FAILOVER‣- 간단한 백엔드 디플로이먼트가 실패하는 상황을 시뮬레이션하려면, 환경 변수
ERROR_RATE값을 1로 설정해 요청이 실패하게 만들자. - 시간이 조금 지나면, 이상값 감지가 호스트가 비정상임을 감지하고 트래픽을 우선순위가 두 번째인 east-cluster 워크로드로 라우팅한다.
# 신규 터미널 : 반복 접속 해두기 while true; do docker exec -it mypc curl -s -H "Host: simple-backend.istioinaction.io" http://$EXT_IP | jq ".body" ; date "+%Y-%m-%d %H:%M:%S" ; sleep 1; echo; done ... "Hello from WEST" 2025-05-24 01:57:49 "Hello from WEST" 2025-05-24 01:57:51 "Hello from EAST" 2025-05-24 01:57:52 ... # kwest -n istioinaction set env deploy simple-backend-west ERROR_RATE='1' kwest exec -it -n istioinaction deploy/simple-backend-west -- env | grep ERROR ERROR_RATE=1 # iwest proxy-config endpoint deploy/istio-ingressgateway.istio-system --cluster 'outbound|80||simple-backend.istioinaction.svc.cluster.local' ENDPOINT STATUS OUTLIER CHECK CLUSTER 10.10.0.20:8080 HEALTHY FAILED outbound|80||simple-backend.istioinaction.svc.cluster.local 172.19.255.202:15443 HEALTHY OK outbound|80||simple-backend.istioinaction.svc.cluster.local- 이 결과는 클러스터 간 장애 극복이 작동함을 보여준다.
- 클러스터 간 트래픽은 상대 클러스터의 east-west 게이트웨이를 통과하며 SNI 통과로 처리된다는 것을 알 수 있다. As seen in this detailed walkthrough, cross-cluster traffic traverses the opposite cluster’s east-west gateway and is treated as an SNI passthrough.
- 이는 원격 클러스터에 도달한 트래픽의 로드 밸런싱에 영향을 미친다. This has implications for load balancing once traffic reaches the remote cluster.
- 이 호출은 SNI/TCP 커넥션이라 게이트웨이가 TLS 커넥션을 종료하지 않으므로, east-west 게이트웨이는 커넥션을 그대로 백엔드 서비스에 전달할 수 밖에 없다. Since this call is an SNI/TCP connection and the gateway does not terminate the TLS connection, the east-west gateway can only forward the connection as is to the backend service.
- 이렇게 되면 커넥션이 east-west 게이트웨이에서 백엔드 서비스까지 이어지기 때문에 요청 단위로 로드 밸런싱되지 않는다. This opens a connection from the east-west gateway to the backend service and does not have request-level load-balancing capabilities.
- 그러므로 클러스터 사이의 장애 극복이나 로드 밸런싱에서는, 클라이언트의 관점으로는 부하 분산이나 장애 극복이 수행되지만 트래픽이 원격 클러스터의 모든 인스턴스 사이에서 반드시 균등하게 분산되는 것은 아니다. Thus, on failover or load balancing across multiple clusters, the load is balanced or failed over from the client’s point of view but not necessarily balanced evenly across all instances on the remote cluster.
# (옵션) keast get deploy -n istioinaction simple-backend-east keast scale deploy -n istioinaction simple-backend-east --replicas 2 keast get pod -n istioinaction -l app=simple-backend -owide NAME READY STATUS RESTARTS AGE IP NODE NOMINATED NODE READINESS GATES simple-backend-east-57fff57cbc-mrpz7 2/2 Running 0 4s 10.20.0.20 east-control-plane <none> <none> simple-backend-east-57fff57cbc-rsjj8 2/2 Running 0 8m52s 10.20.0.19 east-control-plane <none> <none> keast logs -n istio-system -l app=istio-eastwestgateway -f [2025-05-23T17:00:03.479Z] "- - -" 0 - - - "-" 24077 25394 72725 - "-" "-" "-" "-" "10.20.0.19:8080" outbound_.80_._.simple-backend.istioinaction.svc.cluster.local 10.20.0.17:52606 10.20.0.17:15443 10.20.0.1:30549 outbound_.80_._.simple-backend.istioinaction.svc.cluster.local - [2025-05-23T16:58:59.706Z] "- - -" 0 - - - "-" 20492 21766 151569 - "-" "-" "-" "-" "10.20.0.19:8080" outbound_.80_._.simple-backend.istioinaction.svc.cluster.local 10.20.0.17:42680 10.20.0.17:15443 10.20.0.1:27937 outbound_.80_._.simple-backend.istioinaction.svc.cluster.local - [2025-05-23T17:00:42.201Z] "- - -" 0 - - - "-" 20492 21768 54084 - "-" "-" "-" "-" "10.20.0.20:8080" outbound_.80_._.simple-backend.istioinaction.svc.cluster.local 10.20.0.17:41558 10.20.0.17:15443 10.20.0.1:23386 outbound_.80_._.simple-backend.istioinaction.svc.cluster.local - ...인가 정책을 사용해 클러스터 간 접근 제어 확인하기 VERIFYING CROSS-CLUSTER ACCESS CONTROL USING AUTHORIZATION POLICIES‣- 마지막으로 확인할 기능은 클러스터 사이의 접근 제어다. verify is access control across clusters
- 접근 제어를 하려면 워크로드가 트래픽을 서로 인증해, 트래픽을 승인하거나 거부하는 결정을 내리는 데 사용 가능한 믿을 수 있는 메타데이터를 만들어야 한다는 점을 기억하자.
- 이를 시연하기 위해 시나리오를 생각해보자.
- 트래픽 출처가 인그레스 게이트웨이인 경우에만 서비스로의 트래픽을 허용하고 싶다고 해보자. 출처가 다르면 거절한다.
- 그렇게 하기 위한 정책을 정의해
ch12/security/allow-only-ingress-policy.yaml파일에 저장해뒀다. 이를 east-cluster 에 적용하자.
# 적용 전에 west-cluster 서비스를 제거해서 east 에서만 트래픽을 처리하게 하자 >> 이미 위에서 장애 상황이라 안해도 되긴함 kwest delete deploy simple-backend-west -n istioinaction # cat ch12/security/allow-only-ingress-policy.yaml apiVersion: "security.istio.io/v1beta1" kind: "AuthorizationPolicy" metadata: name: "allow-only-ingress" namespace: istioinaction spec: selector: matchLabels: app: simple-backend rules: - from: - source: principals: ["cluster.local/ns/istio-system/sa/istio-ingressgateway-service-account"] # istio-ingressgateway를 통과한 traffic만 해당 spiffe 정보를 갖고있다. keast apply -f ch12/security/allow-only-ingress-policy.yaml keast get authorizationpolicy -A- 업데이트가 전파되고 나면, west-cluster 의 워크로드에서 요청을 만들어 정책을 시험해보자. 이를 위해 임시 파드를 실행한다.
# kwest run netshoot -n istioinaction --rm -it --image=nicolaka/netshoot -- zsh ----------------------------------- # curl -s webapp.istioinaction/api/catalog # 직접 요청하면 실패!-> src가 istio-ingressgateway가 아니기떄문에 AuthorizationPolicy에 의해 access denied됨 curl -s simple-backend.istioinaction.svc.cluster.local RBAC: access denied # istio-ingressgateway 로 요청하면 성공! curl -s -H "Host: simple-backend.istioinaction.io" http://istio-ingressgateway.istio-system { "name": "simple-backend-east", "uri": "/", "type": "HTTP", "ip_addresses": [ "10.20.0.19" ], "start_time": "2025-05-23T17:05:12.690726", "end_time": "2025-05-23T17:05:12.841887", "duration": "151.163ms", "body": "Hello from EAST", "code": 200 } # kiali 등 확인을 위해 반복 접속 실행 watch curl -s simple-backend.istioinaction.svc.cluster.local watch 'curl -s -H "Host: simple-backend.istioinaction.io" http://istio-ingressgateway.istio-system' exit ------------------------------------ 정책이 인그레스 게이트웨이에서 들어온 트래픽을 허용한 것을 볼 수 있다.
- 이는 워크로드가 클러스터 간에 상호 인증해서 정책이 ID 인증서에 인코딩된 인증 데이터를 접근 제어에 사용할 수 있음을 보여준다.
- 로드 밸런싱, 지역 인식 라우팅, 클러스터 간 장애 극복, 상호 인증 트래픽, 접근 제어에 대한 우리의 모든 예제는 다중 클러스터 서비스 메시에서의 워크로드가 실행 중인 클러스터가 어디든 상관없이 이스티오의 모든 기능을 사용할 수 있음을 보여준다. 그리고 설정을 따로 더 하지 않아도 그럴 수 있다.
- 바라건데, 이번 장이 이스티오가 조직 내에서 어떻게 확장하는지, 어떻게 여러 클러스터를 단일 메시로 통합하는지, 여러 조직에게 그것이 왜 중요한지를 충분히 보여줬길 바란다.
- 다름장에서는 가상머신을 서비스 메시로 통합해본다. 이는 레거시 워크로드를 운영해야 하는 성숙한 기업에게 아주 가치 있는 기능이다.
12.3.8. Summary‣- 참고
‣[사례] 토스 + 토스뱅크 Istio 배포 모델 : 계열사와의 통신- Youtube- 아키텍처
- 접근 정책 : Sidecar
- 이중화된 클러스터에 대한 CA 공유 : (유추) 토스 P-R 클러스터 ← 메시 연합 → 토스뱅크 P-R 클러스터
(참고) Gloo Mesh 솔루션 기반의 Multi-Cluster 라우팅 : 3개의 Datacenter‣- 실습 후 kind 삭제 :
kind delete cluster --namewest&& kind delete cluster --nameeast&& docker rm -fmypc
- 이스티오의 요청 처리 기능 확장하기
This chapter coversExtending Istio on the request path- 엔보이 필터 이해하기
- 이스티오의 EnvoyFilter 리소스를 사용해 엔보이 직접 설정하기 Using Istio’s EnvoyFilter resource to configure Envoy directly
- 루아 Lua 를 사용해 요청 경로 커스터마이징하기 Using Lua to customize the request path
- 웹어셈블리 WebAssembly 를 사용해 요청 경로 커스터마이징하기 Using WebAssembly to customize the request path
들어가며‣- 지금까지 살펴본 것처럼, 이스티오는 애플리케이션 네트워킹 기능으로 조직에 많은 가치를 제공할 수 있다.
- 그렇지만 이스티오를 채택하는 조직에는 이스티오의 기본 버전이 충족하지 못하는 제약이나 가정이 있을 가능성이 높다.
- 따라서 이런 제약을 잘 충족시키도록 이스티오 기능의 확장이 필요할 것이다. You will likely need to extend Istio’s capabilities to more nicely fit within these constraints.
- 3장에서 살펴봤고 이 책에서 내내 강조했듯이, 엔보이 프록시는 이스티오 서비스 메시의 기본 구성 요소다.
- 엔보이는 메시 내부 서비스 사이의 요청 경로에서 애플리케이션 인스턴스와 함께 있는 서비스 프록시다.
- 엔보이에 서비스의 애플리케이션 네트워킹을 간단하게 만들어줄 수 있는 중요한 기능 집합이 있기는 하지만, 맞춤형 통합 혹은 통합 최종 단계를 위해서는 엔보이를 강화해야 하는 상황에 직면할 수 있다. 다음은 그 확장의 예시들이다.
- 속도 제한 rate limiting 혹은 외부 인가 서비스와 통합 Integrating with rate limiting or external authorization services
- 헤더 추가, 제거, 수정 Adding, removing, or modifying headers
- 요청 페이로드를 보강하기 위해 다른 서비스 호출 Calling out to other services to enrich a request payload
- HMAC 서명/검증 같은 사용자 정의 프로토콜 구현 Implementing custom protocols like HMAC signing/verification
- 비표준 보안 토큰 처리 Non-standard security token handling
- 엔보이는 사용자에게 필요한 거의 모든 것을 제공할 수 있지만, 결국은 사용자의 특정 사용 사례에 맞게 맞춤 조정해야 한다.
- 이번 장에서는 요청 경로에서 이스티오를 확장하는 것을 다루는데, 이는 필연적으로 엔보이 확장을 의미하게 된다.
14.1. 엔보이의 확장 기능
[강력 추천 공식 문서]‣Envoy Life of a Request- Docs


Request flow- Docs- A TCP connection from downstream is accepted by an Envoy listener running on a worker thread.
- The listener filter chain is created and runs. It can provide SNI and other pre-TLS info. Once completed, the listener will match a network filter chain. Each listener may have multiple filter chains which match on some combination of destination IP CIDR range, SNI, ALPN, source ports, etc. A transport socket, in our case the TLS transport socket, is associated with this filter chain.
- On network reads, the TLS transport socket decrypts the data read from the TCP connection to a decrypted data stream for further processing.
- The network filter chain is created and runs. The most important filter for HTTP is the HTTP connection manager, which is the last network filter in the chain.
- The HTTP/2 codec in HTTP connection manager deframes and demultiplexes the decrypted data stream from the TLS connection to a number of independent streams. Each stream handles a single request and response.
- For each HTTP stream, an Downstream HTTP filter chain is created and runs. The request first passes through CustomFilter which may read and modify the request. The most important HTTP filter is the router filter which sits at the end of the HTTP filter chain. When
decodeHeadersis invoked on the router filter, the route is selected and a cluster is picked. The request headers on the stream are forwarded to an upstream endpoint in that cluster. The router filter obtains an HTTP connection pool from the cluster manager for the matched cluster to do this. - Cluster specific load balancing is performed to find an endpoint. The cluster’s circuit breakers are checked to determine if a new stream is allowed. A new connection to the endpoint is created if the endpoint’s connection pool is empty or lacks capacity.
- For each stream an Upstream HTTP filter chain is created and runs. By default this only includes the CodecFilter, sending data to the appropriate codec, but if the cluster is configured with an upstream HTTP filter chain, that filter chain will be created and run on each stream, which includes creating and running separate filter chains for retries and shadowed requests.
- The upstream endpoint connection’s HTTP/2 codec multiplexes and frames the request’s stream with any other streams going to that upstream over a single TCP connection.
- The upstream endpoint connection’s TLS transport socket encrypts these bytes and writes them to a TCP socket for the upstream connection.
- The request, consisting of headers, and optional body and trailers, is proxied upstream, and the response is proxied downstream. The response passes through the HTTP filters in the opposite order from the request, starting at the codec filter, traversing any upstream HTTP filters, then going through the router filter and passing through CustomFilter, before being sent downstream.
- If independent half-close is enabled the stream is destroyed after both request and response are complete (END_STREAM for the HTTP/2 stream is observed in both directions) AND response has success (2xx) status code. Otherwise the stream is destroyed when the response is complete, even if the request has not yet completed. Post-request processing will update stats, write to the access log and finalize trace spans.
들어가며 : 필터 확장‣- 엔보이 프록시의 강점 중 하나는 확장할 수 있게 만들어졌다는 점이다.
- 엔보이의 API를 설계하는 데 많은 고민과 주의가 반영됐으며, 다른 사람들이 작성한 확장 기능도 인기를 얻게 해준 큰 이유 중 하나다.
- 엔보이를 확장할 수 있는 주요 방법은 필터 확장이다.
- 엔보이를 확장할 수 있는 지점이 어디인지, 무엇이 애플리케이션에 가장 큰 이점을 주는지 이해하려면 먼저 엔보이의 아키텍처를 이해해야 한다.
14.1.1 엔보이의 필터 체인 이해하기 Understanding Envoy’s filter chaining‣- 3장에서는 그림 14.1과 같이 엔보이의 개념인 리스너, 루트, 클러스터를 소개헀다.
- 이것들이 고수준 개념임을 강조했지만, 이번 장에서는 더 자세히 다루기로 약속한 바 있다.
- 여기서는 리스너와, 필터 및 필터 체인을 사용해 리스너 모델을 확장하는 방법에 중점을 둔다.
- 엔보이의 리스너는 네트워킹 인터페이스에 포트를 열고 들어오는 트래픽 수신을 시작하는 방법이다. A listener in Envoy is a way to open a port on a networking interface and start listening to incoming traffic.
- 궁극적으로 엔보이는 네트워크 커넥션에서 바이트를 가져와 어떤 방식으로 처리하는 3계층과 4계층(L3/L4) 프록시다. Envoy is ultimately a layer 3 and layer 4 (L3/L4) proxy that takes bytes off a network connection and processes them in some way.
- 이것이 아키텍처의 첫 번째 중요 부분인 필터로 이어진다. This brings us to the first important part of the architecture: the filter.
- 리스너는 네트워크 스트림에서 바이트를 읽어들인 후 그림 14.2와 같이 다양한 필터 혹은 기능 단계들을 거쳐 처리한다. A listener reads bytes off the networking stream and processes them through various filters or stages of functionality.
- 엔보이에서 가장 기본적인 필터는 네트워크 필터로, 바이트 스트림에서 인코딩/디코딩 작업을 한다. Envoy’s most basic filters are network filters, which operate on a stream of bytes for either encoding or decoding.
- 스트림에서 필터가 둘 이상 순서대로 동작하도록 설정할 수 있는데, 이를 필터 체인이라고 부른다. 필터 체인을 사용하면 프록시의 기능을 구현할 수 있다. You can configure more than one filter to operate on the stream in a sequence called a filter chain, and these chains can be used to implement the functionality of the proxy.
- 예를 들어, 엔보이에는 대표적으로 다음과 같은 프로토콜용 네트워크 필터가 있다. network filters for the following protocols
- MongoDB
- Redis
- Thrift
- Kafka
HTTP Connection Manager(HCM)
- 가장 많이 사용하는 네트워크 필터 중 하나가
HttpConnectionManager이다. - 이 필터는 바이트 스트림을 HTTP 기반 프로토콜(즉, HTTP 1.1, HTTP 2, gRPC, 최근에는 HTTP 3 등)의 HTTP 헤더, 바디, 트레일러로 변환하는 것에 관한 세부 사항을 추상화하는 역할을 하며, 그림 14.3에서 볼 수 있다. This filter is responsible for abstracting away the details of converting a stream of bytes into HTTP headers, body, and trailers for HTTP-based protocols (that is, HTTP 1.1, HTTP 2, gRPC, and recently HTTP 3, and so on) and is shown in figure 14.3.
HCM은 바이트 스트림을 HTTP 요청으로 변환하고, 이를 헤더나 바디 세부 정보 같은 L7 속성을 바탕으로 라우팅
HttpConnectionManager는 HTTP 요청을 처리할 뿐 아니라 헤더, 경로 접두사 path prefix 등 요청 속성을 바탕으로 한 요청 라우팅, 액세스 로깅, 헤더 조작도 처리한다.- 또 HCM에는 필터 기반 아키텍처가 있어 HTTP 요청에서 동작하는 HTTP 필터를 순서대로 또는 연쇄로 설정하거나 구축할 수 있다. The HCM also has a filter-based architecture that allows you to build or configure HTTP filters into a sequence or chain of filters that operate on an HTTP request.
- 기본 HTTP 필터의 예시는 다음과 같다, 전체목록 - Docs
- Cross-origin resource sharing (CORS)
- Cross-site request forgery prevention (CSRF)
- ExternalAuth 외부 인증
- RateLimit 속도 제한
- Fault injection 결합 주입
- gRPC/JSON transcoding 트랜스코딩
- Gzip
- Lua 루아
- Role-based access control (RBAC) 역할 기반 접근 제어
- Tap
- Router 라우터
- WebAssembly (Wasm) 웹어셈블리
- HTTP 요청 하나에서 HTTP 필터가 순서대로 동작하도록 설정할 수 있다. HTTP filters can be configured in a sequence to operate on an HTTP request.
- HTTP 필터들은 요청을 업스트림 클러스터로 보내는 터미널 필터로 끝나야 한다. The HTTP filters must end in a terminal filter that sends the request to an upstream cluster.
- 이를 담당하는 HTTP 필터는 라우터 필터로 그림 14.14에 표시돼 있다. The HTTP filter responsible for this is the router filter, shown in figure 14.4.
- 라우터 필터는 요청을 적절한 업스트림 클러스터를 찾아 전달하며, 이때 타임아웃과 재시도 파라미터를 설정할 수 있다 - Docs The router filter matches requests to upstream clusters with configurable timeout and retry parameters.
HCM 에는 HTTP 요청을 처리하는 필터 체인이 있으며, 라우팅 필터로 끝난다
- 또한 사용자는 엔보이의 핵심 코드를 변경하지 않고도 자신만의 필터를 직접 작성하고 프록시 위에 얹어 계층화할 수 있다. Users can also write their own filters and layer them on top of the proxy without having to change any of Envoy’s core code.
- 예를 들어, 이스티오의 프록시는 데이터 플레인용으로 엔보이 위에 필터를 추가해 커스텀 엔보이를 빌드한다. For example, Istio’s proxy adds filters on top of Envoy and builds a custom Envoy for its data plane.
- 그렇지만 이렇게 커스텀 엔보이 프록시 빌드를 도입하면, 유지 보수할 것이 많아질 수 있고 개발자가 C++를 사용해야 한다. However, this introduces a custom Envoy proxy build that can be a lot to maintain and require developers to use C++.
14.1.2 확장용 필터 Filters intended for extension‣- 자신만의 필터를 C++로 작성해 프록시에 내장할 수 있지만, 이와 관련된 내용은 이 책의 범위를 벗어난다.
- 필터 작성 등과 같이 엔보이 바이너리 자체에 변경 사항을 컴파일하지 않고도 엔보이의 HTTP 기능을 확장하는 방법이 있는데, 이 경우 다음 HTTP 필터들을 사용한다. There are ways to extend Envoy’s HTTP capabilities, including writing filters, without compiling changes into the Envoy binary itself, by using the following HTTP filters:
- 외부 처리 External processing
- 루아 Lua
- 웹어셈블리 Wasm (WebAssembly)
- 이런 필터를 사용하면 외부 서비스를 호출하도록 설정하거나, 루아 스크립트를 실행하거나, 커스텀 코드를 실행해 HTTP 요청이나 응답을 처리할 때 HCM의 기능을 강화할 수 있다. With these filters, you can configure calls out to an external service, run a Lua script, or run custom code to enhance the capabilities of the HCM when processing HTTP requests or responses.
- 외부 서비스를 호출해 처리하는 부분에 대해 이야기할 때는 속도 제한 필터를 중점을 두겠다. For calling an external service for processing, we’ll focus on the rate-limiting filter.
- 또한 9장에서 다룬 것처럼 외부 인가를 요청할 수도 있다.
14.1.3 이스티오의 데이터 플레인 커스터마이징하기 Customizing Istio’s data plane‣- 엔보이의 필터 아키텍처를 깊이 있게 이해한 것을 바탕으로, 이후 절들에서 다음 방법 중 하나를 사용해 엔보이 데이터 플레인의 기능을 확장한다.
- 엔보이 HTTP 필터를 이스티오 API에서 EnvoyFilter 리소스로 설정하기
- 속도 제한 서버 RLS, Rate-Limit Server 호출하기
- 루아 스크립트를 구현해 루아 HTTP 필터에 불러오기
- 웹어셈블리 HTTP 필터용 웹어셈블리 모듈(Wasm 모듈) 구현하기
- 엔보이의 필터를 직접 설정하는 방법을 이해해야 하며, 이를 위해 이스티오의 EnvoyFilter 리소스를 사용할 것이다.
- 이전 장들에서 이미 사용해봤지만, 여기서 더 자세히 살펴본다.
14.2. EnvoyFilter 리소스로 엔보이 필터 설정하기
[실습 환경 구성] k8s(1.23.17) 배포 & mypc 컨테이너‣# git clone https://github.com/AcornPublishing/istio-in-action cd istio-in-action/book-source-code-master pwd # 각자 자신의 pwd 경로 code . # 아래 extramounts 생략 시, myk8s-control-plane 컨테이너 sh/bash 진입 후 직접 git clone 가능 kind create cluster --name myk8s --image kindest/node:v1.23.17 --config - <<EOF kind: Cluster apiVersion: kind.x-k8s.io/v1alpha4 nodes: - role: control-plane extraPortMappings: - containerPort: 30000 # Sample Application (istio-ingrssgateway) HTTP hostPort: 30000 - containerPort: 30001 # Prometheus hostPort: 30001 - containerPort: 30002 # Grafana hostPort: 30002 - containerPort: 30003 # Kiali hostPort: 30003 - containerPort: 30004 # Tracing hostPort: 30004 - containerPort: 30005 # Sample Application (istio-ingrssgateway) HTTPS hostPort: 30005 - containerPort: 30006 # TCP Route hostPort: 30006 - containerPort: 30007 # kube-ops-view hostPort: 30007 extraMounts: # 해당 부분 생략 가능 - hostPath: /Users/gasida/Downloads/istio-in-action/book-source-code-master # 각자 자신의 pwd 경로로 설정 containerPath: /istiobook networking: podSubnet: 10.10.0.0/16 serviceSubnet: 10.200.0.0/22 EOF # 설치 확인 docker ps # 노드에 기본 툴 설치 docker exec -it myk8s-control-plane sh -c 'apt update && apt install tree psmisc lsof wget bridge-utils net-tools dnsutils tcpdump ngrep iputils-ping git vim -y' # (옵션) kube-ops-view helm repo add geek-cookbook https://geek-cookbook.github.io/charts/ helm install kube-ops-view geek-cookbook/kube-ops-view --version 1.2.2 --set service.main.type=NodePort,service.main.ports.http.nodePort=30007 --set env.TZ="Asia/Seoul" --namespace kube-system kubectl get deploy,pod,svc,ep -n kube-system -l app.kubernetes.io/instance=kube-ops-view ## kube-ops-view 접속 URL 확인 open "http://localhost:30007/#scale=1.5" open "http://localhost:30007/#scale=1.3" # (옵션) metrics-server helm repo add metrics-server https://kubernetes-sigs.github.io/metrics-server/ helm install metrics-server metrics-server/metrics-server --set 'args[0]=--kubelet-insecure-tls' -n kube-system kubectl get all -n kube-system -l app.kubernetes.io/instance=metrics-server- kind docker network 에 테스트용 PC(실제로는 컨테이너) 배포
# kind 설치 시 kind 이름의 도커 브리지가 생성된다 : 172.18.0.0/16 대역 docker network ls docker inspect kind # mypc 컨테이너 기동 : kind 도커 브리지를 사용하고, 컨테이너 IP를 지정 없이 혹은 지정 해서 사용 docker run -d --rm --name mypc --network kind --ip 172.19.0.100 nicolaka/netshoot sleep infinity # IP 지정 실행 시 혹은 IP 지정 실행 시 에러 발생 시 아래 처럼 IP 지정 없이 실행 docker run -d --rm --name mypc --network kind nicolaka/netshoot sleep infinity # IP 지정 없이 실행 시 docker ps # kind network 중 컨테이너(노드) IP(대역) 확인 docker ps -q | xargs docker inspect --format '{{.Name}} {{.NetworkSettings.Networks.kind.IPAddress}}' /mypc 172.19.0.100 /myk8s-control-plane 172.19.0.2 # 동일한 docker network(kind) 내부에서 컨테이너 이름 기반 도메인 통신 가능 확인! docker exec -it mypc ping -c 1 172.19.0.2 docker exec -it mypc ping -c 1 myk8s-control-plane docker exec -it myk8s-control-plane ping -c 1 mypc 64 bytes from mypc.kind (fc00:f853:ccd:e793::3): icmp_seq=1 ttl=64 time=0.080 ms --- mypc ping statistics --- 1 packets transmitted, 1 received, 0% packet loss, time 0ms rtt min/avg/max/mdev = 0.080/0.080/0.080/0.000 ms[실습 환경 구성] (편리성 설정) MetalLB 배포‣- MetalLB 배포
# MetalLB 배포 kubectl apply -f https://raw.githubusercontent.com/metallb/metallb/v0.14.9/config/manifests/metallb-native.yaml # 확인 kubectl get crd kubectl get pod -n metallb-system # IPAddressPool, L2Advertisement 설정 : MetalLB 파드(speaker) 배포 정상 완료 후 아래 설정 실행하자. cat << EOF | kubectl apply -f - apiVersion: metallb.io/v1beta1 kind: IPAddressPool metadata: name: default namespace: metallb-system spec: addresses: - 172.19.255.101-172.19.255.120 --- apiVersion: metallb.io/v1beta1 kind: L2Advertisement metadata: name: default namespace: metallb-system spec: ipAddressPools: - default EOF # 확인 kubectl get IPAddressPool,L2Advertisement -A- 샘플 애플리케이션 배포 후 확인
# cat << EOF | kubectl apply -f - apiVersion: apps/v1 kind: Deployment metadata: name: nginx spec: selector: matchLabels: app: nginx template: metadata: labels: app: nginx spec: containers: - name: nginx image: nginx:latest ports: - containerPort: 80 --- apiVersion: v1 kind: Service metadata: name: nginx-service spec: selector: app: nginx ports: - port: 80 targetPort: 80 type: LoadBalancer EOF # 확인 kubectl get deploy,pod,svc,ep kubectl get svc nginx-service -o jsonpath='{.status.loadBalancer.ingress[0].ip}' LBIP=$(kubectl get svc nginx-service -o jsonpath='{.status.loadBalancer.ingress[0].ip}') # 외부?에서 각 클러스터의 Service(LB)로 접속(인입) 확인 : TCP 80 포트 사용으로 편리하다! docker exec -it mypc curl -s $LBIP docker exec -it mypc curl -s $LBIP -v -I # 확인 후 삭제 kubectl delete deploy,svc --all# myk8s-control-plane 진입 후 설치 진행 docker exec -it myk8s-control-plane bash ----------------------------------- # (옵션) 코드 파일들 마운트 확인 tree /istiobook/ -L 1 혹은 git clone ... /istiobook # istioctl 설치 export ISTIOV=1.17.8 echo 'export ISTIOV=1.17.8' >> /root/.bashrc curl -s -L https://istio.io/downloadIstio | ISTIO_VERSION=$ISTIOV sh - cp istio-$ISTIOV/bin/istioctl /usr/local/bin/istioctl # demo 프로파일 컨트롤 플레인 배포 istioctl install --set profile=demo --set values.global.proxy.privileged=true -y # 보조 도구 설치 kubectl apply -f istio-$ISTIOV/samples/addons # 빠져나오기 exit ----------------------------------- # 설치 확인 : istiod, istio-ingressgateway, crd 등 kubectl get istiooperators -n istio-system -o yaml kubectl get all,svc,ep,sa,cm,secret,pdb -n istio-system kubectl get cm -n istio-system istio -o yaml kubectl get crd | grep istio.io | sort # 실습을 위한 네임스페이스 설정 kubectl create ns istioinaction kubectl label namespace istioinaction istio-injection=enabled kubectl get ns --show-labels # istio-ingressgateway 서비스 : nodeport 지정 변경 , externalTrafficPolicy 설정 (ClientIP 수집) kubectl patch svc -n istio-system istio-ingressgateway -p '{"spec": {"type": "LoadBalancer", "ports": [{"port": 80, "targetPort": 8080, "nodePort": 30000}]}}' kubectl patch svc -n istio-system istio-ingressgateway -p '{"spec": {"type": "LoadBalancer", "ports": [{"port": 443, "targetPort": 8443, "nodePort": 30005}]}}' kubectl patch svc -n istio-system istio-ingressgateway -p '{"spec":{"externalTrafficPolicy": "Local"}}' kubectl describe svc -n istio-system istio-ingressgateway # NodePort 변경 및 nodeport 30001~30003으로 변경 : prometheus(30001), grafana(30002), kiali(30003), tracing(30004) kubectl patch svc -n istio-system prometheus -p '{"spec": {"type": "NodePort", "ports": [{"port": 9090, "targetPort": 9090, "nodePort": 30001}]}}' kubectl patch svc -n istio-system grafana -p '{"spec": {"type": "NodePort", "ports": [{"port": 3000, "targetPort": 3000, "nodePort": 30002}]}}' kubectl patch svc -n istio-system kiali -p '{"spec": {"type": "NodePort", "ports": [{"port": 20001, "targetPort": 20001, "nodePort": 30003}]}}' kubectl patch svc -n istio-system tracing -p '{"spec": {"type": "NodePort", "ports": [{"port": 80, "targetPort": 16686, "nodePort": 30004}]}}' # Prometheus 접속 : envoy, istio 메트릭 확인 open http://127.0.0.1:30001 # Grafana 접속 open http://127.0.0.1:30002 # Kiali 접속 : NodePort open http://127.0.0.1:30003 # tracing 접속 : 예거 트레이싱 대시보드 open http://127.0.0.1:30004들어가며 : tap 필터 (실습~)‣- 이스티오의 데이터 플레인을 확장하는 첫 번째 단계는 엔보이의 기존 필터가 우리가 찾고 있는 확장 유형을 달성하는 데 충분하지 파악하는 것이다. The first step in extending Istio’s data plane is to figure out whether an existing filter in Envoy is sufficient to accomplish the type of extension we’re looking for.
- 필터가 존재하는 경우, EnvoyFilter 리소스를 사용해 이스티오의 데이터 플레인을 직접 설정할 수 있다. If one exists, we can use the EnvoyFilter resource to directly configure Istio’s data plane.
- 이스티오의 API는 일반적으로 특정 네트워크나 보안 시나리오에 초점을 맞춰 기저 underlying 엔보이의 설정을 추상화한다. Istio’s APIs generally abstract away the underlying Envoy configuration, focusing on specific networking or security scenarios.
- VirtualService, DestinationRule, and AuthorizationPolicy 같은 리소스는 모두 결국 엔보이 설정으로 변환되며, 필터 체인에서 특정 HTTP 필터를 설정하기도 한다. Resources like VirtualService, DestinationRule, and AuthorizationPolicy all end up getting translated to an Envoy configuration and potentially configure specific HTTP filters in a filter chain.
- 이스티오는 기저 엔보이에서 할 수 있는 모든 필터나 설정을 노출하려고 시도하지 않으며, 따라서 엔보이를 직접 설정해야 하는 상황이 있을 수 있다. Istio does not try to expose every possible filter or configuration for the underlying Envoy proxy, and there may be cases where we need to configure Envoy directly.
- 이스티오의 EnvoyFilter 리소스는 이스티오의 고수준 API에서 노출하지 않는 엔보이의 일부를 설정하거나 조정해야 하는 고급 사용 사례를 위한 것이다. Istio’s EnvoyFilter resource is intended for advanced use cases where a user needs to either tweak or configure a portion of Envoy not exposed by Istio’s higher-level APIs.
- 이 리소스는 엔보이의 거의 모든 것을 설정할 수 있으며(일부 제한 있음) 리스너, 루트, 클러스터, 필터가 포함된다. This resource can configure just about anything (with some limitations) in Envoy, including listeners, routes, clusters, and filters.
- EnvoyFilter 리소스는 이스티오의 고급 사용자용이며 비상 수단이다. The EnvoyFilter resource is intended for advanced usage of Istio and is a 'break glass' solution.
- 기저 엔보이 API는 이스티오 버전 간에 언제든 달라질 수 있으니, 배포하는 모든 EnvoyFilter 의 유효성을 반드시 확인해야 한다. The underlying Envoy API may change at any time between releases of Istio, so be sure to validate any EnvoyFilter you deploy.
- 이전 버전과의 호환성은 어떤 것도 가정해서는 안 된다. 이 API를 잘못 설정하면 이스티오 데이터 플레인 전체가 멈출 수도 있다. Do not assume any backward compatibility here. Bad configuration with this API can potentially take down the entire Istio data plane.
- 예제를 보고 어떻게 작동하는지 이해해보자. 사용할 서비스를 배포하자.
# kubectl get envoyfilter -A NAMESPACE NAME AGE istio-system stats-filter-1.13 12m istio-system stats-filter-1.14 12m istio-system stats-filter-1.15 12m istio-system stats-filter-1.16 12m istio-system stats-filter-1.17 12m istio-system tcp-stats-filter-1.13 12m istio-system tcp-stats-filter-1.14 12m istio-system tcp-stats-filter-1.15 12m istio-system tcp-stats-filter-1.16 12m istio-system tcp-stats-filter-1.17 12m # 배포 kubectl apply -f services/catalog/kubernetes/catalog.yaml -n istioinaction kubectl apply -f services/webapp/kubernetes/webapp.yaml -n istioinaction kubectl apply -f services/webapp/istio/webapp-catalog-gw-vs.yaml -n istioinaction kubectl apply -f ch9/sleep.yaml -n istioinaction # 확인 kubectl get gw,vs,dr -n istioinaction NAME AGE gateway.networking.istio.io/coolstore-gateway 3s NAME GATEWAYS HOSTS AGE virtualservice.networking.istio.io/webapp-virtualservice ["coolstore-gateway"] ["webapp.istioinaction.io"] 3s # 호출 확인 : mypc EXT_IP=$(kubectl -n istio-system get svc istio-ingressgateway -o jsonpath='{.status.loadBalancer.ingress[0].ip}') docker exec -it mypc curl -s -H "Host: webapp.istioinaction.io" http://$EXT_IP docker exec -it mypc curl -s -H "Host: webapp.istioinaction.io" http://$EXT_IP/api/catalog [{"id":1,"color":"amber","department":"Eyewear","name":"Elinor Glasses","price":"282.00"},{"id":2,"color":"cyan","department":"Clothing","name":"Atlas Shirt","price":"127.00"},{"id":3,"color":"teal","department":"Clothing","name":"Small Metal Shoes","price":"232.00"},{"id":4,"color":"red","department":"Watches","name":"Red Dragon Watch","price":"232.00"}] # 신규 터미널 : mypc 에서 반복 접속 EXT_IP=$(kubectl -n istio-system get svc istio-ingressgateway -o jsonpath='{.status.loadBalancer.ingress[0].ip}') while true; do docker exec -it mypc curl -s -H "Host: webapp.istioinaction.io" http://$EXT_IP/api/catalog ; echo ; date "+%Y-%m-%d %H:%M:%S" ; sleep 1; echo; done # 호출 확인 : 자신의 호스트 PC curl -s http://webapp.istioinaction.io:30000 curl -s http://webapp.istioinaction.io:30000/api/catalog- webapp 서비스를 거쳐 흐르는 특정 요청을 디버깅할 도구로 데이터 플레인을 확장하고 싶다고 하자. Suppose we want to extend our data plane with tooling to debug certain requests that flow through the webapp service.
- 엔보이를 커스텀 필터로 확장할 수도 있지만, 충분히 살펴보니 이런 기능을 위한 tap 필터가 있음을 발견했다. We can extend Envoy with some custom filters, but if we look thoroughly enough, we see that a Tap filter exists for this type of functionality.
- 이스티오의 API가 이 필터를 노출하고 있지는 않으므로, webapp 서비스에 이 필터를 설정하려면 EnvoyFilter 리소스를 사용하면 된다. It is not exposed by Istio’s APIs, so we can use the EnvoyFilter resource to configure this filter for our webapp service.
- EnvoyFilter 리소스에 대해 알아야 할 첫 번째 사항은, 달리 지정하지 않은 한 네임스페이스의 모든 워크로드에 적용된다는 것이다. The first thing to know about an EnvoyFilter resource is that it applies to all workloads in the namespace for which it is declared, unless you specify otherwise.
- istio-system 네임스페이스에 EnvoyFilter 리소스를 만들었다면 메시의 모든 워크로드에 적용된다. If you create an EnvoyFilter resource in the istio-system namespace, it will be applied to all workloads in the mesh.
- 네임스페이스 내에서 커스텀 EnvoyFilter 설정을 적용할 워크로드를 좀 더 특정하고 싶다면, 예제에서 보겠지만
workloadSelector를 사용하면 된다. If you want to be more specific about the workloads in a namespace to which the custom EnvoyFilter configuration applies, you can use a workloadSelector, as we’ll see in our example.
- EnvoyFilter 리소스에 대해 알아야 할 두 번째 사항은, 다른 이스티오 리소스가 모두 변환되고 설정된 후에야 적용된다는 것이다. The second thing to know about an EnvoyFilter resource is that it applies after all other Istio resources have been translated and configured.
- 예를 들어 VirtualService or DestinationRule 리소스가 있다면, 이 설정들이 먼저 데이터 플레인에 적용된다. For example, if you have VirtualService or DestinationRule resources, those configurations are applied to the data plane first.
- 마지막으로, EnvoyFilter 리소스로 워크로드를 설정할 때 각별히 주의해야 한다. Finally, you should take great care when configuring a workload with the Envoy Filter resource.
- 따라서 엔보이 명명 규칙과 설정 세부 사항을 잘 알아두자. 이는 정말 이스티오 API의 고급 사용법으로, 잘못 설정하면 메시를 마비시킬 수 있다. You should be familiar with Envoy naming conventions and configuration specifics. This really is an advanced usage of Istio’s API and can bring down your mesh if misconfigured.
- 이 예제에서는 그림 14.5와 같이 webapp 워크로드의 데이터 플레인을 거치는 메시지를 샘플링하도록 엔보이의 tap 필터를 설정하려고 한다 - Docs In our example, we want to configure Envoy’s tap filter to sample messages that go over the data plane for the webapp workload, as shown in figure 14.5.
- 요청이나 응답이 tap 필터를 지나 흐를 때마다 tap 필터는 그 요청/응답을 어떤 수신 에이전트로 스트리밍한다. 이 예제에서는 콘솔/CLI로 스트리밍한다. Every time a request or response flows over the tap filter, it streams it out to some listening agent. In this example, we stream it out to the console/CLI.
- EnvoyFilter 리소스는 다음과 같다
# cat ch14/tap-envoy-filter.yaml apiVersion: networking.istio.io/v1alpha3 kind: EnvoyFilter metadata: name: tap-filter namespace: istioinaction spec: workloadSelector: labels: app: webapp # 워크로드 셀렉터 configPatches: - applyTo: HTTP_FILTER # 설정할 위치 match: context: SIDECAR_INBOUND listener: portNumber: 8080 filterChain: filter: name: "envoy.filters.network.http_connection_manager" # HCM설정 subFilter: name: "envoy.filters.http.router" # tap 필터를 이 router 필터 바로 앞에 배치하기 위함 patch: # 엔보이 설정 패치 operation: INSERT_BEFORE value: name: envoy.filters.http.tap typed_config: "@type": "type.googleapis.com/envoy.extensions.filters.http.tap.v3.Tap" commonConfig: adminConfig: configId: tap_config- EnvoyFilter 를 istioinaction 네임스페이스에 배포했다.
- workloadSelector를 사용해 이 설정을 적용할 워크로드를 구체적으로 지정했다.
- 다음으로 엔보이 설정에서 패치할 위치를 지정해야 한다.
- 이 예제에서는 인바운드 리스너(SIDECAR_INBOUDN)의 HTTP_FILTER가 되도록 지정했다.
- 앞서 언근한 바와 같이 리스너를 위한 네트워크 필터들이 있으며, 그중 하나가 HCM 이다.
- HCM에도 HTTP 요청을 처리하는 HTTP용 필터 체인이 있다.
- 또한 이 예제에서는 특정 리스너도 지정했는데, HCM을 8080 포트에 바인딩된 리스너를 지정했다.
- 마지막으로, 이 HCM HTTP 필터 체인에서 envoy.filters.http.router HTTP 필터를 골랐다.
- 이 필터를 고른 이유는, 다음 절에서 보겠지만 새로운 tap 필터를 이 router 필터 바로 앞에 배치할 것이기 때문이다.
- EnvoyFilter 리소스의 patch 부분에서 설정을 어떻게 패치할지 지정한다.
- 여기서는 앞서 설정 부분에서 선택한 필터 앞에 설정을 병합한다. → 앞서 router filter를 선택
- 추가하는 필터인 envoy_filters.http.tap 은 HCM 필터 체인에서 envoy.filters.http.router 앞에 위치한다.
- tap 필터 설정의 구조를 명확하게 해야 하므로 명시적인 타입을 지정한다 - Docs
- 이 EnvoyFilter를 istioinaction 네임스페이스에 webapp 워크로드에 적용하자.
# cat ch14/tap-envoy-filter.yaml kubectl apply -f ch14/tap-envoy-filter.yaml kubectl get envoyfilter -n istioinaction NAME AGE tap-filter 10s # docker exec -it myk8s-control-plane istioctl proxy-config listener deploy/webapp.istioinaction docker exec -it myk8s-control-plane istioctl proxy-config listener deploy/webapp.istioinaction --port 15006 docker exec -it myk8s-control-plane istioctl proxy-config listener deploy/webapp.istioinaction --port 15006 -o json ... { "name": "envoy.filters.http.tap", "typedConfig": { "@type": "type.googleapis.com/envoy.extensions.filters.http.tap.v3.Tap", "commonConfig": { "adminConfig": { "configId": "tap_config" } } } }, { "name": "envoy.filters.http.router", "typedConfig": { "@type": "type.googleapis.com/envoy.extensions.filters.http.router.v3.Router" } } ...- tap 기능이 동작하는지 확인해보자. 2개의 터미널 창이 필요한다. 창 하나에서는 curl 로 tap 설정을 전달해 webapp 워크로드에서 tap을 시작하자.
# 터미널 1 : 포트 포워딩 설정 후 tap 시작 kubectl port-forward -n istioinaction deploy/webapp 15000 & curl -X POST -d @./ch14/tap-config.json localhost:15000/tap # 터미널 2 : 기존 반복 접속하는 것 활용 EXT_IP=$(kubectl -n istio-system get svc istio-ingressgateway -o jsonpath='{.status.loadBalancer.ingress[0].ip}') docker exec -it mypc curl -s -H "Host: webapp.istioinaction.io" http://$EXT_IP/api/catalog docker exec -it mypc curl -s -H "x-app-tap: true" -H "Host: webapp.istioinaction.io" http://$EXT_IP/api/catalog while true; do docker exec -it mypc curl -s -H "x-app-tap: true" -H "Host: webapp.istioinaction.io" http://$EXT_IP/api/catalog ; echo ; date "+%Y-%m-%d %H:%M:%S" ; sleep 1; echo; done # 터미널 3 : 로그 확인 docker exec -it myk8s-control-plane istioctl proxy-config log deploy/webapp -n istioinaction --level http:debug docker exec -it myk8s-control-plane istioctl proxy-config log deploy/webapp -n istioinaction --level tap:debug kubectl logs -n istioinaction -l app=webapp -c istio-proxy -f 2025-05-24T15:25:22.271550Z debug envoy http external/envoy/source/common/http/conn_manager_impl.cc:329 [C1314] new stream thread=31 2025-05-24T15:25:22.271571Z debug envoy http external/envoy/source/common/http/conn_manager_impl.cc:1049 [C1314][S8779601432379246889] request headers complete (end_stream=true): ':authority', 'catalog.istioinaction:80' ':path', '/items' ':method', 'GET' 'user-agent', 'beegoServer' 'x-app-tap', 'true' 'x-b3-parentspanid', '7e508d9e9fdd4e95' 'x-b3-sampled', '1' 'x-b3-spanid', 'dd0331e4b59e09cc' 'x-b3-traceid', '1b7de837e06330fa7e508d9e9fdd4e95' 'x-envoy-attempt-count', '1' 'x-envoy-internal', 'true' 'x-forwarded-client-cert', 'By=spiffe://cluster.local/ns/istioinaction/sa/webapp;Hash=afae77b57f556ba074d972d1ff0bb0cf1a01c5f0e64fdd4c46acebbe574c92c8;Subject="";URI=spiffe://cluster.local/ns/istio-system/sa/istio-ingressgateway-service-account' 'x-forwarded-for', '172.19.0.100' 'x-forwarded-proto', 'http' 'x-request-id', '6ad55c18-93b6-9196-971d-dfd885c71a61' 'accept-encoding', 'gzip' thread=31 2025-05-24T15:25:22.271572Z debug envoy http external/envoy/source/common/http/conn_manager_impl.cc:1032 [C1314][S8779601432379246889] request end stream thread=31 2025-05-24T15:25:22.272674Z debug envoy http external/envoy/source/common/http/conn_manager_impl.cc:1687 [C1314][S8779601432379246889] encoding headers via codec (end_stream=false): ...- tap 을 시작한 창에 tap 출력이 표시돼야 한다. 이 출력은 헤더, 바디, 트레일러 등 요청에 대한 모드 정보를 준다.
- 엔보이 tap 필터와 이 필터를 이스티오에서 사용해 네트워크 전반의 요청을 디버깅하는 방법을 계속해서 알아보자.
14.3. 외부 호출로 요청 속도 제한하기(= 요청 빈도 제한하기)
들어가며 : 속도 제한 소개 - Docs Rate-limiting requests with external call-out‣- 앞 절에서는 기본 HTTP 필터에 있는 기능으로 이스티오 데이터 플레인을 확장해봤는데, 외부 호출 기능으로 데이터 플레인을 확장하는 기본 필터들도 있다. In the previous section, we extended the Istio data plane with functionality that exists in an out-of-the-box HTTP filter. There are also out-of-the-box filters that enhance the data plane with functionality that exists as a call-out.
- 우리는 이 필터들을 사용해 외부 서비스를 호출하고, 요청을 계속할지 여부나 방법을 결정할 수 있는 어떤 기능을 수행하게 해본다. With these filters, we call out to an external service and have it perform some functionality that can determine how or whether to continue with a request.
- 이번 절에서는 특정 워크로드에서 서비스 측 속도 제한을 적용하기 위해 속도 제한 서비스를 호출하도록 이스티오 데이터 플레인을 설정하는 방법을 살펴본다. In this section, we explore how to configure Istio’s data plane to call out to a rate-limiting service to enforce service-side rate-limiting for a particular workload
동일한 서비스의 여러 복제본은 특정 서비스에 대한 글로벌 제한 속도를 받기 위해 동일한 속도 제한 서비스를 호출한다.
- 이스티오가 데이터 플레인에 엔보이를 사용하는 것처럼, 속도 제한에 대한 특정 호출은 엔보이 HTTP 필터에서 나온다. Just as Istio uses Envoy for the data plane, the specific call-out for rate limiting comes from an Envoy HTTP filter.
- 엔보이에서 속도 제한을 하는 방법은 여러 가지가 있지만 (네트워크 필터, 로컬 속도 제한, 글로벌 속도 제한), 우리는 특히 글로벌 속도 제한 기능을 살펴본다. There are several ways to do rate limiting in Envoy (as a network filter, local rate limiting, and global rate limiting), but we specifically explore the global rate-limiting functionality.
- 글로벌 속도 제한을 사용하면 특정 워크로드의 모든 엔보이 프록시가 동일한 속도 제한 서비스를 호출하며, 이 속도 제한 서비스는 백엔드 글로벌 키-값 저장소(= Redis)를 호출한다. (그림 14.7 참조) With global rate limiting, you have all Envoy proxies for a particular workload calling the same rate-limiting service, which calls a backend global key-value store as shown in figure 14.7.
- 이 아키텍처를 사용하면 서비스의 복제본 개수에 상관없이 속도 제한이 적용되도록 할 수 있다. With this architecture, we can ensure that a rate limit is enforced regardless of how many replicas of a service exist.
- 엔보이 전역 속도 제한을 사용하면 속도 제한 서버를 호출해 특정 요청에 속도 제한을 적용해야 하는지 여부를 결정할 수 있다.
- 결정을 내리고자 요청 속성을 속도 제한 서버로 전송한다.
- 속도 제한을 하려면 엔보이 커뮤니티에서 제공하는 속도 제한 서버를 - Github 배포하거나, 더 정확히는 엔보이 속도 제한 API - Code 를 구현하는 속도 제한 서버를 배포해야 한다. To configure rate limiting, we need to deploy the rate-limit server, which comes from the Envoy community or, more accurately, a rate-limit server that implements the Envoy rate-limiting API.
- 이 서버는 백엔드 레디스 캐시와 통신하도록 설정돼 있으며, 레디스에 속도 제한 카운터를 저장한다 (원한다면 Memcached 를 사용할 수 있다). This server is configured to talk with a backend Redis cache and stores rate-limit counters in Redis (optionally, you can use Memcache).
- 따라서 속도 제한 서버를 배포하기 전에 기대하는 속도 제한 동작으로 설정해야 한다. Before we deploy the rate-limit server, we need to configure it with the expected rate-limiting behavior.
- 14.3.1 엔보이 속도 제한 이해하기 Understanding Envoy rate limiting(= 요청 빈도 제한)
들어가며‣- 엔보이 속도 제한 서버 RLS(= rate limit server) 를 구성하기 전에 속도 제한이 어떻게 작동하는지 이해해야 한다. Before configuring the Envoy rate-limit server (RLS), we need to understand how rate limiting works.
- 특히 엔보이의 HTTP 전역 속도 제한을 살펴볼 것인데, 이 속도 제한은 HTTP 필터로 존재하고 HCM에서 HTTP 필터 체인으로 설정해야 한다. We are specifically looking at understanding Envoy’s HTTP global rate limiting, which exists as an HTTP filter and needs to be configured into the HTTP filter chain on the HCM.
- 속도 제한 필터는 HTTP 요청을 처리할 때 요청에서 특정 속성을 가져오고 RLS로 보내 평가를 받는다. When the rate-limit filter processes an HTTP request, it takes certain attributes from the request and sends them out to the RLS for evaluation.
- 엔보이 속도 제한에서 이런 속성들 혹은 속성 그룹들을 가리켜 디스크립터 descripter 라고 한다. Envoy rate-limiting terminology uses the word descriptors to refer to attributes or groups of attributes.
- 요청이 디스크립터 또는 속성은 원격 주소일 수도, 요청 헤더일 수도, 목적지일 수도, 혹은 요청의 어떤 일반 속성 같은 것일 수도 있다. These descriptors, or attributes, of the request can be things like remote address, request headers, destination, or any other generic attributes about the request.
- 속성 제한 서버 RLS는 그림 14.8처럼 전송된 요청의 속성을 미리 정의한 속성 집합과 비교해 일치하는 속성의 카운터를 늘린다. The RLS evaluates the request attributes that have been sent as part of a request against a set of predefined attributes, as shown in figure 14.8, and increments counters for those attributes.
- 카운트할 속성은 트리 형태로 그룹화하거나 정의해 결정할 수 있다. The request attributes may be grouped or defined in a tree to determine what attributes should be counted.
- 속성 또는 속성 집합이 속도 제한 서버 정의와 일치하면 해당 제한의 횟수를 늘린다. If an attribute or set of attributes matches the RLS definitions, then the counts for those limits are incremented.
- 횟수가 임계값을 초과하면 해당 요청에는 속도 제한이 적용된다. If a count exceeds a threshold, that request is rate-limited.
요청 속성은 속도 제한 서버로 전송되며, 속도 제한 서버는 미리 설정한 디스크립터 집합과 비교해 속도 제한 결정을 내린다.
엔보이 속도 제한 서버 설정하기 CONFIGURING THE ENVOY RATE-LIMIT SERVER‣- 속성 카운터와 한도가 포함된 속도 제한 서버 설정을 만들어보자. Let’s configure the RLS with the attribute counters and limits.
- 우리 예제에서는 예제 조직에서 보유한 로열티 등급에 따라 특정 사용자 집단을 제한하고자 한다. For our example use case, we want to limit certain groups of users depending on what loyalty tier they have with our example organization.
- 요청의 로열티 등급은
x-loyalty헤더를 검사해 판단할 수 있다. We can determine the loyalty tier in a request by examining the x-loyalty header.
- 골드 등급(x-loyalty: gold)의 사용자 그룹에는 요청을 분당 10개까지 허용하고, 실버 등급(x-loyalty: silver)에는 요청을 분당 5개까지 허용한다. 또한 브론즈 등급(x-loyalty: bronze)에는 요청을 분당 3개까지 허용한다. For a particular group of users in the gold tier (x-loyalty: gold), we allow 10 requests per minute.For silver (x-loyalty: silver), we allow five requests per minute; and for bronze (x-loyalty: bronze), we allow three requests per minute.
- 식별할 수 없는 로열티 등급의 경우, 분당 요청이 하나를 넘어가면 속도 제한이 처리를 제한한다. For a loyalty tier that cannot be identified, rate limiting will kick in after one request per minute.
- 요청이 디스크립터를 포착하는 속도 제한 서버 설정은 다음과 같이 표현할 수 있다.
# cat ch14/rate-limit/rlsconfig.yaml apiVersion: v1 kind: ConfigMap metadata: name: catalog-ratelimit-config namespace: istioinaction data: config.yaml: | domain: catalog-ratelimit descriptors: - key: header_match value: no_loyalty rate_limit: unit: MINUTE requests_per_unit: 1 - key: header_match value: gold_request rate_limit: unit: MINUTE requests_per_unit: 10 - key: header_match value: silver_request rate_limit: unit: MINUTE requests_per_unit: 5 - key: header_match value: bronze_request rate_limit: unit: MINUTE requests_per_unit: 3- 실제 요청 헤더를 직접 다루지 않고, 요청의 일부로 전송된 속성만 다루고 있음을 유의하자. 다음 절에서는 이 속성들을 정의하는 방법을 살펴볼 것이다.
- 앞서 언급했듯이, 속도 제한 서버 설정은 속도를 제한하기 위해 따라야 하는 규칙(= descriptor)을 정의한다.
- 이스티오 데이터 플레인(= envoy proxy)을 거쳐 요청이 처리될 때 속성들이 속도 제한 서버로 보내진다. 속성이 규칙 조건에 일치하면 그에 따라 처리를 제한한다.
요청 경로에 속도 제한 걸기* CONFIGURING THE REQUEST PATH FOR RATE LIMITING‣- 속도 제한 서버 설정을 만들고 나면, 특정 요청에 대해 어떤 속성을 전송할 것인지 엔보이를 설정해야 한다.
- 엔보이 용어로는 이 설정을 특정 요청 경로에 취하는 속도 제한 조치 rate-limit action 라고 부른다.
- 예를 들어, catalog 서비스를
/items경로로 호출하면 요청에x-loyalty헤더가 있는지와 어느 그룹에 속하는지를 포착하려고 한다.
- 적절한 속성 action 을 속도 제한 서버로 보내도록 설정하려면 특정 엔보이 루트 설정에 rate_limit 설정을 지정해야 한다.
- 이스티오에는 아직 전용 API가 없으므로(이 책을 저술하는 시점에는) EnvoyFilter 리소스를 사용해야 한다.
- catalog 서비스의 모든 경로에 속도 제한 조치를 지정하는 방법은 다음과 같다.
# cat ch14/rate-limit/catalog-ratelimit-actions.yaml apiVersion: networking.istio.io/v1alpha3 kind: EnvoyFilter metadata: name: catalog-ratelimit-actions namespace: istioinaction spec: workloadSelector: labels: app: catalog configPatches: - applyTo: VIRTUAL_HOST match: context: SIDECAR_INBOUND routeConfiguration: vhost: route: action: ANY patch: operation: MERGE # Applies the rate limit rules. value: rate_limits: # 속도 제한 조치 - actions: - header_value_match: descriptor_value: no_loyalty expect_match: false headers: - name: "x-loyalty" - actions: - header_value_match: descriptor_value: bronze_request headers: - name: "x-loyalty" exact_match: bronze - actions: - header_value_match: descriptor_value: silver_request headers: - name: "x-loyalty" exact_match: silver - actions: - header_value_match: descriptor_value: gold_request headers: - name: "x-loyalty" exact_match: gold- 이제 이 규칙들을 속도 제한 서버와 함께 배포하고 데이터 플레인을 설정하는 방법을 살펴보자.
- k8s configmap 으로 규칙을 배포하고, 속도 제한 서버를 레디스 백엔드와 함께 배포하자.
# tree ch14/rate-limit ch14/rate-limit ├── catalog-ratelimit-actions.yaml ├── catalog-ratelimit.yaml ├── rls.yaml └── rlsconfig.yaml cat ch14/rate-limit/rlsconfig.yaml # rate limit server config cat ch14/rate-limit/rls.yaml # rate limit server # kubectl apply -f ch14/rate-limit/rlsconfig.yaml -n istioinaction kubectl apply -f ch14/rate-limit/rls.yaml -n istioinaction # 확인 kubectl get cm -n istioinaction catalog-ratelimit-config kubectl get pod -n istioinaction NAME READY STATUS RESTARTS AGE ratelimit-99d5d9c5-vd5b4 0/1 ContainerCreating 0 9s redis-6cf4ff9768-vfgjd 1/1 Running 0 9s ...- 엔보이가 속성을 속도 제한 서버로 보내게 해야 한다. 그래야 속도 제한 서버가 개수를 세어 속도 제한을 처리할 수 있기 때문이다.
- 이를 위해 그 역할을 하는 EnvoyFilter 리소스를 적용해보자.
# 기존에 반복 호출은 취소해두자 # cat ch14/rate-limit/catalog-ratelimit.yaml apiVersion: networking.istio.io/v1alpha3 kind: EnvoyFilter metadata: name: catalog-ratelimit-filter namespace: istioinaction spec: workloadSelector: labels: app: catalog configPatches: - applyTo: HTTP_FILTER match: context: SIDECAR_INBOUND listener: portNumber: 3000 filterChain: filter: name: "envoy.filters.network.http_connection_manager" subFilter: name: "envoy.filters.http.router" # route filter 선택 patch: operation: INSERT_BEFORE # rate limit filter를 route filter 앞에 배치 value: name: envoy.filters.http.ratelimit typed_config: "@type": type.googleapis.com/envoy.extensions.filters.http.ratelimit.v3.RateLimit domain: catalog-ratelimit failure_mode_deny: true rate_limit_service: grpc_service: envoy_grpc: cluster_name: outbound|8081||ratelimit.istioinaction.svc.cluster.local # 위에서 배포한 ratelimit server의 endpoint timeout: 10s transport_api_version: V3 cat ch14/rate-limit/catalog-ratelimit-actions.yaml kubectl apply -f ch14/rate-limit/catalog-ratelimit.yaml -n istioinaction kubectl apply -f ch14/rate-limit/catalog-ratelimit-actions.yaml -n istioinaction kubectl get envoyfilter -A NAMESPACE NAME AGE istioinaction catalog-ratelimit-actions 27s istioinaction catalog-ratelimit-filter 28s ...- 속도 제한 기능을 시험해보기 위해 sleep 앱을 배포하고 catalog 서비스를 호출하는 클라이언트를 시뮬레이션해보자.
# sleep 앱에서 catalog 서비스를 호출 시도 : 대략 1분에 한 번 정도 호출 성공! >> x-loyalty 헤더가 없을 때 속도 제한 값! kubectl exec -it deploy/sleep -n istioinaction -c sleep -- curl http://catalog/items -v ... kubectl exec -it deploy/sleep -n istioinaction -c sleep -- curl http://catalog/items -v ... < HTTP/1.1 429 Too Many Requests < x-envoy-ratelimited: true ... # silver 헤더는? kubectl exec -it deploy/sleep -n istioinaction -c sleep -- curl -H "x-loyalty: silver" http://catalog/items -v kubectl exec -it deploy/sleep -n istioinaction -c sleep -- curl -H "x-loyalty: silver" http://catalog/items -v kubectl exec -it deploy/sleep -n istioinaction -c sleep -- curl -H "x-loyalty: silver" http://catalog/items -v kubectl exec -it deploy/sleep -n istioinaction -c sleep -- curl -H "x-loyalty: silver" http://catalog/items -v kubectl exec -it deploy/sleep -n istioinaction -c sleep -- curl -H "x-loyalty: silver" http://catalog/items -v kubectl exec -it deploy/sleep -n istioinaction -c sleep -- curl -H "x-loyalty: silver" http://catalog/items -v ... < HTTP/1.1 429 Too Many Requests ... # docker exec -it myk8s-control-plane istioctl proxy-config route deploy/catalog.istioinaction --name 'InboundPassthroughClusterIpv4' docker exec -it myk8s-control-plane istioctl proxy-config route deploy/catalog.istioinaction --name 'InboundPassthroughClusterIpv4' -o json | grep actions docker exec -it myk8s-control-plane istioctl proxy-config route deploy/catalog.istioinaction --name 'inbound|3000||' docker exec -it myk8s-control-plane istioctl proxy-config route deploy/catalog.istioinaction --name 'inbound|3000||' -o json | grep actions docker exec -it myk8s-control-plane istioctl proxy-config route deploy/catalog.istioinaction --name 'inbound|3000||' -o json ... "rateLimits": [ { "actions": [ { "headerValueMatch": { "descriptorValue": "no_loyalty", "expectMatch": false, "headers": [ { "name": "x-loyalty" } ] } } ] }, { "actions": [ { "headerValueMatch": { "descriptorValue": "bronze_request", "headers": [ { "name": "x-loyalty", "exactMatch": "bronze" ...- 다음 실습을 위해 리소스 삭제
#
kubectl delete envoyfilter -n istioinaction --all
kubectl get envoyfilter -A

#
kubectl delete -f ch14/rate-limit/rlsconfig.yaml -n istioinaction
kubectl delete -f ch14/rate-limit/rls.yaml -n istioinaction
14.4. 루아로 이스티오의 데이터 플레인 확장하기
Lua 소개 : 가벼운 명령형/절차적 언어로, 확장 언어로 쓰일 수 있는 스크립팅 언어를 주 목적으로 설계 - Wiki Extending Istio’s data plane with Lua‣- 이미 존재하는 엔보이 필터를 설정해 이스티오의 데이터 플레인을 확장하는 것은 편리하지만, 추가하려는 기능이 기본 엔보이 필터에 없는 경우에는 어떻게 해야 할까? Extending Istio’s data plane by configuring existing Envoy filters is convenient, but what if the functionality we want to add doesn’t already exist as an out-of-the box Envoy filter?
- 요청 경로에 어떤 커스텀 로직을 구현하고 싶다면 어떻게 해야 할까? 이 절에서는 자체 커스텀 로직으로 데이터 플레인 동작을 확장하는 방법을 살펴본다. What if we want to implement some custom logic on the request path? In this section, we look at how to extend data-plane behavior with our own custom logic.
- 이전 절에서 엔보이에는 데이터 플레인 동작을 강화하기 위해 필터 체인에 추가할 수 있는 기본 필터가 많이 있음을 확인했다. 그중 하나가 루아 필터로, 루아 필터를 사용하면 루아 스크립트를 작성해 프록시에 주입함으로써 요청/응답 경로의 동작을 커스텀할 수 있다 (그림 14.9 참조) One of those is the Lua filter, which allows us to customize the behavior of the request or response path by writing Lua scripts and injecting them into the proxy.
- 이런 스크립트는 요청이나 응답의 헤더를 조작하고 바디를 조사하는 데 사용할 수 있다. 계속해서 루아 스크립트를 주입해 요청 경로의 처리를 변경하도록 EnvoyFilter 리소스를 사용해 데이터 플레인을 설정할 것이다. These scripts can be used to manipulate the headers and inspect the body of a request or response. We will continue to use the EnvoyFilter resource to configure the data plane to inject Lua scripts to change the processing of the request path.
루아 스크립트 언어로 요청 경로 기능 확장하기
실습 : 요청 경로의 동작을 커스텀‣- 요청 경로의 동작을 커스텀하는 일반적인 예를 들어본다. 들어오는 요청 모두를 A/B 테스트 그룹의 일부로 처리하고 싶다고 해보자.
- 어떤 그룹인지는 요청의 속성을 기반으로 런타임에서만 판단할 수 있다.
- 특정 요청이 어느 그룹에 속했는지 판단하려면 A/B 테스트 엔진을 호출해야 한다.
- 이 호출의 응답은 요청의 헤더로 추가해야 하며, 업스트림 서비스는 이 헤더를 사용해 A/B 테스트 목적에 맞는 라우팅 결정을 내릴 수 있다.
- 이 예제를 위해 몇 가지 보조 서비스를 배포해보자. 받은 요청의 헤더를 되돌려 보내는 샘플 httpbin 서비스를 배포할 것이다.
- 또한 샘플 A/B 테스트 버킷 서비스도 배포해보겠다. 이 서비스는 요청의 헤더를 평가해 요청이 속해야 하는 그룹을 나타내는 문자열을 반환한다.
# cat ch14/bucket-tester-service.yaml ... apiVersion: apps/v1 kind: Deployment metadata: labels: app: bucket-tester version: v1 name: bucket-tester spec: replicas: 1 selector: matchLabels: app: bucket-tester version: v1 template: metadata: labels: app: bucket-tester version: v1 spec: containers: - image: hashicorp/http-echo:1.0 # 수정 https://hub.docker.com/r/hashicorp/http-echo/tags imagePullPolicy: IfNotPresent name: bucket-tester args: - "-text=dark-launch-7" ports: - containerPort: 5678 name: http protocol: TCP securityContext: privileged: false # kubectl apply -f ch14/httpbin.yaml -n istioinaction kubectl apply -f ch14/bucket-tester-service.yaml -n istioinaction # 확인 kubectl get pod -n istioinaction NAME READY STATUS RESTARTS AGE NAME READY STATUS RESTARTS AGE bucket-tester-688c598b47-96gvm 2/2 Running 0 37s httpbin-85d76b4bb6-dwxzv 2/2 Running 0 37s ...- 요청이나 응답 헤더를 조작하는 용도로 작성할 수 있는 루아 스크립트를 살펴보고, 이 사용 사례를 구현하는 방법도 살펴보자. Let’s look at a Lua script we can write to manipulate the request or response headers and how we can implement this use case.
- 엔보이에서는 루아 함수
envoy_on_reqest()혹은envoy_on_response()를 구현해 요청과 응답 각각을 확인하고 조작할 수 있다. In Envoy, we can implement the envoy_on_request () or envoy_on_response() Lua function to inspect and manipulate the request and response, respectively. - 루아 내에서 다른 서비스를 호출해야 한다면 엔보이가 제공하는 함수를 사용해야 한다 (RPC 호출을 하는데 범용 루아 라이브러리를 사용하면 안된다. 우리는 엔보이가 자체 논블로킹 non-blocking 스레딩 아키텍처로 호출을 올바르게 관리하길 원하기 때문이다). If we need to make a call to another service from within Lua, we have to use an Envoy-provided function (we should not use a general-purpose Lua library to make RPC calls, because we want Envoy to manage the call correctly with its non-blocking threading architecture).
httpCall()함수를 사용하면 외부 서비스와 통신할 수 있다. 다음 스크립트는 우리의 사용 사례를 구현한 것이다. We can use the http-Call() function to communicate with an external service. The following script implements our use case:
# cat ch14/lua-filter.yaml ... function envoy_on_request(request_handle) local headers, test_bucket = request_handle:httpCall( "bucket_tester", { [":method"] = "GET", [":path"] = "/", [":scheme"] = "http", [":authority"] = "bucket-tester.istioinaction.svc.cluster.local", ["accept"] = "*/*" }, "", 5000) sanitized_bucket = string.gsub(test_bucket, "[\r\n]", "") -- sanitize test_bucket string request_handle:headers():add("x-test-cohort", sanitized_bucket) end function envoy_on_response(response_handle) response_handle:headers():add("istioinaction", "it works!") end ...envoy_on_reqest()함수를 구현하고,httpCall()내장 함수를 사용해 외부 서비스와 통신하고 있다.- 또한 응답을 받아 x-test-cohort 라는 헤더를 추가하고 있다.
httpCall()포함한 내장 함수는 문서 참조 - Docs - 앞 절에서 했던 것처럼 이 스크립트를 EnvoyFilter 리소스에 추가할 수 있다.
# cat ch14/lua-filter.yaml apiVersion: networking.istio.io/v1alpha3 kind: EnvoyFilter metadata: name: httpbin-lua-extension namespace: istioinaction spec: workloadSelector: labels: app: httpbin configPatches: - applyTo: HTTP_FILTER match: context: SIDECAR_INBOUND listener: portNumber: 80 filterChain: filter: name: "envoy.filters.network.http_connection_manager" subFilter: name: "envoy.filters.http.router" patch: operation: INSERT_BEFORE value: name: envoy.lua typed_config: "@type": "type.googleapis.com/envoy.extensions.filters.http.lua.v3.Lua" inlineCode: | function envoy_on_request(request_handle) local headers, test_bucket = request_handle:httpCall( "bucket_tester", { [":method"] = "GET", [":path"] = "/", [":scheme"] = "http", [":authority"] = "bucket-tester.istioinaction.svc.cluster.local", ["accept"] = "*/*" }, "", 5000) sanitized_bucket = string.gsub(test_bucket, "[\r\n]", "") -- sanitize test_bucket string request_handle:headers():add("x-test-cohort", sanitized_bucket) end function envoy_on_response(response_handle) response_handle:headers():add("istioinaction", "it works!") end - applyTo: CLUSTER match: context: SIDECAR_OUTBOUND patch: operation: ADD value: # cluster specification name: bucket_tester type: STRICT_DNS connect_timeout: 0.5s lb_policy: ROUND_ROBIN load_assignment: cluster_name: bucket_tester endpoints: - lb_endpoints: - endpoint: address: socket_address: protocol: TCP address: bucket-tester.istioinaction.svc.cluster.local port_value: 80- workloadSelector 정의한 대로 이 필터를 httpbin 워크로드에 적용 후 httpbin 서비스 호출 확인!
# kubectl apply -f ch14/lua-filter.yaml kubectl get envoyfilter -n istioinaction # istio-proxy config 확인 내용 추가해두자 kubectl exec -it deploy/sleep -n istioinaction -c sleep -- curl -H "x-test-cohort: dark-launch-7" http://httpbin.istioinaction:8000/ -v # httpbin 서비스 호출 확인! kubectl exec -it deploy/sleep -n istioinaction -c sleep -- curl http://httpbin.istioinaction:8000/ -v * Host httpbin.istioinaction:8000 was resolved. * IPv6: (none) * IPv4: 10.200.0.28 * Trying 10.200.0.28:8000... * Connected to httpbin.istioinaction (10.200.0.28) port 8000 > GET / HTTP/1.1 > Host: httpbin.istioinaction:8000 > User-Agent: curl/8.5.0 > Accept: */* > < HTTP/1.1 200 OK < server: envoy < date: Sat, 24 May 2025 16:50:58 GMT < content-type: text/html; charset=utf-8 < content-length: 9593 < access-control-allow-origin: * < access-control-allow-credentials: true < x-envoy-upstream-service-time: 3 < istioinaction: it works! < <!DOCTYPE html> <html lang="en"> <head> <meta charset="UTF-8"> <title>httpbin.org</title> <link href="https://fonts.googleapis.com/css?family=Open+Sans:400,700|Source+Code+Pro:300,600|Titillium+Web:400,600,700" ... kubectl exec -it deploy/sleep -n istioinaction -c sleep -- curl http://httpbin.istioinaction:8000/headers { "headers": { "Accept": "*/*", "Host": "httpbin.istioinaction:8000", "User-Agent": "curl/8.5.0", "X-B3-Parentspanid": "2e7142be2dc74902", "X-B3-Sampled": "1", "X-B3-Spanid": "3b5211d85959411b", "X-B3-Traceid": "be30ab938800b9482e7142be2dc74902", "X-Envoy-Attempt-Count": "1", "X-Forwarded-Client-Cert": "By=spiffe://cluster.local/ns/istioinaction/sa/httpbin;Hash=d9400e65c508a6d8ddc36aba279db8a5e5df8831ab13421bcca8d15a1c5a3d93;Subject=\"\";URI=spiffe://cluster.local/ns/istioinaction/sa/sleep", "X-Test-Cohort": "dark-launch-7" } }- 자세한 내용은 이 책 소스 코드에 있는
ch14/lua-filter.yaml파일에서 살펴볼 수 있다. - 이 예제에서는 데이터 플레인의 기능을 확장하기 위해 의도적으로 구축된 필터를 사용하는 방법을 알아봤다.
- 루아 스크립트 언어를 사용해 이 기능을 구현했으며, 내장 함수를 사용해 다른 함수를 호출했다.
- 다음 절에서는 웹어셈블리를 사용해 다른 언어로 우리의 커스텀 기능을 구현하는 방법을 다룬다.
- 다음 실습을 위해 리소스 삭제
# kubectl delete envoyfilter -n istioinaction --all kubectl get envoyfilter -A # kubectl delete -f ch14/httpbin.yaml -n istioinaction kubectl delete -f ch14/bucket-tester-service.yaml -n istioinaction- Lua 를 활용하는 실습 시나리오 추가해볼 것!
14.5. 웹어셈블리로 이스티오의 데이터 플레인 확장하기
들어가며 : 웹어셈블리로 새 엔보이 필터를 작성 - Docs Extending Istio’s data plane with WebAssembly
- 이 장에서 살펴보는, 요청 경로상에서 이스티오를 확장하는 마지막 방법은 웹어셈블리로 새 엔보이 필터를 작성하는 것이다. The last approach to extend Istio on the request path that we cover in this chapter is writing new Envoy filters with WebAssembly.
- 앞 절에서는 기존 엔보이 필터를 재사용하고 설정해 기본 이스티오 기능을 확장해봤으며, 요청 경로를 조작하는 우리의 자체 커스텀 스크립트를 주입하기도 했다.
- 이번 절에서는 우리의 자체 엔보이 필터를 구축하는 방법과 이스티오 데이터 플레인에 배포하는 방법을 살펴본다. In this section, we explore how we can build our own Envoy filters and dynamically deploy them to the Istio data plane.
14.5.1 웹어셈블리 소개 Introducing WebAssembly‣- 웹어셈블리 Wasm, WebAssembly 란 바이너리 명령 형식으로, 여러 가지 환경 간에 이식할 수 있는 것을 목표로 했으며 여러 프로그래밍 언어로 컴파일해 가상머신에서 실행할 수 있다. WebAssembly (Wasm) is a binary instruction format that is intended to be portable across environments and that can be compiled from many different programming languages and run in a VM.
- 본래 웹어셈블리는 브라우저의 웹 애플리케이션에서 CPU 집약적인 작업의 실행 속도를 높이고, 브라우저 기반 애플리케이션 지원을 자바스크립트 외의 언어로도 확장하기 위해 개발됐다 (그림 14.10 참조). Wasm was originally developed to speed up the execution of CPU-intensive operations for web apps in a browser and extend the support for browser-based apps to languages other than JavaScript.
- 웹어셈블리는 2019년에 W3C 권고 사항이 됐으며 모든 주요 브라우저에서 지원하고 있다. It became a W3C Recommendation in 2019 and is supported in all major browsers.
- 웹어셈블리는 모듈로 패키징된 커스텀 코드로, 웹 브라우저 같은 대상 호스트 안의 격리된 가상머신에서 안전하게 실행할 수 있다.
- 웹어셈블리는 저장 공간과 메모리를 적게 차지하고 거의 네이티브에 가까운 속도로 실행되도록 설계됐다. Wasm is intended to have a compact size and load footprint and execute at near-native speeds.
- 또한 호스트 애플리케이션(즉, 브라우저)에 내장돼도 안전한데, 메모리 안전 memory safe 하고 격리된 sandboxed 실행 환경(가상머신)에서 실행되기 때문이다. It is also safe to embed in host applications (that is, a browser) because it is memory safe and runs in a sandboxed execution environment (VM).
- 웹어셈블리 모듈은 호스트 시스템이 허용하는 메모리와 기능에만 접근할 수 있다. A Wasm module only has access to memory and functionality that the host system allows.
14.5.2 왜 엔보이에 웹어셈블리를 사용하는가? Why WebAssembly for Envoy?‣- 네이티브 엔보이 필터를 직접 작성하는 데는 크게 두 가지 단점이 있다
- C++ 여야 한다.
- 변경 사항을 엔보이의 새 바이너리로 정적으로 빌드해야 하는데, 이는 사실상 엔보이 ‘커스텀’ 빌드다.
- 엔보이는 웹어셈블리 실행 엔진을 내장하고 있으므로, HTTP 필터를 포함해 엔보이의 다양한 영역을 커스터마이징하고 확장하는 데 사용할 수 있다. Envoy embeds a WebAssembly execution engine that can be used to customize and extend various areas of Envoy, including HTTP filters.
- 웹어셈블리가 지원하는 언어라면 어느 것이든 엔보이 필터로 작성해 그림 14.11 처럼 런타임에 프록시로 동적으로 불러올 수 있다. You can write Envoy filters in any language supported by Wasm and dynamically load them into the proxy at run time, as shown in figure 14.11.
- 즉, 이스티오에서 기본 엔보이 프록시를 계속 사용하면서 커스텀 필터를 런타임에 동적으로 불러올 수 있다는 것이다. This means you can keep using the out-of-the-box Envoy proxy in Istio and dynamically load your custom filters at run time.
웹어셈블리 (Wasm) 모듈을 패키징해 웹어셈블리 HTTP 필터 내에서 실행할 수 있다.
- How it works - Blog
- Set up local cache of Wasm extensions
- Pull desired Wasm extension into the local cache
- Mount the
wasm-cacheinto appropriate workloads - Configure Envoy with
EnvoyFilterCRD to use the Wasm filter
- Image fetcher in Istio agent - Blog
Remote Wasm module fetch flow
- Istio 1.9부터 Istio-agent는
EnvoyFiltersistio-agent 내부의 xDS 프록시와 Envoy의 확장 구성 검색 서비스(ECDS)를 활용하여 remote에 구성된 원격 HTTP 소스에서 가져온 Wasm 바이너리를 로드하는 안정적인 솔루션을 제공해 왔습니다. Istio 1.12의 새로운 Wasm API 구현에도 동일한 메커니즘이 적용됩니다. 원격 가져오기가 실패할 경우 Envoy가 잘못된 구성으로 인해 중단될 염려 없이 HTTP 원격 리소스를 안정적으로 사용할 수 있습니다. - 또한, Istio 1.12는 이 기능을 Wasm OCI 이미지로 확장합니다. 즉, Istio 에이전트는 이제 Docker Hub, Google Container Registry(GCR), Amazon Elastic Container Registry(ECR) 등 모든 OCI 레지스트리에서 Wasm 이미지를 가져올 수 있습니다. 이미지를 가져온 후, Istio 에이전트는 Wasm 바이너리를 추출하여 캐시한 다음 Envoy 필터 체인에 삽입합니다.
- Wasm module distribution via the Istio Agent - Blog
- Istio 1.9 이전에는 원격 Wasm 모듈을 프록시에 배포하기 위해 Envoy 원격 데이터 소스가 필요했습니다. 이 예시에서는 두 가지
EnvoyFilter리소스가 정의되어 있습니다. 하나는 원격 가져오기 Envoy 클러스터를 추가하는 리소스이고, 다른 하나는 HTTP 필터 체인에 Wasm 필터를 삽입하는 리소스입니다. 이 방법에는 단점이 있습니다. 잘못된 구성이나 일시적인 오류로 인해 원격 가져오기가 실패하면 Envoy가 잘못된 구성에 고정됩니다. Wasm 확장 프로그램이 fail closed 로 구성된 경우 , 잘못된 원격 가져오기로 인해 Envoy 서비스가 중단됩니다. 이 문제를 해결하려면 Envoy xDS 프로토콜을 근본적으로 변경 하여 비동기 xDS 응답을 허용해야 합니다. - Istio 1.9는 istio-agent 내부의 xDS 프록시와 Envoy의 확장 구성 검색 서비스 (ECDS) 를 활용하여 기본적으로 안정적인 배포 메커니즘을 제공합니다 .
- istio-agent는 istiod에서 확장 구성 리소스 업데이트를 가로채고, 원격 페치 힌트를 읽어와 Wasm 모듈을 다운로드한 후, 다운로드된 Wasm 모듈의 경로로 ECDS 구성을 다시 작성합니다. 다운로드가 실패하면 istio-agent는 ECDS 업데이트를 거부하고 잘못된 구성이 Envoy에 도달하는 것을 방지합니다. 자세한 내용은 Wasm 모듈 배포 관련 문서를 참조하세요 .
14.5.3 웹어셈블리로 새로운 엔보이 필터 만들기 Building a new Envoy filter with WebAssembly‣- 웹어셈블리로 엔보이 필터를 빌드하려면 어떤 언어를 사용하고 싶은지, 어떤 엔보이 버전을 사용 중인지, 그 버전에서 어떤 엔보이 ABI Abstract Binary Interace 를 지원하는지 등을 알아야 한다.
- 그러고 나서 적절한 언어 SDK를 골라 빌드 및 종속성 도구를 제대로 준비해야 한다.
- 이절에서는 Sola.io의
wasme라는 오픈소스 개발자 도구를 사용해 엔보이용 웹어셈블리 필터를 만들고 빌드해본다. wasme를 사용하면 엔보이 프로젝트용 웹어셈블리를 빠르게 부트스트랩하고 보일러플레이트 생성 boilerplate scaffolding 을 모두 자동화해준다.- 그럼 웹어셈블리로 엔보이 필터 빌드를 시작하는 방법을 살펴보자.
- 이 책을 저술하는 시점에 엔보이 웹어셈블리 SDK가 있는 프래그래밍 언어는 다음 네 가지다.
- C++
- Rust
- AssemblyScript 어셈블리스크립트 (TypeScript 타입스크립트)
- TinyGo
- 이 절에선느 어셈블리스크립트 https://www.assemblyscript.org/ 를 사용해 웹어셈블리로 새 엔보이 필터를 빌드해본다.
- 어셈블리스크립트는 타입스크립트의 변형이므로 자바스크립트 개발자라면 익숙할 것이다.
- 어셈블리스크립트는 엔보이 필터를 구축하는 데 있어 C++의 훌륭한 대체재다.
[공식 문서] Distributing WebAssembly Modules 실습 - Docs‣- 소개
- Istio는 WebAssembly(Wasm)를 사용하여 프록시 기능을 확장할 수 있는 기능을 제공합니다.
- Wasm 확장성의 주요 장점 중 하나는 런타임에 확장 기능을 동적으로 로드할 수 있다는 것입니다.
- 이러한 확장 기능은 먼저 Envoy 프록시에 배포해야 합니다.
- Istio는 프록시 에이전트가 Wasm 모듈을 동적으로 다운로드할 수 있도록 허용하여 이를 가능하게 합니다.
- Wasm 모듈 구성
- 이 예시에서는 메시에 HTTP 기본 인증 확장을 추가합니다.
- 원격 이미지 레지스트리에서 기본 인증 모듈을 가져와 로드하도록 Istio를 구성합니다.
- 이 모듈은 API 호출 시 실행되도록 구성됩니다
/api. - 원격 Wasm 모듈로 WebAssembly 필터를 구성하려면
WasmPlugin리소스를 생성하세요.
# 설정 전 호출 확인 EXT_IP=$(kubectl -n istio-system get svc istio-ingressgateway -o jsonpath='{.status.loadBalancer.ingress[0].ip}') docker exec -it mypc curl -s -H "Host: webapp.istioinaction.io" http://$EXT_IP/api/catalog -v # kubectl explain wasmplugins.extensions.istio.io ... # kubectl apply -f - <<EOF apiVersion: extensions.istio.io/v1alpha1 kind: WasmPlugin metadata: name: basic-auth namespace: istio-system # 모든 네임스페이스에 영향 spec: selector: matchLabels: istio: ingressgateway url: oci://ghcr.io/istio-ecosystem/wasm-extensions/basic_auth:1.12.0 phase: AUTHN pluginConfig: basic_auth_rules: - prefix: "/api" request_methods: - "GET" - "POST" credentials: - "ok:test" - "YWRtaW4zOmFkbWluMw==" EOF # kubectl get WasmPlugin -A NAMESPACE NAME AGE istio-system basic-auth 21s- 구성된 Wasm 모듈을 확인
# 자격 증명 없이 테스트 EXT_IP=$(kubectl -n istio-system get svc istio-ingressgateway -o jsonpath='{.status.loadBalancer.ingress[0].ip}') docker exec -it mypc curl -s -H "Host: webapp.istioinaction.io" http://$EXT_IP/api/catalog -v * Trying 172.19.255.101:80... * Connected to 172.19.255.101 (172.19.255.101) port 80 > GET /api/catalog HTTP/1.1 > Host: webapp.istioinaction.io > User-Agent: curl/8.7.1 > Accept: */* > * Request completely sent off < HTTP/1.1 401 Unauthorized < www-authenticate: Basic realm=istio < date: Sat, 24 May 2025 17:10:14 GMT < server: istio-envoy < content-length: 0 < * Connection #0 to host 172.19.255.101 left intact # 자격 증명으로 테스트 docker exec -it mypc curl -s -H "Authorization: Basic YWRtaW4zOmFkbWluMw==" -H "Host: webapp.istioinaction.io" http://$EXT_IP/api/catalog -v ... < HTTP/1.1 200 OK < content-length: 357 < content-type: application/json; charset=utf-8 < date: Sat, 24 May 2025 17:10:38 GMT < x-envoy-upstream-service-time: 4 < server: istio-envoy < * Connection #0 to host 172.19.255.101 left intact [{"id":1,"color":"amber","department":"Eyewear","name":"Elinor Glasses","price":"282.00"},{"id":2,"color":"cyan","department":"Clothing","name":"Atlas Shirt","price":"127.00"},{"id":3,"color":"teal","department":"Clothing","name":"Small Metal Shoes","price":"232.00"},{"id":4,"color":"red","department":"Watches","name":"Red Dragon Watch","price":"232.00"}]%- 실습 완료 후 리소스 삭제
# kubectl delete WasmPlugin -n istio-system basic-authIstio 에 Coraza (코라자) WAF 적용 - KrBlog‣- Coraza is an open source, high performance, Web Application Firewall ready to protect your beloved applications - Home , Link
- Go 언어로 작성되었으며, ModSecurity SecLang 규칙 세트를 지원하고 OWASP 핵심 규칙 세트와 100% 호환됩니다.
- ⇲ Drop-in - Coraza는 부분 호환성이 있는 대체 엔진입니다.
트러스트웨이브OWASP ModSecurity 엔진을 지원하며 업계 표준 SecLang 규칙 세트를 지원합니다. - 🔥 보안 - Coraza는 OWASP CRS를 실행하여 OWASP Top Ten을 포함한 다양한 공격으로부터 웹 애플리케이션을 최소한의 오탐으로 보호합니다. CRS는 SQL 인젝션(SQLi), 크로스 사이트 스크립팅(XSS), PHP 및 Java 코드 인젝션, HTTPoxy, Shellshock, 스크립팅/스캐너/봇 탐지, 메타데이터 및 오류 유출 등 다양한 일반적인 공격 유형을 차단합니다.
- 🔌 확장성 - Coraza는 핵심 라이브러리로, 온프레미스 웹 애플리케이션 방화벽 인스턴스를 구축하기 위한 다양한 통합 기능을 제공합니다. 감사 로거, 지속성 엔진, 연산자, 액션 등 Coraza를 원하는 대로 확장할 수 있는 자체 기능을 생성하세요.
- 🚀 성능 - 대규모 웹사이트부터 소규모 블로그까지, Coraza는 성능 저하를 최소화하면서 부하를 처리할 수 있습니다. 벤치마크를 확인해 보세요.
- ﹡ 단순성 - 누구나 Coraza 소스 코드를 이해하고 수정할 수 있습니다. 새로운 기능으로 Coraza를 쉽게 확장할 수 있습니다.
- 플러그인 지원
- Proxy WASM extension for proxies with proxy-wasm support (e.g. Envoy) - stable, still under development
- Caddy Reverse Proxy and Webserver Plugin - stable, needs a maintainer
- HAProxy SPOE Plugin - preview
- Traefik Proxy Plugin - preview, needs maintainer
- Gin Web Framework Middleware - preview, needs maintainer
- Apache HTTP Server - experimental
- Nginx - experimental
- Coraza C Library - experimental
- Quick Start - Docs
- OWASP Core Ruleset - Docs
- Playground - Link
- 추천 영상
- proxy-wasm filter based on Coraza WAF - Github
- Coraza 기반으로 구축되고 proxy-wasm ABI를 구현하는 웹 애플리케이션 방화벽 WASM 필터입니다.
- Envoy에서 직접 로드하거나 Istio 플러그인으로 사용할 수도 있습니다.
- WAF는 플러그 앤 플레이 방식의 보안 솔루션이 아닙니다. WAF가 효과적으로 작동하려면 보호하려는 환경과 트래픽에 맞춰 구성 및 튜닝이 필요합니다.
- 실제 운영 환경에서는 배포된 구성( @recommended-conf 및 @crs-setup-conf 참조 )을 완전히 숙지하고 사용된 규칙 세트에 대한 튜닝 단계를 수행하는 것이 좋습니다.
- OWASP 핵심 규칙 세트(CRS) 튜닝에 대한 자세한 내용은 " False Positives and Tuning" 가이드를 참조하십시오.
- Istio WasmPlugin 설정
# kubectl apply -f - <<EOF apiVersion: extensions.istio.io/v1alpha1 kind: WasmPlugin metadata: name: coraza-ingressgateway namespace: istio-system spec: selector: matchLabels: istio: ingressgateway url: oci://ghcr.io/corazawaf/coraza-proxy-wasm phase: AUTHN pluginConfig: default_directives: default directives_map: default: - Include @demo-conf - SecDebugLogLevel 9 - SecRuleEngine On - Include @crs-setup-conf - Include @owasp_crs/*.conf EOF # kubectl logs -n istio-system -l app=istio-ingressgateway | grep -i wasm 2025-05-24T17:11:53.979886Z info wasm fetching image corazawaf/coraza-proxy-wasm from registry ghcr.io with tag latest # kubectl get WasmPlugin -A NAMESPACE NAME AGE istio-system coraza-ingressgateway 9s- 동작 확인
# curl -s http://webapp.istioinaction.io:30000/api/catalog # XSS (Cross-Site Scripting) 공격 시도 : REQUEST-941-APPLICATION-ATTACK-XSS curl -s 'http://webapp.istioinaction.io:30000/api/catalog?arg=<script>alert(0)</script>' -IL HTTP/1.1 403 Forbidden date: Sat, 24 May 2025 17:12:18 GMT server: istio-envoy transfer-encoding: chunked # 로그 모니터링 kubectl logs -n istio-system -l app=istio-ingressgateway -f 2025-05-24T17:12:18.930422Z critical envoy wasm external/envoy/source/extensions/common/wasm/context.cc:1157 wasm log istio-system.coraza-ingressgateway: [client "192.168.65.1"] Coraza: Access denied (phase 1). Inbound Anomaly Score Exceeded in phase 1 (Total Score: 20) [file "@owasp_crs/REQUEST-949-BLOCKING-EVALUATION.conf"] [line "11347"] [id "949111"] [rev ""] [msg "Inbound Anomaly Score Exceeded in phase 1 (Total Score: 20)"] [data ""] [severity "emergency"] [ver "OWASP_CRS/4.0.0-rc2"] [maturity "0"] [accuracy "0"] [tag "anomaly-evaluation"] [hostname "10.10.0.11"] [uri "/api/catalog?arg=<script>alert(0)</script>"] [unique_id "BbLvIZIwuFWmGUBEstA"] thread=31 [2025-05-24T17:12:18.903Z] "HEAD /api/catalog?arg=<script>alert(0)</script> HTTP/1.1" 403 - - "-" 0 0 27 - "192.168.65.1" "curl/8.7.1" "7bd6ec78-f62c-9a5b-9935-59579223c78e" "webapp.istioinaction.io:30000" "-" outbound|80||webapp.istioinaction.svc.cluster.local - 10.10.0.11:8080 192.168.65.1:45222 - # SQLI phase 2 (reading the body request) curl -i -X POST 'http://webapp.istioinaction.io:30000/api/catalog' --data "1%27%20ORDER%20BY%203--%2B" HTTP/1.1 403 Forbidden date: Sat, 24 May 2025 17:13:02 GMT server: istio-envoy content-length: 0 # 로그 모니터링 # 어떤 공격이었는지(SQLI) 로그에서 확인가능!! kubectl logs -n istio-system -l app=istio-ingressgateway -f 2025-05-24T17:13:02.942570Z critical envoy wasm external/envoy/source/extensions/common/wasm/context.cc:1157 wasm log istio-system.coraza-ingressgateway: [client "192.168.65.1"] Coraza: Warning. SQL Injection Attack Detected via libinjection [file "@owasp_crs/REQUEST-942-APPLICATION-ATTACK-SQLI.conf"] [line "8669"] [id "942100"] [rev ""] [msg "SQL Injection Attack Detected via libinjection"] [data "Matched Data: sB1c found within ARGS_POST_NAMES:1' ORDER BY 3--+: 1' ORDER BY 3--+"] [severity "critical"] [ver "OWASP_CRS/4.0.0-rc2"] [maturity "0"] [accuracy "0"] [tag "application-multi"] [tag "language-multi"] [tag "platform-multi"] [tag "attack-sqli"] [tag "paranoia-level/1"] [tag "OWASP_CRS"] [tag "capec/1000/152/248/66"] [tag "PCI/6.5.2"] [hostname "10.10.0.11"] [uri "/api/catalog"] [unique_id "rpdGHRkBcQvvKOcZsYv"][msg_match_1 "SQL Injection Attack Detected via libinjection"] [data_match_1 "Matched Data: sB1c found within ARGS_POST_NAMES:1' ORDER BY 3--+: 1' ORDER BY 3-- "] thread=32- 프로메테우스 메트릭 확인 :
curl -s localhost:8082/stats/prometheus | grep waf_filter
- 참고 영상
Summary‣- 엔보이의 내부 아키텍처는 리스너와 필터를 중심으로 구축됐다. Envoy’s internal architecture is built around listeners and filters.
- 즉시 사용할 수 있는 엔보이 필터가 많다. There are many out-of-the-box Envoy filters.
- 이스티오의 데이터 플레인(엔보이 프록시)을 확장할 수 있다. We can extend Istio’s data plane (Envoy proxy).
- 이스티오의 EnvoyFilter 리소스를 사용해 엔보이의 HTTP 필터 구조를 직접 구성하면 더 세밀한 설정이 가능하며, 이스티오의 API로는 노출되지 않는 엔보이의 부분들도 설정할 수 있다. Envoy’s HTTP filter architecture can be configured directly with Istio’s EnvoyFilter resource for more fine-grained configuration or to configure aspects of Envoy not exposed by Istio’s API.
- 속도 제한이나 tap 필터 같은 기능으로 서비스 간 통신에서 엔보이의 요청 경로를 확장할 수 있다. We can extend Envoy’s request path for service-to-service communication with functionality like rate limiting or the tap filter.
- 루아와 웹어셈블리를 사용하면 엔보이를 다시 빌드하지 않고도 데이터 플레인을 고급 수준에서 커스터마이징할 수 있다. Lua and Wasm are available for more advanced customizations to the data plane without having to rebuild Envoy.
- 실습 후 kind 삭제 :
kind delete cluster --namemyk8s&& docker rm -fmypc
'Kubernetes' 카테고리의 다른 글
[IHOS 1기] 6주차 - 운영, 튜닝 (1) 2025.05.18 [IHOS 1기] 5주차 - 마이크로서비스 통신 보안 (1) 2025.05.11 [IHOS 1기] 4주차 - Observability (1) 2025.05.03 [IHOS 1기] 3주차 - Traffic control, Resilience (0) 2025.04.27 [IHOS 1기] 2주차 - Envoy, IstioGateway (0) 2025.04.19